
Motherboard DIY Troubleshooting Guide
Page 14
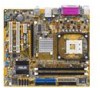
... or missing, contact your motherboard package for buying an ASUS® P4RD1-MX motherboard! Before you for the following items. Motherboard ASUS P4RD1-MX motherboard Cables 1 x Serial ATA signal cable 1 x Serial ATA power cable 1 x Ultra DMA 133/100/66 cable 1 x Floppy disk drive cable Accessories I/O shield Application CD ASUS motherboard support CD Documentation User guide If any of ASUS quality motherboards! Thank you start installing the motherboard, and hardware devices on it another standout in your package with the list below. 1.2 Package contents...
... or missing, contact your motherboard package for buying an ASUS® P4RD1-MX motherboard! Before you for the following items. Motherboard ASUS P4RD1-MX motherboard Cables 1 x Serial ATA signal cable 1 x Serial ATA power cable 1 x Ultra DMA 133/100/66 cable 1 x Floppy disk drive cable Accessories I/O shield Application CD ASUS motherboard support CD Documentation User guide If any of ASUS quality motherboards! Thank you start installing the motherboard, and hardware devices on it another standout in your package with the list below. 1.2 Package contents...

Motherboard DIY Troubleshooting Guide
Page 15
..., and video capabilities. TV-out support The motherboard comes with a TV-out connector that speeds up to 150 MB/s data transfer rate. PCI Express™ interface The motherboard fully supports PCI Express, the latest I /O controller hub that allows 4.3GB/s and 3.2GB/s data transfer rates, respectively. ASUS P4RD1-MX 1-3 The motherboard also supports the Intel® Hyper-Threading Technology. 1.3 Special features 1.3.1 Product highlights Latest processor technology The motherboard comes with a 478-pin surface...
..., and video capabilities. TV-out support The motherboard comes with a TV-out connector that speeds up to 150 MB/s data transfer rate. PCI Express™ interface The motherboard fully supports PCI Express, the latest I /O controller hub that allows 4.3GB/s and 3.2GB/s data transfer rates, respectively. ASUS P4RD1-MX 1-3 The motherboard also supports the Intel® Hyper-Threading Technology. 1.3 Special features 1.3.1 Product highlights Latest processor technology The motherboard comes with a 478-pin surface...

Motherboard DIY Troubleshooting Guide
Page 17
... the BIOS codes and data are corrupted. Simply shut down and reboot the system, and the BIOS automatically restores the CPU previous setting for each parameter. C.P.R. (CPU Parameter Recall) The C.P.R. ASUS P4RD1-MX 1-5 ASUS MyLogo™ This new feature present in the motherboard allows you to restore the original BIOS data from the support CD in case the system hangs due to buy a replacement ROM chip. 1.3.2 Innovative ASUS...
... the BIOS codes and data are corrupted. Simply shut down and reboot the system, and the BIOS automatically restores the CPU previous setting for each parameter. C.P.R. (CPU Parameter Recall) The C.P.R. ASUS P4RD1-MX 1-5 ASUS MyLogo™ This new feature present in the motherboard allows you to restore the original BIOS data from the support CD in case the system hangs due to buy a replacement ROM chip. 1.3.2 Innovative ASUS...
Motherboard DIY Troubleshooting Guide
Page 26
... intend to install expansion cards. Make sure to the card. Align the card connector with the slot and press firmly until the card is already installed in a chassis). 3. Failure to do so may need to use . 4. Remove the system unit cover (if your motherboard is completely seated on the next page. 3. Turn on BIOS setup. 2. Install the software drivers for information on the system and change the necessary BIOS settings, if...
... intend to install expansion cards. Make sure to the card. Align the card connector with the slot and press firmly until the card is already installed in a chassis). 3. Failure to do so may need to use . 4. Remove the system unit cover (if your motherboard is completely seated on the next page. 3. Turn on BIOS setup. 2. Install the software drivers for information on the system and change the necessary BIOS settings, if...

Motherboard DIY Troubleshooting Guide
Page 27
... Re-direct to IRQ#9 Communications Port (COM1)* IRQ holder for PCI steering* Floppy Disk Controller Printer Port (LPT1)* System CMOS/Real Time Clock IRQ holder for PCI steering* IRQ holder for PCI steering* IRQ holder for PCI steering* PS/2 Compatible Mouse Port* Numeric Data Processor Primary IDE Channel Secondary IDE Channel * These IRQs are usually available for this motherboard PCI slot 1 PCI slot 2 PCIe x1 slot PCIe x16 slot Onboard USB controller 1 Onboard USB controller 2 Onboard USB controller 3 Onboard USB 2.0 controller Onboard SATA Onboard LAN Onboard HD audio Onboard VGA...
... Re-direct to IRQ#9 Communications Port (COM1)* IRQ holder for PCI steering* Floppy Disk Controller Printer Port (LPT1)* System CMOS/Real Time Clock IRQ holder for PCI steering* IRQ holder for PCI steering* IRQ holder for PCI steering* PS/2 Compatible Mouse Port* Numeric Data Processor Primary IDE Channel Secondary IDE Channel * These IRQs are usually available for this motherboard PCI slot 1 PCI slot 2 PCIe x1 slot PCIe x16 slot Onboard USB controller 1 Onboard USB controller 2 Onboard USB controller 3 Onboard USB 2.0 controller Onboard SATA Onboard LAN Onboard HD audio Onboard VGA...

Motherboard DIY Troubleshooting Guide
Page 31
P4RD1-MX ® KBPWR 12 23 +5V (Default) +5VSB P4RD1-MX Keyboard power setting ASUS P4RD1-MX 1-19 3. This feature requires an ATX power supply that can supply at least 1A on the keyboard (the default is the Space Bar). Keyboard power (3-pin KBPWR) This jumper allows you to wake up feature. Set this jumper to pins 2-3 (+5VSB) to enable or disable the keyboard wake-up the computer when you press a key on the +5VSB lead, and a corresponding setting in the BIOS.
P4RD1-MX ® KBPWR 12 23 +5V (Default) +5VSB P4RD1-MX Keyboard power setting ASUS P4RD1-MX 1-19 3. This feature requires an ATX power supply that can supply at least 1A on the keyboard (the default is the Space Bar). Keyboard power (3-pin KBPWR) This jumper allows you to wake up feature. Set this jumper to pins 2-3 (+5VSB) to enable or disable the keyboard wake-up the computer when you press a key on the +5VSB lead, and a corresponding setting in the BIOS.

Motherboard DIY Troubleshooting Guide
Page 43
....exe) from the motherboard support CD to the optical drive. A:\>afudos /oOLDBIOS1.ROM Main filename Extension name ASUS P4RD1-MX 2-3 Copy the original or the latest motherboard BIOS file to the bootable floppy disk. 2.1.2 AFUDOS utility The AFUDOS utility allows you created earlier. 2. This utility also allows you can use as shown. 1. Windows® 2000 environment To create a set of boot disks for reference only. Copying...
....exe) from the motherboard support CD to the optical drive. A:\>afudos /oOLDBIOS1.ROM Main filename Extension name ASUS P4RD1-MX 2-3 Copy the original or the latest motherboard BIOS file to the bootable floppy disk. 2.1.2 AFUDOS utility The AFUDOS utility allows you created earlier. 2. This utility also allows you can use as shown. 1. Windows® 2000 environment To create a set of boot disks for reference only. Copying...

Motherboard DIY Troubleshooting Guide
Page 47
...;oppy disk drive, then turn on the system. 2. Checking for CD-ROM... Checking for floppy... Completed. Remove any floppy disk from the support CD: 1. Floppy not found ! ASUS P4RD1-MX 2-7 Starting BIOS recovery... CD-ROM found ! Reading file "P4RD1MX.ROM". Doing so can cause system boot failure! 4. Restart the system after the utility completes the updating process. Visit the ASUS website (www.asus.com) to the optical drive. 3. The utility displays the...
...;oppy disk drive, then turn on the system. 2. Checking for CD-ROM... Checking for floppy... Completed. Remove any floppy disk from the support CD: 1. Floppy not found ! ASUS P4RD1-MX 2-7 Starting BIOS recovery... CD-ROM found ! Reading file "P4RD1MX.ROM". Doing so can cause system boot failure! 4. Restart the system after the utility completes the updating process. Visit the ASUS website (www.asus.com) to the optical drive. 3. The utility displays the...

Motherboard DIY Troubleshooting Guide
Page 49
... Install ASUS Update VX.XX.XX. ASUS P4RD1-MX 2-9 Installing ASUS Update To install ASUS Update: 1. The ASUS Update utility is available in the support CD that allows you to manage, save, and update the motherboard BIOS in the optical drive. Quit all Windows® applications before you to your system. 2.1.5 ASUS Update utility The ASUS Update is a utility that comes with the motherboard package. The ASUS Update utility allows you update the BIOS using this utility. ASUS Update requires an Internet connection either through a network or an Internet Service...
... Install ASUS Update VX.XX.XX. ASUS P4RD1-MX 2-9 Installing ASUS Update To install ASUS Update: 1. The ASUS Update utility is available in the support CD that allows you to manage, save, and update the motherboard BIOS in the optical drive. Quit all Windows® applications before you to your system. 2.1.5 ASUS Update utility The ASUS Update is a utility that comes with the motherboard package. The ASUS Update utility allows you update the BIOS using this utility. ASUS Update requires an Internet connection either through a network or an Internet Service...
Motherboard DIY Troubleshooting Guide
Page 54
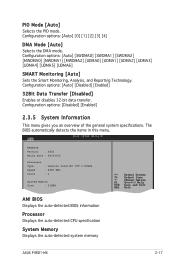
... can change the value of the field opposite the item. Configure DRAM Timing by SPD Memory Acceleration Mode DRAM Idle Timer DRAm Refresh Rate [Enabled] [Auto] [Auto] [Auto] Graphic Adapter Priority Graphics Aperture Size Spread Spectrum [AGP/PCI] [ 64 MB] [Enabled] ICH Delayed Transaction [Enabled] MPS Revision [1.4] Select Screen Select Item +- Select Screen Select Item +- Refer to "2.2.7 Pop-up window." 2.2.7 Pop-up window Scroll bar 2-14 Chapter 2: BIOS setup For example, selecting Main...
... can change the value of the field opposite the item. Configure DRAM Timing by SPD Memory Acceleration Mode DRAM Idle Timer DRAm Refresh Rate [Enabled] [Auto] [Auto] [Auto] Graphic Adapter Priority Graphics Aperture Size Spread Spectrum [AGP/PCI] [ 64 MB] [Enabled] ICH Delayed Transaction [Enabled] MPS Revision [1.4] Select Screen Select Item +- Select Screen Select Item +- Refer to "2.2.7 Pop-up window." 2.2.7 Pop-up window Scroll bar 2-14 Chapter 2: BIOS setup For example, selecting Main...

Motherboard DIY Troubleshooting Guide
Page 56
... a CD-ROM drive. Type [Auto] Selects the type of IDE devices. 2.3.4 Primary, Secondary, Third and Fourth IDE Master/Slave While entering Setup, the BIOS automatically detects the presence of IDE drive. Primary IDE Master Device : Hard Disk Vendor : ST320413A Size : 20.0GB LBA Mode : Supported Block Mode : 16 Sectors PIO Mode : Supported Async DMA : MultiWord DMA-2 Ultra DMA : Ultra DMA-5 SMART Monitoring: Supported Type [Auto] LBA/Large Mode [Auto] Block(Multi-sector Transfer) M [Auto] PIO Mode [Auto] DMA Mode [Auto] SMART Monitoring [Auto] 32Bit Data...
... a CD-ROM drive. Type [Auto] Selects the type of IDE devices. 2.3.4 Primary, Secondary, Third and Fourth IDE Master/Slave While entering Setup, the BIOS automatically detects the presence of IDE drive. Primary IDE Master Device : Hard Disk Vendor : ST320413A Size : 20.0GB LBA Mode : Supported Block Mode : 16 Sectors PIO Mode : Supported Async DMA : MultiWord DMA-2 Ultra DMA : Ultra DMA-5 SMART Monitoring: Supported Type [Auto] LBA/Large Mode [Auto] Block(Multi-sector Transfer) M [Auto] PIO Mode [Auto] DMA Mode [Auto] SMART Monitoring [Auto] 32Bit Data...
Motherboard DIY Troubleshooting Guide
Page 57
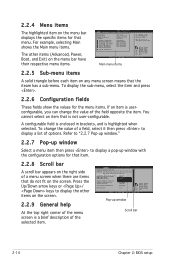
...1 System Memory Size : 512MB AMI BIOS Displays the auto-detected BIOS information Processor Displays the auto-detected CPU specification System Memory Displays the auto-detected system memory ASUS P4RD1-MX 2-17 Configuration options: [Auto] [0] [1] [2] [3] [4] DMA Mode [Auto] Selects the DMA mode. Configuration options: [Auto] [SWDMA0] [SWDMA1] [SWDMA2] [MWDMA0] [MWDMA1] [MWDMA2] [UDMA0] [UDMA1] [UDMA2] [UDMA3] [UDMA4] [UDMA5] [UDMA6] SMART Monitoring [Auto] Sets the Smart Monitoring, Analysis, and Reporting Technology. Configuration options: [Disabled] [Enabled...
...1 System Memory Size : 512MB AMI BIOS Displays the auto-detected BIOS information Processor Displays the auto-detected CPU specification System Memory Displays the auto-detected system memory ASUS P4RD1-MX 2-17 Configuration options: [Auto] [0] [1] [2] [3] [4] DMA Mode [Auto] Selects the DMA mode. Configuration options: [Auto] [SWDMA0] [SWDMA1] [SWDMA2] [MWDMA0] [MWDMA1] [MWDMA2] [UDMA0] [UDMA1] [UDMA2] [UDMA3] [UDMA4] [UDMA5] [UDMA6] SMART Monitoring [Auto] Sets the Smart Monitoring, Analysis, and Reporting Technology. Configuration options: [Disabled] [Enabled...

Motherboard DIY Troubleshooting Guide
Page 58
...USB Configuration The items in this menu allows you to disabled or set the USB controller. USB Configuration Module Version - 2.24.0-10.4 USB Devices Enabled: None USB Controller Legacy USB Support USB 2.0 Controller Mode BIOS EHCI Hand-Off [USB OHCI + EHCI] [Auto] [HiSpeed] [Enabled] The Module Version and USB Devices Enabled items show the auto-detected values. USB Configuration JumperFree Configuration CPU Configuration Chipset Onboard Devices Configuration PCIPnP Configure CPU. USB Controller [USB OHCI + EHCI] Allows you to change the settings...
...USB Configuration The items in this menu allows you to disabled or set the USB controller. USB Configuration Module Version - 2.24.0-10.4 USB Devices Enabled: None USB Controller Legacy USB Support USB 2.0 Controller Mode BIOS EHCI Hand-Off [USB OHCI + EHCI] [Auto] [HiSpeed] [Enabled] The Module Version and USB Devices Enabled items show the auto-detected values. USB Configuration JumperFree Configuration CPU Configuration Chipset Onboard Devices Configuration PCIPnP Configure CPU. USB Controller [USB OHCI + EHCI] Allows you to change the settings...

Motherboard DIY Troubleshooting Guide
Page 61
... to boot legacy operating systems that the BIOS automatically detects. Configuration options: [Disabled] [Enabled] CPU Internal Thermal Control [Auto] Disables or sets the CPU internal thermal control. You can only adjust the Ratio CMOS if you installed an unlocked CPU. HyperThreading Function [Enabled] Enables or disables the Intel® HyperThreading technology function. Configuration options: [Auto] [Disabled] ASUS P4RD1-MX 2-21 2.4.3 CPU Configuration The items in CMOS then actual and setpoint values may differ. Select Screen Select Item +- Use the...
... to boot legacy operating systems that the BIOS automatically detects. Configuration options: [Disabled] [Enabled] CPU Internal Thermal Control [Auto] Disables or sets the CPU internal thermal control. You can only adjust the Ratio CMOS if you installed an unlocked CPU. HyperThreading Function [Enabled] Enables or disables the Intel® HyperThreading technology function. Configuration options: [Auto] [Disabled] ASUS P4RD1-MX 2-21 2.4.3 CPU Configuration The items in CMOS then actual and setpoint values may differ. Select Screen Select Item +- Use the...
Motherboard DIY Troubleshooting Guide
Page 62
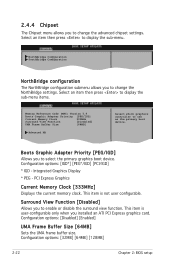
...-menu items. Memory Reference Code (MRC) Version 5.9 Boots Graphic Adapter Priority [PEG/IGD] Current Memory Clock 333MHz Surround View Function [Disabled] UMA Frame Buffer Size [64MB] Advanced NB Select which graphics controller to display the sub-menu. Boots Graphic Adapter Priority [PEG/IGD] Allows you to change the advanced chipset settings. Integrated Graphics Display * PEG - Surround View Function [Disabled] Allows you installed an ATI PCI Express graphics card. Select an item then press to use as the primary boot device...
...-menu items. Memory Reference Code (MRC) Version 5.9 Boots Graphic Adapter Priority [PEG/IGD] Current Memory Clock 333MHz Surround View Function [Disabled] UMA Frame Buffer Size [64MB] Advanced NB Select which graphics controller to display the sub-menu. Boots Graphic Adapter Priority [PEG/IGD] Allows you to change the advanced chipset settings. Integrated Graphics Display * PEG - Surround View Function [Disabled] Allows you installed an ATI PCI Express graphics card. Select an item then press to use as the primary boot device...
Motherboard DIY Troubleshooting Guide
Page 64
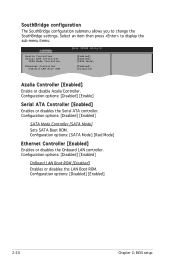
...] [SATA Mode] [Enabled] [Disabled] Azalia Controller [Enabled] Enable or disable Azalia Controller. Configuration options: [Disabled] [Enable] Serial ATA Controller [Enabled] Enables or disables the Serial ATA controller. Configuration options: [Disabled] [Enabled] OnBoard LAN Boot ROM [Disabled] Enables or disables the LAN Boot ROM. Configuration options: [Disabled] [Enabled] SATA Mode Controller [SATA Mode] Sets SATA Boot ROM. Select an item then press to change the SouthBridge settings. Configuration options: [Disabled] [Enabled] 2-24 Chapter 2: BIOS...
...] [SATA Mode] [Enabled] [Disabled] Azalia Controller [Enabled] Enable or disable Azalia Controller. Configuration options: [Disabled] [Enable] Serial ATA Controller [Enabled] Enables or disables the Serial ATA controller. Configuration options: [Disabled] [Enabled] OnBoard LAN Boot ROM [Disabled] Enables or disables the LAN Boot ROM. Configuration options: [Disabled] [Enabled] SATA Mode Controller [SATA Mode] Sets SATA Boot ROM. Select an item then press to change the SouthBridge settings. Configuration options: [Disabled] [Enabled] 2-24 Chapter 2: BIOS...

Motherboard DIY Troubleshooting Guide
Page 68
... S3 Resume [No] Determines whether to invoke VGA BIOS POST on S3 Resume ACPI 2.0 Support ACPI APIC Support APM Configuration Hardware Monitor [Auto] [No] [No] [Enabled] 2.5.1 Suspend Mode [Auto] Allows you to change the settings for the Advanced Configuration and Power Interface (ACPI) and the Advanced Power Management (APM). Configuration options: [Disabled] [Enabled] 2-28 Chapter 2: BIOS setup 2.5 Power menu The Power menu items allow you to select the Advanced Con...
... S3 Resume [No] Determines whether to invoke VGA BIOS POST on S3 Resume ACPI 2.0 Support ACPI APIC Support APM Configuration Hardware Monitor [Auto] [No] [No] [Enabled] 2.5.1 Suspend Mode [Auto] Allows you to change the settings for the Advanced Configuration and Power Interface (ACPI) and the Advanced Power Management (APM). Configuration options: [Disabled] [Enabled] 2-28 Chapter 2: BIOS setup 2.5 Power menu The Power menu items allow you to select the Advanced Con...
Motherboard DIY Troubleshooting Guide
Page 73
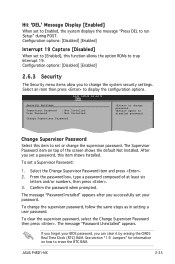
... Setup" during POST. To change the system security settings. Configuration options: [Disabled] [Enabled] Interrupt 19 Capture [Disabled] When set your BIOS password, you set to Enabled, the system displays the message "Press DEL to trap Interrupt 19. again to display the configuration options. After you can clear it by erasing the CMOS Real Time Clock (RTC) RAM. From the password box, type a password composed of the screen shows the defaultESNCotExInisttalled. ASUS P4RD1-MX...
... Setup" during POST. To change the system security settings. Configuration options: [Disabled] [Enabled] Interrupt 19 Capture [Disabled] When set your BIOS password, you set to Enabled, the system displays the message "Press DEL to trap Interrupt 19. again to display the configuration options. After you can clear it by erasing the CMOS Real Time Clock (RTC) RAM. From the password box, type a password composed of the screen shows the defaultESNCotExInisttalled. ASUS P4RD1-MX...
Motherboard DIY Troubleshooting Guide
Page 78
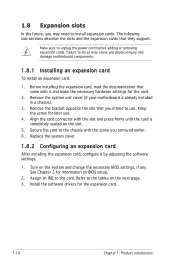
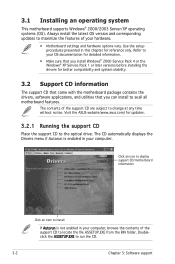
The CD automatically displays the Drivers menu if Autorun is not enabled in your hardware. • Motherboard settings and hardware options vary. The contents of your computer, browse the contents of the support CD to change at any time without notice. Always install the latest OS version and corresponding updates to maximize the features of the support CD are subject to locate the file...
The CD automatically displays the Drivers menu if Autorun is not enabled in your hardware. • Motherboard settings and hardware options vary. The contents of your computer, browse the contents of the support CD to change at any time without notice. Always install the latest OS version and corresponding updates to maximize the features of the support CD are subject to locate the file...

Motherboard DIY Troubleshooting Guide
Page 80
... 3: Software support ASUS Update The ASUS Update utility allows you keep your computer in a Windows® environment. ADOBE Acrobat Reader V7.0 Installs the Adobe® Acrobat® Reader V7.0. View the online help for details. ASUS PC Probe II This smart utility monitors the fan speed, CPU temperature, and system voltages, and alerts you of any detected problems. This utility helps you to update the motherboard BIOS in healthy operating condition. 3.2.3 Utilities menu The Utilities menu shows...
... 3: Software support ASUS Update The ASUS Update utility allows you keep your computer in a Windows® environment. ADOBE Acrobat Reader V7.0 Installs the Adobe® Acrobat® Reader V7.0. View the online help for details. ASUS PC Probe II This smart utility monitors the fan speed, CPU temperature, and system voltages, and alerts you of any detected problems. This utility helps you to update the motherboard BIOS in healthy operating condition. 3.2.3 Utilities menu The Utilities menu shows...


