
P4PE-X User Manual
Page 3
Features Contents Notices v Safety information vi About this guide vii ASUS contact information viii P4PE-X specifications summary ix Chapter 1: Product introduction 1.1 Welcome 1-2 1.2 Package contents 1-2 1.3 Special features 1-3 1.4 Motherboard components 1-4 1.5 Motherboard layout 1-7 1.6 Before you proceed 1-8 1.7 Motherboard installation 1-9 1.7.1 Placement direction 1-9 1.7.2 Screw holes 1-9 1.8 Central Processing Unit (CPU 1-10 1.8.1 Overview 1-10 1.8.2 Installing the CPU 1-11 1.9 System memory 1-12 1.9.1 Memory configurations 1-12 1.9.2 Installing...
Features Contents Notices v Safety information vi About this guide vii ASUS contact information viii P4PE-X specifications summary ix Chapter 1: Product introduction 1.1 Welcome 1-2 1.2 Package contents 1-2 1.3 Special features 1-3 1.4 Motherboard components 1-4 1.5 Motherboard layout 1-7 1.6 Before you proceed 1-8 1.7 Motherboard installation 1-9 1.7.1 Placement direction 1-9 1.7.2 Screw holes 1-9 1.8 Central Processing Unit (CPU 1-10 1.8.1 Overview 1-10 1.8.2 Installing the CPU 1-11 1.9 System memory 1-12 1.9.1 Memory configurations 1-12 1.9.2 Installing...

P4PE-X User Manual
Page 6
... where it may become wet. • Place the product on it by yourself. Operation safety • Before installing the motherboard and adding devices on a stable surface. • If you add a device. • Before connecting or removing signal cables from the...correctly connected and the power cables are connected. If possible, disconnect all power cables from the existing system before you encounter technical problems with the package. • Before using the product, make sure all power cables are unplugged. • Seek professional assistance before using , contact your local ...
... where it may become wet. • Place the product on it by yourself. Operation safety • Before installing the motherboard and adding devices on a stable surface. • If you add a device. • Before connecting or removing signal cables from the...correctly connected and the power cables are connected. If possible, disconnect all power cables from the existing system before you encounter technical problems with the package. • Before using the product, make sure all power cables are unplugged. • Seek professional assistance before using , contact your local ...

P4PE-X User Manual
Page 12
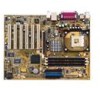
... with the Intel® 845PE chipset to enter the world of system memory with the list below. 1.2 Package contents Check your P4PE-X package for the following items. ASUS P4PE-X motherboard ATX form factor: 12 in x 9 in your package with PC3200/2700/2100/1600 DDR SDRAM, high-resolution graphics via an AGP 4X slot, USB 2.0, and 6-channel audio...
... with the Intel® 845PE chipset to enter the world of system memory with the list below. 1.2 Package contents Check your P4PE-X package for the following items. ASUS P4PE-X motherboard ATX form factor: 12 in x 9 in your package with PC3200/2700/2100/1600 DDR SDRAM, high-resolution graphics via an AGP 4X slot, USB 2.0, and 6-channel audio...
P4PE-X User Manual
Page 20
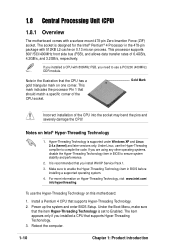
...Pentium® 4 Processor in BIOS before installing a supported operating system. 4. The socket is recommended that the CPU has a gold triangular mark on this motherboard: 1. Gold Mark Incorrect installation of 6.4GB/s, 4.2GB/s, and 3.2GB/s, respectively. Install a Pentium 4 CPU that should match a specific corner of ... system stability and performance. 2. To use the Hyper-Threading compliler to enable the Hyper-Threading Technology item in the 478-pin package with a surface mount 478-pin Zero Insertion Force (ZIF) socket. Power up the system and enter BIOS Setup. Under the...
...Pentium® 4 Processor in BIOS before installing a supported operating system. 4. The socket is recommended that the CPU has a gold triangular mark on this motherboard: 1. Gold Mark Incorrect installation of 6.4GB/s, 4.2GB/s, and 3.2GB/s, respectively. Install a Pentium 4 CPU that should match a specific corner of ... system stability and performance. 2. To use the Hyper-Threading compliler to enable the Hyper-Threading Technology item in the 478-pin package with a surface mount 478-pin Zero Insertion Force (ZIF) socket. Power up the system and enter BIOS Setup. Under the...
P4PE-X User Manual
Page 21
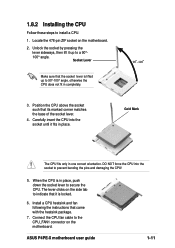
...heatsink package. 7. Gold Mark The CPU fits only in place, push down the socket lever to secure the CPU. DO NOT force the CPU into the socket until it up to prevent bending the pins and damaging the CPU! 5. Locate the 478-pin ZIF socket on the motherboard. ... that its marked corner matches the base of the socket lever. 4. 1.8.2 Installing the CPU Follow these steps to the CPU_FAN1 connector on the motherboard. 2. ASUS P4PE-X motherboard user guide 1-11 Position the CPU above the socket such that it is in one correct orientation. When the CPU is locked. 6. The ...
...heatsink package. 7. Gold Mark The CPU fits only in place, push down the socket lever to secure the CPU. DO NOT force the CPU into the socket until it up to prevent bending the pins and damaging the CPU! 5. Locate the 478-pin ZIF socket on the motherboard. ... that its marked corner matches the base of the socket lever. 4. 1.8.2 Installing the CPU Follow these steps to the CPU_FAN1 connector on the motherboard. 2. ASUS P4PE-X motherboard user guide 1-11 Position the CPU above the socket such that it is in one correct orientation. When the CPU is locked. 6. The ...

P4PE-X User Manual
Page 63
Software support Chapter 3 This chapter describes the contents of the support CD that comes with the motherboard package.
Software support Chapter 3 This chapter describes the contents of the support CD that comes with the motherboard package.


