NCT-D MB User Manual English Version
Page 4
... OS shut down function 3-2 3.2.2 Using the dual function power switch 3-2 3.3 ASUS POST Reporter 3-3 3.3.1 Vocal POST messages 3-3 3.3.2 Winbond Voice Editor 3-5 Chapter 4: BIOS setup 4.1 Managing and updating your BIOS 4-1 4.1.1 Creating a bootable floppy disk 4-1 4.1.2 AFUDOS utility 4-2 4.1.3 ASUS CrashFree BIOS 2 utility 4-5 4.1.4 ASUS EZ Flash utility 4-7 4.1.5 ASUS Update utility 4-8 4.2 BIOS setup program 4-11 4.2.1 BIOS menu screen 4-12 4.2.2 Menu bar 4-12 4.2.3 Navigation keys 4-12 4.2.4 Menu...
... OS shut down function 3-2 3.2.2 Using the dual function power switch 3-2 3.3 ASUS POST Reporter 3-3 3.3.1 Vocal POST messages 3-3 3.3.2 Winbond Voice Editor 3-5 Chapter 4: BIOS setup 4.1 Managing and updating your BIOS 4-1 4.1.1 Creating a bootable floppy disk 4-1 4.1.2 AFUDOS utility 4-2 4.1.3 ASUS CrashFree BIOS 2 utility 4-5 4.1.4 ASUS EZ Flash utility 4-7 4.1.5 ASUS Update utility 4-8 4.2 BIOS setup program 4-11 4.2.1 BIOS menu screen 4-12 4.2.2 Menu bar 4-12 4.2.3 Navigation keys 4-12 4.2.4 Menu...
NCT-D MB User Manual English Version
Page 8
... It includes description of the switches, jumpers, and connectors on ASUS hardware and software products. Refer to when configuring the motherboard. Detailed descriptions of shutting down the system. • Chapter 4: BIOS setup This chapter tells how to perform when installing system components... POST messages, and ways of the BIOS parameters are not part of the motherboard and the new technology it supports. • Chapter 2: Hardware information This chapter lists the hardware setup procedures that may refer to the ASUS contact information. 2. These documents are also...
... It includes description of the switches, jumpers, and connectors on ASUS hardware and software products. Refer to when configuring the motherboard. Detailed descriptions of shutting down the system. • Chapter 4: BIOS setup This chapter tells how to perform when installing system components... POST messages, and ways of the BIOS parameters are not part of the motherboard and the new technology it supports. • Chapter 2: Hardware information This chapter lists the hardware setup procedures that may refer to the ASUS contact information. 2. These documents are also...
NCT-D MB User Manual English Version
Page 11
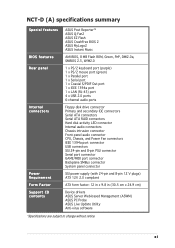
xi NCT-D (A) specifications summary Special features BIOS features Rear panel Internal connectors Power Requirement Form Factor Support CD contents ASUS Post Reporter™ ASUS Q-Fan2 ASUS EZ Flash ASUS CrashFree BIOS 2 ASUS MyLogo2 ASUS Instant Music AMI BIOS, 8 MB Flash ROM, Green, PnP, DMI2.0a, SMBIOS 2.3, WfM2.0 1 x PS/2 keyboard port (purple) 1 x PS/2 ...compliant ATX form factor: 12 in x 9.8 in (30.5 cm x 24.9 cm) Device drivers ASUS Server Web-based Management (ASWM) ASUS PC Probe ASUS Live Update Utility Anti-virus software *Specifications are subject to change without notice.
xi NCT-D (A) specifications summary Special features BIOS features Rear panel Internal connectors Power Requirement Form Factor Support CD contents ASUS Post Reporter™ ASUS Q-Fan2 ASUS EZ Flash ASUS CrashFree BIOS 2 ASUS MyLogo2 ASUS Instant Music AMI BIOS, 8 MB Flash ROM, Green, PnP, DMI2.0a, SMBIOS 2.3, WfM2.0 1 x PS/2 keyboard port (purple) 1 x PS/2 ...compliant ATX form factor: 12 in x 9.8 in (30.5 cm x 24.9 cm) Device drivers ASUS Server Web-based Management (ASWM) ASUS PC Probe ASUS Live Update Utility Anti-virus software *Specifications are subject to change without notice.
NCT-D MB User Manual English Version
Page 18
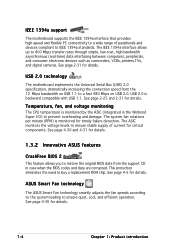
... and data are corrupted. See page 2-25 and 2-31 for details. 1.3.2 Innovative ASUS features CrashFree BIOS 2 This feature allows you to restore the original BIOS data from the 12 Mbps bandwidth on USB 2.0. ASUS Smart Fan technology The ASUS Smart Fan technology smartly adjusts the fan speeds according to the system loading to a fast 480...
... and data are corrupted. See page 2-25 and 2-31 for details. 1.3.2 Innovative ASUS features CrashFree BIOS 2 This feature allows you to restore the original BIOS data from the 12 Mbps bandwidth on USB 2.0. ASUS Smart Fan technology The ASUS Smart Fan technology smartly adjusts the fan speeds according to the system loading to a fast 480...
NCT-D MB User Manual English Version
Page 19
... Music This unique feature allows you can easily update the system BIOS even before entering the operating system. ASUS NCT-D 1-5 ASUS EZ Flash BIOS With the ASUS EZ Flash, you to playback audio files even before loading the operating system. ASUS MyLogo2™ This new feature present in different languages. See page 4-7 for details. See page 4-33...
... Music This unique feature allows you can easily update the system BIOS even before entering the operating system. ASUS NCT-D 1-5 ASUS EZ Flash BIOS With the ASUS EZ Flash, you to playback audio files even before loading the operating system. ASUS MyLogo2™ This new feature present in different languages. See page 4-7 for details. See page 4-33...
NCT-D MB User Manual English Version
Page 29
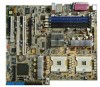
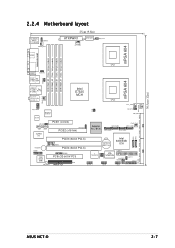
...Below:Mic In Intel E7525 MCH CPU2 REAR_FAN2 CPU_FAN2 FP_AUDIO1 Broadcom BCM5751 J4 FM_CPU2 J3 SEC_IDE AD1980 LAN_EN1 CD1 AUX1 SUPER I/O BUZZER1 GAME1 AMI BIOS 8Mb SB_PWR1 PCIE1 (x4 link) SATA_EN1 PCIE2 (x16 link) Adaptec AIC-8130 SATA_RAID2 FRNT_FAN2 SATA_RAID4 SATA_RAID1 SATA_RAID3 SATA1 SATA2 PCIX3 (64-bit... PCI-X) COM2 PCIX4 (64-bit PCI-X) BPSMB1 PCI5 (32-bit 5V PCI) TI TSB43AB22A WIFI NCT-D IE1394_2 1394_EN1 USB_EN1 CR2032 3V Lithium Cell CMOS Power Intel 6300ESB ICH VIA VT6212L FLOPPY CHASSIS1 HDLED1 CLRTC1 PANEL1 USB78 USB56 PRI_IDE...
...Below:Mic In Intel E7525 MCH CPU2 REAR_FAN2 CPU_FAN2 FP_AUDIO1 Broadcom BCM5751 J4 FM_CPU2 J3 SEC_IDE AD1980 LAN_EN1 CD1 AUX1 SUPER I/O BUZZER1 GAME1 AMI BIOS 8Mb SB_PWR1 PCIE1 (x4 link) SATA_EN1 PCIE2 (x16 link) Adaptec AIC-8130 SATA_RAID2 FRNT_FAN2 SATA_RAID4 SATA_RAID1 SATA_RAID3 SATA1 SATA2 PCIX3 (64-bit... PCI-X) COM2 PCIX4 (64-bit PCI-X) BPSMB1 PCI5 (32-bit 5V PCI) TI TSB43AB22A WIFI NCT-D IE1394_2 1394_EN1 USB_EN1 CR2032 3V Lithium Cell CMOS Power Intel 6300ESB ICH VIA VT6212L FLOPPY CHASSIS1 HDLED1 CLRTC1 PANEL1 USB78 USB56 PRI_IDE...
NCT-D MB User Manual English Version
Page 38
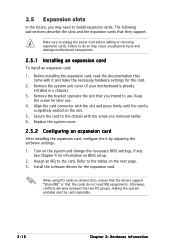
... card to the tables on the next page. 3. Refer to the chassis with the screw you removed earlier. 6. When using PCI cards on BIOS setup. 2. Otherwise, conflicts will arise between the two PCI groups, making the system unstable and the card inoperable. 2-16 Chapter 2: Hardware information... Failure to install expansion cards. Remove the system unit cover (if your motherboard is completely seated on the system and change the necessary BIOS settings, if any. Replace the system cover. 2.5.2 Configuring an expansion card After installing the expansion card, configure the it and make ...
... card to the tables on the next page. 3. Refer to the chassis with the screw you removed earlier. 6. When using PCI cards on BIOS setup. 2. Otherwise, conflicts will arise between the two PCI groups, making the system unstable and the card inoperable. 2-16 Chapter 2: Hardware information... Failure to install expansion cards. Remove the system unit cover (if your motherboard is completely seated on the system and change the necessary BIOS settings, if any. Replace the system cover. 2.5.2 Configuring an expansion card After installing the expansion card, configure the it and make ...

NCT-D MB User Manual English Version
Page 41
... never remove the cap on pins 2-3 for about 5~10 seconds, then move the cap back to pins 2-3. Removing the cap will cause system boot failure! NCT-D NCT-D Clear RTC RAM CLRTC1 2 1 Normal (Default) 3 2 Clear CMOS You do not need to clear the RTC when the system hangs due to re-... OFF the computer and unplug the power cord. 2. Hold down and reboot the system so the BIOS can clear the CMOS memory of date, time, and system setup parameters by erasing the CMOS RTC RAM data. ASUS NCT-D 2-19 To erase the RTC RAM: 1. Remove the onboard battery. 3. Re-install the battery. ...
... never remove the cap on pins 2-3 for about 5~10 seconds, then move the cap back to pins 2-3. Removing the cap will cause system boot failure! NCT-D NCT-D Clear RTC RAM CLRTC1 2 1 Normal (Default) 3 2 Clear CMOS You do not need to clear the RTC when the system hangs due to re-... OFF the computer and unplug the power cord. 2. Hold down and reboot the system so the BIOS can clear the CMOS memory of date, time, and system setup parameters by erasing the CMOS RTC RAM data. ASUS NCT-D 2-19 To erase the RTC RAM: 1. Remove the onboard battery. 3. Re-install the battery. ...
NCT-D MB User Manual English Version
Page 43
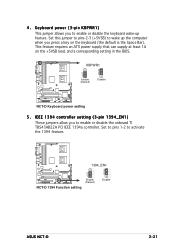
... disable the onboard TI TBS43AB22A PCI IEEE 1394a controller. KBPWR1 2 1 Enable (Default) 3 2 Disable NCT-D NCT-D Keyboard power setting 5 . NCT-D NCT-D 1394 Function setting 1394_EN1 2 1 Enable (Default) 3 2 Disable ASUS NCT-D 2-21 This feature requires an ATX power supply that can supply at least 1A on the keyboard (...or disable the keyboard wake-up the computer when you press a key on the +5VSB lead, and a corresponding setting in the BIOS. 4. IEEE 1394 controller setting (3-pin 1394_EN1) These jumpers allow you to wake up feature. Keyboard power (3-pin KBPWR1) This jumper...
... disable the onboard TI TBS43AB22A PCI IEEE 1394a controller. KBPWR1 2 1 Enable (Default) 3 2 Disable NCT-D NCT-D Keyboard power setting 5 . NCT-D NCT-D 1394 Function setting 1394_EN1 2 1 Enable (Default) 3 2 Disable ASUS NCT-D 2-21 This feature requires an ATX power supply that can supply at least 1A on the keyboard (...or disable the keyboard wake-up the computer when you press a key on the +5VSB lead, and a corresponding setting in the BIOS. 4. IEEE 1394 controller setting (3-pin 1394_EN1) These jumpers allow you to wake up feature. Keyboard power (3-pin KBPWR1) This jumper...
NCT-D MB User Manual English Version
Page 49
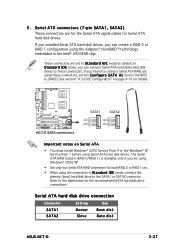
...create a Serial ATA RAID set using the Adaptec® HostRAID™ technology embedded in the BIOS to S t a n d a r d I D E mode by default. Serial ATA hard disk drive connection Connector SATA1 SATA2 Setting Master Slave Use Boot disk Data disk ASUS NCT-D 2-27 In S t a n d a r d I D E mode, connect ... boot/data hard disk drives to the SATA1 or SATA2 connector. Refer to the table below for details. 3 . NCT-D NCT-D SATA connectors SATA1 SATA2 GND RSATA_TXP1 RSATA_TXN1 GND RSATA_RXN1 RSATA_RXP1 GND GND RSATA_TXP2 RSATA_TXN2 GND RSATA_RXN2 RSATA_RXP2 GND Important notes on...
...create a Serial ATA RAID set using the Adaptec® HostRAID™ technology embedded in the BIOS to S t a n d a r d I D E mode by default. Serial ATA hard disk drive connection Connector SATA1 SATA2 Setting Master Slave Use Boot disk Data disk ASUS NCT-D 2-27 In S t a n d a r d I D E mode, connect ... boot/data hard disk drives to the SATA1 or SATA2 connector. Refer to the table below for details. 3 . NCT-D NCT-D SATA connectors SATA1 SATA2 GND RSATA_TXP1 RSATA_TXN1 GND RSATA_RXN1 RSATA_RXP1 GND GND RSATA_TXP2 RSATA_TXN2 GND RSATA_RXN2 RSATA_RXP2 GND Important notes on...
NCT-D MB User Manual English Version
Page 50
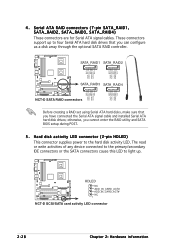
...connected the Serial ATA signal cable and installed Serial ATA hard disk drives; These connectors support up . SATA_RAID1 SATA_RAID2 SATA_RAID3 SATA_RAID4 NCT-D NCT-D SATA RAID connectors Before creating a RAID set using Serial ATA hard disks, make sure that you can configure as a... power to four Serial ATA hard disk drives that you cannot enter the RAID utility and SATA BIOS setup during POST. 5 . HDLED NC ADD_IN_CARD_ACT# ADD_IN_CARD_ACT# NC 1 NCT-D NCT-D SCSI/SATA card activity LED connector 2-28 Chapter 2: Hardware information GND RSATA_TXP1 RSATA_TXN1 GND RSATA_RXN1 ...
...connected the Serial ATA signal cable and installed Serial ATA hard disk drives; These connectors support up . SATA_RAID1 SATA_RAID2 SATA_RAID3 SATA_RAID4 NCT-D NCT-D SATA RAID connectors Before creating a RAID set using Serial ATA hard disks, make sure that you can configure as a... power to four Serial ATA hard disk drives that you cannot enter the RAID utility and SATA BIOS setup during POST. 5 . HDLED NC ADD_IN_CARD_ACT# ADD_IN_CARD_ACT# NC 1 NCT-D NCT-D SCSI/SATA card activity LED connector 2-28 Chapter 2: Hardware information GND RSATA_TXP1 RSATA_TXN1 GND RSATA_RXN1 ...
NCT-D MB User Manual English Version
Page 57
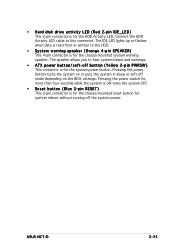
ASUS NCT-D 2-35 The IDE LED lights up or flashes when data is read from or written to the HDD. • System warning speaker (Orange 4-pin SPEAKER) ... to this connector. Connect the HDD Activity LED cable to hear system beeps and warnings. • ATX power button/soft-off mode depending on the BIOS settings.
ASUS NCT-D 2-35 The IDE LED lights up or flashes when data is read from or written to the HDD. • System warning speaker (Orange 4-pin SPEAKER) ... to this connector. Connect the HDD Activity LED cable to hear system beeps and warnings. • ATX power button/soft-off mode depending on the BIOS settings.

NCT-D MB User Manual English Version
Page 61
After making all switches are running, the BIOS beeps (see anything within 30 seconds from the time you press the ATX power button. Connect the power cord to a power outlet that all the ... appear on . At power on self tests or POST. Connect the power cord to the power connector at the back of the system chassis. 4. ASUS NCT-D 3-1 AMI BIOS beep codes Beep Description One beep Two continuous beeps followed by two short beeps Two continuous beeps followed by four short beeps Error Keyboard controller...
After making all switches are running, the BIOS beeps (see anything within 30 seconds from the time you press the ATX power button. Connect the power cord to a power outlet that all the ... appear on . At power on self tests or POST. Connect the power cord to the power connector at the back of the system chassis. 4. ASUS NCT-D 3-1 AMI BIOS beep codes Beep Description One beep Two continuous beeps followed by two short beeps Two continuous beeps followed by four short beeps Error Keyboard controller...
NCT-D MB User Manual English Version
Page 62
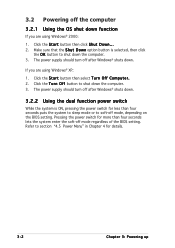
... 3.2.2 Using the dual function power switch While the system is selected, then click the O K button to soft-off mode, depending on the BIOS setting. Pressing the power switch for details. 3-2 Chapter 3: Powering up Make sure that the S h u t D o w n option button... is ON, pressing the power switch for less than four seconds lets the system enter the soft-off mode regardless of the BIOS setting. If you are using Windows® 2000: 1. 3.2 Powering off the computer 3.2.1 Using the OS shut down the computer. 3. Click the S t a r t button then ...
... 3.2.2 Using the dual function power switch While the system is selected, then click the O K button to soft-off mode, depending on the BIOS setting. Pressing the power switch for details. 3-2 Chapter 3: Powering up Make sure that the S h u t D o w n option button... is ON, pressing the power switch for less than four seconds lets the system enter the soft-off mode regardless of the BIOS setting. If you are using Windows® 2000: 1. 3.2 Powering off the computer 3.2.1 Using the OS shut down the computer. 3. Click the S t a r t button then ...
NCT-D MB User Manual English Version
Page 63
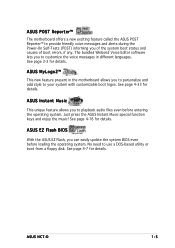
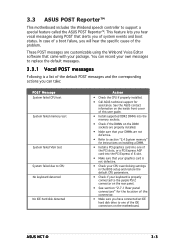
...the BIOS setup and restore the default CPU parameters. • Check if your own messages to replace the default messages. 3.3.1 Vocal POST messages Following is properly connected to the purple PS/2 connector on the rear panel. • See section "2.7.1 Rear panel connectors" for assistance. ASUS NCT-D ... default POST messages and the corresponding actions you have connected an IDE hard disk drive to support a special feature called the ASUS POST Reporter™. This feature lets you hear vocal messages during POST that came with your DIMMs are customizable using the Winbond...
...the BIOS setup and restore the default CPU parameters. • Check if your own messages to replace the default messages. 3.3.1 Vocal POST messages Following is properly connected to the purple PS/2 connector on the rear panel. • See section "2.7.1 Rear panel connectors" for assistance. ASUS NCT-D ... default POST messages and the corresponding actions you have connected an IDE hard disk drive to support a special feature called the ASUS POST Reporter™. This feature lets you hear vocal messages during POST that came with your DIMMs are customizable using the Winbond...
NCT-D MB User Manual English Version
Page 64
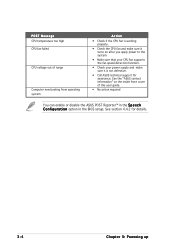
See section 4.4.2 for assistance. See the "ASUS contact information" on the inside front cover of range Computer now booting from operating system Action • Check if the CPU fan is working properly. &#... sure that your CPU fan supports the fan speed detection function. • Check your power supply and make sure it is not defective. • Call ASUS technical support for details. 3-4 Chapter 3: Powering up POST Message CPU temperature too high CPU fan failed CPU voltage out of this user guide. • No...
See section 4.4.2 for assistance. See the "ASUS contact information" on the inside front cover of range Computer now booting from operating system Action • Check if the CPU fan is working properly. &#... sure that your CPU fan supports the fan speed detection function. • Check your power supply and make sure it is not defective. • Call ASUS technical support for details. 3-4 Chapter 3: Powering up POST Message CPU temperature too high CPU fan failed CPU voltage out of this user guide. • No...
NCT-D MB User Manual English Version
Page 69
Detailed descriptions of the BIOS parameters are also provided. 4 BIOS setup This chapter tells how to change the system settings through the BIOS Setup menus.
Detailed descriptions of the BIOS parameters are also provided. 4 BIOS setup This chapter tells how to change the system settings through the BIOS Setup menus.
NCT-D MB User Manual English Version
Page 70
Chapter summary 4 4.1 Managing and updating your BIOS 4-1 4.2 BIOS setup program 4-11 4.3 Main menu 4-14 4.4 Advanced menu 4-18 4.5 Power menu 4-27 4.6 Boot menu 4-32 4.7 Exit menu 4-37 ASUS NCT-D
Chapter summary 4 4.1 Managing and updating your BIOS 4-1 4.2 BIOS setup program 4-11 4.3 Main menu 4-14 4.4 Advanced menu 4-18 4.5 Power menu 4-27 4.6 Boot menu 4-32 4.7 Exit menu 4-37 ASUS NCT-D
NCT-D MB User Manual English Version
Page 71
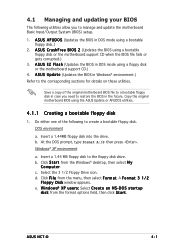
... environment a. b. Windows® XP environment a. Click S t a r t from the format options field, then click S t a r t. ASUS NCT-D 4-1 A S U S C r a s h F r e e B I O S 2 (Updates the BIOS using the ASUS Update or AFUDOS utilities. 4.1.1 Creating a bootable floppy disk 1. Save a copy of the following utilities allow you need to restore the BIOS in DOS mode using a bootable floppy disk.) 2. Insert a 1.44 MB floppy disk to...
... environment a. b. Windows® XP environment a. Click S t a r t from the format options field, then click S t a r t. ASUS NCT-D 4-1 A S U S C r a s h F r e e B I O S 2 (Updates the BIOS using the ASUS Update or AFUDOS utilities. 4.1.1 Creating a bootable floppy disk 1. Save a copy of the following utilities allow you need to restore the BIOS in DOS mode using a bootable floppy disk.) 2. Insert a 1.44 MB floppy disk to...
NCT-D MB User Manual English Version
Page 72
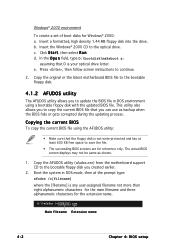
...alphanumeric characters for the main filename and three alphanumeric characters for Windows® 2000: a. e. Copying the current BIOS To copy the current BIOS file using a bootable floppy disk with the updated BIOS file. Insert the Windows® 2000 CD to continue. 2. Copy the AFUDOS utility (afudos.exe) from the... To create a set of boot disks for the extension name. c. Click S t a r t, then select R u n. This utility also allows you to update the BIOS file in DOS mode, then at least 600 KB free space to the bootable floppy disk you can use as shown. 1. Boot the system in...
...alphanumeric characters for the main filename and three alphanumeric characters for Windows® 2000: a. e. Copying the current BIOS To copy the current BIOS file using a bootable floppy disk with the updated BIOS file. Insert the Windows® 2000 CD to continue. 2. Copy the AFUDOS utility (afudos.exe) from the... To create a set of boot disks for the extension name. c. Click S t a r t, then select R u n. This utility also allows you to update the BIOS file in DOS mode, then at least 600 KB free space to the bootable floppy disk you can use as shown. 1. Boot the system in...


