N4L-VM DH User's Manual English Edition
Page 3
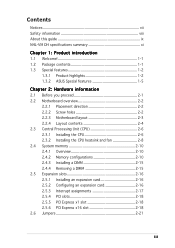
... viii About this guide ix N4L-VM DH specifications summary xi Chapter 1: Product introduction 1.1 Welcome 1-1 1.2 Package contents 1-1 1.3 Special features 1-2 1.3.1 Product highlights 1-2 1.3.2 ASUS Special features 1-5 Chapter 2: Hardware information 2.1 Before you proceed 2-1 2.2 Motherboard overview 2-2 2.2.1 Placement direction 2-2 2.2.2 Screw holes 2-2 2.2.3 Motherboard layout 2-3 2.2.4 Layout contents 2-4 2.3 Central Processing Unit (CPU 2-6 2.3.1 Installing the CPU 2-6 2.3.2 Installing the CPU heatsink and fan 2-8 2.4 System memory...
... viii About this guide ix N4L-VM DH specifications summary xi Chapter 1: Product introduction 1.1 Welcome 1-1 1.2 Package contents 1-1 1.3 Special features 1-2 1.3.1 Product highlights 1-2 1.3.2 ASUS Special features 1-5 Chapter 2: Hardware information 2.1 Before you proceed 2-1 2.2 Motherboard overview 2-2 2.2.1 Placement direction 2-2 2.2.2 Screw holes 2-2 2.2.3 Motherboard layout 2-3 2.2.4 Layout contents 2-4 2.3 Central Processing Unit (CPU 2-6 2.3.1 Installing the CPU 2-6 2.3.2 Installing the CPU heatsink and fan 2-8 2.4 System memory...
N4L-VM DH User's Manual English Edition
Page 15
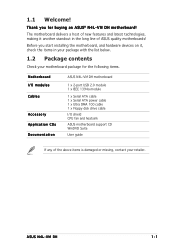
... 1 x Serial ATA cable 1 x Serial ATA power cable 1 x Ultra DMA 100 cable 1 x Floppy disk drive cable I/O shield CPU fan and heatsink ASUS motherboard support CD WinDVD Suite User guide If any of ASUS quality motherboards! ASUS N4L-VM DH 1-1 The motherboard delivers a host of new features and latest technologies, making it , check the items in the long line...
... 1 x Serial ATA cable 1 x Serial ATA power cable 1 x Ultra DMA 100 cable 1 x Floppy disk drive cable I/O shield CPU fan and heatsink ASUS motherboard support CD WinDVD Suite User guide If any of ASUS quality motherboards! ASUS N4L-VM DH 1-1 The motherboard delivers a host of new features and latest technologies, making it , check the items in the long line...
N4L-VM DH User's Manual English Edition
Page 29
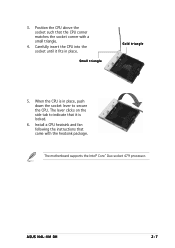
Carefully insert the CPU into the socket until it is in place. When the CPU is locked. 6. The lever clicks on the side tab to indicate that it fits in place, push down the socket lever to secure the CPU. Install a CPU heatsink and fan following the instructions that the CPU corner matches the socket corner with the heatsink package. The motherboard supports the Intel® Core™ Duo socket 479 processor. ASUS N4L-VM DH 2-7 3. Small triangle Gold triangle 5. Position the CPU above the socket such that came with a small triangle. 4.
Carefully insert the CPU into the socket until it is in place. When the CPU is locked. 6. The lever clicks on the side tab to indicate that it fits in place, push down the socket lever to secure the CPU. Install a CPU heatsink and fan following the instructions that the CPU corner matches the socket corner with the heatsink package. The motherboard supports the Intel® Core™ Duo socket 479 processor. ASUS N4L-VM DH 2-7 3. Small triangle Gold triangle 5. Position the CPU above the socket such that came with a small triangle. 4.

N4L-VM DH User's Manual English Edition
Page 30
Push down one end of the installed CPU. Orient the heatsink and fan assembly such that the CPU fan cable is closest to ensure optimum thermal condition and performance. CPU fan CPU heatsink Retention bracket Retention hook hole 2. Place the heatsink on top of the retention bracket into the retention hook hole. 2-8 Chapter 2: Hardware information To install the CPU heatsink and fan: 1. 2.3.2 Installing the CPU heatsink and fan The Intel® Core™ family processor requires a specially designed heatsink and fan assembly to the CPU fan connector.
Push down one end of the installed CPU. Orient the heatsink and fan assembly such that the CPU fan cable is closest to ensure optimum thermal condition and performance. CPU fan CPU heatsink Retention bracket Retention hook hole 2. Place the heatsink on top of the retention bracket into the retention hook hole. 2-8 Chapter 2: Hardware information To install the CPU heatsink and fan: 1. 2.3.2 Installing the CPU heatsink and fan The Intel® Core™ family processor requires a specially designed heatsink and fan assembly to the CPU fan connector.

N4L-VM DH User's Manual English Edition
Page 31
Push down the handle until the other end of the retention bracket is hooked into the hole to secure the heatsink and fan to connect the CPU fan connector! CPU_FAN N4L-VM DH ® N4L-VM DH CPU fan connector Do not forget to the motherboard. Hardware monitoring errors can occur if you fail to the connector on the motherboard labeled CPU_FAN. ASUS N4L-VM DH 2-9 GND +12V Rotation 4. Connect the CPU fan cable to plug this connector. 3.
Push down the handle until the other end of the retention bracket is hooked into the hole to secure the heatsink and fan to connect the CPU fan connector! CPU_FAN N4L-VM DH ® N4L-VM DH CPU fan connector Do not forget to the motherboard. Hardware monitoring errors can occur if you fail to the connector on the motherboard labeled CPU_FAN. ASUS N4L-VM DH 2-9 GND +12V Rotation 4. Connect the CPU fan cable to plug this connector. 3.
