ME-99 User Manual
Page 7
... (1) 5.25" and (2) 3.5" floppy drives (1) Serial COM2 cable connector set (1) Bag of spare jumper caps (1) Support CD with drivers and utilities (1) This Motherboard User's Manual Connector set for LCD (with LCD chip onboard) Connector set for TV Out (with TV Out chip onboard) Connector set... for audio input/output and game/MIDI port (with audio chip onboard) ASUS IrDA-compliant infrared module (optional) ASUS PCI-L101 Wake-On-LAN 10/100 Fast Ethernet Card (optional) ASUS ME-99 User's Manual 7 INTRODUCTION Sections/Checklist 1. 1. INTRODUCTION 1.1 How This Manual Is ...
... (1) 5.25" and (2) 3.5" floppy drives (1) Serial COM2 cable connector set (1) Bag of spare jumper caps (1) Support CD with drivers and utilities (1) This Motherboard User's Manual Connector set for LCD (with LCD chip onboard) Connector set for TV Out (with TV Out chip onboard) Connector set... for audio input/output and game/MIDI port (with audio chip onboard) ASUS IrDA-compliant infrared module (optional) ASUS PCI-L101 Wake-On-LAN 10/100 Fast Ethernet Card (optional) ASUS ME-99 User's Manual 7 INTRODUCTION Sections/Checklist 1. 1. INTRODUCTION 1.1 How This Manual Is ...
ME-99 User Manual
Page 10
ACPI provides more Energy Saving Features for Windows 95/98/NT. 10 ASUS ME-99 User's Manual The best of all ASUS smart series motherboards. With these new technology is compatible with two connectors that these features implemented in two channels. Supports UltraDMA/66, UltraDMA/33, ... Enhanced IDE devices, such as Windows 98 must be ready around the clock, yet satisfy all system components, and 32-bit device drivers and installation procedures for future operating systems (OS) supporting OS Direct Power Management (OSPM) functionality. The new PC'98 requirements for ...
ACPI provides more Energy Saving Features for Windows 95/98/NT. 10 ASUS ME-99 User's Manual The best of all ASUS smart series motherboards. With these new technology is compatible with two connectors that these features implemented in two channels. Supports UltraDMA/66, UltraDMA/33, ... Enhanced IDE devices, such as Windows 98 must be ready around the clock, yet satisfy all system components, and 32-bit device drivers and installation procedures for future operating systems (OS) supporting OS Direct Power Management (OSPM) functionality. The new PC'98 requirements for ...
ME-99 User Manual
Page 27
... sure that you intend to use an IRQ to use . Keep the bracket for your used , leaving 3 IRQs free. Install the necessary software drivers for possible future use . In a standard design, there are 16 IRQs available but most of them are two types of your expansion card. 3.7.2... and the bracket plate on a specific hardware device gives you removed above. 5. ASUS ME-99 User's Manual 27 H/W SETUP Expansion Cards 3. Make sure that no two devices use the same IRQ or your motherboard has PCI audio onboard, an extra IRQ will be exclusively assigned to cards installed in...
... sure that you intend to use an IRQ to use . Keep the bracket for your used , leaving 3 IRQs free. Install the necessary software drivers for possible future use . In a standard design, there are 16 IRQs available but most of them are two types of your expansion card. 3.7.2... and the bracket plate on a specific hardware device gives you removed above. 5. ASUS ME-99 User's Manual 27 H/W SETUP Expansion Cards 3. Make sure that no two devices use the same IRQ or your motherboard has PCI audio onboard, an extra IRQ will be exclusively assigned to cards installed in...
ME-99 User Manual
Page 71
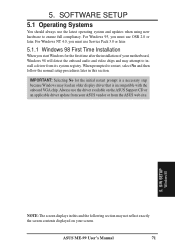
...driver available on your motherboard, Windows 98 will detect the onboard audio and video chips and may load an older display driver that is incompatible with the onboard VGA chip. IMPORTANT: Selecting No for the first time after the installation of your screen. When prompted to install a driver from the ASUS... necessary step because Windows may attempt to restart, select No and then follow the normal setup procedures later in this section. ASUS ME-99 User's Manual 71 Always use Service Pack 3.0 or later. 5.1.1 Windows 98 First Time Installation When you must use the latest...
...driver available on your motherboard, Windows 98 will detect the onboard audio and video chips and may load an older display driver that is incompatible with the onboard VGA chip. IMPORTANT: Selecting No for the first time after the installation of your screen. When prompted to install a driver from the ASUS... necessary step because Windows may attempt to restart, select No and then follow the normal setup procedures later in this section. ASUS ME-99 User's Manual 71 Always use Service Pack 3.0 or later. 5.1.1 Windows 98 First Time Installation When you must use the latest...
ME-99 User Manual
Page 72
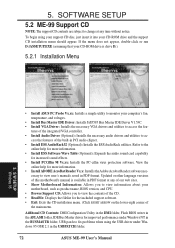
...cillin virus protection software. Refer to view the contents of this motherboard's manual is drive D:). 5.2.1 Installation Menu 5. S/W SETUP Windows 98 • Install ASUS PC Probe Vx.xx: Installs a simple utility to monitor your motherboard, such as product name, BIOS version, and CPU. •...99 Support CD NOTE: The support CD contents are subject to change at any time without notice. cess the features of our web sites. • Show Motherboard Information: Allows you to view information about your computer's fan, temperature, and voltages. • Install Bus Master IDE Driver...
...cillin virus protection software. Refer to view the contents of this motherboard's manual is drive D:). 5.2.1 Installation Menu 5. S/W SETUP Windows 98 • Install ASUS PC Probe Vx.xx: Installs a simple utility to monitor your motherboard, such as product name, BIOS version, and CPU. •...99 Support CD NOTE: The support CD contents are subject to change at any time without notice. cess the features of our web sites. • Show Motherboard Information: Allows you to view information about your computer's fan, temperature, and voltages. • Install Bus Master IDE Driver...
ME-99 User Manual
Page 74
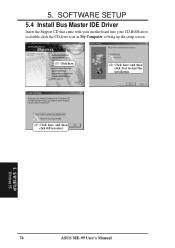
SOFTWARE SETUP 5.4 Install Bus Master IDE Driver Insert the Support CD that came with your motherboard into your CD-ROM drive or double-click the CD drive icon in My Computer to bring up the setup screen. (1) Click here. (2) Click here and then click Next to start the installation. (3) Click here and then click OK to restart. 5. S/W SETUP Windows 98 74 ASUS ME-99 User's Manual 5.
SOFTWARE SETUP 5.4 Install Bus Master IDE Driver Insert the Support CD that came with your motherboard into your CD-ROM drive or double-click the CD drive icon in My Computer to bring up the setup screen. (1) Click here. (2) Click here and then click Next to start the installation. (3) Click here and then click OK to restart. 5. S/W SETUP Windows 98 74 ASUS ME-99 User's Manual 5.
ME-99 User Manual
Page 75
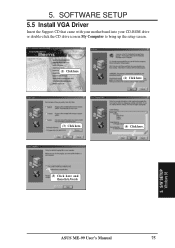
S/W SETUP Windows 98 ASUS ME-99 User's Manual 75 5. SOFTWARE SETUP 5.5 Install VGA Driver Insert the Support CD that came with your motherboard into your CD-ROM drive or double-click the CD drive icon in My Computer to bring up the setup screen. (1) Click here. (2) Click here. (3) Click here. (4) Click here. (5) Click here and then click Finish. 5.
S/W SETUP Windows 98 ASUS ME-99 User's Manual 75 5. SOFTWARE SETUP 5.5 Install VGA Driver Insert the Support CD that came with your motherboard into your CD-ROM drive or double-click the CD drive icon in My Computer to bring up the setup screen. (1) Click here. (2) Click here. (3) Click here. (4) Click here. (5) Click here and then click Finish. 5.
ME-99 User Manual
Page 79
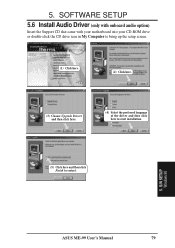
S/W SETUP Windows 98 ASUS ME-99 User's Manual 79 SOFTWARE SETUP 5.6 Install Audio Driver (only with onboard audio option) Insert the Support CD that came with your motherboard into your CD-ROM drive or double-click the CD drive icon in My Computer to bring up the setup screen. (1) Click here. (2) Click here. (3) Choose Upgrade Drivers and then click here. (4) Select the preferred language of the driver and then click here to start installation. (5) Click here and then click Finish to restart. 5. 5.
S/W SETUP Windows 98 ASUS ME-99 User's Manual 79 SOFTWARE SETUP 5.6 Install Audio Driver (only with onboard audio option) Insert the Support CD that came with your motherboard into your CD-ROM drive or double-click the CD drive icon in My Computer to bring up the setup screen. (1) Click here. (2) Click here. (3) Choose Upgrade Drivers and then click here. (4) Select the preferred language of the driver and then click here to start installation. (5) Click here and then click Finish to restart. 5. 5.


