
User Guide
Page 7
Do not place the product in your retailer. If possible, disconnect all the manuals that came with the product, contact a qualified service technician or your retailer. Detailed descriptions of the electrical outlet you detect any area ... Ensure that your power supply is organized This guide contains the following parts: • Chapter 1: Product introduction This chapter describes the features of the motherboard and the new technology it , carefully read all power cables from the existing system before you encounter technical problems with the package. • Before using...
Do not place the product in your retailer. If possible, disconnect all the manuals that came with the product, contact a qualified service technician or your retailer. Detailed descriptions of the electrical outlet you detect any area ... Ensure that your power supply is organized This guide contains the following parts: • Chapter 1: Product introduction This chapter describes the features of the motherboard and the new technology it , carefully read all power cables from the existing system before you encounter technical problems with the package. • Before using...

User Guide
Page 13
... AMD® Socket AM3; Before you for the following items. Motherboard Cables Accessories Application DVD Documentations ASUS M4N75TD motherboard 1 x Ultra DMA 133/100/66 cable 2 x Serial ATA cables 1 x SLI bridge cable 1 x I/O shield ASUS motherboard support DVD User manual If any of ASUS quality motherboards! Thank you start installing the motherboard, and hardware devices on it another standout in the new...
... AMD® Socket AM3; Before you for the following items. Motherboard Cables Accessories Application DVD Documentations ASUS M4N75TD motherboard 1 x Ultra DMA 133/100/66 cable 2 x Serial ATA cables 1 x SLI bridge cable 1 x I/O shield ASUS motherboard support DVD User manual If any of ASUS quality motherboards! Thank you start installing the motherboard, and hardware devices on it another standout in the new...

User Guide
Page 21
... usable memory for the dual-channel configuration. Any excess memory from the same vendor. • Due to section 2.4 Ai Tweaker menu for manual memory frequency adjustment. • For system stability, use of the lower-sized channel for the OS can be about 3GB or less. For... optimum compatibility, we recommend that you install a 64-bit Windows OS when having 4GB or more memory on the motherboard. • This motherboard does not support DIMMs made up of accessing information from a memory module. DDR3 modules are developed for overclocking may install varying memory ...
... usable memory for the dual-channel configuration. Any excess memory from the same vendor. • Due to section 2.4 Ai Tweaker menu for manual memory frequency adjustment. • For system stability, use of the lower-sized channel for the OS can be about 3GB or less. For... optimum compatibility, we recommend that you install a 64-bit Windows OS when having 4GB or more memory on the motherboard. • This motherboard does not support DIMMs made up of accessing information from a memory module. DDR3 modules are developed for overclocking may install varying memory ...

User Guide
Page 30
...incompaible with ones recommended in the Memory QVL (Qualified Vendors Lists) in this user manual or on the ASUS website at www.asus.com after using the MemOK! Replace the DIMMs with the motherboard may cause system boot failure, and the DRAM_LED near the MemOK! MemOK! Press and... LEDs for about 30 seconds for the system to boot after the whole tuning process, the DRAM_LED lights continuously. function. 1-18 ASUS M4N75TD switch until the DRAM_LED starts blinking to begin automatic memory compatibility tuning for overclockers and gamers who continually change settings to memory tuning ...
...incompaible with ones recommended in the Memory QVL (Qualified Vendors Lists) in this user manual or on the ASUS website at www.asus.com after using the MemOK! Replace the DIMMs with the motherboard may cause system boot failure, and the DRAM_LED near the MemOK! MemOK! Press and... LEDs for about 30 seconds for the system to boot after the whole tuning process, the DRAM_LED lights continuously. function. 1-18 ASUS M4N75TD switch until the DRAM_LED starts blinking to begin automatic memory compatibility tuning for overclockers and gamers who continually change settings to memory tuning ...

User Guide
Page 37
...to SATA 5-6 connectors. 3. NVIDIA nForce® 750a SLI® Serial ATA connectors (7-pin SATA1-6) These connectors are set the SATA Mode select item in the motherboard support DVD. Make sure to install the AHCI driver or RAID driver in the bundled support DVD before using these connectors, set to the... manual bundled in the BIOS to the SATA connectors, you intend to create a Serial ATA RAID set using Serial ATA hard disk drives. • SATA1-4 ...
...to SATA 5-6 connectors. 3. NVIDIA nForce® 750a SLI® Serial ATA connectors (7-pin SATA1-6) These connectors are set the SATA Mode select item in the motherboard support DVD. Make sure to install the AHCI driver or RAID driver in the bundled support DVD before using these connectors, set to the... manual bundled in the BIOS to the SATA connectors, you intend to create a Serial ATA RAID set using Serial ATA hard disk drives. • SATA1-4 ...
User Guide
Page 43
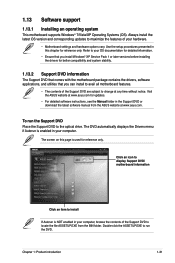
... any time without notice. Click an icon to display Support DVD/ motherboard information Click an item to change at www.asus.com. Chapter 1: Product introduction 1-31 Visit the ASUS website at www.asus.com for updates. • For detailed software instructions, see the Manual folder in your OS documentation for detailed information. • Ensure that...
... any time without notice. Click an icon to display Support DVD/ motherboard information Click an item to change at www.asus.com. Chapter 1: Product introduction 1-31 Visit the ASUS website at www.asus.com for updates. • For detailed software instructions, see the Manual folder in your OS documentation for detailed information. • Ensure that...

User Guide
Page 44
Installing two SLI-ready graphics cards The following pictures are properly seated on the slots. 1-32 ASUS M4N75TD Prepare two SLI-ready graphics cards. 2. The graphics cards and the motherboard layout may vary with models, but the installation steps remain the same. 1. Ensure that the cards are...1-24 for details. • We recommend that you to Chapter 2 in this user manual for the locations of the PCIEX16 slots recommended for multi-graphics card installation. 3. If your motherboard has more than two PCIEX16 slots, refer to install multi-graphics processing units (GPU) ...
Installing two SLI-ready graphics cards The following pictures are properly seated on the slots. 1-32 ASUS M4N75TD Prepare two SLI-ready graphics cards. 2. The graphics cards and the motherboard layout may vary with models, but the installation steps remain the same. 1. Ensure that the cards are...1-24 for details. • We recommend that you to Chapter 2 in this user manual for the locations of the PCIEX16 slots recommended for multi-graphics card installation. 3. If your motherboard has more than two PCIEX16 slots, refer to install multi-graphics processing units (GPU) ...

User Guide
Page 51
... the instructions of BIOS, DO NOT manually update the BIOS. The following circumstances: • An error message appears on the screen during the system bootup and requests you need to restore the BIOS in Windows® environment. 2. ASUS EZ Flash 2 utility: Updates the BIOS using the motherboard support DVD or a USB flash drive...
... the instructions of BIOS, DO NOT manually update the BIOS. The following circumstances: • An error message appears on the screen during the system bootup and requests you need to restore the BIOS in Windows® environment. 2. ASUS EZ Flash 2 utility: Updates the BIOS using the motherboard support DVD or a USB flash drive...

User Guide
Page 61
... only when you to adjust the ratio between CPU Core Clock and CPU Bus Frequency. Configuration options: [Manual] [Auto] [D.O.C.P] The following items vary depending on the CPU and memory modules you install on the motherboard. Use the and keys to 600. The values range from 100 to adjust the value. CPU Bus...] This item appears only when you set the Ai Overclock Tuner item to adjust the PCIE frequency. PCIE Frequency [XXX] Use the and keys to [Manual]. DRAM O.C.
... only when you to adjust the ratio between CPU Core Clock and CPU Bus Frequency. Configuration options: [Manual] [Auto] [D.O.C.P] The following items vary depending on the CPU and memory modules you install on the motherboard. Use the and keys to 600. The values range from 100 to adjust the value. CPU Bus...] This item appears only when you set the Ai Overclock Tuner item to adjust the PCIE frequency. PCIE Frequency [XXX] Use the and keys to [Manual]. DRAM O.C.


