
User Manual
Page 1
Motherboard
Motherboard

User Manual
Page 1
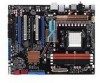
Motherboard M4A79T Deluxe
Motherboard M4A79T Deluxe
User Manual
Page 3
...Contents...iii Notices ...vii Safety information...viii About this guide...ix M4A79T Deluxe specifications summary xi Chapter 1: Product introduction 1.1 Welcome!...1-1 1.2 Package contents 1-1 1.3 Special features 1-2 1.3.1 Product highlights 1-2 1.3.2 ASUS unique features 1-3 1.3.3 ASUS intelligent performance and overclocking features 1-5 Chapter 2: Hardware information 2.1 Before you proceed 2-1 2.2 Motherboard overview 2-2 2.2.1 Motherboard layout 2-2 2.2.2 Layout contents 2-3 2.2.3 Placement direction 2-4 2.2.4 Screw holes 2-4 2.3 Central Processing Unit...
...Contents...iii Notices ...vii Safety information...viii About this guide...ix M4A79T Deluxe specifications summary xi Chapter 1: Product introduction 1.1 Welcome!...1-1 1.2 Package contents 1-1 1.3 Special features 1-2 1.3.1 Product highlights 1-2 1.3.2 ASUS unique features 1-3 1.3.3 ASUS intelligent performance and overclocking features 1-5 Chapter 2: Hardware information 2.1 Before you proceed 2-1 2.2 Motherboard overview 2-2 2.2.1 Motherboard layout 2-2 2.2.2 Layout contents 2-3 2.2.3 Placement direction 2-4 2.2.4 Screw holes 2-4 2.3 Central Processing Unit...
User Manual
Page 8
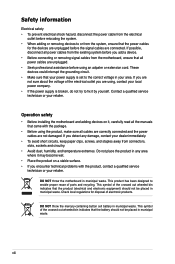
... devices are unplugged before the signal cables are not sure about the voltage of electronic products. Operation safety • Before installing the motherboard and adding devices on a stable surface. • If you are not damaged. Safety information Electrical safety • To prevent electrical... disconnect all power cables from the existing system before you add a device. • Before connecting or removing signal cables from the motherboard, ensure that all power cables are unplugged. • Seek professional assistance before using the product, make sure all the manuals that...
... devices are unplugged before the signal cables are not sure about the voltage of electronic products. Operation safety • Before installing the motherboard and adding devices on a stable surface. • If you are not damaged. Safety information Electrical safety • To prevent electrical... disconnect all power cables from the existing system before you add a device. • Before connecting or removing signal cables from the motherboard, ensure that all power cables are unplugged. • Seek professional assistance before using the product, make sure all the manuals that...

User Manual
Page 9
... the BIOS Setup menus. It includes description of the support DVD that may include optional documentation, such as warranty flyers, that comes with the motherboard package and the software. • Chapter 5: ATI® CrossFireX™ support This chapter describes the ATI® CrossFireX™ feature and.... About this guide is organized This guide contains the following sources for additional information and for product and software updates. 1. ASUS websites The ASUS website provides updated information on the motherboard. • Chapter 3: BIOS setup This chapter tells how to the...
... the BIOS Setup menus. It includes description of the support DVD that may include optional documentation, such as warranty flyers, that comes with the motherboard package and the software. • Chapter 5: ATI® CrossFireX™ support This chapter describes the ATI® CrossFireX™ feature and.... About this guide is organized This guide contains the following sources for additional information and for product and software updates. 1. ASUS websites The ASUS website provides updated information on the motherboard. • Chapter 3: BIOS setup This chapter tells how to the...
User Manual
Page 15
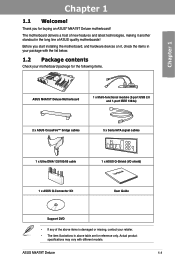
... may vary with the list below. 1.2 Package contents Check your motherboard package for the following items. Chapter 1 ASUS M4A79T Deluxe Motherboard 1 x Multi-functional module (2-port USB 2.0 and 1-port IEEE 1394a) 2 x ASUS CrossFire™ bridge cables 5 x Serial ATA signal cables 1 x Ultra DMA 133/100/66 cable 1 x ASUS Q-Connector Kit 1 x ASUS Q-Shield (I/O shield) User Manual User Guide Support DVD •...
... may vary with the list below. 1.2 Package contents Check your motherboard package for the following items. Chapter 1 ASUS M4A79T Deluxe Motherboard 1 x Multi-functional module (2-port USB 2.0 and 1-port IEEE 1394a) 2 x ASUS CrossFire™ bridge cables 5 x Serial ATA signal cables 1 x Ultra DMA 133/100/66 cable 1 x ASUS Q-Connector Kit 1 x ASUS Q-Shield (I/O shield) User Manual User Guide Support DVD •...
User Manual
Page 16
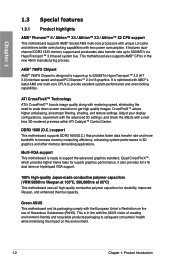
... is optimized with a realtime 3D-rendered previews within ATI Catalyst™ Control Center. DDR3 1600 (O.C.) support This motherboard supports DDR3 1600(O.C.) that provides faster data transfer rate and more bandwith to increase memory computing efficiency, enhancing system performance...high quality images. Multi-VGA support This motherboard is in line with the European Union's Restriction on the environment. 1-2 Chapter 1: Product Introduction Green ASUS This motherboard and its packaging comply with the ASUS vision of creating environment-friendly and recyclable products...
... is optimized with a realtime 3D-rendered previews within ATI Catalyst™ Control Center. DDR3 1600 (O.C.) support This motherboard supports DDR3 1600(O.C.) that provides faster data transfer rate and more bandwith to increase memory computing efficiency, enhancing system performance...high quality images. Multi-VGA support This motherboard is in line with the European Union's Restriction on the environment. 1-2 Chapter 1: Product Introduction Green ASUS This motherboard and its packaging comply with the ASUS vision of creating environment-friendly and recyclable products...

User Manual
Page 17
...series also features an extra 2 or 1-phase power dedicated to the OS environment, simply click the mouse or press a key. ASUS Green Design This motherboard and its packaging comply with friends, or quickly check on the use of Hazardous Substances (RoHS) to safeguard consumers' health while ...Skype, Google talk, QQ, and Yahoo! The actual boot time is the one-stop gateway to hardware configurations and product models. ASUS M4A79T Deluxe 1-3 Messenger to ensure longer component lifespan. This series' high quality power components effectively lowers system temperature to keep in OS...
...series also features an extra 2 or 1-phase power dedicated to the OS environment, simply click the mouse or press a key. ASUS Green Design This motherboard and its packaging comply with friends, or quickly check on the use of Hazardous Substances (RoHS) to safeguard consumers' health while ...Skype, Google talk, QQ, and Yahoo! The actual boot time is the one-stop gateway to hardware configurations and product models. ASUS M4A79T Deluxe 1-3 Messenger to ensure longer component lifespan. This series' high quality power components effectively lowers system temperature to keep in OS...
User Manual
Page 18
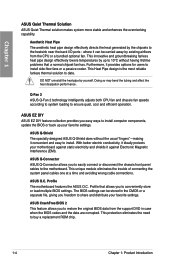
...by up to install computer components, update the BIOS or back up your motherboard against static electricity and shields it ideally protects your favorite settings. Chapter 1 ASUS Quiet Thermal Solution ASUS Quiet Thermal solution makes system more stable and enhances the overclocking capability. Furthermore...This Heat Pipe design is the most reliable fanless thermal solution to the motherboard. The BIOS settings can be stored in case when the BIOS codes and the data are corrupted. ASUS O.C. This unique module eliminates the trouble of connecting the system panel cables...
...by up to install computer components, update the BIOS or back up your motherboard against static electricity and shields it ideally protects your favorite settings. Chapter 1 ASUS Quiet Thermal Solution ASUS Quiet Thermal solution makes system more stable and enhances the overclocking capability. Furthermore...This Heat Pipe design is the most reliable fanless thermal solution to the motherboard. The BIOS settings can be stored in case when the BIOS codes and the data are corrupted. ASUS O.C. This unique module eliminates the trouble of connecting the system panel cables...
User Manual
Page 21
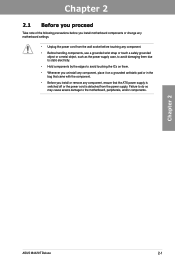
... 2 ASUS M4A79T Deluxe 2-1 Failure to do so may cause severe damage to avoid touching the ICs on them. • Whenever you uninstall any component, place it on a grounded antistatic pad or in the bag that came with the component. • Before you install or remove any component, ensure that the ATX power supply...a metal object, such as the power supply case, to avoid damaging them due to static electricity. • Hold components by the edges to the motherboard, peripherals, and/or components. Chapter 2 2.1 Before you proceed Take note of the following precautions before you install...
... 2 ASUS M4A79T Deluxe 2-1 Failure to do so may cause severe damage to avoid touching the ICs on them. • Whenever you uninstall any component, place it on a grounded antistatic pad or in the bag that came with the component. • Before you install or remove any component, ensure that the ATX power supply...a metal object, such as the power supply case, to avoid damaging them due to static electricity. • Hold components by the edges to the motherboard, peripherals, and/or components. Chapter 2 2.1 Before you proceed Take note of the following precautions before you install...

User Manual
Page 22
2.2 Motherboard overview 2.2.1 Motherboard layout Chapter 2 Refer to 2.8 Connectors for more information about rear panel connectors and internal connectors. 2-2 Chapter 2: Hardware information
2.2 Motherboard overview 2.2.1 Motherboard layout Chapter 2 Refer to 2.8 Connectors for more information about rear panel connectors and internal connectors. 2-2 Chapter 2: Hardware information

User Manual
Page 24
The edge with external ports goes to the rear part of the chassis Chapter 2 2-4 Chapter 2: Hardware information 2.2.3 Placement direction When installing the motherboard, make sure that you place it into the holes indicated by circles to secure the motherboard to the chassis. Place this side towards the rear of the chassis as indicated in the image below. 2.2.4 Screw holes Place nine (9) screws into the chassis in the correct orientation. Doing so can damage the motherboard. DO NOT overtighten the screws!
The edge with external ports goes to the rear part of the chassis Chapter 2 2-4 Chapter 2: Hardware information 2.2.3 Placement direction When installing the motherboard, make sure that you place it into the holes indicated by circles to secure the motherboard to the chassis. Place this side towards the rear of the chassis as indicated in the image below. 2.2.4 Screw holes Place nine (9) screws into the chassis in the correct orientation. Doing so can damage the motherboard. DO NOT overtighten the screws!

User Manual
Page 25
2.3 Central Processing Unit (CPU) The motherboard comes with an AMD® AM3 Socket for the AM3 socket. Press the lever sideways to unlock the socket, then lift it up to a 90&#... a different pinout from the AM2+/AM2 socket. Socket lever ASUS M4A79T Deluxe 2-5 Locate the CPU socket on the socket and damaging the CPU! 2.3.1 Installing the CPU To install a CPU: 1. DO NOT force the CPU into the socket to prevent bending the connectors on the motherboard. Make sure you use a CPU designed for AMD®...
2.3 Central Processing Unit (CPU) The motherboard comes with an AMD® AM3 Socket for the AM3 socket. Press the lever sideways to unlock the socket, then lift it up to a 90&#... a different pinout from the AM2+/AM2 socket. Socket lever ASUS M4A79T Deluxe 2-5 Locate the CPU socket on the socket and damaging the CPU! 2.3.1 Installing the CPU To install a CPU: 1. DO NOT force the CPU into the socket to prevent bending the connectors on the motherboard. Make sure you use a CPU designed for AMD®...

User Manual
Page 27
... in this section do not have to remove the retention module base when installing the CPU or installing other motherboard components. • If you use only AMD-certified heatsink and fan assembly. ASUS M4A79T Deluxe 2-7 Chapter 2 Retention bracket lock Retention bracket CPU fan CPU heatsink Retention module base Your boxed CPU heatsink and ...and fan assembly, make sure that the heatsink fits properly on the retention module base. • The retention module base is already installed on the motherboard upon purchase. • You do not match the CPU documentation, follow the latter.
... in this section do not have to remove the retention module base when installing the CPU or installing other motherboard components. • If you use only AMD-certified heatsink and fan assembly. ASUS M4A79T Deluxe 2-7 Chapter 2 Retention bracket lock Retention bracket CPU fan CPU heatsink Retention module base Your boxed CPU heatsink and ...and fan assembly, make sure that the heatsink fits properly on the retention module base. • The retention module base is already installed on the motherboard upon purchase. • You do not match the CPU documentation, follow the latter.

User Manual
Page 29
Chapter 2 ASUS M4A79T Deluxe 2-9 Hardware monitoring errors can occur if you fail to connect the CPU fan connector! 5. When the fan and heatsink assembly is in place, connect the CPU fan cable to the connector on the motherboard labeled CPU_FAN. • Do not forget to plug this connector. • This connector is backward compatible with old 3-pin CPU fan.
Chapter 2 ASUS M4A79T Deluxe 2-9 Hardware monitoring errors can occur if you fail to connect the CPU fan connector! 5. When the fan and heatsink assembly is in place, connect the CPU fan cable to the connector on the motherboard labeled CPU_FAN. • Do not forget to plug this connector. • This connector is backward compatible with old 3-pin CPU fan.
User Manual
Page 30
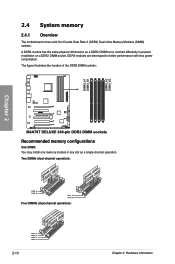
... 3 (DDR3) Dual Inline Memory Modules (DIMM) sockets. Two DIMMs (dual-channel operation): Four DIMMs (dual-channel operation): 2-10 Chapter 2: Hardware information 2.4 System memory 2.4.1 Overview The motherboard comes with less power consumption. A DDR3 module has the same physical dimensions as a single-channel operation. The figure illustrates the location of the DDR3 DIMM...
... 3 (DDR3) Dual Inline Memory Modules (DIMM) sockets. Two DIMMs (dual-channel operation): Four DIMMs (dual-channel operation): 2-10 Chapter 2: Hardware information 2.4 System memory 2.4.1 Overview The motherboard comes with less power consumption. A DDR3 module has the same physical dimensions as a single-channel operation. The figure illustrates the location of the DDR3 DIMM...
User Manual
Page 31
... load (4 DIMMs) or overclocking condition. For optimum compatibility, it is recommended that you install 4GB or more memory installed on the motherboard. • This motherboard does not support DIMMs made up of the lower-sized channel for the dual-channel configuration. To operate at the vendor-marked or ... the higher-sized channel is then mapped for better overclocking capability. • Always install DIMMs with the same CAS latency. Chapter 2 ASUS M4A79T Deluxe 2-11 Any excess memory from the orange slots for single-channel operation. • It is dependent on its SPD.
... load (4 DIMMs) or overclocking condition. For optimum compatibility, it is recommended that you install 4GB or more memory installed on the motherboard. • This motherboard does not support DIMMs made up of the lower-sized channel for the dual-channel configuration. To operate at the vendor-marked or ... the higher-sized channel is then mapped for better overclocking capability. • Always install DIMMs with the same CAS latency. Chapter 2 ASUS M4A79T Deluxe 2-11 Any excess memory from the orange slots for single-channel operation. • It is dependent on its SPD.

User Manual
Page 32
...; ••• ••• ••• • • ••• ••• • •• Chapter 2 2-12 Chapter 2: Hardware information M4A79T Deluxe Motherboard Qualified Vendors Lists (QVL) DDR3-1600 MHz capability Vendor Part No.
...; ••• ••• ••• • • ••• ••• • •• Chapter 2 2-12 Chapter 2: Hardware information M4A79T Deluxe Motherboard Qualified Vendors Lists (QVL) DDR3-1600 MHz capability Vendor Part No.

User Manual
Page 35
Chapter 2 Locked Retaining Clip 2.4.4 Removing a DIMM Follow these steps to avoid damaging the DIMM. 3. ASUS M4A79T Deluxe 2-15 Unlock a DIMM socket by pressing the retaining clips outward. 2. Remove the DIMM from the socket. Firmly insert the DIMM into a socket to remove ... break on the socket. 2 DIMM notch 1 1 Unlocked retaining clip A DIMM is properly seated. 2.4.3 Installing a DIMM Make sure to both the motherboard and the components. 1. Failure to do so may cause severe damage to unplug the power supply before adding or removing DIMMs or other system components...
Chapter 2 Locked Retaining Clip 2.4.4 Removing a DIMM Follow these steps to avoid damaging the DIMM. 3. ASUS M4A79T Deluxe 2-15 Unlock a DIMM socket by pressing the retaining clips outward. 2. Remove the DIMM from the socket. Firmly insert the DIMM into a socket to remove ... break on the socket. 2 DIMM notch 1 1 Unlocked retaining clip A DIMM is properly seated. 2.4.3 Installing a DIMM Make sure to both the motherboard and the components. 1. Failure to do so may cause severe damage to unplug the power supply before adding or removing DIMMs or other system components...

User Manual
Page 36
... between the two PCI groups, making the system unstable and the card inoperable. Turn on the next page. 3. Remove the system unit cover (if your motherboard is completely seated on shared slots, ensure that the drivers support "Share IRQ" or that you intend to do not need to the tables on... in a chassis). 3. Secure the card to the table on BIOS setup. 2. Chapter 2 2.5 Expansion slots In the future, you may cause you physical injury and damage motherboard components. 2.5.1 Installing an expansion card To install an expansion card: 1.
... between the two PCI groups, making the system unstable and the card inoperable. Turn on the next page. 3. Remove the system unit cover (if your motherboard is completely seated on shared slots, ensure that the drivers support "Share IRQ" or that you intend to do not need to the tables on... in a chassis). 3. Secure the card to the table on BIOS setup. 2. Chapter 2 2.5 Expansion slots In the future, you may cause you physical injury and damage motherboard components. 2.5.1 Installing an expansion card To install an expansion card: 1.


