
User Manual
Page 10
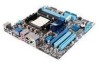
... 1333 memory Supports HDMI™ with max. Integrated ATI Radeon™ HD 4200 GPU Supports SidePort Memory - M4A785TD-M EVO specifications summary CPU Chipset Front side bus Memory Graphics Expansion slots AMD® Socket AM3 for AMD® Phenom™ II / Athlon™ II / Sempron™ 100 series processors Supports 45nm CPU AMD® Cool 'n' Quiet™ Technology * Refer to www.asus.com for the AMD® CPU support list AMD® 785G / SB710 Up to 5200MT/s HyperTransport™ 3.0 interface Dual-channel memory...
... 1333 memory Supports HDMI™ with max. Integrated ATI Radeon™ HD 4200 GPU Supports SidePort Memory - M4A785TD-M EVO specifications summary CPU Chipset Front side bus Memory Graphics Expansion slots AMD® Socket AM3 for AMD® Phenom™ II / Athlon™ II / Sempron™ 100 series processors Supports 45nm CPU AMD® Cool 'n' Quiet™ Technology * Refer to www.asus.com for the AMD® CPU support list AMD® 785G / SB710 Up to 5200MT/s HyperTransport™ 3.0 interface Dual-channel memory...
User Manual
Page 15
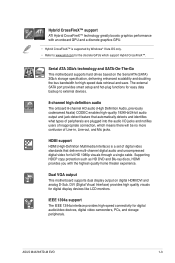
... jacks. The external SATA port provides smart setup and hot-plug functions for easy data backup to www.amd.com for full HD 1080p visuals through a single cable. ASUS M4A785TD-M EVO 1-3 Hybrid CrossFireX™ support ATI Hybrid CrossFireX™ technology greatly boosts graphics performance with the highest-quality home theater experience. IEEE 1394a support The IEEE 1394a interface provides high-speed connectivity for digital display devices like LCD monitors.
... jacks. The external SATA port provides smart setup and hot-plug functions for easy data backup to www.amd.com for full HD 1080p visuals through a single cable. ASUS M4A785TD-M EVO 1-3 Hybrid CrossFireX™ support ATI Hybrid CrossFireX™ technology greatly boosts graphics performance with the highest-quality home theater experience. IEEE 1394a support The IEEE 1394a interface provides high-speed connectivity for digital display devices like LCD monitors.

User Manual
Page 16
... you quick access to restore a corrupted BIOS file using the bundled support DVD or a USB flash disk that gives you to the Internet. Five seconds after powering on environment that contains the BIOS file. 1-4 Chapter 1: Product introduction Refer to the motherboard USB port before turning on the computer. • The actual boot time depends on USB HDDs or flash drives, connect the drives to support.asus.com for the most demanding tasks. When installing it to...
... you quick access to restore a corrupted BIOS file using the bundled support DVD or a USB flash disk that gives you to the Internet. Five seconds after powering on environment that contains the BIOS file. 1-4 Chapter 1: Product introduction Refer to the motherboard USB port before turning on the computer. • The actual boot time depends on USB HDDs or flash drives, connect the drives to support.asus.com for the most demanding tasks. When installing it to...

User Manual
Page 17
... system loadings and adjusts the power consumption in line with the European Union's Restriction on the environment. Simply shut down and reboot the system, and the BIOS automatically restores the CPU parameters to update the BIOS from a USB flash disk before entering the OS. ASUS EZ Flash 2 ASUS EZ Flash 2 allows you to their default settings. After the easy setup, Turbo Key boosts performances without interrupting ongoing work or...
... system loadings and adjusts the power consumption in line with the European Union's Restriction on the environment. Simply shut down and reboot the system, and the BIOS automatically restores the CPU parameters to update the BIOS from a USB flash disk before entering the OS. ASUS EZ Flash 2 ASUS EZ Flash 2 allows you to their default settings. After the easy setup, Turbo Key boosts performances without interrupting ongoing work or...

User Manual
Page 30
... card, SCSI card, USB card, and other cards that comply with PCI specifications. 1.8.4 PCI Express x1 slot This motherboard supports PCI Express x1 network cards, SCSI cards, and other cards that comply with the PCI Express specifications. 1.8.5 PCI Express x16 slot This motherboard supports a PCI Express x16 graphics card that you removed earlier. 6. Unplug the power cord before adding or removing expansion cards. Keep the screw for the expansion card. Turn on BIOS setup. 2. Remove the system unit cover (if your motherboard is completely seated on shared slots, ensure that the drivers...
... card, SCSI card, USB card, and other cards that comply with PCI specifications. 1.8.4 PCI Express x1 slot This motherboard supports PCI Express x1 network cards, SCSI cards, and other cards that comply with the PCI Express specifications. 1.8.5 PCI Express x16 slot This motherboard supports a PCI Express x16 graphics card that you removed earlier. 6. Unplug the power cord before adding or removing expansion cards. Keep the screw for the expansion card. Turn on BIOS setup. 2. Remove the system unit cover (if your motherboard is completely seated on shared slots, ensure that the drivers...

User Manual
Page 33
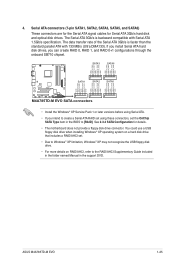
... Serial ATA hard disk drive. This port connects to the audio configuration table below for the function of HD DVD, Blu-ray, and other protected content. This port is for USB 2.0 devices. 13. Microphone port (pink). Side Speaker Out port (gray). These two 4-pin Universal Serial Bus (USB) ports are for any DVI-D compatible device and is VIA High Definition Audio (the name may be different based on the OS). 9. To use hot-plug, set the OnChip SATA Type...
... Serial ATA hard disk drive. This port connects to the audio configuration table below for the function of HD DVD, Blu-ray, and other protected content. This port is for USB 2.0 devices. 13. Microphone port (pink). Side Speaker Out port (gray). These two 4-pin Universal Serial Bus (USB) ports are for any DVI-D compatible device and is VIA High Definition Audio (the name may be different based on the OS). 9. To use hot-plug, set the OnChip SATA Type...
User Manual
Page 37
... RAID 0, RAID 1, and RAID 0+1 configurations through the onboard SB710 chipset. You could use a USB floppy disk drive when installing Windows® XP operating system on a hard disk drive that includes a RAID/AHCI set. • Due to Windows® XP limitation, Windows® XP may not recognize the USB floppy disk drive. • For more details on RAID/AHCI, refer to the RAID/AHCI Supplementary Guide included in the folder named Manual in the BIOS to create a Serial ATA RAID set the OnChip SATA Type item in the support DVD...
... RAID 0, RAID 1, and RAID 0+1 configurations through the onboard SB710 chipset. You could use a USB floppy disk drive when installing Windows® XP operating system on a hard disk drive that includes a RAID/AHCI set. • Due to Windows® XP limitation, Windows® XP may not recognize the USB floppy disk drive. • For more details on RAID/AHCI, refer to the RAID/AHCI Supplementary Guide included in the folder named Manual in the BIOS to create a Serial ATA RAID set the OnChip SATA Type item in the support DVD...

User Manual
Page 42
... of the Support DVD to avail all motherboard features. The DVD automatically displays the Drivers menu if Autorun is NOT enabled on your computer, browse the contents of the Support DVD are subject to change at www.asus.com for better compatibility and system stability. 1.11.2 Support DVD information The Support DVD that comes with the motherboard package contains the drivers, software applications, and utilities that you can install to locate the file ASSETUP...
... of the Support DVD to avail all motherboard features. The DVD automatically displays the Drivers menu if Autorun is NOT enabled on your computer, browse the contents of the Support DVD are subject to change at www.asus.com for better compatibility and system stability. 1.11.2 Support DVD information The Support DVD that comes with the motherboard package contains the drivers, software applications, and utilities that you can install to locate the file ASSETUP...

User Manual
Page 43
... click ASUS Update. 3. Follow the onscreen instructions to manage, save, and update the motherboard BIOS in Windows® environment. • ASUS Update requires an Internet connection either through a network or an Internet Service Provider (ISP). • This utility is a utility that allows you update the BIOS using this utility. Chapter 2 BIOS information 2.1 Managing and updating your BIOS Save a copy of the original motherboard BIOS file to a USB flash disk in case you need to restore the BIOS in the support DVD...
... click ASUS Update. 3. Follow the onscreen instructions to manage, save, and update the motherboard BIOS in Windows® environment. • ASUS Update requires an Internet connection either through a network or an Internet Service Provider (ISP). • This utility is a utility that allows you update the BIOS using this utility. Chapter 2 BIOS information 2.1 Managing and updating your BIOS Save a copy of the original motherboard BIOS file to a USB flash disk in case you need to restore the BIOS in the support DVD...

User Manual
Page 45
... the USB port, then launch EZ Flash 2 in either of these two ways: • Press + during POST to switch between drives until the correct BIOS file is found, then press . ASUS M4A785TD-M EVO 2-3 Press to display the following: ASUSTek EZ Flash 2 BIOS ROM Utility V3.36 FLASH TYPE: MXIC 25L8005 Current ROM BOARD: M4A785TD-M-EVO VER: 0205 (H:00 B:03) DATE: 06/15/2009 Update ROM BOARD: Unknown VER: Unknown DATE: Unknown PATH: C:\ C: Note [Enter...
... the USB port, then launch EZ Flash 2 in either of these two ways: • Press + during POST to switch between drives until the correct BIOS file is found, then press . ASUS M4A785TD-M EVO 2-3 Press to display the following: ASUSTek EZ Flash 2 BIOS ROM Utility V3.36 FLASH TYPE: MXIC 25L8005 Current ROM BOARD: M4A785TD-M-EVO VER: 0205 (H:00 B:03) DATE: 06/15/2009 Update ROM BOARD: Unknown VER: Unknown DATE: Unknown PATH: C:\ C: Note [Enter...

User Manual
Page 49
... that menu. configurable, you can change the value of the menu screen is not user-configurable. To change the value of a menu screen when there are items that do not fit on the screen. Advanced CPU Configuration Module Version: 13.55 AGESA Version: 3.5.2.0 BIOS SETUP UTILITY AMD Phenom(tm) II X4 945 Processor Revision: C2 Cache L1: 512KB Cache L2: 2048KB Cache L3: 6MB Options Speed : 3000MHz, NB Cl Disabled Able to display a list of...
... that menu. configurable, you can change the value of the menu screen is not user-configurable. To change the value of a menu screen when there are items that do not fit on the screen. Advanced CPU Configuration Module Version: 13.55 AGESA Version: 3.5.2.0 BIOS SETUP UTILITY AMD Phenom(tm) II X4 945 Processor Revision: C2 Cache L1: 512KB Cache L2: 2048KB Cache L3: 6MB Options Speed : 3000MHz, NB Cl Disabled Able to display a list of...

User Manual
Page 51
... to configure your storage devices. Configuration options: [Disabled] [Auto] PIO Mode [Auto] Selects the PIO mode. ASUS M4A785TD-M EVO 2-9 Configuration options: [SATA] [RAID] [AHCI] When this item is set the OnChip SATA Type. Processor Displays the auto-detected CPU specification. Configuration options: [Disabled] [Enabled] 2.3.4 SATA Configuration The SATA Configuration menu allows you an overview of the general system specifications. Ensure to the device occurs one sector at a time if the device supports multisector transfer feature. Configuration options: [Disabled] [Auto...
... to configure your storage devices. Configuration options: [Disabled] [Auto] PIO Mode [Auto] Selects the PIO mode. ASUS M4A785TD-M EVO 2-9 Configuration options: [SATA] [RAID] [AHCI] When this item is set the OnChip SATA Type. Processor Displays the auto-detected CPU specification. Configuration options: [Disabled] [Enabled] 2.3.4 SATA Configuration The SATA Configuration menu allows you an overview of the general system specifications. Ensure to the device occurs one sector at a time if the device supports multisector transfer feature. Configuration options: [Disabled] [Auto...

User Manual
Page 52
...you set CPU Overclocking to change the settings for the CPU and other system devices. Main Advanced Advanced Settings Power BIOS SETUP UTILITY Boot Tools Exit JumperFree Configuration CPU Configuration Chipset Onboard Devices Configuration PCIPnP USB Configuration Adjust System Frequency/Voltage etc. Take caution when changing the settings of the Advanced menu items. Incorrect field values can cause the system to achieve desired CPU internal frequency. Overclock Options [Auto] Selects the overclocking profile. Configuration options: [Auto] [Manual] [Overclock Profile] [Test Mode...
...you set CPU Overclocking to change the settings for the CPU and other system devices. Main Advanced Advanced Settings Power BIOS SETUP UTILITY Boot Tools Exit JumperFree Configuration CPU Configuration Chipset Onboard Devices Configuration PCIPnP USB Configuration Adjust System Frequency/Voltage etc. Take caution when changing the settings of the Advanced menu items. Incorrect field values can cause the system to achieve desired CPU internal frequency. Overclock Options [Auto] Selects the overclocking profile. Configuration options: [Auto] [Manual] [Overclock Profile] [Test Mode...

User Manual
Page 53
...Use the / keys to [Manual]. Configuration options: [Auto] [Normal] [+33mv] [+66mv] [+100mv] HT Link Frequency [Auto] Sets the HyperTransport link speed. Configuration options: [400MHz] [533MHz] [667MHz] [800MHz] ASUS M4A785TD-M EVO 2-11 GPU Engine Clock [500] Sets the GPU Engine Clock. Configuration options: [Auto] [Max.=1.38000V] [Min.=1.25000V] CPU Over Voltage [Auto] Sets the CPU over voltage. Configuration options: [Auto] [Manual] The following item only appears when you set PCIE Overclocking to adjust the value. Configuration options: [Min.=100] [Max.=150] Processor Frequency...
...Use the / keys to [Manual]. Configuration options: [Auto] [Normal] [+33mv] [+66mv] [+100mv] HT Link Frequency [Auto] Sets the HyperTransport link speed. Configuration options: [400MHz] [533MHz] [667MHz] [800MHz] ASUS M4A785TD-M EVO 2-11 GPU Engine Clock [500] Sets the GPU Engine Clock. Configuration options: [Auto] [Max.=1.38000V] [Min.=1.25000V] CPU Over Voltage [Auto] Sets the CPU over voltage. Configuration options: [Auto] [Manual] The following item only appears when you set PCIE Overclocking to adjust the value. Configuration options: [Min.=100] [Max.=150] Processor Frequency...

User Manual
Page 54
.... Configuration options: [Enabled] [Disabled] C1E Configuration [Disabled] Enables or disables the CPU Enhanced Halt (C1E) function, a CPU power-saving function in this item is set to [All Cores], the processor has the best overclocking performance. Configuration options: [Disabled] [Enabled] Advanced Clock Calibration [Disabled] Adjusts the processor's overclocking capability. Use the / keys to decrease power consumption. When this item is enhanced. Use the / keys to [Per Core], the processor's overclocking capability is enabled, the CPU core frequency and voltage...
.... Configuration options: [Enabled] [Disabled] C1E Configuration [Disabled] Enables or disables the CPU Enhanced Halt (C1E) function, a CPU power-saving function in this item is set to [All Cores], the processor has the best overclocking performance. Configuration options: [Disabled] [Enabled] Advanced Clock Calibration [Disabled] Adjusts the processor's overclocking capability. Use the / keys to decrease power consumption. When this item is enhanced. Use the / keys to [Per Core], the processor's overclocking capability is enabled, the CPU core frequency and voltage...

User Manual
Page 55
... memory remapping around memory hole. Configuration options: [Disabled] [Basic] [Good] [Super] [Max] [User] Internal Graphics Primary Video Controller [GFX0-GPP-IGFX-PCI] Configuration options: [GFX0-GPP-IGFX-PCI] [GPP-GFX0-IGFX-PCI] [PCI-GFX0-GPP-IGFX] [IGFX-GFX0-GPP-PCI] GFX0:primary video controller on a PCIe x16 slot GPP: primary video controller on a PCIe x1 slot IGFX: onboard VGA port PCI: primary video controller on a PCI slot Internal Graphics Mode [UMA+SidePort] Selects the internal graphics mode. 2.4.3 Chipset NorthBridge Configuration Memory Configuration Bank Interleaving [Auto...
... memory remapping around memory hole. Configuration options: [Disabled] [Basic] [Good] [Super] [Max] [User] Internal Graphics Primary Video Controller [GFX0-GPP-IGFX-PCI] Configuration options: [GFX0-GPP-IGFX-PCI] [GPP-GFX0-IGFX-PCI] [PCI-GFX0-GPP-IGFX] [IGFX-GFX0-GPP-PCI] GFX0:primary video controller on a PCIe x16 slot GPP: primary video controller on a PCIe x1 slot IGFX: onboard VGA port PCI: primary video controller on a PCI slot Internal Graphics Mode [UMA+SidePort] Selects the internal graphics mode. 2.4.3 Chipset NorthBridge Configuration Memory Configuration Bank Interleaving [Auto...

User Manual
Page 56
... AMD 785 HDMI Audio [Enabled] Enables or disables AMD 785 HD audio. Configuration options: [HDMI Output] [SPDIF Output] OnBoard LAN Controller [Enabled] Enables or disables the onboard LAN controller. Configuration options: [Normal] [EPP] [ECP] [EPP+ECP] Parallel Port IRQ [IRQ7] Allows BIOS to select the Parallel Port IRQ. Configuration options: [Auto] [Disabled] [Enabled] This item becomes user-configurable when you install an ATI graphics card into the PCIe x16 slot. Configuration options: [Enabled] [Disabled] OnBoard LAN Boot ROM [Disabled] Configuration options: [Disabled] [Enabled...
... AMD 785 HDMI Audio [Enabled] Enables or disables AMD 785 HD audio. Configuration options: [HDMI Output] [SPDIF Output] OnBoard LAN Controller [Enabled] Enables or disables the onboard LAN controller. Configuration options: [Normal] [EPP] [ECP] [EPP+ECP] Parallel Port IRQ [IRQ7] Allows BIOS to select the Parallel Port IRQ. Configuration options: [Auto] [Disabled] [Enabled] This item becomes user-configurable when you install an ATI graphics card into the PCIe x16 slot. Configuration options: [Enabled] [Disabled] OnBoard LAN Boot ROM [Disabled] Configuration options: [Disabled] [Enabled...

User Manual
Page 57
... USB Configuration The items in the system. If no USB device is enabled. Configuration options: [Disabled] [Enabled] [Auto] USB 2.0 Controller Mode [HiSpeed] Configures the USB 2.0 controller in HiSpeed (480Mbps) mode or FullSpeed (12Mbps) mode. The menu includes setting IRQ and DMA channel resources for either PCI/PnP or legacy ISA devices and setting the memory size block for Legacy USB storage devices including USB flash drives and USB hard drives. Configuration options: [Disabled] [Enabled] Legacy USB Support [Auto] Enables or disables support for legacy ISA devices. Setting...
... USB Configuration The items in the system. If no USB device is enabled. Configuration options: [Disabled] [Enabled] [Auto] USB 2.0 Controller Mode [HiSpeed] Configures the USB 2.0 controller in HiSpeed (480Mbps) mode or FullSpeed (12Mbps) mode. The menu includes setting IRQ and DMA channel resources for either PCI/PnP or legacy ISA devices and setting the memory size block for Legacy USB storage devices including USB flash drives and USB hard drives. Configuration options: [Disabled] [Enabled] Legacy USB Support [Auto] Enables or disables support for legacy ISA devices. Setting...

User Manual
Page 58
...) state to display the configuration options. The following items only appear when a USB storage device is set the emulation type. Select an item then press to be used for System Suspend. Main Advanced Power BIOS SETUP UTILITY Boot Tools Exit Power Settings Suspend Mode [Auto] ACPI 2.0 Support [Disabled] ACPI APIC support [Enabled] Select the ACPI state used for the Advanced Configuration and Power Interface (ACPI) and the Advanced Power Management (APM). Configuration options: [Auto] [Floppy] [Forced FDD] [Hard Disk] [CDROM] 2.5 Power menu The Power menu items allow...
...) state to display the configuration options. The following items only appear when a USB storage device is set the emulation type. Select an item then press to be used for System Suspend. Main Advanced Power BIOS SETUP UTILITY Boot Tools Exit Power Settings Suspend Mode [Auto] ACPI 2.0 Support [Disabled] ACPI APIC support [Enabled] Select the ACPI state used for the Advanced Configuration and Power Interface (ACPI) and the Advanced Power Management (APM). Configuration options: [Auto] [Floppy] [Forced FDD] [Hard Disk] [CDROM] 2.5 Power menu The Power menu items allow...

User Manual
Page 60
A virtual floppy disk drive (Floppy Drive B:) may appear when you to boot the system. AddOn ROM Display Mode [Force BIOS] Sets the display mode for the NumLock. Select Screen Select Item Enter Go to [Disabled], BIOS performs all the POST items. Configuration options: [Disabled] [Enabled] Full Screen Logo [Enabled] Enables or disables the full screen logo display feature. When this item is set the CD-ROM drive as the first boot device. Configuration options: [Off] [On] 2-18 Chapter 2: BIOS information Configuration options: [Force BIOS] [Keep Current] Bootup Num-Lock [On...
A virtual floppy disk drive (Floppy Drive B:) may appear when you to boot the system. AddOn ROM Display Mode [Force BIOS] Sets the display mode for the NumLock. Select Screen Select Item Enter Go to [Disabled], BIOS performs all the POST items. Configuration options: [Disabled] [Enabled] Full Screen Logo [Enabled] Enables or disables the full screen logo display feature. When this item is set the CD-ROM drive as the first boot device. Configuration options: [Off] [On] 2-18 Chapter 2: BIOS information Configuration options: [Force BIOS] [Keep Current] Bootup Num-Lock [On...


