
User Manual
Page 1
Motherboard
Motherboard

User Manual
Page 1
M4A78-E Motherboard
M4A78-E Motherboard
User Manual
Page 3
...Contents...iii Notices ...vii Safety information...viii About this guide...ix M4A78-E specifications summary xi Chapter 1: Product introduction 1.1 Welcome!...1-1 1.2 Package contents 1-1 1.3 Special features 1-2 1.3.1 Product highlights 1-2 1.3.2 ASUS unique features 1-3 1.3.3 ASUS intelligent performance and overclocking features........... 1-5 Chapter 2: Hardware information 2.1 Before you proceed 2-1 2.2 Motherboard overview 2-2 2.2.1 Motherboard layout 2-2 2.2.2 Layout contents 2-3 2.2.3 Placement direction 2-4 2.2.4 Screw holes 2-4 2.3 Central Processing Unit...
...Contents...iii Notices ...vii Safety information...viii About this guide...ix M4A78-E specifications summary xi Chapter 1: Product introduction 1.1 Welcome!...1-1 1.2 Package contents 1-1 1.3 Special features 1-2 1.3.1 Product highlights 1-2 1.3.2 ASUS unique features 1-3 1.3.3 ASUS intelligent performance and overclocking features........... 1-5 Chapter 2: Hardware information 2.1 Before you proceed 2-1 2.2 Motherboard overview 2-2 2.2.1 Motherboard layout 2-2 2.2.2 Layout contents 2-3 2.2.3 Placement direction 2-4 2.2.4 Screw holes 2-4 2.3 Central Processing Unit...

User Manual
Page 8
..., disconnect the power cable from the electrical outlet before relocating the system. • When adding or removing devices to or from the motherboard, ensure that all power cables are unplugged. • Seek professional assistance before the signal cables are connected. If possible, disconnect all... • Make sure that came with the product, contact a qualified service technician or your retailer. Operation safety • Before installing the motherboard and adding devices on a stable surface. • If you detect any area where it may become wet. • Place the product on...
..., disconnect the power cable from the electrical outlet before relocating the system. • When adding or removing devices to or from the motherboard, ensure that all power cables are unplugged. • Seek professional assistance before the signal cables are connected. If possible, disconnect all... • Make sure that came with the product, contact a qualified service technician or your retailer. Operation safety • Before installing the motherboard and adding devices on a stable surface. • If you detect any area where it may become wet. • Place the product on...
User Manual
Page 9
... information This chapter lists the hardware setup procedures that you need when installing and configuring the motherboard. ASUS websites The ASUS website provides updated information on the motherboard. • Chapter 3: BIOS setup This chapter tells how to the ASUS contact information. 2. These documents are also provided. • Chapter 4: Software support This chapter describes the contents...
... information This chapter lists the hardware setup procedures that you need when installing and configuring the motherboard. ASUS websites The ASUS website provides updated information on the motherboard. • Chapter 3: BIOS setup This chapter tells how to the ASUS contact information. 2. These documents are also provided. • Chapter 4: Software support This chapter describes the contents...
User Manual
Page 15
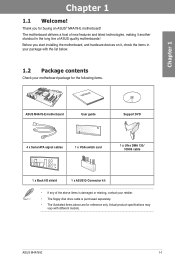
...purchased separately. • The illustrated items above are for buying an ASUS® M4A78-E motherboard! Before you for reference only. ASUS M4A78-E 1-1 Product introduction Thank you start installing the motherboard, and hardware devices on it another standout in your package with ...different models. Actual product specifications may vary with the list below. 1.2 Package contents Check your motherboard package for the following items. User Manual ASUS M4A78-E motherboard User guide Support DVD 4 x Serial ATA signal cables 1 x VGA switch card 1 x Ultra DMA...
...purchased separately. • The illustrated items above are for buying an ASUS® M4A78-E motherboard! Before you for reference only. ASUS M4A78-E 1-1 Product introduction Thank you start installing the motherboard, and hardware devices on it another standout in your package with ...different models. Actual product specifications may vary with the list below. 1.2 Package contents Check your motherboard package for the following items. User Manual ASUS M4A78-E motherboard User guide Support DVD 4 x Serial ATA signal cables 1 x VGA switch card 1 x Ultra DMA...
User Manual
Page 16
...65533;���3����C����P���U��) This motherboard supports AMD® AM3 �m�u��lt�i-�c�o�r�e��p�r�...(�s�o�c�k�e�t �A�M�2��+�/A�M��2��) This motherboard supports AMD® Socket AM2+ multi-core processors. It features dualchannel DDR2 1066 memory support and accelerates data transfer...
...65533;���3����C����P���U��) This motherboard supports AMD® AM3 �m�u��lt�i-�c�o�r�e��p�r�...(�s�o�c�k�e�t �A�M�2��+�/A�M��2��) This motherboard supports AMD® Socket AM2+ multi-core processors. It features dualchannel DDR2 1066 memory support and accelerates data transfer...
User Manual
Page 17
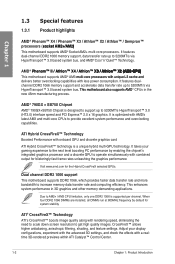
... provide balanced computing power and energy consumption. 8+1 Phase Power Design To fully unleash the next-generation AM3 CPU's potential, the ASUS M4 Series motherboards have adopted a brand new 8-phase VRM power design. ASUS M4A78-E 1-3 HDMI, DVI, and D-Sub. Chapter 1 HDMI support Enjoy Full HD 1080p Multimedia Home-Theater Entertainment High-Definition Multimedia Interface (HDMI...
... provide balanced computing power and energy consumption. 8+1 Phase Power Design To fully unleash the next-generation AM3 CPU's potential, the ASUS M4 Series motherboards have adopted a brand new 8-phase VRM power design. ASUS M4A78-E 1-3 HDMI, DVI, and D-Sub. Chapter 1 HDMI support Enjoy Full HD 1080p Multimedia Home-Theater Entertainment High-Definition Multimedia Interface (HDMI...
User Manual
Page 18
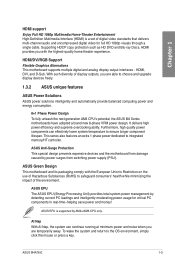
...their favorite settings. What's more stable and enhance the overclocking capability. ASUS EZ DIY ASUS EZ DIY feature collection provides you to easily connect or disconnect the chassis front panel cables to the motherboard. ASUS O.C. The actual boot time is a user-friendly BIOS update utility... your pictures without entering Windows at a time and avoiding wrong cable connections. Profile The motherboard features the ASUS O.C. You can be stored in OS. ASUS Quiet Thermal Solutions ASUS Quiet Thermal solutions make the system more , the user-friendly picture manager lets you view...
...their favorite settings. What's more stable and enhance the overclocking capability. ASUS EZ DIY ASUS EZ DIY feature collection provides you to easily connect or disconnect the chassis front panel cables to the motherboard. ASUS O.C. The actual boot time is a user-friendly BIOS update utility... your pictures without entering Windows at a time and avoiding wrong cable connections. Profile The motherboard features the ASUS O.C. You can be stored in OS. ASUS Quiet Thermal Solutions ASUS Quiet Thermal solutions make the system more , the user-friendly picture manager lets you view...

User Manual
Page 19
... the CPU default setting for each parameter. settings in TurboV provides the best O.C. feature of real-time OC-now a reality with the ASUS TurboV. When the system hangs due to turn the PC power button into a physical overclocking button. This easy OC tool allows you to... performance and overclocking features TurboV Feel the adrenaline rush of the motherboard BIOS allows automatic re-setting to the BIOS default settings in case the system hangs due to overclocking. ASUS M4A78-E 1-5 and its user-friendly interface makes overclock with just one touch! eliminates the need to open ...
... the CPU default setting for each parameter. settings in TurboV provides the best O.C. feature of real-time OC-now a reality with the ASUS TurboV. When the system hangs due to turn the PC power button into a physical overclocking button. This easy OC tool allows you to... performance and overclocking features TurboV Feel the adrenaline rush of the motherboard BIOS allows automatic re-setting to the BIOS default settings in case the system hangs due to overclocking. ASUS M4A78-E 1-5 and its user-friendly interface makes overclock with just one touch! eliminates the need to open ...

User Manual
Page 21
...motherboard settings. • Unplug the power cord from the power supply. Failure to do so may cause severe damage to avoid touching the ICs on them. • Whenever you uninstall any component, place it on a grounded antistatic pad or in any component, ensure that the ATX... electricity. • Hold components by the edges to the motherboard, peripherals, or components. Onboard LED The motherboard comes with the component. • Before you install or remove any motherboard component. Chapter 2 ASUS M4A78-E 2-1 Chapter 2: Chapter 2 2.1 Before you proceed Hardware ...
...motherboard settings. • Unplug the power cord from the power supply. Failure to do so may cause severe damage to avoid touching the ICs on them. • Whenever you uninstall any component, place it on a grounded antistatic pad or in any component, ensure that the ATX... electricity. • Hold components by the edges to the motherboard, peripherals, or components. Onboard LED The motherboard comes with the component. • Before you install or remove any motherboard component. Chapter 2 ASUS M4A78-E 2-1 Chapter 2: Chapter 2 2.1 Before you proceed Hardware ...
User Manual
Page 22
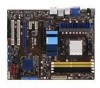
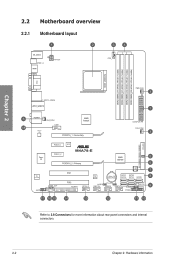
2.2 Motherboard overview 2.2.1 Motherboard layout Chapter 2 Refer to 2.8 Connectors for more information about rear panel connectors and internal connectors. 2-2 Chapter 2: Hardware information
2.2 Motherboard overview 2.2.1 Motherboard layout Chapter 2 Refer to 2.8 Connectors for more information about rear panel connectors and internal connectors. 2-2 Chapter 2: Hardware information

User Manual
Page 24
The edge with external ports goes to the chassis. Doing so can damage the motherboard. 2.2.3 Placement direction When installing the motherboard, ensure that you place it into the chassis in the image below. 2.2.4 Screw holes Place nine screws into the holes indicated by circles to secure the motherboard to the rear part of the chassis Chapter 2 2-4 Chapter 2: Hardware information Place this side towards the rear of the chassis as indicated in the correct orientation. DO NOT overtighten the screws!
The edge with external ports goes to the chassis. Doing so can damage the motherboard. 2.2.3 Placement direction When installing the motherboard, ensure that you place it into the chassis in the image below. 2.2.4 Screw holes Place nine screws into the holes indicated by circles to secure the motherboard to the rear part of the chassis Chapter 2 2-4 Chapter 2: Hardware information Place this side towards the rear of the chassis as indicated in the correct orientation. DO NOT overtighten the screws!

User Manual
Page 25
...ASUS M4A78-E 2-5 The CPU socket is also compatible with an AM2+/AM2 socket designed for Phenom™ X4 / Phenom™ X3 / Athlon™ X2 / Athlon™/ Sempron™ processors (socket AM2+/AM2). Ensure that the socket lever is lifted up to a 90º angle; Locate the CPU socket on this motherboard.... 2.3.1 Installing the CPU To install a CPU: 1. Do not install an Opteron™ processor on the motherboard. 2.3 Central Processing Unit (CPU) The motherboard comes with AMD® Phenom™ II / Athlon&#...
...ASUS M4A78-E 2-5 The CPU socket is also compatible with an AM2+/AM2 socket designed for Phenom™ X4 / Phenom™ X3 / Athlon™ X2 / Athlon™/ Sempron™ processors (socket AM2+/AM2). Ensure that the socket lever is lifted up to a 90º angle; Locate the CPU socket on this motherboard.... 2.3.1 Installing the CPU To install a CPU: 1. Do not install an Opteron™ processor on the motherboard. 2.3 Central Processing Unit (CPU) The motherboard comes with AMD® Phenom™ II / Athlon&#...
User Manual
Page 27
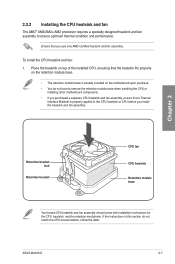
...; The retention module base is properly applied to ensure optimum thermal condition and performance. ASUS M4A78-E 2-7 If the instructions in this section do not have to remove the retention module base when installing the CPU or installing other motherboard components. • If you purchased a separate CPU heatsink and fan assembly, ensure that you...
...; The retention module base is properly applied to ensure optimum thermal condition and performance. ASUS M4A78-E 2-7 If the instructions in this section do not have to remove the retention module base when installing the CPU or installing other motherboard components. • If you purchased a separate CPU heatsink and fan assembly, ensure that you...

User Manual
Page 29
When the fan and heatsink assembly is in place, connect the CPU fan cable to the connector on the motherboard labeled CPU_FAN. • Do not forget to plug this connector. • This connector is backward compatible with old 3-pin CPU fan. Hardware monitoring errors can occur if you fail to connect the CPU fan connector! 5. Chapter 2 ASUS M4A78-E 2-9
When the fan and heatsink assembly is in place, connect the CPU fan cable to the connector on the motherboard labeled CPU_FAN. • Do not forget to plug this connector. • This connector is backward compatible with old 3-pin CPU fan. Hardware monitoring errors can occur if you fail to connect the CPU fan connector! 5. Chapter 2 ASUS M4A78-E 2-9

User Manual
Page 30
DDR2 DIMMs are notched differently to the 184-pin DDR DIMM. The figure illustrates the location of the DDR2 DIMM sockets: Chapter 2 2-10 Chapter 2: Hardware information A DDR2 module has the same physical dimensions as a DDR DIMM but has a 240-pin footprint compared to prevent installation on a DDR DIMM socket. 2.4 System memory 2.4.1 Overview The motherboard comes with four Double Data Rate 2 (DDR2) Dual Inline Memory Modules (DIMM) sockets.
DDR2 DIMMs are notched differently to the 184-pin DDR DIMM. The figure illustrates the location of the DDR2 DIMM sockets: Chapter 2 2-10 Chapter 2: Hardware information A DDR2 module has the same physical dimensions as a DDR DIMM but has a 240-pin footprint compared to prevent installation on a DDR DIMM socket. 2.4 System memory 2.4.1 Overview The motherboard comes with four Double Data Rate 2 (DDR2) Dual Inline Memory Modules (DIMM) sockets.
User Manual
Page 31
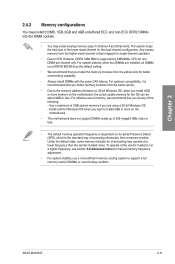
... or more efficient memory cooling system to the memory address limitation on the motherboard. • This motherboard does not support DIMMs made up of the following: - The system maps the total size of accessing information from a memory module. Chapter 2 ASUS M4A78-E 2-11 For effective use a more memory on its Serial Presence Detect (SPD), which... a 64-bit Windows OS when you do any of 256 megabit (Mb) chips or less. • The default memory operation frequency is dependent on the motherboard, the actual usable memory for the OS can be about 3GB or less.
... or more efficient memory cooling system to the memory address limitation on the motherboard. • This motherboard does not support DIMMs made up of the following: - The system maps the total size of accessing information from a memory module. Chapter 2 ASUS M4A78-E 2-11 For effective use a more memory on its Serial Presence Detect (SPD), which... a 64-bit Windows OS when you do any of 256 megabit (Mb) chips or less. • The default memory operation frequency is dependent on the motherboard, the actual usable memory for the OS can be about 3GB or less.

User Manual
Page 32
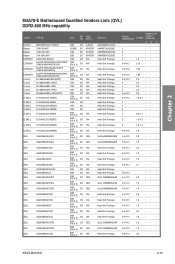
... of 2) DS N/A Heat-Sink Package 5-5-5-15 2.2-2.3 • • BoxP/N:TXDD4096M1066HC5DC-D 4GB (TXDD2048M1066HC5-D) (Kit of 2) DS N/A Heat-Sink Package 5-5-5-15 2.2-2.3 • 2-12 Chapter 2: Hardware information Chapter 2 M4A78-E Motherboard Qualified Vendors Lists (QVL) DDR2-1066 MHz capability Vendor Apacer Apacer CORSAIR Crucial Crucial G.SKILL G.SKILL G.SKILL GEIL GEIL GEIL GEIL GEIL GEIL GEIL Hynix...
... of 2) DS N/A Heat-Sink Package 5-5-5-15 2.2-2.3 • • BoxP/N:TXDD4096M1066HC5DC-D 4GB (TXDD2048M1066HC5-D) (Kit of 2) DS N/A Heat-Sink Package 5-5-5-15 2.2-2.3 • 2-12 Chapter 2: Hardware information Chapter 2 M4A78-E Motherboard Qualified Vendors Lists (QVL) DDR2-1066 MHz capability Vendor Apacer Apacer CORSAIR Crucial Crucial G.SKILL G.SKILL G.SKILL GEIL GEIL GEIL GEIL GEIL GEIL GEIL Hynix...
User Manual
Page 33
...; 5-5-5-15 1.8 •• 5-5-5-15 1.8 ••• 4-4-4-12 2.0 •• 5-5-5-15 1.8 • • 4-4-4-12 2.0 ••• 5-5-5-15 1.8 ••• 4-4-4-12 2.0 ••• ASUS M4A78-E 2-13 Chapter 2 M4A78-E Motherboard Qualified Vendors Lists (QVL) DDR2-800 MHz capability Vendor Part No. Size SS/ Chip DS Brand Chip NO.
...; 5-5-5-15 1.8 •• 5-5-5-15 1.8 ••• 4-4-4-12 2.0 •• 5-5-5-15 1.8 • • 4-4-4-12 2.0 ••• 5-5-5-15 1.8 ••• 4-4-4-12 2.0 ••• ASUS M4A78-E 2-13 Chapter 2 M4A78-E Motherboard Qualified Vendors Lists (QVL) DDR2-800 MHz capability Vendor Part No. Size SS/ Chip DS Brand Chip NO.


