User Manual
Page 6
...4-13 4.4.1 RAID definitions 4-13 4.4.2 Installing Serial ATA hard disks 4-14 4.4.3 Setting the RAID item in BIOS 4-14 4.4.4 AMD® Option ROM Utility 4-15 4.5 Creating a RAID driver disk 4-18 4.5.1 Creating a RAID driver disk without entering the OS 4-18 4.5.2 Creating a RAID/SATA driver disk in Windows 4-18 Chapter 5: ATI® CrossFireX™ technology support 5.1 ATI® CrossFireX™ technology 5-1 5.1.1 Requirements 5-1 5.1.2 Before you begin 5-1 5.1.3 Installing CrossFireX™ graphics cards 5-2 5.1.4 Installing the device drivers 5-3 5.1.5 Enabling the...
...4-13 4.4.1 RAID definitions 4-13 4.4.2 Installing Serial ATA hard disks 4-14 4.4.3 Setting the RAID item in BIOS 4-14 4.4.4 AMD® Option ROM Utility 4-15 4.5 Creating a RAID driver disk 4-18 4.5.1 Creating a RAID driver disk without entering the OS 4-18 4.5.2 Creating a RAID/SATA driver disk in Windows 4-18 Chapter 5: ATI® CrossFireX™ technology support 5.1 ATI® CrossFireX™ technology 5-1 5.1.1 Requirements 5-1 5.1.2 Before you begin 5-1 5.1.3 Installing CrossFireX™ graphics cards 5-2 5.1.4 Installing the device drivers 5-3 5.1.5 Enabling the...
User Manual
Page 18
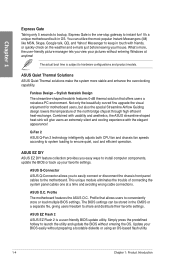
... with friends, or quickly check on the weather and e-mails just before leaving your favorite settings. ASUS Q-Connector ASUS Q-Connector allows you easy ways to hardware configurations and product models. Update your pictures without entering the OS. Q-Fan 2 ASUS Q-Fan 2 technology intelligently adjusts both CPU fan and chassis fan speeds according to system loading to share and distribute their favorite settings. Profile The motherboard features the ASUS O.C. The actual boot time is a user-friendly BIOS update utility.
... with friends, or quickly check on the weather and e-mails just before leaving your favorite settings. ASUS Q-Connector ASUS Q-Connector allows you easy ways to hardware configurations and product models. Update your pictures without entering the OS. Q-Fan 2 ASUS Q-Fan 2 technology intelligently adjusts both CPU fan and chassis fan speeds according to system loading to share and distribute their favorite settings. Profile The motherboard features the ASUS O.C. The actual boot time is a user-friendly BIOS update utility.
User Manual
Page 37
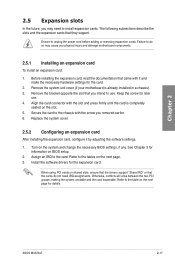
... the card connector with the screw you may cause you intend to install expansion cards. See Chapter 3 for the expansion card. When using PCI cards on the system and change the necessary BIOS settings, if any. Turn on shared slots, ensure that the drivers support "Share IRQ" or that they support. Install the software drivers for information on the slot. 5. Remove the system unit cover (if your motherboard is completely seated on BIOS setup. 2.
... the card connector with the screw you may cause you intend to install expansion cards. See Chapter 3 for the expansion card. When using PCI cards on the system and change the necessary BIOS settings, if any. Turn on shared slots, ensure that the drivers support "Share IRQ" or that they support. Install the software drivers for information on the slot. 5. Remove the system unit cover (if your motherboard is completely seated on BIOS setup. 2.

User Manual
Page 39
... you install two graphics cards, we recommend that you plug the rear chassis fan cable to the figure below for the location of the slots. 2.5.6 Two PCI Express x16 slots This motherboard supports two ATI CrossFireX™ PCI Express x16 graphics cards that comply with the PCI Express specifications. See page 2-32 for better thermal environment. Refer to the motherboard connector labeled CHA_FAN1 for the connector location. x16 link) PCI Express x1_2 slot PCI Express x1_1 slot PCI Express x16_1 slot (black, at max. ASUS M4A78-E 2-19...
... you install two graphics cards, we recommend that you plug the rear chassis fan cable to the figure below for the location of the slots. 2.5.6 Two PCI Express x16 slots This motherboard supports two ATI CrossFireX™ PCI Express x16 graphics cards that comply with the PCI Express specifications. See page 2-32 for better thermal environment. Refer to the motherboard connector labeled CHA_FAN1 for the connector location. x16 link) PCI Express x1_2 slot PCI Express x1_1 slot PCI Express x16_1 slot (black, at max. ASUS M4A78-E 2-19...

User Manual
Page 42
... functions well under high voltage settings. 2-22 Chapter 2: Hardware information CPU overvoltage setting (3-pin OV_CPU) This jumper allows you to pins 1-2 when you install a new CPU and have not booted for more information about the CPU overvoltage setting. • DO NOT set the OV_CPU jumper to enable or disable the advanced CPU overvoltage setting in 3.5 Ai Tweaker menu first to work stably under the highest BIOS voltage setting before you change the jumper setting. Read the following...
... functions well under high voltage settings. 2-22 Chapter 2: Hardware information CPU overvoltage setting (3-pin OV_CPU) This jumper allows you to pins 1-2 when you install a new CPU and have not booted for more information about the CPU overvoltage setting. • DO NOT set the OV_CPU jumper to enable or disable the advanced CPU overvoltage setting in 3.5 Ai Tweaker menu first to work stably under the highest BIOS voltage setting before you change the jumper setting. Read the following...

User Manual
Page 59
... of BIOS, DO NOT manually update the BIOS. However, BIOS updating is no problem using a bootable floppy disk or the motherboard support DVD when the BIOS file fails or gets corrupted. Inappropriate BIOS updating may result to instability or failure to run the BIOS Setup. • You have installed a new system component that you change the default BIOS settings except in Windows® environment. 2. Chapter 3 ASUS M4A78-E 3-1 The following circumstances: • An error message appears on system stability, compatibility, or...
... of BIOS, DO NOT manually update the BIOS. However, BIOS updating is no problem using a bootable floppy disk or the motherboard support DVD when the BIOS file fails or gets corrupted. Inappropriate BIOS updating may result to instability or failure to run the BIOS Setup. • You have installed a new system component that you change the default BIOS settings except in Windows® environment. 2. Chapter 3 ASUS M4A78-E 3-1 The following circumstances: • An error message appears on system stability, compatibility, or...
User Manual
Page 60
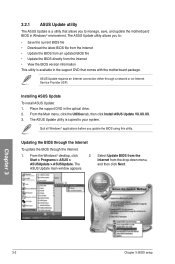
.... 3.2.1 ASUS Update utility The ASUS Update is a utility that comes with the motherboard package. ASUS Update requires an Internet connection either through the Internet: 1. The ASUS Update utility is copied to manage, save, and update the motherboard BIOS in the optical drive. 2. Installing ASUS Update To install ASUS Update: 1. Chapter 3 3-2 Chapter 3: BIOS setup From the Windows® desktop, click 2. Place the support DVD in Windows® environment. The ASUS Update utility allows you update the BIOS using this utility. Start > Programs > ASUS > ASUSUpdate...
.... 3.2.1 ASUS Update utility The ASUS Update is a utility that comes with the motherboard package. ASUS Update requires an Internet connection either through the Internet: 1. The ASUS Update utility is copied to manage, save, and update the motherboard BIOS in the optical drive. 2. Installing ASUS Update To install ASUS Update: 1. Chapter 3 3-2 Chapter 3: BIOS setup From the Windows® desktop, click 2. Place the support DVD in Windows® environment. The ASUS Update utility allows you update the BIOS using this utility. Start > Programs > ASUS > ASUSUpdate...

User Manual
Page 67
...presence of device connected to select a field. Main BIOS SETUP UTILITY SATA 1 Device : Hard Disk Vendor : HDT722516DLA380 Size 164.7GB LBA Mode : Supported Block Mode : 16Sectors PIO Mode : 4 Async DMA : MultiWord DMA-2 Ultra DMA : Ultra DMA-6 SMART Monitoring:Supported LBA/Large Mode [Auto] Block(Multi-sector Transfer)M [Auto] PIO Mode [Auto] DMA Mode [Auto] SMART Monitoring [Auto] 32Bit Data Transfer [Enabled] Select the type of IDE/SATA devices. BIOS SETUP UTILITY Main Ai Tweaker Advanced Power Boot Tools Exit...
...presence of device connected to select a field. Main BIOS SETUP UTILITY SATA 1 Device : Hard Disk Vendor : HDT722516DLA380 Size 164.7GB LBA Mode : Supported Block Mode : 16Sectors PIO Mode : 4 Async DMA : MultiWord DMA-2 Ultra DMA : Ultra DMA-6 SMART Monitoring:Supported LBA/Large Mode [Auto] Block(Multi-sector Transfer)M [Auto] PIO Mode [Auto] DMA Mode [Auto] SMART Monitoring [Auto] 32Bit Data Transfer [Enabled] Select the type of IDE/SATA devices. BIOS SETUP UTILITY Main Ai Tweaker Advanced Power Boot Tools Exit...
User Manual
Page 69
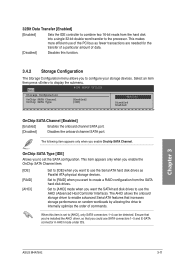
OnChip SATA Type [IDE] Allows you want to create a RAID configuration from the hard disk into a single 32-bit double word transfer to configure your storage devices. The AHCI allows the onboard storage driver to enable advanced Serial ATA features that you enable Onchip SATA Channel. Set to [RAID] when you to use SATA connectors 1-5 and E-SATA connector in AHCI mode under OS. Set to [AHCI] mode when you want the SATA hard disk drives to set to internally optimize the order of commands. Chapter 3 ASUS M4A78-E 3-11 This item appears...
OnChip SATA Type [IDE] Allows you want to create a RAID configuration from the hard disk into a single 32-bit double word transfer to configure your storage devices. The AHCI allows the onboard storage driver to enable advanced Serial ATA features that you enable Onchip SATA Channel. Set to [RAID] when you to use SATA connectors 1-5 and E-SATA connector in AHCI mode under OS. Set to [AHCI] mode when you want the SATA hard disk drives to set to internally optimize the order of commands. Chapter 3 ASUS M4A78-E 3-11 This item appears...

User Manual
Page 70
...3-12 Chapter 3: BIOS setup BIOS SETUP UTILITY Main Ai Tweaker Advanced Power Boot Tools Exit Configure System Frequency/Voltage AI Overclocking Tuner [Auto] DRAM Frequency Control [Auto] HT Link Speed [Auto] ******* Please key in this chapter vary depending on the CPU and DIMM model you installed on the motherboard. Loads the optimal settings for this menu. Select any of these preset overclocking configuration options: Manual Auto Allows you to select the CPU overclocking options to achieve the desired CPU internal frequency. Change Option F1 General Help...
...3-12 Chapter 3: BIOS setup BIOS SETUP UTILITY Main Ai Tweaker Advanced Power Boot Tools Exit Configure System Frequency/Voltage AI Overclocking Tuner [Auto] DRAM Frequency Control [Auto] HT Link Speed [Auto] ******* Please key in this chapter vary depending on the CPU and DIMM model you installed on the motherboard. Loads the optimal settings for this menu. Select any of these preset overclocking configuration options: Manual Auto Allows you to select the CPU overclocking options to achieve the desired CPU internal frequency. Change Option F1 General Help...

User Manual
Page 72
Configuration options: [Disabled] [Enabled] Power Down Mode [Channel] Allows you to set the AI Overclocking Tuner item to [Manual]. 3.5.8 Memory Configuration Ai Tweaker BIOS SETUP UTILITY Memory Configuration Bank Interleaving Channel Interleaving MemClk Tristate C3/ATLVID Memory Hole Remapping DCT Unganged Mode Power Down Enable [Auto] [XOR of Address bit] [Disabled] [Enabled] [Auto] [Disabled] Enable Bank Memory Interleavng Bank Interleaving [Auto] Configuration options: [Disabled] [Auto] Channel Interleaving [XOR of Address bit] Configuration options: [...
Configuration options: [Disabled] [Enabled] Power Down Mode [Channel] Allows you to set the AI Overclocking Tuner item to [Manual]. 3.5.8 Memory Configuration Ai Tweaker BIOS SETUP UTILITY Memory Configuration Bank Interleaving Channel Interleaving MemClk Tristate C3/ATLVID Memory Hole Remapping DCT Unganged Mode Power Down Enable [Auto] [XOR of Address bit] [Disabled] [Enabled] [Auto] [Disabled] Enable Bank Memory Interleavng Bank Interleaving [Auto] Configuration options: [Disabled] [Auto] Channel Interleaving [XOR of Address bit] Configuration options: [...
User Manual
Page 76
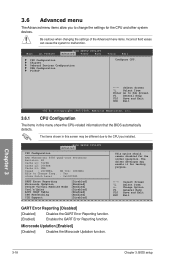
...[Enabled] [Enabled] [Disabled] This option should remain disabled for the normal operation. The driver developer may be different due to change the settings for testing purpose. ←→ Select Screen ↑↓ Select Item +- 3.6 Advanced menu The Advanced menu items allow you to the CPU you installed. BIOS SETUP UTILITY Main Ai Tweaker Advanced Power Boot Tools Exit CPU Configuration Chipset Onboard Devices Configuration USB Configuration PCIPnP Configure CPU. ←→ Select Screen ↑↓ Select Item Enter Go to Sub Screen...
...[Enabled] [Enabled] [Disabled] This option should remain disabled for the normal operation. The driver developer may be different due to change the settings for testing purpose. ←→ Select Screen ↑↓ Select Item +- 3.6 Advanced menu The Advanced menu items allow you to the CPU you installed. BIOS SETUP UTILITY Main Ai Tweaker Advanced Power Boot Tools Exit CPU Configuration Chipset Onboard Devices Configuration USB Configuration PCIPnP Configure CPU. ←→ Select Screen ↑↓ Select Item Enter Go to Sub Screen...

User Manual
Page 78
...[User] Disables the DRAM ECC mode. Set to [User] to adjust ECC mode automatically. Set to [Good] to adjust the DRAM BG Scrub sub-item manually. Set to [Super] to adjust ECC mode automatically. RS780D Configuration BIOS SETUP UTILITY Advanced NorthBridge2 Chipset Configuration Internal Graphics Configuration PCI Express Configuration Primary Video Controller [PCI-E] Internal Graphics Conf Internal Graphics Configuration BIOS SETUP UTILITY Advanced Internal Graphics Configuration Internal Graphics Mode UMA Frame Buffer Size SidePort Clock Speed SidePort Voltage...
...[User] Disables the DRAM ECC mode. Set to [User] to adjust ECC mode automatically. Set to [Good] to adjust the DRAM BG Scrub sub-item manually. Set to [Super] to adjust ECC mode automatically. RS780D Configuration BIOS SETUP UTILITY Advanced NorthBridge2 Chipset Configuration Internal Graphics Configuration PCI Express Configuration Primary Video Controller [PCI-E] Internal Graphics Conf Internal Graphics Configuration BIOS SETUP UTILITY Advanced Internal Graphics Configuration Internal Graphics Mode UMA Frame Buffer Size SidePort Clock Speed SidePort Voltage...
User Manual
Page 82
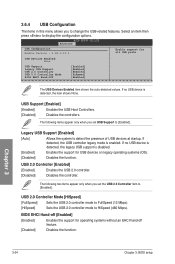
... legacy mode is detected, the item shows None. If no USB device is enabled. The following items appear only when you set the USB 2.0 Controller item to [Enabled]. BIOS EHCI Hand-off [Enabled] [Enabled] Enables the support for all USB ports USB Devices Enabled None USB Support Legacy USB Support USB 2.0 Controller USB 2.0 Controller Mode BIOS EHCI Hand-Off [Enabled] [Enabled] [Enabled] [HiSpeed] [Enabled] The USB Devices Enabled item shows the auto-detected values. 3.6.4 USB Configuration The items in this menu allows you to display the configuration options...
... legacy mode is detected, the item shows None. If no USB device is enabled. The following items appear only when you set the USB 2.0 Controller item to [Enabled]. BIOS EHCI Hand-off [Enabled] [Enabled] Enables the support for all USB ports USB Devices Enabled None USB Support Legacy USB Support USB 2.0 Controller USB 2.0 Controller Mode BIOS EHCI Hand-Off [Enabled] [Enabled] [Enabled] [HiSpeed] [Enabled] The USB Devices Enabled item shows the auto-detected values. 3.6.4 USB Configuration The items in this menu allows you to display the configuration options...
User Manual
Page 89
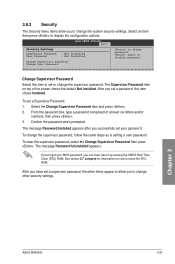
... Clock (RTC) RAM. If you forget your BIOS password, you successfully set your password. From the password box, type a password composed of the screen shows the default Not Installed. To change password. After you have set a supervisor password, the other security settings. Confirm the password when prompted. See section 2.7 Jumpers for information on top of at least six letters and/or numbers, then press . 3. BIOS SETUP UTILITY Boot Security Settings Supervisor Password : Not Installed User Password : Not Installed Change Supervisor Password Change User...
... Clock (RTC) RAM. If you forget your BIOS password, you successfully set your password. From the password box, type a password composed of the screen shows the default Not Installed. To change password. After you have set a supervisor password, the other security settings. Confirm the password when prompted. See section 2.7 Jumpers for information on top of at least six letters and/or numbers, then press . 3. BIOS SETUP UTILITY Boot Security Settings Supervisor Password : Not Installed User Password : Not Installed Change Supervisor Password Change User...
User Manual
Page 97
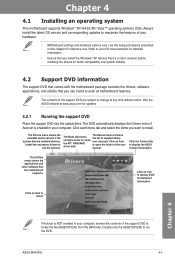
... compatibility and system stability. 4.2 Support DVD information The support DVD that comes with the motherboard package contains the drivers, software applications, and utilities that the motherboard supports. The Manual menu contains the list of the support DVD are subject to your hardware. • Motherboard settings and hardware options vary. Double-click the ASSETUP.EXE to display the ASUS contact information. The Drivers menu shows the available device drivers if the system detects installed devices. ASUS M4A78-E 4-1 The DVD automatically displays the Drivers menu...
... compatibility and system stability. 4.2 Support DVD information The support DVD that comes with the motherboard package contains the drivers, software applications, and utilities that the motherboard supports. The Manual menu contains the list of the support DVD are subject to your hardware. • Motherboard settings and hardware options vary. Double-click the ASSETUP.EXE to display the ASUS contact information. The Drivers menu shows the available device drivers if the system detects installed devices. ASUS M4A78-E 4-1 The DVD automatically displays the Drivers menu...
User Manual
Page 102
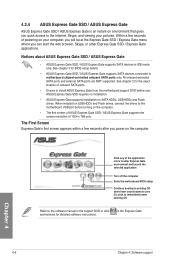
.... When installed on USB HDDs and Flash drives, connect the drives to motherboard chipset-controlled onboard SATA ports only. All onboard extended SATA ports and external SATA ports are NOT supported. See chapter 2 for BIOS setup details. • ASUS Express Gate SSD / ASUS Express Gate supports SATA devices connected to the motherboard USB port before use. 4.3.4 ASUS Express Gate SSD / ASUS Express Gate ASUS Express Gate SSD / ASUS Express Gate is an instant-on your pictures. See chapter 3 for the exact location of 1024 x 768 only. Click any of powering on environment...
.... When installed on USB HDDs and Flash drives, connect the drives to motherboard chipset-controlled onboard SATA ports only. All onboard extended SATA ports and external SATA ports are NOT supported. See chapter 2 for BIOS setup details. • ASUS Express Gate SSD / ASUS Express Gate supports SATA devices connected to the motherboard USB port before use. 4.3.4 ASUS Express Gate SSD / ASUS Express Gate ASUS Express Gate SSD / ASUS Express Gate is an instant-on your pictures. See chapter 3 for the exact location of 1024 x 768 only. Click any of powering on environment...
User Manual
Page 114
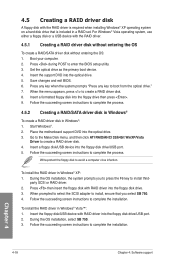
... RAID driver disk A floppy disk with RAID driver into the floppy disk drive/USB port. 2. Press during POST to complete the installation. Insert the floppy disk/USB device with the RAID driver is required when installing Windows® XP operating system on a hard disk drive that you to press the F6 key to create a RAID driver disk. 8. Chapter 4 4-18 Chapter 4: Software support Place the motherboard support DVD into the floppy disk drive/USB port. 5. During the OS installation, select SB 750. 3. Follow the succeeding screen instructions to enter the BIOS setup utility...
... RAID driver disk A floppy disk with RAID driver into the floppy disk drive/USB port. 2. Press during POST to complete the installation. Insert the floppy disk/USB device with the RAID driver is required when installing Windows® XP operating system on a hard disk drive that you to press the F6 key to create a RAID driver disk. 8. Chapter 4 4-18 Chapter 4: Software support Place the motherboard support DVD into the floppy disk drive/USB port. 5. During the OS installation, select SB 750. 3. Follow the succeeding screen instructions to enter the BIOS setup utility...
User Manual
Page 119
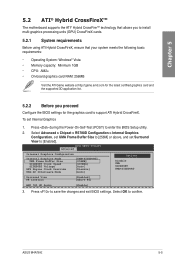
...save the changes and exit BIOS settings. Press to enter the BIOS Setup utility. 2. BIOS SETUP UTILITY Advanced Internal Graphics Configuration Internal Graphics Mode UMA Frame Buffer Size SIDEPORT Clock Speed SIDEPORT Voltage GFX Engine Clock Override UMA-SP Interleave Mode [UMA+SIDEPORT] [256MB] [667MHz] [Auto] [Disable] [Auto] Options Disable UMA SIDEPORT UMA+SIDEPORT Surround View FB Location [Enabled] [Above 4G] AMD 780 HD Audio [Enable] 3. ASUS M4A78-E 5-5 Select Advanced > Chipset > RS780D Configuration > Internal Graphics Configuration, set UMA...
...save the changes and exit BIOS settings. Press to enter the BIOS Setup utility. 2. BIOS SETUP UTILITY Advanced Internal Graphics Configuration Internal Graphics Mode UMA Frame Buffer Size SIDEPORT Clock Speed SIDEPORT Voltage GFX Engine Clock Override UMA-SP Interleave Mode [UMA+SIDEPORT] [256MB] [667MHz] [Auto] [Disable] [Auto] Options Disable UMA SIDEPORT UMA+SIDEPORT Surround View FB Location [Enabled] [Above 4G] AMD 780 HD Audio [Enable] 3. ASUS M4A78-E 5-5 Select Advanced > Chipset > RS780D Configuration > Internal Graphics Configuration, set UMA...
User Manual
Page 120
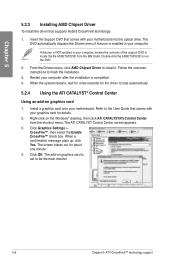
... CATALYST(R) Control Center from the BIN folder. Chapter 5 5.2.3 Installing AMD Chipset Driver To install the driver that comes with your graphics card for details. 2. Double-click the ASSETUP.EXE to install it. The DVD automatically displays the Drivers menu if Autorun is set to finish the installation. 3. The screen blacks out for about one minute. 4. Follow the onscreen instructions to be the main monitor. 5-6 Chapter 5: ATI® CrossFireX™ technology support When...
... CATALYST(R) Control Center from the BIN folder. Chapter 5 5.2.3 Installing AMD Chipset Driver To install the driver that comes with your graphics card for details. 2. Double-click the ASSETUP.EXE to install it. The DVD automatically displays the Drivers menu if Autorun is set to finish the installation. 3. The screen blacks out for about one minute. 4. Follow the onscreen instructions to be the main monitor. 5-6 Chapter 5: ATI® CrossFireX™ technology support When...


