
User Manual
Page 1
Motherboard
Motherboard

User Manual
Page 1
M4A78-E Motherboard
M4A78-E Motherboard
User Manual
Page 3
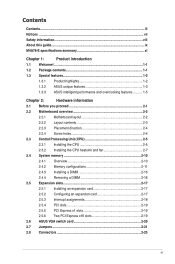
...Contents...iii Notices ...vii Safety information...viii About this guide...ix M4A78-E specifications summary xi Chapter 1: Product introduction 1.1 Welcome!...1-1 1.2 Package contents 1-1 1.3 Special features 1-2 1.3.1 Product highlights 1-2 1.3.2 ASUS unique features 1-3 1.3.3 ASUS intelligent performance and overclocking features........... 1-5 Chapter 2: Hardware information 2.1 Before you proceed 2-1 2.2 Motherboard overview 2-2 2.2.1 Motherboard layout 2-2 2.2.2 Layout contents 2-3 2.2.3 Placement direction 2-4 2.2.4 Screw holes 2-4 2.3 Central Processing Unit...
...Contents...iii Notices ...vii Safety information...viii About this guide...ix M4A78-E specifications summary xi Chapter 1: Product introduction 1.1 Welcome!...1-1 1.2 Package contents 1-1 1.3 Special features 1-2 1.3.1 Product highlights 1-2 1.3.2 ASUS unique features 1-3 1.3.3 ASUS intelligent performance and overclocking features........... 1-5 Chapter 2: Hardware information 2.1 Before you proceed 2-1 2.2 Motherboard overview 2-2 2.2.1 Motherboard layout 2-2 2.2.2 Layout contents 2-3 2.2.3 Placement direction 2-4 2.2.4 Screw holes 2-4 2.3 Central Processing Unit...

User Manual
Page 8
...all cables are correctly connected and the power cables are using an adapter or extension cord. Operation safety • Before installing the motherboard and adding devices on it, carefully read all the manuals that came with the product, contact a qualified service technician or your...in any damage, contact your dealer immediately. • To avoid short circuits, keep paper clips, screws, and staples away from the motherboard, ensure that all power cables from the existing system before using , contact your retailer. Safety information Electrical safety • To prevent ...
...all cables are correctly connected and the power cables are using an adapter or extension cord. Operation safety • Before installing the motherboard and adding devices on it, carefully read all the manuals that came with the product, contact a qualified service technician or your...in any damage, contact your dealer immediately. • To avoid short circuits, keep paper clips, screws, and staples away from the motherboard, ensure that all power cables from the existing system before using , contact your retailer. Safety information Electrical safety • To prevent ...
User Manual
Page 9
... it supports. • Chapter 2: Hardware information This chapter lists the hardware setup procedures that you need when installing and configuring the motherboard. ASUS websites The ASUS website provides updated information on the motherboard. • Chapter 3: BIOS setup This chapter tells how to the following parts: • Chapter 1: Product introduction This chapter describes the features...
... it supports. • Chapter 2: Hardware information This chapter lists the hardware setup procedures that you need when installing and configuring the motherboard. ASUS websites The ASUS website provides updated information on the motherboard. • Chapter 3: BIOS setup This chapter tells how to the following parts: • Chapter 1: Product introduction This chapter describes the features...
User Manual
Page 15
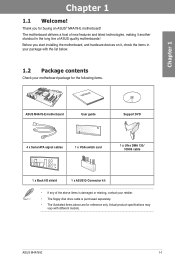
... long line of the above items is damaged or missing, contact your package with different models. Before you for buying an ASUS® M4A78-E motherboard! ASUS M4A78-E 1-1 Actual product specifications may vary with the list below. 1.2 Package contents Check your motherboard package for reference only. Chapter 1 Chapter 1: Chapter 1 1.1 Welcome! Product introduction Thank you start installing the...
... long line of the above items is damaged or missing, contact your package with different models. Before you for buying an ASUS® M4A78-E motherboard! ASUS M4A78-E 1-1 Actual product specifications may vary with the list below. 1.2 Package contents Check your motherboard package for reference only. Chapter 1 Chapter 1: Chapter 1 1.1 Welcome! Product introduction Thank you start installing the...
User Manual
Page 16
...65533;���3����C����P���U��) This motherboard supports AMD® AM3 �m�u��lt�i-�c�o�r�e��p�...processors (�s�o�c�k�e�t �A�M�2��+�/A�M��2��) This motherboard supports AMD® Socket AM2+ multi-core processors. ATI® CrossFireX™ Technology ATI's CrossFireX™ boosts image...
...65533;���3����C����P���U��) This motherboard supports AMD® AM3 �m�u��lt�i-�c�o�r�e��p�...processors (�s�o�c�k�e�t �A�M�2��+�/A�M��2��) This motherboard supports AMD® Socket AM2+ multi-core processors. ATI® CrossFireX™ Technology ATI's CrossFireX™ boosts image...
User Manual
Page 17
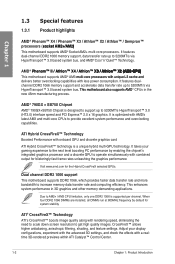
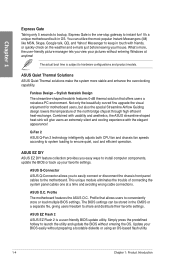
... design. HDMI, DVI, and D-Sub. ASUS Green Design This motherboard and its packaging comply with the highest-quality home theater experience. ASUS M4A78-E 1-3 It delivers high power efficiency and supreme overclocking ability. ASUS EPU The ASUS EPU (Energy Processing Unit) provides total system...away. HDMI/DVI/RGB Support Flexible Graphics Alternatives This motherboard supports multiple digital and analog display output interfaces - ASUS Anti-Surge Protection This special design prevents expensive devices and the motherboard from damage caused by power surges from switching power ...
... design. HDMI, DVI, and D-Sub. ASUS Green Design This motherboard and its packaging comply with the highest-quality home theater experience. ASUS M4A78-E 1-3 It delivers high power efficiency and supreme overclocking ability. ASUS EPU The ASUS EPU (Energy Processing Unit) provides total system...away. HDMI/DVI/RGB Support Flexible Graphics Alternatives This motherboard supports multiple digital and analog display output interfaces - ASUS Anti-Surge Protection This special design prevents expensive devices and the motherboard from damage caused by power surges from switching power ...
User Manual
Page 18
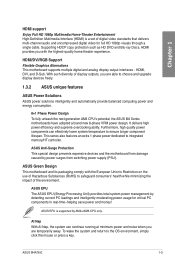
... BIOS without preparing a bootable diskette or using an OS-based flash utility. 1-4 Chapter 1: Product Introduction Profile The motherboard features the ASUS O.C. This unique module eliminates the trouble of the north bridge chipset through high efficient heat-exchange. The BIOS settings ... Gate Taking only 5 seconds to bootup, Express Gate is the one at anytime! ASUS O.C. Fanless Design-Stylish Heatsink Design The streamline-shaped heatsink features 0-dB thermal solution that allows users to the motherboard. Messenger to ensure quiet, cool and efficient operation. It's a unique...
... BIOS without preparing a bootable diskette or using an OS-based flash utility. 1-4 Chapter 1: Product Introduction Profile The motherboard features the ASUS O.C. This unique module eliminates the trouble of the north bridge chipset through high efficient heat-exchange. The BIOS settings ... Gate Taking only 5 seconds to bootup, Express Gate is the one at anytime! ASUS O.C. Fanless Design-Stylish Heatsink Design The streamline-shaped heatsink features 0-dB thermal solution that allows users to the motherboard. Messenger to ensure quiet, cool and efficient operation. It's a unique...

User Manual
Page 19
... interrupting ongoing work or games-with just one touch! Moreover, the ASUS OC profiles in different scenarios. Chapter 1 1.3.3 ASUS intelligent performance and overclocking features TurboV Feel the adrenaline rush of the motherboard BIOS allows automatic re-setting to the BIOS default settings in case... or rebooting the OS; feature of real-time OC-now a reality with just a few clicks away. ASUS M4A78-E 1-5 eliminates the need to overclocking, C.P.R. Turbo Key ASUS Turbo Key allows the user to turn the PC power button into a physical overclocking button. Simply shut down...
... interrupting ongoing work or games-with just one touch! Moreover, the ASUS OC profiles in different scenarios. Chapter 1 1.3.3 ASUS intelligent performance and overclocking features TurboV Feel the adrenaline rush of the motherboard BIOS allows automatic re-setting to the BIOS default settings in case... or rebooting the OS; feature of real-time OC-now a reality with just a few clicks away. ASUS M4A78-E 1-5 eliminates the need to overclocking, C.P.R. Turbo Key ASUS Turbo Key allows the user to turn the PC power button into a physical overclocking button. Simply shut down...

User Manual
Page 21
Failure to do so may cause severe damage to indicate that the system is a reminder that the ATX power supply is switched off mode. This is ON, in sleep mode, or in soft-off or the power cord is detached from the ... you install or remove any component, ensure that you should shut down the system and unplug the power cable before you install motherboard components or change any motherboard component. Chapter 2 ASUS M4A78-E 2-1 Chapter 2: Chapter 2 2.1 Before you proceed Hardware information Take note of the onboard LED. The illustration below shows the location of the ...
Failure to do so may cause severe damage to indicate that the system is a reminder that the ATX power supply is switched off mode. This is ON, in sleep mode, or in soft-off or the power cord is detached from the ... you install or remove any component, ensure that you should shut down the system and unplug the power cable before you install motherboard components or change any motherboard component. Chapter 2 ASUS M4A78-E 2-1 Chapter 2: Chapter 2 2.1 Before you proceed Hardware information Take note of the onboard LED. The illustration below shows the location of the ...
User Manual
Page 22
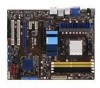
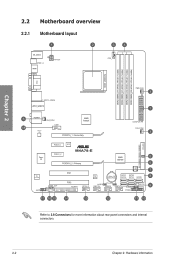
2.2 Motherboard overview 2.2.1 Motherboard layout Chapter 2 Refer to 2.8 Connectors for more information about rear panel connectors and internal connectors. 2-2 Chapter 2: Hardware information
2.2 Motherboard overview 2.2.1 Motherboard layout Chapter 2 Refer to 2.8 Connectors for more information about rear panel connectors and internal connectors. 2-2 Chapter 2: Hardware information

User Manual
Page 24
Doing so can damage the motherboard. The edge with external ports goes to the rear part of the chassis Chapter 2 2-4 Chapter 2: Hardware information DO NOT overtighten the screws! 2.2.3 Placement direction When installing the motherboard, ensure that you place it into the chassis in the image below. 2.2.4 Screw holes Place nine screws into the holes indicated by circles to secure the motherboard to the chassis. Place this side towards the rear of the chassis as indicated in the correct orientation.
Doing so can damage the motherboard. The edge with external ports goes to the rear part of the chassis Chapter 2 2-4 Chapter 2: Hardware information DO NOT overtighten the screws! 2.2.3 Placement direction When installing the motherboard, ensure that you place it into the chassis in the image below. 2.2.4 Screw holes Place nine screws into the holes indicated by circles to secure the motherboard to the chassis. Place this side towards the rear of the chassis as indicated in the correct orientation.

User Manual
Page 25
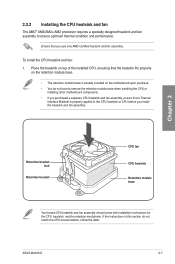
otherwise, the CPU will not fit in completely. Do not install an Opteron™ processor on the motherboard. Locate the CPU socket on this motherboard. 2.3.1 Installing the CPU To install a CPU: 1. Unlock the socket by pressing the lever sideways, then lift it up to a 90&#...90º angle; 2.3 Central Processing Unit (CPU) The motherboard comes with an AM2+/AM2 socket designed for Phenom™ X4 / Phenom™ X3 / Athlon™ X2 / Athlon™/ Sempron™ processors (socket AM2+/AM2). Socket lever ASUS M4A78-E 2-5 Ensure that the socket lever is not compatible with ...
otherwise, the CPU will not fit in completely. Do not install an Opteron™ processor on the motherboard. Locate the CPU socket on this motherboard. 2.3.1 Installing the CPU To install a CPU: 1. Unlock the socket by pressing the lever sideways, then lift it up to a 90&#...90º angle; 2.3 Central Processing Unit (CPU) The motherboard comes with an AM2+/AM2 socket designed for Phenom™ X4 / Phenom™ X3 / Athlon™ X2 / Athlon™/ Sempron™ processors (socket AM2+/AM2). Socket lever ASUS M4A78-E 2-5 Ensure that the socket lever is not compatible with ...
User Manual
Page 27
... Material is already installed on the motherboard upon purchase. • You do not match the CPU documentation, follow the latter. Ensure that the heatsink fits properly on the retention module base. • The retention module base is properly applied to ensure optimum thermal condition and performance. ASUS M4A78-E 2-7 Place the heatsink on top...
... Material is already installed on the motherboard upon purchase. • You do not match the CPU documentation, follow the latter. Ensure that the heatsink fits properly on the retention module base. • The retention module base is properly applied to ensure optimum thermal condition and performance. ASUS M4A78-E 2-7 Place the heatsink on top...

User Manual
Page 29
Hardware monitoring errors can occur if you fail to connect the CPU fan connector! 5. When the fan and heatsink assembly is in place, connect the CPU fan cable to the connector on the motherboard labeled CPU_FAN. • Do not forget to plug this connector. • This connector is backward compatible with old 3-pin CPU fan. Chapter 2 ASUS M4A78-E 2-9
Hardware monitoring errors can occur if you fail to connect the CPU fan connector! 5. When the fan and heatsink assembly is in place, connect the CPU fan cable to the connector on the motherboard labeled CPU_FAN. • Do not forget to plug this connector. • This connector is backward compatible with old 3-pin CPU fan. Chapter 2 ASUS M4A78-E 2-9

User Manual
Page 30
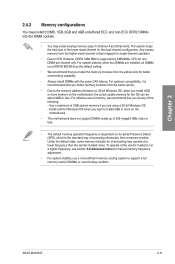
The figure illustrates the location of the DDR2 DIMM sockets: Chapter 2 2-10 Chapter 2: Hardware information A DDR2 module has the same physical dimensions as a DDR DIMM but has a 240-pin footprint compared to prevent installation on a DDR DIMM socket. 2.4 System memory 2.4.1 Overview The motherboard comes with four Double Data Rate 2 (DDR2) Dual Inline Memory Modules (DIMM) sockets. DDR2 DIMMs are notched differently to the 184-pin DDR DIMM.
The figure illustrates the location of the DDR2 DIMM sockets: Chapter 2 2-10 Chapter 2: Hardware information A DDR2 module has the same physical dimensions as a DDR DIMM but has a 240-pin footprint compared to prevent installation on a DDR DIMM socket. 2.4 System memory 2.4.1 Overview The motherboard comes with four Double Data Rate 2 (DDR2) Dual Inline Memory Modules (DIMM) sockets. DDR2 DIMMs are notched differently to the 184-pin DDR DIMM.
User Manual
Page 31
...or at a higher frequency, see section 3.6 Advanced menu for overclocking may install varying memory sizes in Channel A and Channel B. Chapter 2 ASUS M4A78-E 2-11 Under the default state, some memory modules for manual memory frequency adjustment. • For system stability, use of memory, we recommend...may operate at DDR2 800 MHz as the default setting. • We recommend that you install 4GB or more on the motherboard. • This motherboard does not support DIMMs made up of accessing information from a memory module. For optimum compatibility, it is supported by AM3/...
...or at a higher frequency, see section 3.6 Advanced menu for overclocking may install varying memory sizes in Channel A and Channel B. Chapter 2 ASUS M4A78-E 2-11 Under the default state, some memory modules for manual memory frequency adjustment. • For system stability, use of memory, we recommend...may operate at DDR2 800 MHz as the default setting. • We recommend that you install 4GB or more on the motherboard. • This motherboard does not support DIMMs made up of accessing information from a memory module. For optimum compatibility, it is supported by AM3/...

User Manual
Page 32
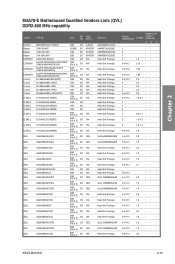
... of 2) DS N/A Heat-Sink Package 5-5-5-15 2.2-2.3 • • BoxP/N:TXDD4096M1066HC5DC-D 4GB (TXDD2048M1066HC5-D) (Kit of 2) DS N/A Heat-Sink Package 5-5-5-15 2.2-2.3 • 2-12 Chapter 2: Hardware information Chapter 2 M4A78-E Motherboard Qualified Vendors Lists (QVL) DDR2-1066 MHz capability Vendor Apacer Apacer CORSAIR Crucial Crucial G.SKILL G.SKILL G.SKILL GEIL GEIL GEIL GEIL GEIL GEIL GEIL Hynix...
... of 2) DS N/A Heat-Sink Package 5-5-5-15 2.2-2.3 • • BoxP/N:TXDD4096M1066HC5DC-D 4GB (TXDD2048M1066HC5-D) (Kit of 2) DS N/A Heat-Sink Package 5-5-5-15 2.2-2.3 • 2-12 Chapter 2: Hardware information Chapter 2 M4A78-E Motherboard Qualified Vendors Lists (QVL) DDR2-1066 MHz capability Vendor Apacer Apacer CORSAIR Crucial Crucial G.SKILL G.SKILL G.SKILL GEIL GEIL GEIL GEIL GEIL GEIL GEIL Hynix...
User Manual
Page 33
Chapter 2 M4A78-E Motherboard Qualified Vendors Lists (QVL) DDR2-800 MHz capability Vendor Part No. Size SS/ Chip DS Brand Chip NO. A-DATA Apacer Apacer Apacer CORSAIR CORSAIR CORSAIR ...; 5-5-5-15 1.8 •• 5-5-5-15 1.8 ••• 4-4-4-12 2.0 •• 5-5-5-15 1.8 • • 4-4-4-12 2.0 ••• 5-5-5-15 1.8 ••• 4-4-4-12 2.0 ••• ASUS M4A78-E 2-13
Chapter 2 M4A78-E Motherboard Qualified Vendors Lists (QVL) DDR2-800 MHz capability Vendor Part No. Size SS/ Chip DS Brand Chip NO. A-DATA Apacer Apacer Apacer CORSAIR CORSAIR CORSAIR ...; 5-5-5-15 1.8 •• 5-5-5-15 1.8 ••• 4-4-4-12 2.0 •• 5-5-5-15 1.8 • • 4-4-4-12 2.0 ••• 5-5-5-15 1.8 ••• 4-4-4-12 2.0 ••• ASUS M4A78-E 2-13


