
M4A77T user's manual
Page 1
Motherboard M4A77T
Motherboard M4A77T

M4A77T user's manual
Page 3
...iii Contents Notices...vi Safety information...vii About this guide...vii M4A77T specifications summary...ix Chapter 1: 1.1 1.2 1.3 Welcome!...1-1 Package contents...1-1 Special features...1-1 1.3.1 1.3.2 Product highlights...1-1 Innovative ASUS features...1-2 Product introduction 1.4 1.5 Before you proceed...1-4 Motherboard overview...1-5 1.5.1 1.5.2 1.5.3 1.5.4 1.6.1 1.6.2 1.7.1 1.7.2 1.7.3 1.7.4 1.8.1 1.8.2 1.8.3 1.8.4 1.8.5 Placement direction...1-5 Screw holes...1-5 Motherboard layout...1-6 Layout contents...1-6 Installing the CPU...1-7 Installing the heatsink and...
...iii Contents Notices...vi Safety information...vii About this guide...vii M4A77T specifications summary...ix Chapter 1: 1.1 1.2 1.3 Welcome!...1-1 Package contents...1-1 Special features...1-1 1.3.1 1.3.2 Product highlights...1-1 Innovative ASUS features...1-2 Product introduction 1.4 1.5 Before you proceed...1-4 Motherboard overview...1-5 1.5.1 1.5.2 1.5.3 1.5.4 1.6.1 1.6.2 1.7.1 1.7.2 1.7.3 1.7.4 1.8.1 1.8.2 1.8.3 1.8.4 1.8.5 Placement direction...1-5 Screw holes...1-5 Motherboard layout...1-6 Layout contents...1-6 Installing the CPU...1-7 Installing the heatsink and...
M4A77T user's manual
Page 6
... harmful interference to which can radiate radio frequency energy and, if not installed and used in our products at ASUS REACH website at http://green.asus.com/english/REACH.htm. DO NOT throw the motherboard in a particular installation. If this unit not expressly approved by turning the equipment off and on a circuit different...
... harmful interference to which can radiate radio frequency energy and, if not installed and used in our products at ASUS REACH website at http://green.asus.com/english/REACH.htm. DO NOT throw the motherboard in a particular installation. If this unit not expressly approved by turning the equipment off and on a circuit different...

M4A77T user's manual
Page 7
...dealer immediately. About this guide is set to change system settings through the BIOS Setup menus. Operation safety Before installing the motherboard and adding devices on a stable surface. How this guide This user guide contains the information you encounter technical problems with the...chapter tells how to the correct voltage in any damage, contact your area. Before connecting or removing signal cables from the motherboard, ensure that all the manuals that your retailer. Safety information Electrical safety To prevent electric shock hazard, disconnect the power cable...
...dealer immediately. About this guide is set to change system settings through the BIOS Setup menus. Operation safety Before installing the motherboard and adding devices on a stable surface. How this guide This user guide contains the information you encounter technical problems with the...chapter tells how to the correct voltage in any damage, contact your area. Before connecting or removing signal cables from the motherboard, ensure that all the manuals that your retailer. Safety information Electrical safety To prevent electric shock hazard, disconnect the power cable...
M4A77T user's manual
Page 11
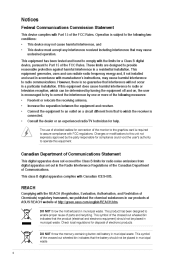
... HyperTransport™ 3.0-based system bus. Chapter 1 1.1 Welcome! ASUS M4A77T 1-1 The motherboard delivers a host of new features and latest technologies, making it , check the items in your motherboard package for buying an ASUS® M4A77T motherboard! Before you for the following items. Motherboard Cables Accessories Application DVD Documentations If any of ASUS quality motherboards! Product introduction Thank you start installing the...
... HyperTransport™ 3.0-based system bus. Chapter 1 1.1 Welcome! ASUS M4A77T 1-1 The motherboard delivers a host of new features and latest technologies, making it , check the items in your motherboard package for buying an ASUS® M4A77T motherboard! Before you for the following items. Motherboard Cables Accessories Application DVD Documentations If any of ASUS quality motherboards! Product introduction Thank you start installing the...

M4A77T user's manual
Page 12
... Key ASUS Turbo Key allows you to meet the higher bandwidth requirements of the latest operating system, 3D graphics, multimedia, and Internet applications. Dual-Channel DDR3 1800(O.C.) support This motherboard supports DDR3 memory that detects the current system loadings and adjusts the...with AMD's latest AM3 multi-core CPUs to provide excellent system performance and overclocking capabilities. AMD Cool 'n' Quiet Technology This motherboard supports the AMD Cool 'n' Quiet technology which monitors system operation and automatically adjusts CPU voltage and frequency for Serial ATA hard ...
... Key ASUS Turbo Key allows you to meet the higher bandwidth requirements of the latest operating system, 3D graphics, multimedia, and Internet applications. Dual-Channel DDR3 1800(O.C.) support This motherboard supports DDR3 memory that detects the current system loadings and adjusts the...with AMD's latest AM3 multi-core CPUs to provide excellent system performance and overclocking capabilities. AMD Cool 'n' Quiet Technology This motherboard supports the AMD Cool 'n' Quiet technology which monitors system operation and automatically adjusts CPU voltage and frequency for Serial ATA hard ...

M4A77T user's manual
Page 13
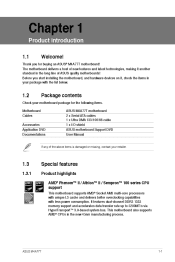
Worry no time. is among the top concerns during computer upgrades. ASUS AI NET 2 ASUS AI NET 2 remotely detects the cable connection immediately after powering on your system up to the motherboard USB port before entering the OS. This remarkable memory rescue tool requires nothing ...flash drives with at 1 meter accuracy. MemOK! MemOK! It supports file downloading to ensure a quiet, cool, and efficient operation. ASUS M4A77T 1-3 Memory compatibility is the fastest memory booting solution today. The technology is an auto-recovery tool that gives you turn on the ...
Worry no time. is among the top concerns during computer upgrades. ASUS AI NET 2 ASUS AI NET 2 remotely detects the cable connection immediately after powering on your system up to the motherboard USB port before entering the OS. This remarkable memory rescue tool requires nothing ...flash drives with at 1 meter accuracy. MemOK! MemOK! It supports file downloading to ensure a quiet, cool, and efficient operation. ASUS M4A77T 1-3 Memory compatibility is the fastest memory booting solution today. The technology is an auto-recovery tool that gives you turn on the ...
M4A77T user's manual
Page 14
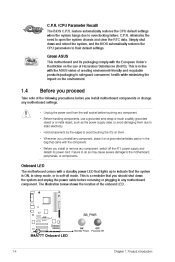
...touching the ICs on them. • Whenever you uninstall any component, place it on the use of Hazardous Substances (RoHS). Green ASUS This motherboard and its packaging comply with the European Union's Restriction on a grounded antistatic pad or in the bag that came with a standby ...power LED that lights up to indicate that you install motherboard components or change any motherboard settings. • Unplug the power cord from the wall socket before removing or plugging in line with the ASUS vision of creating environment-friendly and recyclable products/packaging to open...
...touching the ICs on them. • Whenever you uninstall any component, place it on the use of Hazardous Substances (RoHS). Green ASUS This motherboard and its packaging comply with the European Union's Restriction on a grounded antistatic pad or in the bag that came with a standby ...power LED that lights up to indicate that you install motherboard components or change any motherboard settings. • Unplug the power cord from the wall socket before removing or plugging in line with the ASUS vision of creating environment-friendly and recyclable products/packaging to open...
M4A77T user's manual
Page 15
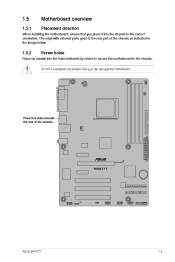
1.5 1.5.1 Motherboard overview Placement direction When installing the motherboard, ensure that you place it into the chassis in the image below. 1.5.2 Place six screws into the holes indicated by circles to secure the motherboard to the rear part of the chassis. Doing so can damage the motherboard. Screw holes Place this side towards the rear of the chassis as indicated in the correct orientation. The edge with external ports goes to the chassis. ASUS M4A77T 1-5 DO NOT overtighten the screws!
1.5 1.5.1 Motherboard overview Placement direction When installing the motherboard, ensure that you place it into the chassis in the image below. 1.5.2 Place six screws into the holes indicated by circles to secure the motherboard to the rear part of the chassis. Doing so can damage the motherboard. Screw holes Place this side towards the rear of the chassis as indicated in the correct orientation. The edge with external ports goes to the chassis. ASUS M4A77T 1-5 DO NOT overtighten the screws!
M4A77T user's manual
Page 16
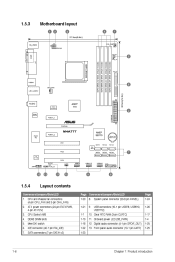
...! Clear RTC RAM (3-pin CLRTC) 11. Digital audio connector (4-1 pin SPDIF_OUT) 13. Onboard power LED (SB_PWR) 12. ATX power connectors (24-pin EATXPWR, 4-pin ATX12V) 3. 1.5.3 Motherboard layout 1.5.4 Layout contents Page Connectors/Jumpers/Slots/LED 1-20 1-21 1-7 1-10 1-18 1-22 1-23 8. Front panel audio connector (10-1 pin AAFP) Page 1-24 1-26 1-17...
...! Clear RTC RAM (3-pin CLRTC) 11. Digital audio connector (4-1 pin SPDIF_OUT) 13. Onboard power LED (SB_PWR) 12. ATX power connectors (24-pin EATXPWR, 4-pin ATX12V) 3. 1.5.3 Motherboard layout 1.5.4 Layout contents Page Connectors/Jumpers/Slots/LED 1-20 1-21 1-7 1-10 1-18 1-22 1-23 8. Front panel audio connector (10-1 pin AAFP) Page 1-24 1-26 1-17...

M4A77T user's manual
Page 17
To install a CPU: Installing the CPU Locate the CPU socket on the motherboard. 2. The CPU fits only in only one correct orientation. The CPU fits in one correct orientation. Press the lever sideways to unlock the socket, then ... and damaging the CPU! 1.6.1 1. DO NOT force the CPU into the socket to a 90°-100° angle; Small triangle Gold triangle ASUS M4A77T 1-7 1.6 Central Processing Unit (CPU) This motherboard comes with a small triangle. Socket lever Ensure that the socket lever is lifted up to prevent bending the pins and damaging the CPU...
To install a CPU: Installing the CPU Locate the CPU socket on the motherboard. 2. The CPU fits only in only one correct orientation. The CPU fits in one correct orientation. Press the lever sideways to unlock the socket, then ... and damaging the CPU! 1.6.1 1. DO NOT force the CPU into the socket to a 90°-100° angle; Small triangle Gold triangle ASUS M4A77T 1-7 1.6 Central Processing Unit (CPU) This motherboard comes with a small triangle. Socket lever Ensure that the socket lever is lifted up to prevent bending the pins and damaging the CPU...
M4A77T user's manual
Page 18
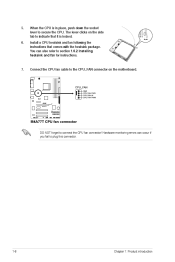
Hardware monitoring errors can also refer to section 1.6.2 Installing heatsink and fan for instructions. You can occur if you fail to indicate that comes with the heatsink package. Connect the CPU fan cable to the CPU_FAN connector on the side tab to plug this connector. 1-8 Chapter 1: Product introduction 5. 6. The lever clicks on the motherboard. 7. DO NOT forget to secure the CPU. Install a CPU heatsink and fan following the instructions that it is in place, push down the socket lever to connect the CPU fan connector! When the CPU is locked.
Hardware monitoring errors can also refer to section 1.6.2 Installing heatsink and fan for instructions. You can occur if you fail to indicate that comes with the heatsink package. Connect the CPU fan cable to the CPU_FAN connector on the side tab to plug this connector. 1-8 Chapter 1: Product introduction 5. 6. The lever clicks on the motherboard. 7. DO NOT forget to secure the CPU. Install a CPU heatsink and fan following the instructions that it is in place, push down the socket lever to connect the CPU fan connector! When the CPU is locked.

M4A77T user's manual
Page 19
...module base when installing the CPU or installing other motherboard components. • If you purchased a separate CPU heatsink and fan assembly, ensure that a Thermal Interface Material is properly applied to the retention module base. 1 2 3 4 5 ASUS M4A77T 1-9 Attach one end of the installed CPU,... ensuring that the heatsink fits properly on the retention module base. • The retention module base is already installed on the motherboard upon purchase. • You do not match the ...
...module base when installing the CPU or installing other motherboard components. • If you purchased a separate CPU heatsink and fan assembly, ensure that a Thermal Interface Material is properly applied to the retention module base. 1 2 3 4 5 ASUS M4A77T 1-9 Attach one end of the installed CPU,... ensuring that the heatsink fits properly on the retention module base. • The retention module base is already installed on the motherboard upon purchase. • You do not match the ...
M4A77T user's manual
Page 20
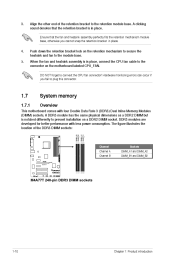
... assembly perfectly fits the retention mechanism module base, otherwise you fail to plug this connector. 1.7 1.7.1 System memory Overview This motherboard comes with less power consumption. Push down the retention bracket lock on the motherboard labeled CPU_FAN. Hardware monitoring errors can occur if you cannot snap the retention bracket in place. 4. 5. Align the...
... assembly perfectly fits the retention mechanism module base, otherwise you fail to plug this connector. 1.7 1.7.1 System memory Overview This motherboard comes with less power consumption. Push down the retention bracket lock on the motherboard labeled CPU_FAN. Hardware monitoring errors can occur if you cannot snap the retention bracket in place. 4. 5. Align the...
M4A77T user's manual
Page 21
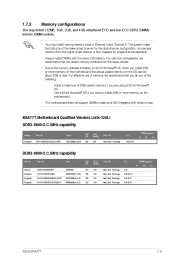
...® OS, when you do any of the following Install a maximum of 3) SS/ DS SS Chip Brand N/A Chip NO. M4A77T Motherboard Qualified Vendors Lists (QVL) DDR3-1866(O.C.)MHz capability Vendor Kingston Part No. For optimum compatibility, we recommend that you are using a ...NO. Heat-Sink Package Heat-Sink Package Heat-Sink Package Heat-Sink Package CL A* N/A 8-8-8-24 9-9-9-27 8-8-8-24 DIMM support B C* ASUS M4A77T 1-11 Memory configurations • This motherboard does not support DIMMs made up of 256 megabits (Mb) chips or less. Any excess memory from the same vendor. • ...
...® OS, when you do any of the following Install a maximum of 3) SS/ DS SS Chip Brand N/A Chip NO. M4A77T Motherboard Qualified Vendors Lists (QVL) DDR3-1866(O.C.)MHz capability Vendor Kingston Part No. For optimum compatibility, we recommend that you are using a ...NO. Heat-Sink Package Heat-Sink Package Heat-Sink Package Heat-Sink Package CL A* N/A 8-8-8-24 9-9-9-27 8-8-8-24 DIMM support B C* ASUS M4A77T 1-11 Memory configurations • This motherboard does not support DIMMs made up of 256 megabits (Mb) chips or less. Any excess memory from the same vendor. • ...

M4A77T user's manual
Page 25
...until the retaining clips snap back in place and the DIMM is keyed with extra force. 1 1 2. Press the retaining clips outward to both the motherboard and the components. 1. 2. Align a DIMM on the socket such that it flips out with a notch so that the notch on the DIMM ... Unlocked retaining clip DIMM notch 2 1 DIMM slot key A DIMM is properly seated. 3 Locked Retaining Clip 1.7.4 1. Remove the DIMM from the socket. DIMM notch ASUS M4A77T 1-15 To remove a DIMM: Removing a DIMM Simultaneously press the retaining clips outward to avoid damaging the DIMM. 3.
...until the retaining clips snap back in place and the DIMM is keyed with extra force. 1 1 2. Press the retaining clips outward to both the motherboard and the components. 1. 2. Align a DIMM on the socket such that it flips out with a notch so that the notch on the DIMM ... Unlocked retaining clip DIMM notch 2 1 DIMM slot key A DIMM is properly seated. 3 Locked Retaining Clip 1.7.4 1. Remove the DIMM from the socket. DIMM notch ASUS M4A77T 1-15 To remove a DIMM: Removing a DIMM Simultaneously press the retaining clips outward to avoid damaging the DIMM. 3.
M4A77T user's manual
Page 26
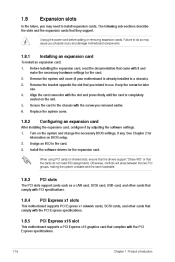
.... 1.8.2 1. 2. 3. When using PCI cards on the system and change the necessary BIOS settings, if any. PCI slots 1.8.4 This motherboard supports PCI Express x1 network cards, SCSI cards, and other cards that complies with the PCI Express specifications. The following sub‑sections ... PCI Express x16 slot 1-16 Chapter 1: Product introduction Install the software drivers for the card. PCI Express x1 slots 1.8.5 This motherboard supports a PCI Express x16 graphics card that comply with the screw you removed earlier. To install an expansion card: Installing an expansion...
.... 1.8.2 1. 2. 3. When using PCI cards on the system and change the necessary BIOS settings, if any. PCI slots 1.8.4 This motherboard supports PCI Express x1 network cards, SCSI cards, and other cards that complies with the PCI Express specifications. The following sub‑sections ... PCI Express x16 slot 1-16 Chapter 1: Product introduction Install the software drivers for the card. PCI Express x1 slots 1.8.5 This motherboard supports a PCI Express x16 graphics card that comply with the screw you removed earlier. To install an expansion card: Installing an expansion...
M4A77T user's manual
Page 28
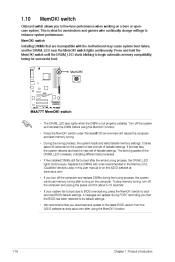
...system performance. It takes about 5-10 seconds. • If your system fail to boot due to the latest BIOS version from the ASUS website at www.asus.com. • If you turn off the system and reinstall the DIMM before using the MemOK! Press and hold the MemOK! switch... switch Installing DIMMs that are incompatible with ones recommended in the Memory QVL (Qualified Vendors Lists) in this user manual or on the ASUS website at www.asus.com after turning on a bare or opencase system. 1.10 MemOK! switch Onboard switch allows you download and update to BIOS overclocking, ...
...system performance. It takes about 5-10 seconds. • If your system fail to boot due to the latest BIOS version from the ASUS website at www.asus.com. • If you turn off the system and reinstall the DIMM before using the MemOK! Press and hold the MemOK! switch... switch Installing DIMMs that are incompatible with ones recommended in the Memory QVL (Qualified Vendors Lists) in this user manual or on the ASUS website at www.asus.com after turning on a bare or opencase system. 1.10 MemOK! switch Onboard switch allows you download and update to BIOS overclocking, ...
M4A77T user's manual
Page 30
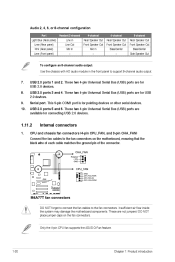
...Serial Bus (USB) ports are not jumpers! USB 2.0 ports 5 and 6. Insufficient air flow inside the system may damage the motherboard components. Only the 4-pin CPU fan supports the ASUS Q-Fan feature. 1-20 Chapter 1: Product introduction USB 2.0 ports 3 and 4. USB 2.0 ports 1 and 2. These are ...9. Serial port. Internal connectors Connect the fan cables to the fan connectors on the fan connectors. DO NOT place jumper caps on the motherboard, ensuring that the black wire of each cable matches the ground pin of the connector. Audio 2, 4, 6, or 8-channel configuration Port...
...Serial Bus (USB) ports are not jumpers! USB 2.0 ports 5 and 6. Insufficient air flow inside the system may damage the motherboard components. Only the 4-pin CPU fan supports the ASUS Q-Fan feature. 1-20 Chapter 1: Product introduction USB 2.0 ports 3 and 4. USB 2.0 ports 1 and 2. These are ...9. Serial port. Internal connectors Connect the fan cables to the fan connectors on the fan connectors. DO NOT place jumper caps on the motherboard, ensuring that the black wire of each cable matches the ground pin of the connector. Audio 2, 4, 6, or 8-channel configuration Port...
M4A77T user's manual
Page 32
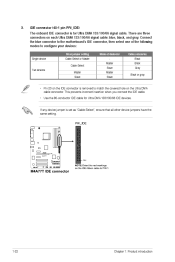
... connect the IDE cable. • Use the 80-conductor IDE cable for Ultra DMA 133/100/66 signal cable. Connect the blue connector to the motherboard's IDE connector, then select one of device(s) Master Slave Master Slave Cable connector Black Black Gray Black or gray IDE connector (40-1 pin PRI_IDE) •...
... connect the IDE cable. • Use the 80-conductor IDE cable for Ultra DMA 133/100/66 signal cable. Connect the blue connector to the motherboard's IDE connector, then select one of device(s) Master Slave Master Slave Cable connector Black Black Gray Black or gray IDE connector (40-1 pin PRI_IDE) •...


