
User Manual
Page 27
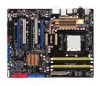
...; Before you install or remove any component, ensure that the ATX power supply is switched off or the power cord is detached from the power supply. ASUS M3A79-T Deluxe 2-1 2.1 Before you proceed Take note of the following precautions before you install motherboard components or change any motherboard settings. • Unplug the power cord from the wall..., such as the power supply case, before handling components to avoid damaging them due to static electricity. • Hold components by the edges to the motherboard, peripherals, and/or components.
...; Before you install or remove any component, ensure that the ATX power supply is switched off or the power cord is detached from the power supply. ASUS M3A79-T Deluxe 2-1 2.1 Before you proceed Take note of the following precautions before you install motherboard components or change any motherboard settings. • Unplug the power cord from the wall..., such as the power supply case, before handling components to avoid damaging them due to static electricity. • Hold components by the edges to the motherboard, peripherals, and/or components.

User Manual
Page 57
... device: SATA hard disk drive (x2) Optical drive: DVD-RW (x1) ASUS M3A79-T Deluxe 2-31 The power supply plugs are uncertain about the minimum power supply requirement for your system, refer to connect the 8-pin ATX +12 V power plug; Find the proper orientation and push down firmly until ...the connectors completely fit. • For a fully configured system, we recommend that you are designed to support the motherboard power requirements with more power-consuming devices....
... device: SATA hard disk drive (x2) Optical drive: DVD-RW (x1) ASUS M3A79-T Deluxe 2-31 The power supply plugs are uncertain about the minimum power supply requirement for your system, refer to connect the 8-pin ATX +12 V power plug; Find the proper orientation and push down firmly until ...the connectors completely fit. • For a fully configured system, we recommend that you are designed to support the motherboard power requirements with more power-consuming devices....
User Manual
Page 98
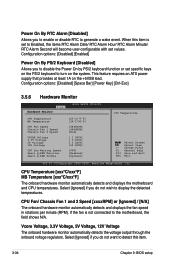
... will become user-configurable with set specific keys on the PS/2 keyboard to turn on the +5VSB lead. This feature requires an ATX power supply that provides at least 1A on the system. Configuration options: [Disabled] [Enabled] Power On By PS/2 Keyboard [Disabled...Select Item +- CPU Temperature [xxxºC/xxxºF] MB Temperature [xxxºC/xxxºF] The onboard hardware monitor automatically detects and displays the motherboard and CPU temperatures. CPU Fan/ Chassis Fan 1 and 2 Speed [xxxxRPM] or [Ignored] / [N/A] The onboard hardware monitor automatically detects and...
... will become user-configurable with set specific keys on the PS/2 keyboard to turn on the +5VSB lead. This feature requires an ATX power supply that provides at least 1A on the system. Configuration options: [Disabled] [Enabled] Power On By PS/2 Keyboard [Disabled...Select Item +- CPU Temperature [xxxºC/xxxºF] MB Temperature [xxxºC/xxxºF] The onboard hardware monitor automatically detects and displays the motherboard and CPU temperatures. CPU Fan/ Chassis Fan 1 and 2 Speed [xxxxRPM] or [Ignored] / [N/A] The onboard hardware monitor automatically detects and...


