User Manual
Page 19
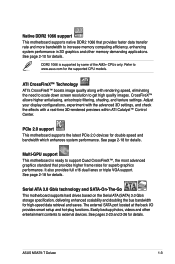
... for superb graphics performance. See page 2-18 for details. Easily backup photos, videos and other memory demanding applications. Serial ATA 3.0 Gb/s technology and SATA-On-The-Go This motherboard supports hard drives based on the Serial ATA (SATA) 3.0 Gb/s storage specification, delivering enhanced scalability and doubling the bus bandwidth for double speed and bandwidth which enhances system performance. PCIe 2.0 support This motherboard supports the latest PCIe 2.0 devices for high-speed data retrieval and saves. ASUS M3A79-T Deluxe 1-3
... for superb graphics performance. See page 2-18 for details. Easily backup photos, videos and other memory demanding applications. Serial ATA 3.0 Gb/s technology and SATA-On-The-Go This motherboard supports hard drives based on the Serial ATA (SATA) 3.0 Gb/s storage specification, delivering enhanced scalability and doubling the bus bandwidth for double speed and bandwidth which enhances system performance. PCIe 2.0 support This motherboard supports the latest PCIe 2.0 devices for high-speed data retrieval and saves. ASUS M3A79-T Deluxe 1-3
User Manual
Page 23
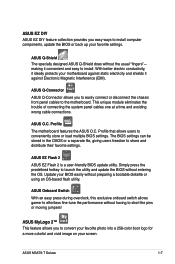
..."- ASUS M3A79-T Deluxe 1-7 ASUS EZ Flash 2 ASUS EZ Flash 2 is a user-friendly BIOS update utility. Update your motherboard against static electricity and shields it convenient and easy to install. ASUS Q-Connector ASUS Q-Connector allows you easy ways to install computer components, update the BIOS or back up your screen. ASUS EZ DIY ASUS EZ DIY feature collection provides you to easily connect or disconnect the chassis front panel cables to the motherboard. ASUS Q-Shield The specially designed ASUS Q-Shield does without entering...
..."- ASUS M3A79-T Deluxe 1-7 ASUS EZ Flash 2 ASUS EZ Flash 2 is a user-friendly BIOS update utility. Update your motherboard against static electricity and shields it convenient and easy to install. ASUS Q-Connector ASUS Q-Connector allows you easy ways to install computer components, update the BIOS or back up your screen. ASUS EZ DIY ASUS EZ DIY feature collection provides you to easily connect or disconnect the chassis front panel cables to the motherboard. ASUS Q-Shield The specially designed ASUS Q-Shield does without entering...
User Manual
Page 29
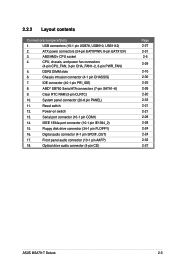
...Layout contents Connectors/Jumpers/Slots 1. Clear RTC RAM (3-pin CLRTC) 10. Floppy disk drive connector (34-1 pin FLOPPY) 16. IDE connector (40-1 pin PRI_IDE) 8. IEEE 1394a port connector (10-1 pin IE1394_2) 15. ATX power connectors (24-pin EATXPWR, 8-pin EATX12V) 3. AM2/AM2+ CPU socket 4. CPU, chassis, and power fan connectors (4-pin CPU_FAN, 3-pin CHA_FAN1-2, 3-pin PWR_FAN) 5. Reset switch 12. Power-on switch 13. Digital audio connector (4-1 pin SPDIF_OUT) 17. AMD® SB750 Serial ATA connectors (7-pin SATA1-6) 9. Serial port...
...Layout contents Connectors/Jumpers/Slots 1. Clear RTC RAM (3-pin CLRTC) 10. Floppy disk drive connector (34-1 pin FLOPPY) 16. IDE connector (40-1 pin PRI_IDE) 8. IEEE 1394a port connector (10-1 pin IE1394_2) 15. ATX power connectors (24-pin EATXPWR, 8-pin EATX12V) 3. AM2/AM2+ CPU socket 4. CPU, chassis, and power fan connectors (4-pin CPU_FAN, 3-pin CHA_FAN1-2, 3-pin PWR_FAN) 5. Reset switch 12. Power-on switch 13. Digital audio connector (4-1 pin SPDIF_OUT) 17. AMD® SB750 Serial ATA connectors (7-pin SATA1-6) 9. Serial port...
User Manual
Page 37
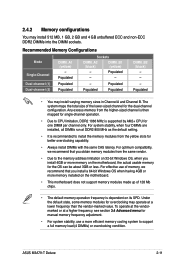
... you install a 64-bit Windows OS when having 4GB or more memory on the motherboard. • This motherboard does not support memory modules made up of 128 Mb chips. • The default memory operation frequency is supported by AM2+ CPU for the dual-channel configuration. Populated • You may install 512 MB, 1 GB, 2 GB and 4 GB unbuffered ECC and non‑ECC DDR2 DIMMs into the DIMM sockets. ASUS M3A79-T Deluxe 2-11...
... you install a 64-bit Windows OS when having 4GB or more memory on the motherboard. • This motherboard does not support memory modules made up of 128 Mb chips. • The default memory operation frequency is supported by AM2+ CPU for the dual-channel configuration. Populated • You may install 512 MB, 1 GB, 2 GB and 4 GB unbuffered ECC and non‑ECC DDR2 DIMMs into the DIMM sockets. ASUS M3A79-T Deluxe 2-11...
User Manual
Page 53
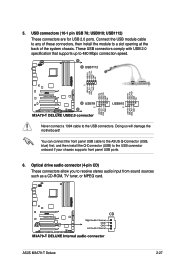
... card. Optical drive audio connector (4-pin CD) These connectors allow you to 480 Mbps connection speed. USB1112) These connectors are for USB 2.0 ports. Connect the USB module cable to any of these connectors, then install the module to the USB connector onboard if your chassis supports front panel USB ports. 6. USB connectors (10-1 pin USB 78; You can connect the front panel USB cable to the ASUS Q-Connector (USB, blue) first, and then install the Q-Connector (USB) to a slot opening at the back of the system chassis. ASUS M3A79-T Deluxe 2-27 5. Never connect a 1394 cable...
... card. Optical drive audio connector (4-pin CD) These connectors allow you to 480 Mbps connection speed. USB1112) These connectors are for USB 2.0 ports. Connect the USB module cable to any of these connectors, then install the module to the USB connector onboard if your chassis supports front panel USB ports. 6. USB connectors (10-1 pin USB 78; You can connect the front panel USB cable to the ASUS Q-Connector (USB, blue) first, and then install the Q-Connector (USB) to a slot opening at the back of the system chassis. ASUS M3A79-T Deluxe 2-27 5. Never connect a 1394 cable...

User Manual
Page 57
...; 8-pin EATX12V) These connectors are designed to support the motherboard power requirements with the following configuration: CPU: AMD Phenom 9950 Memory: 1024 MB DDR2 (x4) Graphics card: PCI Express x16 Radeon 4870 X2 (x2) Serial ATA device: SATA hard disk drive (x2) Optical drive: DVD-RW (x1) ASUS M3A79-T Deluxe 2-31 The system may become unstable or may not boot up if the power is recommended when configuring a system with a higher power output is inadequate. • If you use a power supply...
...; 8-pin EATX12V) These connectors are designed to support the motherboard power requirements with the following configuration: CPU: AMD Phenom 9950 Memory: 1024 MB DDR2 (x4) Graphics card: PCI Express x16 Radeon 4870 X2 (x2) Serial ATA device: SATA hard disk drive (x2) Optical drive: DVD-RW (x1) ASUS M3A79-T Deluxe 2-31 The system may become unstable or may not boot up if the power is recommended when configuring a system with a higher power output is inadequate. • If you use a power supply...
User Manual
Page 65
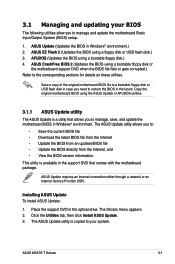
... or an Internet Service Provider (ISP). Click the Utilities tab, then click Install ASUS Update. 3. ASUS M3A79-T Deluxe 3-1 ASUS Update (Updates the BIOS in the support DVD that allows you to the corresponding sections for details on these utilities. Save a copy of the original motherboard BIOS file to a bootable floppy disk or USB flash disk in case you to manage, save, and update the motherboard BIOS in the optical drive. Installing ASUS Update To install ASUS Update: 1. AFUDOS (Updates the BIOS using a floppy disk or USB flash disk.) 3. Place the support DVD in Windows®...
... or an Internet Service Provider (ISP). Click the Utilities tab, then click Install ASUS Update. 3. ASUS M3A79-T Deluxe 3-1 ASUS Update (Updates the BIOS in the support DVD that allows you to the corresponding sections for details on these utilities. Save a copy of the original motherboard BIOS file to a bootable floppy disk or USB flash disk in case you to manage, save, and update the motherboard BIOS in the optical drive. Installing ASUS Update To install ASUS Update: 1. AFUDOS (Updates the BIOS using a floppy disk or USB flash disk.) 3. Place the support DVD in Windows®...
User Manual
Page 77
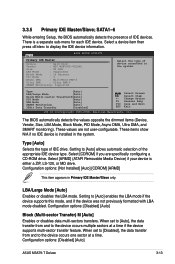
... user-configurable. LBA/Large Mode [Auto] Enables or disables the LBA mode. Configuration options: [Disabled] [Auto] ASUS M3A79-T Deluxe 3-13 The BIOS automatically detects the values opposite the dimmed items (Device, Vendor, Size, LBA Mode, Block Mode, PIO Mode, Async DMA, Ultra DMA, and SMART monitoring). Configuration options: [Not Installed] [Auto] [CDROM] [ARMD] This item appears in the system. SATA1-6 While entering Setup, the BIOS automatically detects the presence of device connected to the device occurs one sector at a time if the device supports...
... user-configurable. LBA/Large Mode [Auto] Enables or disables the LBA mode. Configuration options: [Disabled] [Auto] ASUS M3A79-T Deluxe 3-13 The BIOS automatically detects the values opposite the dimmed items (Device, Vendor, Size, LBA Mode, Block Mode, PIO Mode, Async DMA, Ultra DMA, and SMART monitoring). Configuration options: [Not Installed] [Auto] [CDROM] [ARMD] This item appears in the system. SATA1-6 While entering Setup, the BIOS automatically detects the presence of device connected to the device occurs one sector at a time if the device supports...
User Manual
Page 79
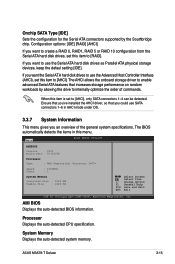
... AHCI allows the onboard storage driver to enable advanced Serial ATA features that you could use SATA connectors 1-6 in this menu. Processor Displays the auto-detected CPU specification. System Memory Displays the auto-detected system memory. ASUS M3A79-T Deluxe 3-15 The BIOS automatically detects the items in AHCI mode under OS. 3.3.7 System Information This menu gives you want the Serial ATA hard disk drives to use the Serial ATA hard disk drives as Parallel ATA physical storage devices, keep the defaul setting [IDE]. Main BIOS SETUP UTILITY AMIBIOS Version...
... AHCI allows the onboard storage driver to enable advanced Serial ATA features that you could use SATA connectors 1-6 in this menu. Processor Displays the auto-detected CPU specification. System Memory Displays the auto-detected system memory. ASUS M3A79-T Deluxe 3-15 The BIOS automatically detects the items in AHCI mode under OS. 3.3.7 System Information This menu gives you want the Serial ATA hard disk drives to use the Serial ATA hard disk drives as Parallel ATA physical storage devices, keep the defaul setting [IDE]. Main BIOS SETUP UTILITY AMIBIOS Version...
User Manual
Page 83
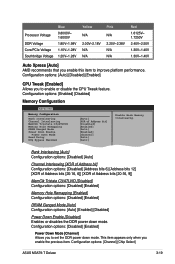
...options: [Disabled] [Enabled] Memory Hole Remapping [Enabled] Configuration options: [Disabled] [Enabled] DRAM Ganged Mode [Auto] Configuration options: [Auto] [Enabled] [Disabled] Power Down Enable [Disabled] Enables or disables the DDR power down mode. Configuration options: [Channel] [Chip Select] ASUS M3A79-T Deluxe 3-19 Processor Voltage DDR Voltage Core/PCIe Voltage Southbridge Voltage Blue 0.8000V~ 1.6000V 1.80V~1.98V 1.10V~1.28V 1.20V~1.28V Yellow N/A 2.00V~2.18V N/A N/A Pink N/A 2.20V~2.38V N/A N/A Red 1.6125V~ 1.7250V 2.40V~2.50V 1.30V~1.40V 1.30V~1.40V Auto Xpress [Auto] AMD...
...options: [Disabled] [Enabled] Memory Hole Remapping [Enabled] Configuration options: [Disabled] [Enabled] DRAM Ganged Mode [Auto] Configuration options: [Auto] [Enabled] [Disabled] Power Down Enable [Disabled] Enables or disables the DDR power down mode. Configuration options: [Channel] [Chip Select] ASUS M3A79-T Deluxe 3-19 Processor Voltage DDR Voltage Core/PCIe Voltage Southbridge Voltage Blue 0.8000V~ 1.6000V 1.80V~1.98V 1.10V~1.28V 1.20V~1.28V Yellow N/A 2.00V~2.18V N/A N/A Pink N/A 2.20V~2.38V N/A N/A Red 1.6125V~ 1.7250V 2.40V~2.50V 1.30V~1.40V 1.30V~1.40V Auto Xpress [Auto] AMD...
User Manual
Page 84
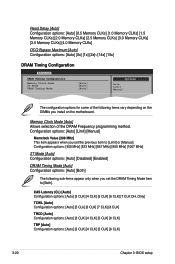
... DRAM Timing Configuration Memory Clock Mode 2T Mode DRAM Timing Mode [Auto] [Auto] [Auto] Options Auto Limit Manual The configuration options for some of the DRAM Frequency programming method. Configuration options: [400 MHz] [533 MHz] [667 MHz] [800 MHz] [1067 MHz] 2T Mode [Auto] Configuration options: [Auto] [Disabled] [Enabled] DRAM Timing Mode [Auto] Configuration options: [Auto] [Both] The following items vary depending on the DIMMs you install on the motherboard. Configuration options: [Auto] [Limit] [Manual] Memclock Value [200 MHz] This item appears when you set...
... DRAM Timing Configuration Memory Clock Mode 2T Mode DRAM Timing Mode [Auto] [Auto] [Auto] Options Auto Limit Manual The configuration options for some of the DRAM Frequency programming method. Configuration options: [400 MHz] [533 MHz] [667 MHz] [800 MHz] [1067 MHz] 2T Mode [Auto] Configuration options: [Auto] [Disabled] [Enabled] DRAM Timing Mode [Auto] Configuration options: [Auto] [Both] The following items vary depending on the DIMMs you install on the motherboard. Configuration options: [Auto] [Limit] [Manual] Memclock Value [200 MHz] This item appears when you set...
User Manual
Page 91
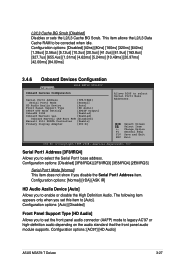
...] [20.97ms] [42.00ms] [84.00ms] 3.4.6 Onboard Devices Configuration Advanced BIOS SETUP UTILITY Onboard Devices Configuraiton Serial Port1 Address [3F8/IRQ4] Serial Port1 Mode [Normal] HD Audio Azalia Device [Auto] Front Panel Support Type [HD Audio] SPDIF_OUT Mode Setting [SPDIF Output] Onboard 1394 [Enabled] Onboard Marvell Lan [Enabled] Onboard Marvell LAN Boot ROM [Disabled] Marvell 6111 ESATA Controller [Enable] Primary Display Adapter [PCI-E] Allows BIOS to be corrected when idle. Configuration options: [Disabled] [3F8/IRQ4] [2F8/IRQ3] [3E8/IRQ4...
...] [20.97ms] [42.00ms] [84.00ms] 3.4.6 Onboard Devices Configuration Advanced BIOS SETUP UTILITY Onboard Devices Configuraiton Serial Port1 Address [3F8/IRQ4] Serial Port1 Mode [Normal] HD Audio Azalia Device [Auto] Front Panel Support Type [HD Audio] SPDIF_OUT Mode Setting [SPDIF Output] Onboard 1394 [Enabled] Onboard Marvell Lan [Enabled] Onboard Marvell LAN Boot ROM [Disabled] Marvell 6111 ESATA Controller [Enable] Primary Display Adapter [PCI-E] Allows BIOS to be corrected when idle. Configuration options: [Disabled] [3F8/IRQ4] [2F8/IRQ3] [3E8/IRQ4...
User Manual
Page 94
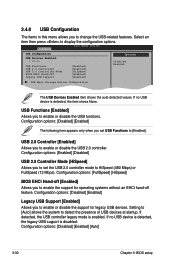
... enabled. 3.4.8 USB Configuration The items in this menu allows you to enable the support for legacy USB devices. Advanced BIOS SETUP UTILITY USB Configuration USB Devices Enabled: 1 Drive USB Functions USB 2.0 Controller USB 2.0 Controller Mode BIOS EHCI Hand-Off Legacy USB Support [Enabled] [Enabled] [HiSpeed] [Enabled] [Enabled] Options Disabled Enabled USB Mass Storage Device Configuration The USB Devices Enabled item shows the auto-detected values. Configuration options: [Disabled] [Enabled] The following item appears only when you set the USB 2.0 controller mode...
... enabled. 3.4.8 USB Configuration The items in this menu allows you to enable the support for legacy USB devices. Advanced BIOS SETUP UTILITY USB Configuration USB Devices Enabled: 1 Drive USB Functions USB 2.0 Controller USB 2.0 Controller Mode BIOS EHCI Hand-Off Legacy USB Support [Enabled] [Enabled] [HiSpeed] [Enabled] [Enabled] Options Disabled Enabled USB Mass Storage Device Configuration The USB Devices Enabled item shows the auto-detected values. Configuration options: [Disabled] [Enabled] The following item appears only when you set the USB 2.0 controller mode...
User Manual
Page 102
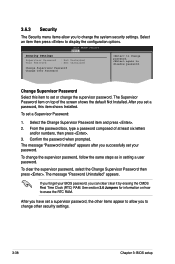
... password box, type a password composed of the screen shows the default Not Installed. Confirm the password when prompted. To clear the supervisor password, select the Change Supervisor Password then press . The message "Password Uninstalled" appears. After you have set a password, this item to set your BIOS password, you can clear clear it by erasing the CMOS Real Time Clock (RTC) RAM. The Supervisor Password item on how to erase the RTC RAM. See section 2.6 Jumpers...
... password box, type a password composed of the screen shows the default Not Installed. Confirm the password when prompted. To clear the supervisor password, select the Change Supervisor Password then press . The message "Password Uninstalled" appears. After you have set a password, this item to set your BIOS password, you can clear clear it by erasing the CMOS Real Time Clock (RTC) RAM. The Supervisor Password item on how to erase the RTC RAM. See section 2.6 Jumpers...
User Manual
Page 111
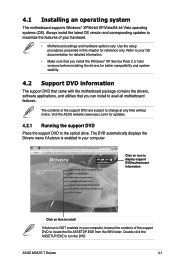
... that you install the Windows® XP Service Pack 2 or later versions before installing the drivers for better compatibility and system stability. 4.2 Support DVD information The support DVD that came with the motherboard package contains the drivers, software applications, and utilities that you can install to run the DVD. Double-click the ASSETUP.EXE to avail all motherboard features. ASUS M3A79-T Deluxe 4-1 4.1 Installing an operating system This motherboard supports Windows® XP/64-bit XP/Vista...
... that you install the Windows® XP Service Pack 2 or later versions before installing the drivers for better compatibility and system stability. 4.2 Support DVD information The support DVD that came with the motherboard package contains the drivers, software applications, and utilities that you can install to run the DVD. Double-click the ASSETUP.EXE to avail all motherboard features. ASUS M3A79-T Deluxe 4-1 4.1 Installing an operating system This motherboard supports Windows® XP/64-bit XP/Vista...
User Manual
Page 112
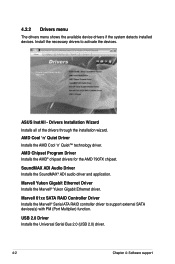
... (USB 2.0) driver. 4-2 Chapter 4: Software support AMD Chipset Program Driver Installs the AMD® chipset drivers for the AMD 790FX chipset. AMD Cool 'n' Quiet Driver Installs the AMD Cool 'n' Quiet™ technology driver. Marvell 61xx SATA RAID Controller Driver Installs the Marvell® Serial ATA RAID controller driver to activate the devices. Install the necessary drivers to support external SATA devices(s) with PM (Port Multiplier) function. SoundMAX ADI Audio Driver Installs the SoundMAX® ADI audio driver and application. ASUS InstAll - 4.2.2 Drivers menu The...
... (USB 2.0) driver. 4-2 Chapter 4: Software support AMD Chipset Program Driver Installs the AMD® chipset drivers for the AMD 790FX chipset. AMD Cool 'n' Quiet Driver Installs the AMD Cool 'n' Quiet™ technology driver. Marvell 61xx SATA RAID Controller Driver Installs the Marvell® Serial ATA RAID controller driver to activate the devices. Install the necessary drivers to support external SATA devices(s) with PM (Port Multiplier) function. SoundMAX ADI Audio Driver Installs the SoundMAX® ADI audio driver and application. ASUS InstAll - 4.2.2 Drivers menu The...
User Manual
Page 130
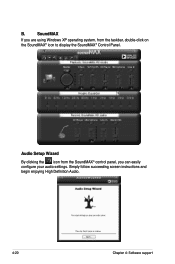
Simply follow succeeding screen instructions and begin enjoying High Definition Audio. 4-20 Chapter 4: Software support SoundMAX If you are using Windows XP operating system, from the SoundMAX® control panel, you can easily configure your audio settings. Audio Setup Wizard By clicking the icon from the taskbar, double-click on the SoundMAX® icon to display the SoundMAX® Control Panel. B.
Simply follow succeeding screen instructions and begin enjoying High Definition Audio. 4-20 Chapter 4: Software support SoundMAX If you are using Windows XP operating system, from the SoundMAX® control panel, you can easily configure your audio settings. Audio Setup Wizard By clicking the icon from the taskbar, double-click on the SoundMAX® icon to display the SoundMAX® Control Panel. B.

User Manual
Page 154
... repair Express Gate • Click Start > All Programs > Express Gate > Express Gate Installer > Repair this software. Main Ai Tweaker BIOS SETUP UTILITY Advanced Power Boot Tools Exit ASUS EZ Flash 2 Express Gate Enter OS Timer Reset User Data [Enabled] [10 Seconds] [No] Press ENTER to run the utility to continue. 4-44 Chapter 4: Software support You can repair Express Gate by clicking on the BIOS setup icon on the support DVD or download new versions from the ASUS support website. OR • Double click the Express Gate setup file...
... repair Express Gate • Click Start > All Programs > Express Gate > Express Gate Installer > Repair this software. Main Ai Tweaker BIOS SETUP UTILITY Advanced Power Boot Tools Exit ASUS EZ Flash 2 Express Gate Enter OS Timer Reset User Data [Enabled] [10 Seconds] [No] Press ENTER to run the utility to continue. 4-44 Chapter 4: Software support You can repair Express Gate by clicking on the BIOS setup icon on the support DVD or download new versions from the ASUS support website. OR • Double click the Express Gate setup file...
User Manual
Page 157
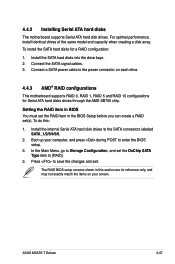
... power connector on your computer, and press during POST to save the changes and exit. Boot up your screen. Install the internal Serial ATA hard disk drives to [RAID]. 3. The RAID BIOS setup screens shown in the BIOS Setup before you can create a RAID set the OnChip SATA Type item to the SATA connectors labeled SATA_1/2/3/4/5/6. 2. ASUS M3A79-T Deluxe 4-47 Setting the RAID item in BIOS You must set the RAID item in this : 1. In the Main Menu, go to Storage Configuration, and set (s). 4.4.2 Installing Serial ATA hard disks The motherboard supports Serial ATA hard disk...
... power connector on your computer, and press during POST to save the changes and exit. Boot up your screen. Install the internal Serial ATA hard disk drives to [RAID]. 3. The RAID BIOS setup screens shown in the BIOS Setup before you can create a RAID set the OnChip SATA Type item to the SATA connectors labeled SATA_1/2/3/4/5/6. 2. ASUS M3A79-T Deluxe 4-47 Setting the RAID item in BIOS You must set the RAID item in this : 1. In the Main Menu, go to Storage Configuration, and set (s). 4.4.2 Installing Serial ATA hard disks The motherboard supports Serial ATA hard disk...

User Manual
Page 164
... adapter to install, make sure you to press the F6 key to install third-party SCSI or RAID driver. 2. Press then insert the floppy disk with RAID driver into the floppy disk drive. 3. To install the RAID driver in Windows® XP: 1. Insert the floppy disk/USB device with RAID driver into the floppy disk drive/ USB port. 2. Follow the succeeding screen instructions to complete the installation. Follow the succeeding screen instructions to complete the installation. 4-54 Chapter 4: Software support To install the RAID driver in Windows® Vista...
... adapter to install, make sure you to press the F6 key to install third-party SCSI or RAID driver. 2. Press then insert the floppy disk with RAID driver into the floppy disk drive. 3. To install the RAID driver in Windows® XP: 1. Insert the floppy disk/USB device with RAID driver into the floppy disk drive/ USB port. 2. Follow the succeeding screen instructions to complete the installation. Follow the succeeding screen instructions to complete the installation. 4-54 Chapter 4: Software support To install the RAID driver in Windows® Vista...


