User Manual
Page 9
...contains the information you have been added by your dealer. ASUS websites The ASUS website provides updated information on the motherboard. • Chapter 3: BIOS setup This chapter tells how to change system settings through the BIOS Setup menus. These documents are also provided. • ...contents of the standard package. Detailed descriptions of the BIOS parameters are not part of the support DVD that comes with the motherboard package and the software. Optional documentation Your product package may include optional documentation, such as warranty flyers, that you need...
...contains the information you have been added by your dealer. ASUS websites The ASUS website provides updated information on the motherboard. • Chapter 3: BIOS setup This chapter tells how to change system settings through the BIOS Setup menus. These documents are also provided. • ...contents of the standard package. Detailed descriptions of the BIOS parameters are not part of the support DVD that comes with the motherboard package and the software. Optional documentation Your product package may include optional documentation, such as warranty flyers, that you need...
User Manual
Page 66
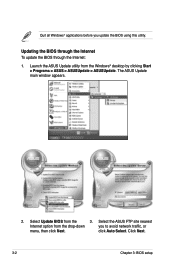
The ASUS Update main window appears. 2. Click Next. 3-2 Chapter 3: BIOS setup Quit all Windows® applications before you to avoid network traffic, or menu, then click Next. Launch the ASUS Update utility from the 3. Select the ASUS FTP site nearest Internet option from the drop‑down you update the BIOS using this utility. Updating the BIOS through the Internet To update the BIOS through the Internet: 1. Select Update BIOS from the Windows® desktop by clicking Start > Programs > ASUS > ASUSUpdate > ASUSUpdate. click Auto Select.
The ASUS Update main window appears. 2. Click Next. 3-2 Chapter 3: BIOS setup Quit all Windows® applications before you to avoid network traffic, or menu, then click Next. Launch the ASUS Update utility from the 3. Select the ASUS FTP site nearest Internet option from the drop‑down you update the BIOS using this utility. Updating the BIOS through the Internet To update the BIOS through the Internet: 1. Select Update BIOS from the Windows® desktop by clicking Start > Programs > ASUS > ASUSUpdate > ASUSUpdate. click Auto Select.
User Manual
Page 67
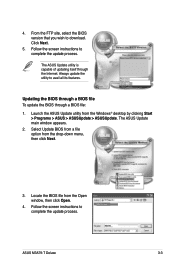
...BIOS through a BIOS file To update the BIOS through the Internet. Select Update BIOS from a file option from the Windows® desktop by clicking Start > Programs > ASUS > ASUSUpdate > ASUSUpdate. Follow the screen instructions to download. From the FTP site, select the BIOS version that you wish to complete the update process. The ASUS...the utility to complete the update process. M3a79t.rom M3a79t ASUS M3A79-T Deluxe 3-3 4. Launch the ASUS Update utility from the drop‑down menu, then click Next. 3. Locate the BIOS file from the Open window, then click Open. 4. ...
...BIOS through a BIOS file To update the BIOS through the Internet. Select Update BIOS from a file option from the Windows® desktop by clicking Start > Programs > ASUS > ASUSUpdate > ASUSUpdate. Follow the screen instructions to download. From the FTP site, select the BIOS version that you wish to complete the update process. The ASUS...the utility to complete the update process. M3a79t.rom M3a79t ASUS M3A79-T Deluxe 3-3 4. Launch the ASUS Update utility from the drop‑down menu, then click Next. 3. Locate the BIOS file from the Open window, then click Open. 4. ...

User Manual
Page 68
... 3 1/2 Floppy Drive icon. Windows® XP environment a. Windows® Vista environment a. Click from the format options field, then click Start. c. Select the Create an MS-DOS startup disk check box. Copy the original or the latest motherboard BIOS file to the floppy disk drive. Right-click Floppy Disk Drive then click Format to...
... 3 1/2 Floppy Drive icon. Windows® XP environment a. Windows® Vista environment a. Click from the format options field, then click Start. c. Select the Create an MS-DOS startup disk check box. Copy the original or the latest motherboard BIOS file to the floppy disk drive. Right-click Floppy Disk Drive then click Format to...

User Manual
Page 73
... by pressing the reset button on your screen. • Visit the ASUS website (www.asus.com) to download the latest BIOS file for most conditions to ensure system compatibility and stability. ASUS M3A79-T Deluxe 3-9 When you start up the computer, the system provides you wish ... your selections from the available options using this section are for reference purposes only, and may not exactly match what you are installing a motherboard, reconfiguring your system, or prompted to use as possible. 3.2 BIOS setup program This motherboard supports a programmable firmware that the...
... by pressing the reset button on your screen. • Visit the ASUS website (www.asus.com) to download the latest BIOS file for most conditions to ensure system compatibility and stability. ASUS M3A79-T Deluxe 3-9 When you start up the computer, the system provides you wish ... your selections from the available options using this section are for reference purposes only, and may not exactly match what you are installing a motherboard, reconfiguring your system, or prompted to use as possible. 3.2 BIOS setup program This motherboard supports a programmable firmware that the...
User Manual
Page 74
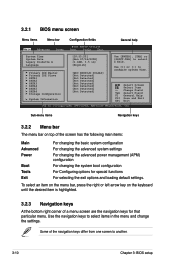
... system settings For changing the advanced power management (APM) configuration For changing the system boot configuration For Configuring options for that particular menu. 3.2.1 BIOS menu screen Menu items Menu bar Main Advanced Power Configuration fields BIOS SETUP UTILITY Boot Tools Exit General help System Time System Date Legacy Diskette A Language [10:55:25...
... system settings For changing the advanced power management (APM) configuration For changing the system boot configuration For Configuring options for that particular menu. 3.2.1 BIOS menu screen Menu items Menu bar Main Advanced Power Configuration fields BIOS SETUP UTILITY Boot Tools Exit General help System Time System Date Legacy Diskette A Language [10:55:25...
User Manual
Page 76
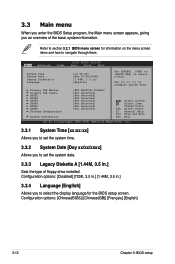
... time. 3.3.2 System Date [Day xx/xx/xxxx] Allows you to select a field. Configuration options: [Chinese(BIG5)] [Chinese(GB)] [Français] [English] 3-12 Chapter 3: BIOS setup Use [+] or [-] to navigate through them. 3.3 Main menu When you enter the BIOS Setup program, the Main menu screen appears, giving you an overview of floppy drive...
... time. 3.3.2 System Date [Day xx/xx/xxxx] Allows you to select a field. Configuration options: [Chinese(BIG5)] [Chinese(GB)] [Français] [English] 3-12 Chapter 3: BIOS setup Use [+] or [-] to navigate through them. 3.3 Main menu When you enter the BIOS Setup program, the Main menu screen appears, giving you an overview of floppy drive...
User Manual
Page 77
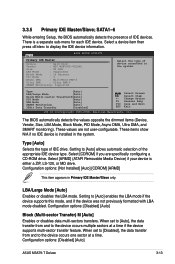
...Selects the type of IDE devices. SATA1-6 While entering Setup, the BIOS automatically detects the presence of IDE drive. LBA/Large Mode [Auto] Enables or disables the LBA mode. Configuration options: [Disabled] [Auto] ASUS M3A79-T Deluxe 3-13 These items show N/A if no IDE device is installed in ...Primary IDE Master/Slave only. Setting to display the IDE device information. Change Option F1 General Help F10 Save and Exit ESC ...
...Selects the type of IDE devices. SATA1-6 While entering Setup, the BIOS automatically detects the presence of IDE drive. LBA/Large Mode [Auto] Enables or disables the LBA mode. Configuration options: [Disabled] [Auto] ASUS M3A79-T Deluxe 3-13 These items show N/A if no IDE device is installed in ...Primary IDE Master/Slave only. Setting to display the IDE device information. Change Option F1 General Help F10 Save and Exit ESC ...
User Manual
Page 78
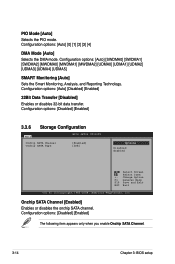
... only when you enable Onchip SATA Channel. 3-14 Chapter 3: BIOS setup PIO Mode [Auto] Selects the PIO mode. Configuration options: [Auto] [Disabled] [Enabled] 32Bit Data Transfer [Disabled] Enables or disables 32-bit data transfer. Configuration options: [Auto] [SWDMA0] [SWDMA1] [SWDMA2] [MWDMA0] [MWDMA1...disables the onchip SATA channel. Configuration options: [Disabled] [Enabled] 3.3.6 Storage Configuration Main BIOS SETUP UTILITY Onchip SATA Channel [Enabled] Onchip SATA Type [IDE] Options Disabled Enabled Select Screen Select Item +- Change Option F1 General Help F10 Save and...
... only when you enable Onchip SATA Channel. 3-14 Chapter 3: BIOS setup PIO Mode [Auto] Selects the PIO mode. Configuration options: [Auto] [Disabled] [Enabled] 32Bit Data Transfer [Disabled] Enables or disables 32-bit data transfer. Configuration options: [Auto] [SWDMA0] [SWDMA1] [SWDMA2] [MWDMA0] [MWDMA1...disables the onchip SATA channel. Configuration options: [Disabled] [Enabled] 3.3.6 Storage Configuration Main BIOS SETUP UTILITY Onchip SATA Channel [Enabled] Onchip SATA Type [IDE] Options Disabled Enabled Select Screen Select Item +- Change Option F1 General Help F10 Save and...
User Manual
Page 79
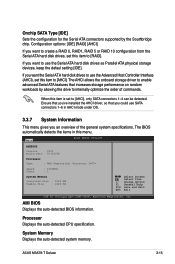
... Screen Select Item +- System Memory Displays the auto-detected system memory. AMI BIOS Displays the auto-detected BIOS information. ASUS M3A79-T Deluxe 3-15 Onchip SATA Type [IDE] Sets the configuration for the Serial ATA connectors supported by allowing the drive to [AHCI]. Configuration options: [IDE] [RAID] [AHCI] If you could use the Advanced Host Controller Interface...
... Screen Select Item +- System Memory Displays the auto-detected system memory. AMI BIOS Displays the auto-detected BIOS information. ASUS M3A79-T Deluxe 3-15 Onchip SATA Type [IDE] Sets the configuration for the Serial ATA connectors supported by allowing the drive to [AHCI]. Configuration options: [IDE] [RAID] [AHCI] If you could use the Advanced Host Controller Interface...
User Manual
Page 80
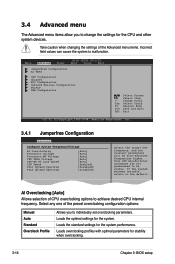
...default. If the system becomes unstable, return to be auto-adjusted. Loads the optimal settings for stability when overclocking. 3-16 Chapter 3: BIOS setup Change Field Tab Select Field F1 General Help F10 Save and Exit ESC Exit v02.61 (C)Copyright 1985-2008, American Megatrends, Inc.... the system. 3.4 Advanced menu The Advanced menu items allow you to malfunction. AI Overclocking [Auto] Allows selection of CPU overclocking options to change the settings for the system.performance. Loads the standard settings for the CPU and other system devices. Take caution when ...
...default. If the system becomes unstable, return to be auto-adjusted. Loads the optimal settings for stability when overclocking. 3-16 Chapter 3: BIOS setup Change Field Tab Select Field F1 General Help F10 Save and Exit ESC Exit v02.61 (C)Copyright 1985-2008, American Megatrends, Inc.... the system. 3.4 Advanced menu The Advanced menu items allow you to malfunction. AI Overclocking [Auto] Allows selection of CPU overclocking options to change the settings for the system.performance. Loads the standard settings for the CPU and other system devices. Take caution when ...
User Manual
Page 82
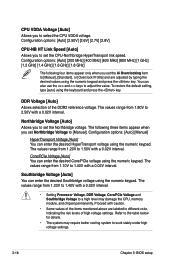
... Voltage and Southbridge Voltage to a high level may require better cooling system to work stably under high voltage settings. 3-18 Chapter 3: BIOS setup The following four items appear only when you set Northbridge Voltage to [Manual]. Core/PCIe Voltage [Auto] You can also use.... The values range from 1.80V to 2.50V with a 0.02V interval. Northbridge Voltage [Auto] Allows you to set the Northbridge voltage. Configuration options: [Auto] [Manual] HyperTransport Voltage [Auto] You can enter the desired Southbridge voltage using the numeric keypad. Refer to the table below for ...
... Voltage and Southbridge Voltage to a high level may require better cooling system to work stably under high voltage settings. 3-18 Chapter 3: BIOS setup The following four items appear only when you set Northbridge Voltage to [Manual]. Core/PCIe Voltage [Auto] You can also use.... The values range from 1.80V to 2.50V with a 0.02V interval. Northbridge Voltage [Auto] Allows you to set the Northbridge voltage. Configuration options: [Auto] [Manual] HyperTransport Voltage [Auto] You can enter the desired Southbridge voltage using the numeric keypad. Refer to the table below for ...
User Manual
Page 84
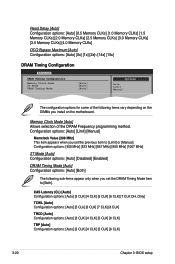
... 2T Mode [Auto] Configuration options: [Auto] [Disabled] [Enabled] DRAM Timing Mode [Auto] Configuration options: [Auto] [Both] The following items vary depending on the DIMMs you install on the motherboard. Configuration options: [Auto] [Limit] [Manual...[7 CLK DH_Only] TCWL [Auto] Configuration options: [Auto] [5 CLk] [6 CLK] [7 CLK] [8 CLK] TRCD [Auto] Configuration options: [Auto] [3 CLK] [4 CLK] [5 CLK] [6 CLK] TRP [Auto] Configuration options: [Auto] [3 CLK] [4 CLK] [5 CLK] [6 CLK] 3-20 Chapter 3: BIOS setup Read Delay [Auto] Configuration options: [Auto] [0.5 Memory CLKs] [1.0 ...
... 2T Mode [Auto] Configuration options: [Auto] [Disabled] [Enabled] DRAM Timing Mode [Auto] Configuration options: [Auto] [Both] The following items vary depending on the DIMMs you install on the motherboard. Configuration options: [Auto] [Limit] [Manual...[7 CLK DH_Only] TCWL [Auto] Configuration options: [Auto] [5 CLk] [6 CLK] [7 CLK] [8 CLK] TRCD [Auto] Configuration options: [Auto] [3 CLK] [4 CLK] [5 CLK] [6 CLK] TRP [Auto] Configuration options: [Auto] [3 CLK] [4 CLK] [5 CLK] [6 CLK] 3-20 Chapter 3: BIOS setup Read Delay [Auto] Configuration options: [Auto] [0.5 Memory CLKs] [1.0 ...
User Manual
Page 86
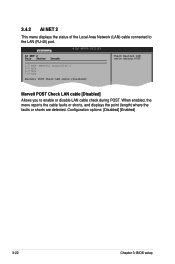
Configuration options: [Disabled] [Enabled] 3-22 Chapter 3: BIOS setup Advanced AI NET 2 Pair Status Length BIOS SETUP UTILITY Check Realtek LAN cable during POST. 1-2 N/A 3-6 N/A 4-5 N/A 7-8 N/A Marvell Controller 0 Marvell POST Check LAN cable [Disabled] Marvell POST Check LAN cable [Disabled] Allows you to ...
Configuration options: [Disabled] [Enabled] 3-22 Chapter 3: BIOS setup Advanced AI NET 2 Pair Status Length BIOS SETUP UTILITY Check Realtek LAN cable during POST. 1-2 N/A 3-6 N/A 4-5 N/A 7-8 N/A Marvell Controller 0 Marvell POST Check LAN cable [Disabled] Marvell POST Check LAN cable [Disabled] Allows you to ...
User Manual
Page 87
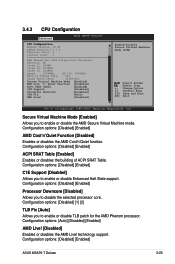
... [Disabled] Enables or disables the AMD Live! Configuration options: [Disabled] [Enabled] ASUS M3A79-T Deluxe 3-23 Configuration options: [Disabled] [Enabled] Processor Downcore [Disabled] Allows you to enable or disable Enhanced Halt State support. Configuration options: [Disabled] [Enabled] C1E Support [Disabled] Allows ...AMD Live! [Disabled] Enable/Disable Secure Virtual Machine Mode (SVM) Select Screen Select Item +- 3.4.3 CPU Configuration Advanced BIOS SETUP UTILITY CPU Configuration Module Version: 13.28 AGESA Version:3.1.7.0 Physical Count: 1 Logical Count: 3 AMD Phenom(tm) ...
... [Disabled] Enables or disables the AMD Live! Configuration options: [Disabled] [Enabled] ASUS M3A79-T Deluxe 3-23 Configuration options: [Disabled] [Enabled] Processor Downcore [Disabled] Allows you to enable or disable Enhanced Halt State support. Configuration options: [Disabled] [Enabled] C1E Support [Disabled] Allows ...AMD Live! [Disabled] Enable/Disable Secure Virtual Machine Mode (SVM) Select Screen Select Item +- 3.4.3 CPU Configuration Advanced BIOS SETUP UTILITY CPU Configuration Module Version: 13.28 AGESA Version:3.1.7.0 Physical Count: 1 Logical Count: 3 AMD Phenom(tm) ...
User Manual
Page 88
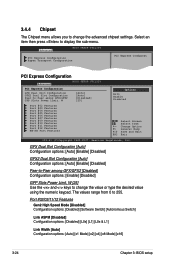
...Disabled] Configuration options: [Disabled] [Software Switch] [Autonomous Switch] Link ASPM [Disabled] Configuration options: [Disabled] [L0s] [L1] [L0s & L1] Link Width [Auto] Configuration options: [Auto] [x1 Mode] [x2] [x4] [x8 Mode] [x16] 3-24 Chapter 3: BIOS setup Advanced BIOS SETUP UTILITY... Configuration PCI Express Configurat PCI Express Configuration Advanced BIOS SETUP UTILITY PCI Express Configuration GFX Dual Slot Configuration GFX2 Dual Slot Configuration Peer-to-Peer among GFX/GFX2 [Disabled] Configuration options: [Enable] [Disabled] GPP Slots Power Limit...
...Disabled] Configuration options: [Disabled] [Software Switch] [Autonomous Switch] Link ASPM [Disabled] Configuration options: [Disabled] [L0s] [L1] [L0s & L1] Link Width [Auto] Configuration options: [Auto] [x1 Mode] [x2] [x4] [x8 Mode] [x16] 3-24 Chapter 3: BIOS setup Advanced BIOS SETUP UTILITY... Configuration PCI Express Configurat PCI Express Configuration Advanced BIOS SETUP UTILITY PCI Express Configuration GFX Dual Slot Configuration GFX2 Dual Slot Configuration Peer-to-Peer among GFX/GFX2 [Disabled] Configuration options: [Enable] [Disabled] GPP Slots Power Limit...
User Manual
Page 89
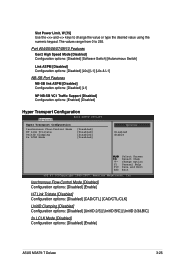
... options: [Disabled] [Enable] HT Link Tristate [Disabled] Configuration options: [Disabled] [CAD/CTL] [CAD/CTL/CLK] UnitID Clumping [Disabled] Configuration options: [Disabled] [UnitID 2/3] [UnitID B/C] [UnitID 2/3&B/C] 2x LCLK Mode [Disabled] Configuration options: [Disabled] [Enable] ASUS M3A79-T Deluxe ...Port Features NB-SB link ASPM [Disabled] Configuration options: [Disabled] [L1] NP NB-SB VC1 Traffic Support [Disabled] Configuration options: [Enabled] [Disabled] Hyper Transport Configuration Advanced BIOS SETUP UTILITY Hyper Transport Configuration Isochronous Flow-Control ...
... options: [Disabled] [Enable] HT Link Tristate [Disabled] Configuration options: [Disabled] [CAD/CTL] [CAD/CTL/CLK] UnitID Clumping [Disabled] Configuration options: [Disabled] [UnitID 2/3] [UnitID B/C] [UnitID 2/3&B/C] 2x LCLK Mode [Disabled] Configuration options: [Disabled] [Enable] ASUS M3A79-T Deluxe ...Port Features NB-SB link ASPM [Disabled] Configuration options: [Disabled] [L1] NP NB-SB VC1 Traffic Support [Disabled] Configuration options: [Enabled] [Disabled] Hyper Transport Configuration Advanced BIOS SETUP UTILITY Hyper Transport Configuration Isochronous Flow-Control ...

User Manual
Page 90
... sets the DRAM BG Scrub. Set this item to [Enabled] to report and correct memory errors automatically, maintaining system integrity. Configuration options: [Disabled] [Enabled] DRAM SCRUB REDIRECT [Disabled] Enables or disables the DRAM SCRUB REDIRECT feature that allows the hardware to correct ... [5.24ms] [10.49ms] [20.97ms] [42.00ms] [84.00ms] 3-26 Chapter 3: BIOS setup ECC Mode [Disabled] Disables or sets the DRAM ECC mode that allows the system to report and correct memory errors. Configuration options: [Disabled] [Basic] [Good] [Super] [Max] [User] DRAM ECC Enable [Disabled] ...
... sets the DRAM BG Scrub. Set this item to [Enabled] to report and correct memory errors automatically, maintaining system integrity. Configuration options: [Disabled] [Enabled] DRAM SCRUB REDIRECT [Disabled] Enables or disables the DRAM SCRUB REDIRECT feature that allows the hardware to correct ... [5.24ms] [10.49ms] [20.97ms] [42.00ms] [84.00ms] 3-26 Chapter 3: BIOS setup ECC Mode [Disabled] Disables or sets the DRAM ECC mode that allows the system to report and correct memory errors. Configuration options: [Disabled] [Basic] [Good] [Super] [Max] [User] DRAM ECC Enable [Disabled] ...
User Manual
Page 91
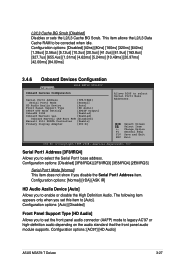
...This item does not show if you to set this item to enable or disable the High Definition Audio. Configuration options: [AC97] [HD Audio] ASUS M3A79-T Deluxe 3-27 Configuration options: [Auto] [Disabled] Front Panel Support Type [HD Audio] Allows you disable the Serial Port1 Address item. This...LAN Boot ROM [Disabled] Marvell 6111 ESATA Controller [Enable] Primary Display Adapter [PCI-E] Allows BIOS to be corrected when idle. Serial Port1 Address [3F8/IRQ4] Allows you to [Auto]. Configuration options: [Normal] [IrDA] [ASK IR] HD Audio Azalia Device [Auto] Allows you to legacy...
...This item does not show if you to set this item to enable or disable the High Definition Audio. Configuration options: [AC97] [HD Audio] ASUS M3A79-T Deluxe 3-27 Configuration options: [Auto] [Disabled] Front Panel Support Type [HD Audio] Allows you disable the Serial Port1 Address item. This...LAN Boot ROM [Disabled] Marvell 6111 ESATA Controller [Enable] Primary Display Adapter [PCI-E] Allows BIOS to be corrected when idle. Serial Port1 Address [3F8/IRQ4] Allows you to [Auto]. Configuration options: [Normal] [IrDA] [ASK IR] HD Audio Azalia Device [Auto] Allows you to legacy...
User Manual
Page 92
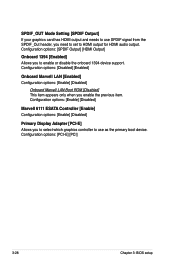
...] [Disabled] Primary Display Adapter [PCI-E] Allows you enable the previous item. Configuration options: [PCI-E] [PCI] 3-28 Chapter 3: BIOS setup Configuration options: [Disabled] [Enabled] Onboard Marvell LAN [Enabled] Configuration options: [Enable] [Disabled] Onboard Marvell LAN Boot ROM [Disabled] This item appears only when you to select which graphics controller to use SPDIF signal from the...
...] [Disabled] Primary Display Adapter [PCI-E] Allows you enable the previous item. Configuration options: [PCI-E] [PCI] 3-28 Chapter 3: BIOS setup Configuration options: [Disabled] [Enabled] Onboard Marvell LAN [Enabled] Configuration options: [Enable] [Disabled] Onboard Marvell LAN Boot ROM [Disabled] This item appears only when you to select which graphics controller to use SPDIF signal from the...


