User Manual
Page 7
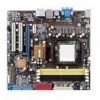
5. 從 CPU PnP 6. 請確認 CPU CPU CPU PnP 保護蓋 CPU CPU CPU CPU 7 A B A B
5. 從 CPU PnP 6. 請確認 CPU CPU CPU PnP 保護蓋 CPU CPU CPU CPU 7 A B A B
User Manual
Page 3
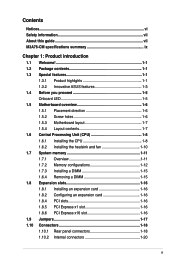
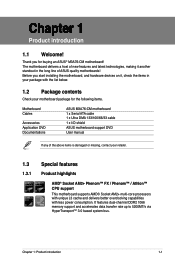
Contents Notices...vi Safety information vii About this guide vii M3A76-CM specifications summary ix Chapter 1: Product introduction 1.1 Welcome 1-1 1.2 Package contents 1-1 1.3 Special features 1-1 1.3.1 Product highlights 1-1 1.3.2 Innovative ASUS features 1-3 1.4 Before you proceed 1-5 Onboard LED 1-5 1.5 Motherboard overview 1-6 1.5.1 Placement direction 1-6 1.5.2 Screw holes 1-6 1.5.3 Motherboard layout 1-7 1.5.4 Layout contents 1-7 1.6 Central Processing Unit (CPU 1-8 1.6.1 Installing the CPU 1-8 1.6.2 Installing the heatsink and fan 1-10 1.7 System memory...
Contents Notices...vi Safety information vii About this guide vii M3A76-CM specifications summary ix Chapter 1: Product introduction 1.1 Welcome 1-1 1.2 Package contents 1-1 1.3 Special features 1-1 1.3.1 Product highlights 1-1 1.3.2 Innovative ASUS features 1-3 1.4 Before you proceed 1-5 Onboard LED 1-5 1.5 Motherboard overview 1-6 1.5.1 Placement direction 1-6 1.5.2 Screw holes 1-6 1.5.3 Motherboard layout 1-7 1.5.4 Layout contents 1-7 1.6 Central Processing Unit (CPU 1-8 1.6.1 Installing the CPU 1-8 1.6.2 Installing the heatsink and fan 1-10 1.7 System memory...

User Manual
Page 4
... 2-1 2.1.2 ASUS EZ Flash 2 utility 2-2 2.1.3 ASUS CrashFree BIOS 3 utility 2-3 2.2 BIOS setup program 2-4 2.2.1 BIOS menu screen 2-5 2.2.2 Menu bar 2-5 2.2.3 Navigation keys 2-6 2.2.4 Menu items 2-6 2.2.5 Submenu items 2-6 2.2.6 Configuration fields 2-6 2.2.7 General help 2-6 2.2.8 Pop-up window 2-6 2.2.9 Scroll bar 2-6 2.3 Main menu 2-7 2.3.1 System Time 2-7 2.3.2 System Date 2-7 2.3.3 Primary IDE Master/Slave and SATA 1~6 2-7 2.3.4 SATA Configuration 2-8 2.3.5 System Information 2-9 2.4 Advanced menu 2-9 2.4.1 JumperFree Configuration 2-9 2.4.2 CPU Configuration...
... 2-1 2.1.2 ASUS EZ Flash 2 utility 2-2 2.1.3 ASUS CrashFree BIOS 3 utility 2-3 2.2 BIOS setup program 2-4 2.2.1 BIOS menu screen 2-5 2.2.2 Menu bar 2-5 2.2.3 Navigation keys 2-6 2.2.4 Menu items 2-6 2.2.5 Submenu items 2-6 2.2.6 Configuration fields 2-6 2.2.7 General help 2-6 2.2.8 Pop-up window 2-6 2.2.9 Scroll bar 2-6 2.3 Main menu 2-7 2.3.1 System Time 2-7 2.3.2 System Date 2-7 2.3.3 Primary IDE Master/Slave and SATA 1~6 2-7 2.3.4 SATA Configuration 2-8 2.3.5 System Information 2-9 2.4 Advanced menu 2-9 2.4.1 JumperFree Configuration 2-9 2.4.2 CPU Configuration...
User Manual
Page 9
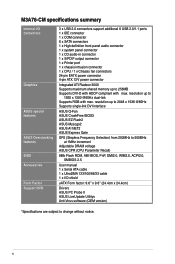
... a 64-bit Windows OS when having 4GB or more memory installed on the next page) ix M3A76-CM specifications summary CPU Chipset System bus Memory Expansion slots Storage Audio USB LAN Back panel I /O ports (continued on the motherboard. 1 x PCI Express™ x16 slot 1 x PCI Express™ x1 slots 2 x PCI...CPU Dual-channel memory architecture 4 x 240-pin DIMM slots support unbuffered ECC and non-ECC DDR2 1066/800/667/533MHz Supports up to 8GB system memory * Due to 12 USB 2.0/1.1 ports (6 ports at mid-board, 6 ports at 800MHz frequency by default for system stability. ** Refer to www.asus...
... a 64-bit Windows OS when having 4GB or more memory installed on the next page) ix M3A76-CM specifications summary CPU Chipset System bus Memory Expansion slots Storage Audio USB LAN Back panel I /O ports (continued on the motherboard. 1 x PCI Express™ x16 slot 1 x PCI Express™ x1 slots 2 x PCI...CPU Dual-channel memory architecture 4 x 240-pin DIMM slots support unbuffered ECC and non-ECC DDR2 1066/800/667/533MHz Supports up to 8GB system memory * Due to 12 USB 2.0/1.1 ports (6 ports at mid-board, 6 ports at 800MHz frequency by default for system stability. ** Refer to www.asus...
User Manual
Page 10
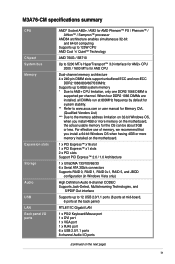
M3A76-CM specifications summary Internal I /O shield uATX Form factor: 9.6'' x 9.6'' (24.4cm x 24.4cm) Drivers ASUS PC Probe II ASUS LiveUpdate Utilitys Anti-...ASUS Overclocking features BIOS Accessories Form Factor Support DVD 3 x USB 2.0 connectors support additional 6 USB 2.0/1.1 ports 1 x IDE connector 1 x COM connector 6 x SATA connectors 1 x High definition front panel audio connector 1 x system panel connector 1 x CD audio-in connector 1 x S/PDIF output connector 1 x Printer port 1 x chassis intrusion connector 1 x CPU / 1 x Chassis fan connectors 24-pin EATX power connector 4-pin ATX...
M3A76-CM specifications summary Internal I /O shield uATX Form factor: 9.6'' x 9.6'' (24.4cm x 24.4cm) Drivers ASUS PC Probe II ASUS LiveUpdate Utilitys Anti-...ASUS Overclocking features BIOS Accessories Form Factor Support DVD 3 x USB 2.0 connectors support additional 6 USB 2.0/1.1 ports 1 x IDE connector 1 x COM connector 6 x SATA connectors 1 x High definition front panel audio connector 1 x system panel connector 1 x CD audio-in connector 1 x S/PDIF output connector 1 x Printer port 1 x chassis intrusion connector 1 x CPU / 1 x Chassis fan connectors 24-pin EATX power connector 4-pin ATX...
User Manual
Page 11
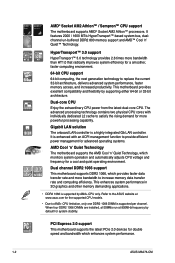
... / Phenom™ / Athlon™ CPU support This motherboard supports AMD® Socket AM2+ multi-core processors with unique L3 cache and delivers better overclocking capabilities with the list below. 1.2 Package contents Check your package with less power consumption. Before you for the following items. Motherboard Cables Accessories Application DVD Documentations ASUS M3A76-CM motherboard 1 x Serial ATA cable...
... / Phenom™ / Athlon™ CPU support This motherboard supports AMD® Socket AM2+ multi-core processors with unique L3 cache and delivers better overclocking capabilities with the list below. 1.2 Package contents Check your package with less power consumption. Before you for the following items. Motherboard Cables Accessories Application DVD Documentations ASUS M3A76-CM motherboard 1 x Serial ATA cable...
User Manual
Page 12
... PCIe 2.0 devices for system stability. AMD® Socket AM2 Athlon™ / Sempron™ CPU support The motherboard supports AMD® Socket AM2 Athlon™ processors. Dual channel DDR2 1066 support This motherboard supports DDR2 1066, which enhances system performance. 1-2 ASUS M3A76-CM This motherboard provides excellent compatibility and flexibility by default for double speed and bandwidth which...
... PCIe 2.0 devices for system stability. AMD® Socket AM2 Athlon™ / Sempron™ CPU support The motherboard supports AMD® Socket AM2 Athlon™ processors. Dual channel DDR2 1066 support This motherboard supports DDR2 1066, which enhances system performance. 1-2 ASUS M3A76-CM This motherboard provides excellent compatibility and flexibility by default for double speed and bandwidth which...
User Manual
Page 13
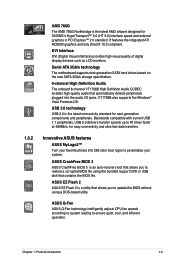
... Interface DVI (Digital Visual Interface) provides high visual quality of digital display devices such as LCD monitors. ASUS Q-Fan ASUS Q-Fan technology intelligently adjusts CPU fan speeds according to system loading to personalize your favorite photos into the audio I/O jacks. USB 2.0 technology...8482; 2.0 standard. Innovative ASUS features ASUS MyLogo2™ Turn your system. 1.3.2 AMD 760G The AMD 760G Northbridge is the latest connectivity standard for easy connectivity and ultra-fast data transfers. Serial ATA 3Gb/s technology The motherboard supports next-generation SATA ...
... Interface DVI (Digital Visual Interface) provides high visual quality of digital display devices such as LCD monitors. ASUS Q-Fan ASUS Q-Fan technology intelligently adjusts CPU fan speeds according to system loading to personalize your favorite photos into the audio I/O jacks. USB 2.0 technology...8482; 2.0 standard. Innovative ASUS features ASUS MyLogo2™ Turn your system. 1.3.2 AMD 760G The AMD 760G Northbridge is the latest connectivity standard for easy connectivity and ultra-fast data transfers. Serial ATA 3Gb/s technology The motherboard supports next-generation SATA ...
User Manual
Page 17
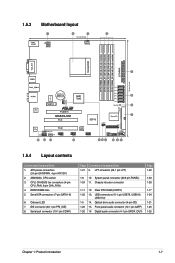
...11 12. ATX power connectors (24-pin EATXPWR, 4-pin ATX12V) 2. Front panel audio connector (10-1 pin AAFP) 1-25 1-20 16 Digital audio connector (4-1 pin SPDIF_OUT) 1-25 Chapter 1: Product introduction 1-7 Onboard LED 7. AM2/AM2+ CPU socket 3. 1.5.3 Motherboard layout 1.5.4 ...Layout contents Connectors/Jumpers/Slots 1. LPT connector (26-1 pin LPT) Page 1-22 1-8 10. CPU, CHASSIS fan connectors (4-pin CPU_FAN, 3-pin CHA_FAN) 4. USB connectors (10-1 ...
...11 12. ATX power connectors (24-pin EATXPWR, 4-pin ATX12V) 2. Front panel audio connector (10-1 pin AAFP) 1-25 1-20 16 Digital audio connector (4-1 pin SPDIF_OUT) 1-25 Chapter 1: Product introduction 1-7 Onboard LED 7. AM2/AM2+ CPU socket 3. 1.5.3 Motherboard layout 1.5.4 ...Layout contents Connectors/Jumpers/Slots 1. LPT connector (26-1 pin LPT) Page 1-22 1-8 10. CPU, CHASSIS fan connectors (4-pin CPU_FAN, 3-pin CHA_FAN) 4. USB connectors (10-1 ...
User Manual
Page 18
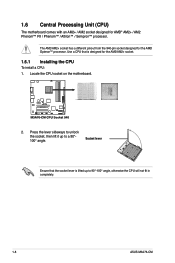
...the lever sideways to unlock the socket, then lift it up to a 90°100° angle. 1.6 Central Processing Unit (CPU) The motherboard comes with an AM2+ / AM2 socket designed for the AMD Opteron™ processor. The AM2/AM2+ socket has a different pinout...AM2 Phenom™ FX / Phenom™ / Athlon™ / Sempron™ processor. Use a CPU that the socket lever is designed for the AM2/AM2+ socket. 1.6.1 Installing the CPU To install a CPU: 1. Socket lever Ensure that is lifted up to 90°-100° angle, otherwise the CPU will not fit in completely. 1-8 ASUS M3A76-CM
...the lever sideways to unlock the socket, then lift it up to a 90°100° angle. 1.6 Central Processing Unit (CPU) The motherboard comes with an AM2+ / AM2 socket designed for the AMD Opteron™ processor. The AM2/AM2+ socket has a different pinout...AM2 Phenom™ FX / Phenom™ / Athlon™ / Sempron™ processor. Use a CPU that the socket lever is designed for the AM2/AM2+ socket. 1.6.1 Installing the CPU To install a CPU: 1. Socket lever Ensure that is lifted up to 90°-100° angle, otherwise the CPU will not fit in completely. 1-8 ASUS M3A76-CM
User Manual
Page 19
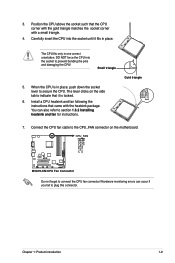
... connector. You can occur if you fail to prevent bending the pins and damaging the CPU! Do not forget to the CPU_FAN connector on the side tab to secure the CPU. The CPU fits only in place, push down the socket lever to indicate that it fits in ...place. Install a CPU heatsink and fan following the instructions that the CPU corner with the gold triangle matches the socket corner with the heatsink package. Chapter 1: Product introduction 1-9 The lever clicks on the motherboard. Position the CPU above the socket such that came with a small...
... connector. You can occur if you fail to prevent bending the pins and damaging the CPU! Do not forget to the CPU_FAN connector on the side tab to secure the CPU. The CPU fits only in place, push down the socket lever to indicate that it fits in ...place. Install a CPU heatsink and fan following the instructions that the CPU corner with the gold triangle matches the socket corner with the heatsink package. Chapter 1: Product introduction 1-9 The lever clicks on the motherboard. Position the CPU above the socket such that came with a small...
User Manual
Page 20
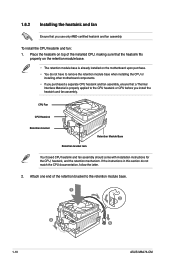
... properly applied to the retention module base. 1 2 3 4 5 1-10 ASUS M3A76-CM If the instructions in this section do not have to remove the retention module base when installing the CPU or installing other motherboard components. • If you use only AMD-certified heatsink and fan assembly. ...Place the heatsink on the motherboard upon purchase. • You do not match the CPU documentation, follow the latter. 2. Attach one end of the installed CPU, making sure that a Thermal Interface Material is already installed on top ...
... properly applied to the retention module base. 1 2 3 4 5 1-10 ASUS M3A76-CM If the instructions in this section do not have to remove the retention module base when installing the CPU or installing other motherboard components. • If you use only AMD-certified heatsink and fan assembly. ...Place the heatsink on the motherboard upon purchase. • You do not match the CPU documentation, follow the latter. 2. Attach one end of the installed CPU, making sure that a Thermal Interface Material is already installed on top ...
User Manual
Page 21
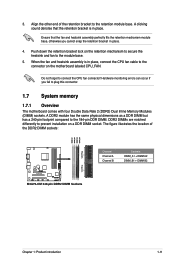
...to the retention module base. A DDR2 module has the same physical dimensions as a DDR DIMM but has a 240-pin footprint compared to connect the CPU fan connector! Align the other end of the DDR2 DIMM sockets: Channel Channel A Channel B Sockets DIMM_A1 + DIMM A2 DIMM_B1 + DIMM B2 Chapter ...1: Product introduction 1-11 Push down the retention bracket lock on the motherboard labeled CPU_FAN. The figure illustrates the location of the retention bracket to plug this connector. 1.7 System memory 1.7.1 Overview The...
...to the retention module base. A DDR2 module has the same physical dimensions as a DDR DIMM but has a 240-pin footprint compared to connect the CPU fan connector! Align the other end of the DDR2 DIMM sockets: Channel Channel A Channel B Sockets DIMM_A1 + DIMM A2 DIMM_B1 + DIMM B2 Chapter ...1: Product introduction 1-11 Push down the retention bracket lock on the motherboard labeled CPU_FAN. The figure illustrates the location of the retention bracket to plug this connector. 1.7 System memory 1.7.1 Overview The...
User Manual
Page 22
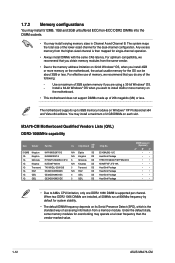
...at 800Mhz frequency by default for the OS can be about 3GB or less. The motherboard supports up of accessing information from a memory module. M3A76-CM Motherboard Qualified Vendors Lists (QVL) DDR2-1066MHz capability Size Vendor Part No. You may install...1G GEIL GE24GB1066C5QC 5 GEIL DS Chip No. Use a maximum of memory, we recommend that you want to AM2+ CPU limitation, only one DDR2 1066 DIMM is then mapped for single-channel operation. • Always install DIMMs with the same...all DIMMs run at a lower frequency than the vendor-marked value. 1-12 ASUS M3A76-CM
...at 800Mhz frequency by default for the OS can be about 3GB or less. The motherboard supports up of accessing information from a memory module. M3A76-CM Motherboard Qualified Vendors Lists (QVL) DDR2-1066MHz capability Size Vendor Part No. You may install...1G GEIL GE24GB1066C5QC 5 GEIL DS Chip No. Use a maximum of memory, we recommend that you want to AM2+ CPU limitation, only one DDR2 1066 DIMM is then mapped for single-channel operation. • Always install DIMMs with the same...all DIMMs run at a lower frequency than the vendor-marked value. 1-12 ASUS M3A76-CM

User Manual
Page 27
... RTC RAM (CLRTC) This jumper allows you to clear the CMOS RTC RAM data. Move the jumper cap from pins 1-2 (default) to overclocking, use the CPU Parameter Recall (C.P.R) feature. Except when clearing the RTC RAM, never remove the cap on pins 2-3 for about 5~10 seconds, then move the jumper again to...
... RTC RAM (CLRTC) This jumper allows you to clear the CMOS RTC RAM data. Move the jumper cap from pins 1-2 (default) to overclocking, use the CPU Parameter Recall (C.P.R) feature. Except when clearing the RTC RAM, never remove the cap on pins 2-3 for about 5~10 seconds, then move the jumper again to...

User Manual
Page 34
...~2.22A (26.64W max.) at the back of the system chassis. Only the CPU FAN supports ASUS Q-Fan. 1-24 ASUS M3A76-CM The USB 2.0 module is purchased separately. 9. Connect the USB module cable to any of the connector. Doing so will damage the motherboard! These USB connectors comply with USB 2.0 specification that the black wire of... matches the ground pin of these connectors, then install the module to 480 Mbps connection speed. Insufficient air flow inside the system may damage the motherboard components. These are for USB 2.0 ports. DO NOT place jumper caps on the...
...~2.22A (26.64W max.) at the back of the system chassis. Only the CPU FAN supports ASUS Q-Fan. 1-24 ASUS M3A76-CM The USB 2.0 module is purchased separately. 9. Connect the USB module cable to any of the connector. Doing so will damage the motherboard! These USB connectors comply with USB 2.0 specification that the black wire of... matches the ground pin of these connectors, then install the module to 480 Mbps connection speed. Insufficient air flow inside the system may damage the motherboard components. These are for USB 2.0 ports. DO NOT place jumper caps on the...

User Manual
Page 47
...F1 General Help F10 Save and Exit ESC Exit v02.61 (C)Copyright 1985-2008, American Megatrends, Inc. 2.4.1 JumperFree Configuration CPU Overclocking [Auto] Allows selection of the Advanced menu items. Incorrect field values can cause the system to malfunction. 2.3.5 System... you to individually set the the overclocking parameter to 5%. Main Advanced Power BIOS SETUP UTILITY Boot Tools Exit JumperFree Configuration CPU Configuration Chipset Onboard Devices Configuration PCIPnP USB Configuration Adjust System Frequency/Voltage etc. Allows you an overview of the preset overclocking...
...F1 General Help F10 Save and Exit ESC Exit v02.61 (C)Copyright 1985-2008, American Megatrends, Inc. 2.4.1 JumperFree Configuration CPU Overclocking [Auto] Allows selection of the Advanced menu items. Incorrect field values can cause the system to malfunction. 2.3.5 System... you to individually set the the overclocking parameter to 5%. Main Advanced Power BIOS SETUP UTILITY Boot Tools Exit JumperFree Configuration CPU Configuration Chipset Onboard Devices Configuration PCIPnP USB Configuration Adjust System Frequency/Voltage etc. Allows you an overview of the preset overclocking...

User Manual
Page 48
.... PCIE Clock [100] Allows you set the AI Overclocking item to [Overclock Profile]. Configuration options: [Auto] [Manual] 2-10 ASUS M3A76-CM The following item appears only when you to manually adjust PCIE clock. Configuration options: [Auto] [Manual] The following item appears only... when you to manually adjust CPU/HT reference clock. CPU /HT Reference Clock (MHz) [200] Allows you set the GPU Overclocking item to [Manual]. Configuration options: [Auto] [Overclock 2%]...
.... PCIE Clock [100] Allows you set the AI Overclocking item to [Overclock Profile]. Configuration options: [Auto] [Manual] 2-10 ASUS M3A76-CM The following item appears only when you to manually adjust PCIE clock. Configuration options: [Auto] [Manual] The following item appears only... when you to manually adjust CPU/HT reference clock. CPU /HT Reference Clock (MHz) [200] Allows you set the GPU Overclocking item to [Manual]. Configuration options: [Auto] [Overclock 2%]...

User Manual
Page 50
to DIMMs even memory slots are not populated. 2-12 ASUS M3A76-CM The standard value is 0.00625V. Configuration options: [Auto][+ 50mv] [+ 100mv] [+ 150mv] 2.4.2 CPU Configuration GART Error Reporting [Disabled] This option should remain disabled for testing purpose. NorthBridge ...normal operation. Configuration options: [Disabled] [Enabled] Microcode Updation [Enabled] Allows you to enable or disable the CPU prefetching. Configuration options: [Disabled] [Enabled] CPU Prefetching [Enabled] Allows you to enable or disable the microcode updation. Use +/- Select an item then press ...
to DIMMs even memory slots are not populated. 2-12 ASUS M3A76-CM The standard value is 0.00625V. Configuration options: [Auto][+ 50mv] [+ 100mv] [+ 150mv] 2.4.2 CPU Configuration GART Error Reporting [Disabled] This option should remain disabled for testing purpose. NorthBridge ...normal operation. Configuration options: [Disabled] [Enabled] Microcode Updation [Enabled] Allows you to enable or disable the CPU prefetching. Configuration options: [Disabled] [Enabled] CPU Prefetching [Enabled] Allows you to enable or disable the microcode updation. Use +/- Select an item then press ...

User Manual
Page 54
... [xxxºC/xxxºF] MB Temperature [xxxºC/xxxºF] The onboard hardware monitor automatically detects and displays the motherboard and CPU temperatures. Configuration options: [Disabled] [Enabled] Fan Auto Mode Start Voltage [5.0V] Allows you to enable or disable RTC to...] Allows you to display the detected speed. Configuration options: [25ºC] [26ºC] [27ºC] ... [47ºC] [48ºC] 2-16 ASUS M3A76-CM Configuration options: [Disabled] [Enabled] Power On From S5 By PS/2 KB/MS [Disabled] Enable or disable PS/2 Keyboard/Mouse to generate a wake event...
... [xxxºC/xxxºF] MB Temperature [xxxºC/xxxºF] The onboard hardware monitor automatically detects and displays the motherboard and CPU temperatures. Configuration options: [Disabled] [Enabled] Fan Auto Mode Start Voltage [5.0V] Allows you to enable or disable RTC to...] Allows you to display the detected speed. Configuration options: [25ºC] [26ºC] [27ºC] ... [47ºC] [48ºC] 2-16 ASUS M3A76-CM Configuration options: [Disabled] [Enabled] Power On From S5 By PS/2 KB/MS [Disabled] Enable or disable PS/2 Keyboard/Mouse to generate a wake event...


