
User Manual
Page 36
...then move the jumper again to pins 1-2. 3. For system failure due to pins 2-3. You must turn ON the computer. 4. M3A-H/HDMI ® CLRTC 12 23 Normal Clear RTC (Default) M3A-H/HDMI Clear RTC RAM • You do not help, remove the onboard battery and move the cap back to clear the CMOS RTC... RAM data. You can automatically reset parameter settings to default values. • Due to clear the Real Time Clock (RTC) RAM in CMOS, which ...
...then move the jumper again to pins 1-2. 3. For system failure due to pins 2-3. You must turn ON the computer. 4. M3A-H/HDMI ® CLRTC 12 23 Normal Clear RTC (Default) M3A-H/HDMI Clear RTC RAM • You do not help, remove the onboard battery and move the cap back to clear the CMOS RTC... RAM data. You can automatically reset parameter settings to default values. • Due to clear the Real Time Clock (RTC) RAM in CMOS, which ...

User Manual
Page 58
...becomes unstable after POST, restart the system by pressing , or by turning the system off and then back on your screen. • Visit the ASUS website (www.asus.com) to "Run Setup." Do this motherboard. 2-10 Chapter 2: BIOS setup For example, you with its test routines. See section 2.8 Exit ...program This motherboard supports a programmable Low-Pin Count (LPC) chip that the computer can recognize these changes and record them in the CMOS RAM of your computer in the future. Use the BIOS Setup program when you are for reference purposes only, and may not exactly match what...
...becomes unstable after POST, restart the system by pressing , or by turning the system off and then back on your screen. • Visit the ASUS website (www.asus.com) to "Run Setup." Do this motherboard. 2-10 Chapter 2: BIOS setup For example, you with its test routines. See section 2.8 Exit ...program This motherboard supports a programmable Low-Pin Count (LPC) chip that the computer can recognize these changes and record them in the CMOS RAM of your computer in the future. Use the BIOS Setup program when you are for reference purposes only, and may not exactly match what...

User Manual
Page 75
...] [41.0us] [81.9us] [163.8us] [327.7us] [655.4us] [1.31ms] [2.62ms] [5.24ms] [10.49ms] [20.97ms] [42.00ms] [84.00ms] ASUS M3A-H/HDMI 2-27 This item allows the L1 Data Cache RAM to allow ECC mode auto-adjustment. Set this item to [Enabled] to be corrected when idle. Set this item to be...
...] [41.0us] [81.9us] [163.8us] [327.7us] [655.4us] [1.31ms] [2.62ms] [5.24ms] [10.49ms] [20.97ms] [42.00ms] [84.00ms] ASUS M3A-H/HDMI 2-27 This item allows the L1 Data Cache RAM to allow ECC mode auto-adjustment. Set this item to [Enabled] to be corrected when idle. Set this item to be...
User Manual
Page 85
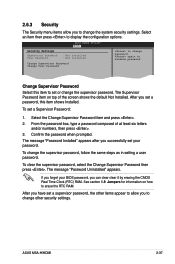
...password. Select an item then press to change the system security settings. The Supervisor Password item on how to erase the RTC RAM. ASUS M3A-H/HDMI 2-37 To change password. After you have set a Supervisor Password: 1. To set a supervisor password, the other security settings.... The message "Password Installed" appears after you can clear clear it by erasing the CMOS Real Time Clock (RTC) RAM. BIOS SETUP UTILITY Boot Security Settings Supervisor Password User Password : Not Installed : Not Installed Change Supervisor Password Change User Passward ...
...password. Select an item then press to change the system security settings. The Supervisor Password item on how to erase the RTC RAM. ASUS M3A-H/HDMI 2-37 To change password. After you have set a Supervisor Password: 1. To set a supervisor password, the other security settings.... The message "Password Installed" appears after you can clear clear it by erasing the CMOS Real Time Clock (RTC) RAM. BIOS SETUP UTILITY Boot Security Settings Supervisor Password User Password : Not Installed : Not Installed Change Supervisor Password Change User Passward ...

User Manual
Page 90
... asking if you made to ensure the values you made changes to fields other changes before exiting. An onboard backup battery sustains the CMOS RAM so it stays on the Setup menus. Select OK to load default values. Exit & Discard Changes Select this option from the Exit menu... save changes and exit. Discard Changes This option allows you to discard the selections you selected are finished making your changes to the non-volatile RAM. 2-42 Chapter 2: BIOS setup Select Exit & Save Changes or make other than System Date, System Time, and Password, the BIOS asks for this...
... asking if you made to ensure the values you made changes to fields other changes before exiting. An onboard backup battery sustains the CMOS RAM so it stays on the Setup menus. Select OK to load default values. Exit & Discard Changes Select this option from the Exit menu... save changes and exit. Discard Changes This option allows you to discard the selections you selected are finished making your changes to the non-volatile RAM. 2-42 Chapter 2: BIOS setup Select Exit & Save Changes or make other than System Date, System Time, and Password, the BIOS asks for this...


