
User Manual
Page 1
Motherboard
Motherboard

User Manual
Page 1
M3A-H/ HDMI Motherboard
M3A-H/ HDMI Motherboard

User Manual
Page 3
Contents Contents...iii Notices...vi Safety information vii About this guide viii M3A-H/HDMI specifications summary x Chapter 1: Product introduction 1.1 Welcome 1-2 1.2 Package contents 1-2 1.3 Special features 1-3 1.3.1 Product highlights 1-3 1.3.2 ASUS AI Lifestyle unique features 1-5 1.3.3 ASUS intelligent performance and overclocking features 1-7 1.4 Before you proceed 1-8 1.5 Motherboard overview 1-9 1.5.1 Motherboard layout 1-9 1.5.2 Placement direction 1-10 1.5.3 Screw holes 1-10 1.6 Central Processing Unit (CPU 1-11 1.6.1 Installing the...
Contents Contents...iii Notices...vi Safety information vii About this guide viii M3A-H/HDMI specifications summary x Chapter 1: Product introduction 1.1 Welcome 1-2 1.2 Package contents 1-2 1.3 Special features 1-3 1.3.1 Product highlights 1-3 1.3.2 ASUS AI Lifestyle unique features 1-5 1.3.3 ASUS intelligent performance and overclocking features 1-7 1.4 Before you proceed 1-8 1.5 Motherboard overview 1-9 1.5.1 Motherboard layout 1-9 1.5.2 Placement direction 1-10 1.5.3 Screw holes 1-10 1.6 Central Processing Unit (CPU 1-11 1.6.1 Installing the...

User Manual
Page 7
...circuitry. • Avoid dust, humidity, and temperature extremes. Contact a qualified service technician or your retailer. Operation safety • Before installing the motherboard and adding devices on a stable surface. • If you detect any area where it may become wet. • Place the product on...any damage, contact your dealer immediately. • To avoid short circuits, keep paper clips, screws, and staples away from the motherboard, ensure that all cables are correctly connected and the power cables are using, contact your area. vii If you encounter technical ...
...circuitry. • Avoid dust, humidity, and temperature extremes. Contact a qualified service technician or your retailer. Operation safety • Before installing the motherboard and adding devices on a stable surface. • If you detect any area where it may become wet. • Place the product on...any damage, contact your dealer immediately. • To avoid short circuits, keep paper clips, screws, and staples away from the motherboard, ensure that all cables are correctly connected and the power cables are using, contact your area. vii If you encounter technical ...

User Manual
Page 8
... added by your dealer. Where to find more information Refer to perform when installing system components. ASUS websites The ASUS website provides updated information on the motherboard. • Chapter 2: BIOS setup This chapter tells how to the ASUS contact information. 2. Refer to change system settings through the BIOS Setup menus. This chapter also lists...
... added by your dealer. Where to find more information Refer to perform when installing system components. ASUS websites The ASUS website provides updated information on the motherboard. • Chapter 2: BIOS setup This chapter tells how to the ASUS contact information. 2. Refer to change system settings through the BIOS Setup menus. This chapter also lists...

User Manual
Page 13
This chapter describes the motherboard features and the new technologies it supports. Chapter 1: 1Product introduction
This chapter describes the motherboard features and the new technologies it supports. Chapter 1: 1Product introduction
User Manual
Page 14
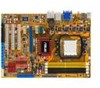
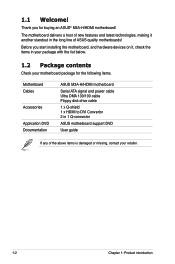
... the following items. Motherboard Cables Accessories Application DVD Documentation ASUS M3A-H/HDMI motherboard Serial ATA signal and power cable Ultra DMA 133/100 cable Floppy disk drive cable 1 x Q-shield 1 x HDMI to DVI Convertor 2 in the long line of the above items is damaged or missing, contact your motherboard package for buying an ASUS® M3A-H/HDMI motherboard! The motherboard delivers a host of...
... the following items. Motherboard Cables Accessories Application DVD Documentation ASUS M3A-H/HDMI motherboard Serial ATA signal and power cable Ultra DMA 133/100 cable Floppy disk drive cable 1 x Q-shield 1 x HDMI to DVI Convertor 2 in the long line of the above items is damaged or missing, contact your motherboard package for buying an ASUS® M3A-H/HDMI motherboard! The motherboard delivers a host of...

User Manual
Page 15
... to provide excellent system performance and overclocking capabilities. AMD® 780G Chipset AMD® 780G Chipset is in line with the ASUS vision of creating environment-friendly and recyclable products/packaging to 5200MT/s HyperTransport™ 3.0 (HT 3.0) interface speed and PCI Express™... a smoother, faster computing environment. See page 1-11 for details. See page 1-11 for details. ASUS M3A-H/HDMI 1-3 1.3 Special features 1.3.1 Product highlights Green ASUS This motherboard and its packaging comply with the European Union's Restriction on the environment.
... to provide excellent system performance and overclocking capabilities. AMD® 780G Chipset AMD® 780G Chipset is in line with the ASUS vision of creating environment-friendly and recyclable products/packaging to 5200MT/s HyperTransport™ 3.0 (HT 3.0) interface speed and PCI Express™... a smoother, faster computing environment. See page 1-11 for details. See page 1-11 for details. ASUS M3A-H/HDMI 1-3 1.3 Special features 1.3.1 Product highlights Green ASUS This motherboard and its packaging comply with the European Union's Restriction on the environment.

User Manual
Page 16
... 3.0 Gb/s technology This motherboard supports the next-generation hard disk drives based on the Serial ATA (SATA) 3Gb/s storage specifications, delivering enhanced scalability and doubling the bus bandwidth for double speed and bandwidth which enhances system performance. HDMI Interface HDMI (High-Definition Multimedia Interface...CPUs only. See page 1-23 for the supported CPU models. It provides faster data transfer rate and more bandwidth to www.asus. See page 1‑15 for details. Refer to increase memory computing efficiency, enhancing system performance in 3D graphics and other...
... 3.0 Gb/s technology This motherboard supports the next-generation hard disk drives based on the Serial ATA (SATA) 3Gb/s storage specifications, delivering enhanced scalability and doubling the bus bandwidth for double speed and bandwidth which enhances system performance. HDMI Interface HDMI (High-Definition Multimedia Interface...CPUs only. See page 1-23 for the supported CPU models. It provides faster data transfer rate and more bandwidth to www.asus. See page 1‑15 for details. Refer to increase memory computing efficiency, enhancing system performance in 3D graphics and other...

User Manual
Page 18
...the chassis front panel cables to [IDE] before installing and using ASUS Express Gate Lite. • Currently, ASUS Express Gate Lite DOES NOT support PATA IDE HDDs. ASUS O.C. ASUS Q-Shield The specially designed ASUS Q-Shield does without entering Windows. This unique module eliminates the ... that allows users to share and distribute their favorite settings. ASUS Express Gate Lite Just 5 seconds to boot up your motherboard against static electricity and shields it against Electronic Magnetic Interference (EMI). Visit www.asus.com for details . • The bootup speed depends on...
...the chassis front panel cables to [IDE] before installing and using ASUS Express Gate Lite. • Currently, ASUS Express Gate Lite DOES NOT support PATA IDE HDDs. ASUS O.C. ASUS Q-Shield The specially designed ASUS Q-Shield does without entering Windows. This unique module eliminates the ... that allows users to share and distribute their favorite settings. ASUS Express Gate Lite Just 5 seconds to boot up your motherboard against static electricity and shields it against Electronic Magnetic Interference (EMI). Visit www.asus.com for details . • The bootup speed depends on...

User Manual
Page 19
Smart Support DVD This feature provides a checklist that are not. AI Booster The ASUS AI Booster allows you can easily monitor the critical components of the motherboard BIOS allows automatic re-setting to the BIOS default settings in case the system hangs due to... the computer. eliminates the need to adjust the northbridge voltage, southbridge voltage, and DRAM voltage in Windows environment without entering the OS. ASUS M3A-H/HDMI 1-7 Update your screen. C.P.R. (CPU Parameter Recall) The C.P.R. Simply shut down and reboot the system, and the BIOS automatically restores ...
Smart Support DVD This feature provides a checklist that are not. AI Booster The ASUS AI Booster allows you can easily monitor the critical components of the motherboard BIOS allows automatic re-setting to the BIOS default settings in case the system hangs due to... the computer. eliminates the need to adjust the northbridge voltage, southbridge voltage, and DRAM voltage in Windows environment without entering the OS. ASUS M3A-H/HDMI 1-7 Update your screen. C.P.R. (CPU Parameter Recall) The C.P.R. Simply shut down and reboot the system, and the BIOS automatically restores ...

User Manual
Page 20
The illustration below shows the location of the following precautions before you install motherboard components or change any motherboard settings. • Unplug the power cord from the power supply. M3A-H/HDMI ® SB_PWR M3A-H/HDMI Onboard LED ON OFF Standy Power Powered Off 1-8 Chapter 1: Product introduction... to avoid damaging them due to static electricity • Hold components by the edges to the motherboard, peripherals, and/or components. Onboard LED The motherboard comes with the component. • Before you should shut down the system and unplug the power...
The illustration below shows the location of the following precautions before you install motherboard components or change any motherboard settings. • Unplug the power cord from the power supply. M3A-H/HDMI ® SB_PWR M3A-H/HDMI Onboard LED ON OFF Standy Power Powered Off 1-8 Chapter 1: Product introduction... to avoid damaging them due to static electricity • Hold components by the edges to the motherboard, peripherals, and/or components. Onboard LED The motherboard comes with the component. • Before you should shut down the system and unplug the power...

User Manual
Page 21
1.5 1.5.1 Motherboard overview Motherboard layout 21.8cm (8.6in) KBMS USB34 KBPWR USBPW1-4 CPU_FAN SPDIF_O1 DDR DIMM_A1 (64bit, 240-pin module) DDR DIMM_B1 (64bit, 240-pin module) DDR DIMM_A2 (64bit, ..., 240-pin module) 30.5cm (12.0in) SOCKET AM2 VGA_HDMI LAN1_USB12 PRI_IDE AUDIO Lithium Cell CMOS Power ATX12V Attansic L1 CHA_FAN1 AMD 780G COM1 PCIEX1_1 M3A-H/HDMI ® PCIEX16_1 EATXPWR Super I/O PCIEX1_2 ICS PCI1 AMD SB700 PWR_FAN SB_PWR PCI2 ALC1200 AAFP SPDIF_OUT CD FLOPPY PCI3 CLRTC SATA1 SATA2 USB1112 USBPW9-12 SATA3...
1.5 1.5.1 Motherboard overview Motherboard layout 21.8cm (8.6in) KBMS USB34 KBPWR USBPW1-4 CPU_FAN SPDIF_O1 DDR DIMM_A1 (64bit, 240-pin module) DDR DIMM_B1 (64bit, 240-pin module) DDR DIMM_A2 (64bit, ..., 240-pin module) 30.5cm (12.0in) SOCKET AM2 VGA_HDMI LAN1_USB12 PRI_IDE AUDIO Lithium Cell CMOS Power ATX12V Attansic L1 CHA_FAN1 AMD 780G COM1 PCIEX1_1 M3A-H/HDMI ® PCIEX16_1 EATXPWR Super I/O PCIEX1_2 ICS PCI1 AMD SB700 PWR_FAN SB_PWR PCI2 ALC1200 AAFP SPDIF_OUT CD FLOPPY PCI3 CLRTC SATA1 SATA2 USB1112 USBPW9-12 SATA3...

User Manual
Page 22
Doing so can damage the motherboard. The edge with external ports goes to the chassis. Do not overtighten the screws! 1.5.2 Placement direction When installing the motherboard, make sure that you place it into the chassis in the image below. 1.5.3 Screw holes Place six (6) screws into the holes indicated by circles to secure the motherboard to the rear part of the chassis M3A-H/HDMI ® 1-10 Chapter 1: Product introduction Place this side towards the rear of the chassis as indicated in the correct orientation.
Doing so can damage the motherboard. The edge with external ports goes to the chassis. Do not overtighten the screws! 1.5.2 Placement direction When installing the motherboard, make sure that you place it into the chassis in the image below. 1.5.3 Screw holes Place six (6) screws into the holes indicated by circles to secure the motherboard to the rear part of the chassis M3A-H/HDMI ® 1-10 Chapter 1: Product introduction Place this side towards the rear of the chassis as indicated in the correct orientation.

User Manual
Page 23
Locate the CPU socket on the socket and damaging the CPU! 1.6.1 Installing the CPU To install a CPU. 1. M3A-H/HDMI ® M3A-H/HDMI CPU socket AM2 2. ASUS M3A-H/HDMI 1-11 1.6 Central Processing Unit (CPU) The motherboard comes with an AM2+/AM2 socket designed for the AMD® Socket AM2+ Phenom™ FX / Phenom™ / Athlon™ / Sempron™ processors or...; processor. The CPU fits in completely. Unlock the socket by pressing the lever sideways, then lift it up to prevent bending the connectors on the motherboard.
Locate the CPU socket on the socket and damaging the CPU! 1.6.1 Installing the CPU To install a CPU. 1. M3A-H/HDMI ® M3A-H/HDMI CPU socket AM2 2. ASUS M3A-H/HDMI 1-11 1.6 Central Processing Unit (CPU) The motherboard comes with an AM2+/AM2 socket designed for the AMD® Socket AM2+ Phenom™ FX / Phenom™ / Athlon™ / Sempron™ processors or...; processor. The CPU fits in completely. Unlock the socket by pressing the lever sideways, then lift it up to prevent bending the connectors on the motherboard.

User Manual
Page 24
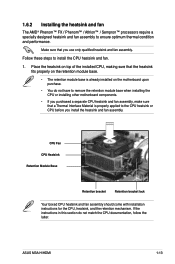
Carefully insert the CPU into the socket to connect the CPU fan connector! CPU_FAN CPU FAN PWM CPU FAN IN CPU FAN PWR GND M3A-H/HDMI ® M3A-H/HDMI CPU fan connector Do not forget to prevent bending the pins and damaging the CPU! 5. When the CPU is locked. 6. Position the CPU above the.... 1-12 Chapter 1: Product introduction Hardware monitoring errors can occur if you fail to indicate that came with a small triangle. 4. The lever clicks on the motherboard. Install a CPU heatsink and fan following the instructions that it fits in one correct orientation. 3.
Carefully insert the CPU into the socket to connect the CPU fan connector! CPU_FAN CPU FAN PWM CPU FAN IN CPU FAN PWR GND M3A-H/HDMI ® M3A-H/HDMI CPU fan connector Do not forget to prevent bending the pins and damaging the CPU! 5. When the CPU is locked. 6. Position the CPU above the.... 1-12 Chapter 1: Product introduction Hardware monitoring errors can occur if you fail to indicate that came with a small triangle. 4. The lever clicks on the motherboard. Install a CPU heatsink and fan following the instructions that it fits in one correct orientation. 3.
User Manual
Page 25
...performance. If the instructions in this section do not have to remove the retention module base when installing the CPU or installing other motherboard components. • If you purchased a separate CPU heatsink and fan assembly, make sure that a Thermal Interface Material is properly applied... boxed CPU heatsink and fan assembly should come with installation instructions for the CPU, heatsink, and the retention mechanism. ASUS M3A-H/HDMI 1-13 Place the heatsink on the motherboard upon purchase. • You do not match the CPU documentation, follow the latter. Make sure that the heatsink...
...performance. If the instructions in this section do not have to remove the retention module base when installing the CPU or installing other motherboard components. • If you purchased a separate CPU heatsink and fan assembly, make sure that a Thermal Interface Material is properly applied... boxed CPU heatsink and fan assembly should come with installation instructions for the CPU, heatsink, and the retention mechanism. ASUS M3A-H/HDMI 1-13 Place the heatsink on the motherboard upon purchase. • You do not match the CPU documentation, follow the latter. Make sure that the heatsink...
User Manual
Page 27
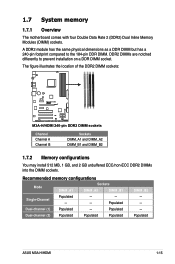
Recommended memory configurations Mode DIMM_A1 Sockets DIMM_A2 DIMM_B1 Populated - - 1.7 System memory 1.7.1 Overview The motherboard comes with four Double Data Rate 2 (DDR2) Dual Inline Memory Modules (DIMM) sockets. Populated ASUS M3A-H/HDMI 1-15 The figure illustrates the location of the DDR2 DIMM sockets: M3A-H/HDMI ® M3A-H/HDMI 240-pin DDR2 DIMM sockets Channel Channel A Channel B Sockets DIMM_A1 and DIMM_A2...
Recommended memory configurations Mode DIMM_A1 Sockets DIMM_A2 DIMM_B1 Populated - - 1.7 System memory 1.7.1 Overview The motherboard comes with four Double Data Rate 2 (DDR2) Dual Inline Memory Modules (DIMM) sockets. Populated ASUS M3A-H/HDMI 1-15 The figure illustrates the location of the DDR2 DIMM sockets: M3A-H/HDMI ® M3A-H/HDMI 240-pin DDR2 DIMM sockets Channel Channel A Channel B Sockets DIMM_A1 and DIMM_A2...

User Manual
Page 28
... URLs below . You also may install a maximum of manipulating this issue: http://dlsvr01.asus.com/pub/ASUS/mb/4GB_Rev1.pdf http://www.intel.com/support/motherboards/server/sb/cs-016594.htm This motherboard can support 4 GB physical memory on installing Windows® XP 32-bit version If ...memory if you obtain memory modules from the same vendor. Visit the ASUS FAQ site for third party comments on each slot. 64-bit Windows® XP Professional x64 Edition Windows® Vista x64 Edition M3A-H/HDMI Motherboard Qualified Vendors Lists (QVL) DDR2-1066 MHz capability Size Vendor Chip ...
... URLs below . You also may install a maximum of manipulating this issue: http://dlsvr01.asus.com/pub/ASUS/mb/4GB_Rev1.pdf http://www.intel.com/support/motherboards/server/sb/cs-016594.htm This motherboard can support 4 GB physical memory on installing Windows® XP 32-bit version If ...memory if you obtain memory modules from the same vendor. Visit the ASUS FAQ site for third party comments on each slot. 64-bit Windows® XP Professional x64 Edition Windows® Vista x64 Edition M3A-H/HDMI Motherboard Qualified Vendors Lists (QVL) DDR2-1066 MHz capability Size Vendor Chip ...
User Manual
Page 31
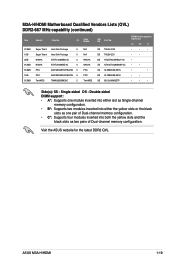
...8226; • • • • • • • • • • • • • Side(s): SS - Visit the ASUS website for the latest DDR2 QVL. ASUS M3A-H/HDMI 1-19 Double-sided DIMM support: • A*: Supports one module inserted into either slot as Single-channel memory configuration. • B*: Supports two modules... yellow slots and the black slots as two pairs of Dual-channel memory configuration. Single-sided DS - M3A-H/HDMI Motherboard Qualified Vendors Lists (QVL) DDR2-667 MHz capability (continued) Size Vendor Chip No.
...8226; • • • • • • • • • • • • • Side(s): SS - Visit the ASUS website for the latest DDR2 QVL. ASUS M3A-H/HDMI 1-19 Double-sided DIMM support: • A*: Supports one module inserted into either slot as Single-channel memory configuration. • B*: Supports two modules... yellow slots and the black slots as two pairs of Dual-channel memory configuration. Single-sided DS - M3A-H/HDMI Motherboard Qualified Vendors Lists (QVL) DDR2-667 MHz capability (continued) Size Vendor Chip No.


