
Motherboard Installation Guide
Page 1
M2R32-MVP Motherboard
M2R32-MVP Motherboard

Motherboard Installation Guide
Page 3
Contents Notices vii Safety information viii About this guide ix M2R32-MVP specifications summary xi Chapter 1: Product introduction 1.1 Welcome 1-1 1.2 Package contents 1-1 1.3 Special features 1-2 1.3.1 Product highlights 1-2 1.3.2 Innovative ASUS features 1-4 Chapter 2: Hardware information 2.1 Before you proceed 2-1 2.2 Motherboard overview 2-2 2.2.1 Placement direction 2-2 2.2.2 Screw holes 2-2 2.2.3 Motherboard layout 2-3 2.2.4 Layout Contents 2-4 2.3 Central Processing Unit (CPU 2-6 2.3.1 Installing the CPU 2-6 2.3.2 Installing the heatsink and fan...
Contents Notices vii Safety information viii About this guide ix M2R32-MVP specifications summary xi Chapter 1: Product introduction 1.1 Welcome 1-1 1.2 Package contents 1-1 1.3 Special features 1-2 1.3.1 Product highlights 1-2 1.3.2 Innovative ASUS features 1-4 Chapter 2: Hardware information 2.1 Before you proceed 2-1 2.2 Motherboard overview 2-2 2.2.1 Placement direction 2-2 2.2.2 Screw holes 2-2 2.2.3 Motherboard layout 2-3 2.2.4 Layout Contents 2-4 2.3 Central Processing Unit (CPU 2-6 2.3.1 Installing the CPU 2-6 2.3.2 Installing the heatsink and fan...

Motherboard Installation Guide
Page 6
If you add a device. • Before connecting or removing signal cables from the motherboard, ensure that your power supply is broken, do not try to fix it , carefully read all the manuals that came with the product, contact a qualified ... or from the system, ensure that the product (electrical and electronic equipment) should not be placed in your area. Operation safety • Before installing the motherboard and adding devices on a stable surface. • If you are using, contact your retailer. These devices could interrupt the grounding circuit. • Make sure that...
If you add a device. • Before connecting or removing signal cables from the motherboard, ensure that your power supply is broken, do not try to fix it , carefully read all the manuals that came with the product, contact a qualified ... or from the system, ensure that the product (electrical and electronic equipment) should not be placed in your area. Operation safety • Before installing the motherboard and adding devices on a stable surface. • If you are using, contact your retailer. These devices could interrupt the grounding circuit. • Make sure that...

Motherboard Installation Guide
Page 7
... the hardware setup procedures that may include optional documentation, such as warranty flyers, that you need when installing and configuring the motherboard. ASUS websites The ASUS website provides updated information on the motherboard. • Chapter 3: Powering up This chapter describes the power up sequence, the vocal POST messages, and ways of the standard package...
... the hardware setup procedures that may include optional documentation, such as warranty flyers, that you need when installing and configuring the motherboard. ASUS websites The ASUS website provides updated information on the motherboard. • Chapter 3: Powering up This chapter describes the power up sequence, the vocal POST messages, and ways of the standard package...

Motherboard Installation Guide
Page 13
This chapter describes the motherboard features and the new technologies it supports 1Product information
This chapter describes the motherboard features and the new technologies it supports 1Product information

Motherboard Installation Guide
Page 15
... technologies, making it , check the items in the long line of the above items is damaged or missing, contact your motherboard package for buying an ASUS® M2R32-MVP motherboard! Before you for the following items. Motherboard ASUS M2R32-MVP motherboard Cables 1 x Floppy disk drive signal cable 1 x Ultra DMA cable 133/100/66 cable 2 x Serial ATA cables 1 x 2-port Serial ATA...
... technologies, making it , check the items in the long line of the above items is damaged or missing, contact your motherboard package for buying an ASUS® M2R32-MVP motherboard! Before you for the following items. Motherboard ASUS M2R32-MVP motherboard Cables 1 x Floppy disk drive signal cable 1 x Ultra DMA cable 133/100/66 cable 2 x Serial ATA cables 1 x 2-port Serial ATA...
Motherboard Installation Guide
Page 16
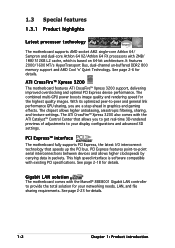
...serial interconnections between devices and allows higher clockspeeds by carrying data in graphics and gaming effects. ATI CrossFire™ Xpress 3200 The motherboard features ATI CrossFire™ Xpress 3200 support, delivering improved overclocking and optimal PCI Express device performance. See page 2-23 for ...dual-channel un-buffered DDR2 800 memory support and AMD Cool 'n' Quiet Technology. PCI Express™ interface The motherboard fully supports PCI Express, the latest I/O interconnect technology that allows you are a step ahead in packets. Gigabit LAN solution The...
...serial interconnections between devices and allows higher clockspeeds by carrying data in graphics and gaming effects. ATI CrossFire™ Xpress 3200 The motherboard features ATI CrossFire™ Xpress 3200 support, delivering improved overclocking and optimal PCI Express device performance. See page 2-23 for ...dual-channel un-buffered DDR2 800 memory support and AMD Cool 'n' Quiet Technology. PCI Express™ interface The motherboard fully supports PCI Express, the latest I/O interconnect technology that allows you are a step ahead in packets. Gigabit LAN solution The...

Motherboard Installation Guide
Page 17
...the JMicron® Serial ATA controller, the Serial ATA 3.0 Gb/s connector (on USB 2.0. See page 2-30 for details. ASUS M2R32-MVP 1-3 The Serial ATA 3.0 Gb/s specification provides twice the bandwidth of the current Serial ATA products with Intel® High ...host of peripherals and devices compliant to a wide range of new features, including Power Management (PM) Implementation Algorithm. USB 2.0 technology The motherboard implements the Universal Serial Bus (USB) 2.0 specification, dramatically increasing the connection speed from the 12 Mbps bandwidth on USB 1.1 to produce crystal...
...the JMicron® Serial ATA controller, the Serial ATA 3.0 Gb/s connector (on USB 2.0. See page 2-30 for details. ASUS M2R32-MVP 1-3 The Serial ATA 3.0 Gb/s specification provides twice the bandwidth of the current Serial ATA products with Intel® High ...host of peripherals and devices compliant to a wide range of new features, including Power Management (PM) Implementation Algorithm. USB 2.0 technology The motherboard implements the Universal Serial Bus (USB) 2.0 specification, dramatically increasing the connection speed from the 12 Mbps bandwidth on USB 1.1 to produce crystal...
Motherboard Installation Guide
Page 18
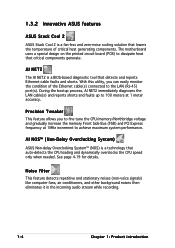
...Overclocking System™ (NOS) is a BIOS-based diagnostic tool that detects and reports Ethernet cable faults and shorts. 1.3.2 Innovative ASUS features ASUS Stack Cool 2 ASUS Stack Cool 2 is a fan-less and zero-noise cooling solution that lowers the temperature of the Ethernet cable(s) connected to... the LAN (RJ-45) port(s). With this utility, you to dissipate heat that critical components generate. The motherboard uses a special design ...
...Overclocking System™ (NOS) is a BIOS-based diagnostic tool that detects and reports Ethernet cable faults and shorts. 1.3.2 Innovative ASUS features ASUS Stack Cool 2 ASUS Stack Cool 2 is a fan-less and zero-noise cooling solution that lowers the temperature of the Ethernet cable(s) connected to... the LAN (RJ-45) port(s). With this utility, you to dissipate heat that critical components generate. The motherboard uses a special design ...
Motherboard Installation Guide
Page 19
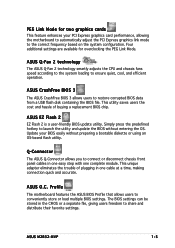
... cable at a time, making connection quick and accurate. Profile The motherboard features the ASUS BIOS Profile that allows users to restore corrupted BIOS data from a USB flash disk containing the BIOS file. The BIOS settings can be stored in one complete module. ASUS M2R32-MVP 1-5 ASUS O.C. Simply press the predefined hotkey to the correct frequency based...
... cable at a time, making connection quick and accurate. Profile The motherboard features the ASUS BIOS Profile that allows users to restore corrupted BIOS data from a USB flash disk containing the BIOS file. The BIOS settings can be stored in one complete module. ASUS M2R32-MVP 1-5 ASUS O.C. Simply press the predefined hotkey to the correct frequency based...

Motherboard Installation Guide
Page 20
ASUS MyLogo2™ ASUS My Logo2™ is the new feature present in the motherboard that allows you to select the language of the motherboard BIOS allows automatic re-setting to the BIOS default settings in case the system hangs due to overclocking. C.P.R. (CPU Parameter Recall) The C.P.R. feature of your..., C.P.R. When the system hangs due to open the system chassis and clear the RTC data. The localized BIOS menus allow easier and faster configuration. ASUS Multi-language BIOS The multi-language BIOS allows you to personalize and add style to your choice from the available options.
ASUS MyLogo2™ ASUS My Logo2™ is the new feature present in the motherboard that allows you to select the language of the motherboard BIOS allows automatic re-setting to the BIOS default settings in case the system hangs due to overclocking. C.P.R. (CPU Parameter Recall) The C.P.R. feature of your..., C.P.R. When the system hangs due to open the system chassis and clear the RTC data. The localized BIOS menus allow easier and faster configuration. ASUS Multi-language BIOS The multi-language BIOS allows you to personalize and add style to your choice from the available options.

Motherboard Installation Guide
Page 21
It includes description of the jumpers and connectors on the motherboard. 2 Hardware information This chapter lists the hardware setup procedures that you have to perform when installing system components.
It includes description of the jumpers and connectors on the motherboard. 2 Hardware information This chapter lists the hardware setup procedures that you have to perform when installing system components.

Motherboard Installation Guide
Page 22
Chapter summary 2 2.1 Before you proceed 2-1 2.2 Motherboard overview 2-2 2.3 Central Processing Unit (CPU 2-6 2.4 System memory 2-11 2.5 Expansion slots 2-15 2.6 Jumper 2-19 2.7 Connectors 2-22 ASUS M2R32-MVP
Chapter summary 2 2.1 Before you proceed 2-1 2.2 Motherboard overview 2-2 2.3 Central Processing Unit (CPU 2-6 2.4 System memory 2-11 2.5 Expansion slots 2-15 2.6 Jumper 2-19 2.7 Connectors 2-22 ASUS M2R32-MVP

Motherboard Installation Guide
Page 23
... remove any component, ensure that the ATX power supply is switched off mode. The illustration below shows the location of the following precautions before you install motherboard components or change any motherboard settings. • Unplug the power ...off or the p o w e r c o r d i s d e t a c h e d f r o m t h e p o w e r s u p p l y . This is a reminder that lights up to the motherboard, peripherals, and/or components. 2.1 Before you proceed Take note of the onboard LED. ® SB_PWR M2R32-MVP M2R32-MVP Onboard LED ON Standby Power OFF Powered Off ASUS M2R32-MVP 2-1
... remove any component, ensure that the ATX power supply is switched off mode. The illustration below shows the location of the following precautions before you install motherboard components or change any motherboard settings. • Unplug the power ...off or the p o w e r c o r d i s d e t a c h e d f r o m t h e p o w e r s u p p l y . This is a reminder that lights up to the motherboard, peripherals, and/or components. 2.1 Before you proceed Take note of the onboard LED. ® SB_PWR M2R32-MVP M2R32-MVP Onboard LED ON Standby Power OFF Powered Off ASUS M2R32-MVP 2-1

Motherboard Installation Guide
Page 24
Make sure to the chassis. Failure to do so can damage the motherboard. ® Place this side towards the rear of the chassis M2R32-MVP 2-2 Chapter 2: Hardware information The edge with external ports goes to the rear part of the chassis as indicated in the image ...below. 2.2.2 Screw holes Place nine (9) screws into the chassis in the correct orientation. 2.2 Motherboard overview Before you install the motherboard, study the ...
Make sure to the chassis. Failure to do so can damage the motherboard. ® Place this side towards the rear of the chassis M2R32-MVP 2-2 Chapter 2: Hardware information The edge with external ports goes to the rear part of the chassis as indicated in the image ...below. 2.2.2 Screw holes Place nine (9) screws into the chassis in the correct orientation. 2.2 Motherboard overview Before you install the motherboard, study the ...
Motherboard Installation Guide
Page 25
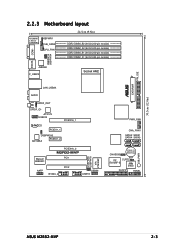
ESATA COM1 USBPW12 USBPW34 ® EATXPWR PRI_IDE 30.5cm (12.0in) 2.2.3 Motherboard layout PS/2KBMS T: Mouse B: Keyboard KBPWR1 CHA_FAN2 CPU_FAN 24.5cm (9.6in) DDR2 DIMM_B2 (64 bit,240-pin module) DDR2 DIMM_A2 (64 bit... AM2 LAN_USB34 AUDIO SPDIF_OUT SPDIF_O1 ATX12V USB910 PCIEX16_1 CD PCIEX1_1 USBPW910 AD1988A PCIEX1_2 Marvell 88E8001 PCIEX16_2 M2R32-MVP PCI1 AAFP IE1394_2 PCI2 USB56 USB78 USBPW56 USBPW78 VIA VT6308P SB_PWR PWR_FAN CHA_FAN1 SATA2 SATA1 SATA4 SATA3 CHASSIS CR2032 3V Lithium Cell CMOS Power iTE CLRTC IT8726F-S 8Mb BIOS FLOPPY PANEL ASUS M2R32-MVP 2-3
ESATA COM1 USBPW12 USBPW34 ® EATXPWR PRI_IDE 30.5cm (12.0in) 2.2.3 Motherboard layout PS/2KBMS T: Mouse B: Keyboard KBPWR1 CHA_FAN2 CPU_FAN 24.5cm (9.6in) DDR2 DIMM_B2 (64 bit,240-pin module) DDR2 DIMM_A2 (64 bit... AM2 LAN_USB34 AUDIO SPDIF_OUT SPDIF_O1 ATX12V USB910 PCIEX16_1 CD PCIEX1_1 USBPW910 AD1988A PCIEX1_2 Marvell 88E8001 PCIEX16_2 M2R32-MVP PCI1 AAFP IE1394_2 PCI2 USB56 USB78 USBPW56 USBPW78 VIA VT6308P SB_PWR PWR_FAN CHA_FAN1 SATA2 SATA1 SATA4 SATA3 CHASSIS CR2032 3V Lithium Cell CMOS Power iTE CLRTC IT8726F-S 8Mb BIOS FLOPPY PANEL ASUS M2R32-MVP 2-3

Motherboard Installation Guide
Page 28
DO NOT force the CPU into the socket to prevent bending the connectors on the motherboard. ® M2R32-MVP M2R32-MVP CPU Socket AM2 2. 2.3 Central Processing Unit (CPU) The motherboard comes with a 940-pin AM2 socket designed for the AM2 socket. The CPU fits in completely. 2-6 Chapter 2: Hardware information Locate the CPU socket on the ...
DO NOT force the CPU into the socket to prevent bending the connectors on the motherboard. ® M2R32-MVP M2R32-MVP CPU Socket AM2 2. 2.3 Central Processing Unit (CPU) The motherboard comes with a 940-pin AM2 socket designed for the AM2 socket. The CPU fits in completely. 2-6 Chapter 2: Hardware information Locate the CPU socket on the ...

Motherboard Installation Guide
Page 30
...ensure optimum thermal condition and performance. Place the heatsink on top of the installed CPU, making sure that the heatsink fits properly on the motherboard upon purchase. • You do not match the CPU documentation, follow the latter. 2-8 Chapter 2: Hardware information To install the CPU ... mechanism. If the instructions in this section do not have to remove the retention module base when installing the CPU or installing other motherboard components. • If you purchased a separate CPU heatsink and fan assembly, make sure that you use only AMD-certified heatsink and...
...ensure optimum thermal condition and performance. Place the heatsink on top of the installed CPU, making sure that the heatsink fits properly on the motherboard upon purchase. • You do not match the CPU documentation, follow the latter. 2-8 Chapter 2: Hardware information To install the CPU ... mechanism. If the instructions in this section do not have to remove the retention module base when installing the CPU or installing other motherboard components. • If you purchased a separate CPU heatsink and fan assembly, make sure that you use only AMD-certified heatsink and...

Motherboard Installation Guide
Page 32
® 5. Hardware monitoring errors can occur if you fail to connect the CPU fan connector! CPU_FAN CPU FAN PWM CPU FAN IN CPU FAN PWR GND M2R32-MVP M2R32-MVP CPU fan connector Do not forget to plug this connector. 2-10 Chapter 2: Hardware information When the fan and heatsink assembly is in place, connect the CPU fan cable to the connector on the motherboard labeled CPU_FAN.
® 5. Hardware monitoring errors can occur if you fail to connect the CPU fan connector! CPU_FAN CPU FAN PWM CPU FAN IN CPU FAN PWR GND M2R32-MVP M2R32-MVP CPU fan connector Do not forget to plug this connector. 2-10 Chapter 2: Hardware information When the fan and heatsink assembly is in place, connect the CPU fan cable to the connector on the motherboard labeled CPU_FAN.

Motherboard Installation Guide
Page 33
2.4 System memory 2.4.1 Overview The motherboard comes with four Double Data Rate 2 (DDR2) Dual Inline Memory Modules (DIMM) sockets. ASUS M2R32-MVP 2-11 A DDR2 module has the same physical dimensions as a DDR DIMM but has a 240-pin footprint compared to prevent installation on a DDR DIMM socket. DDR2 ...
2.4 System memory 2.4.1 Overview The motherboard comes with four Double Data Rate 2 (DDR2) Dual Inline Memory Modules (DIMM) sockets. ASUS M2R32-MVP 2-11 A DDR2 module has the same physical dimensions as a DDR DIMM but has a 240-pin footprint compared to prevent installation on a DDR DIMM socket. DDR2 ...


