User Manual
Page 7
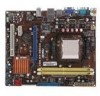
5. 從 CPU PnP 6. 請確認 CPU CPU CPU PnP 保護蓋 CPU CPU CPU CPU 7 A B A B
5. 從 CPU PnP 6. 請確認 CPU CPU CPU PnP 保護蓋 CPU CPU CPU CPU 7 A B A B
User Manual
Page 3
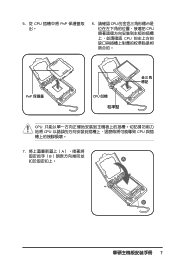
Contents Notices...v Safety information vi About this guide vi M2N68-AM SE2 specifications summary viii Chapter 1: Product introduction 1.1 Before you proceed 1-1 1.2 Motherboard overview 1-2 1.2.1 Motherboard layout 1-2 1.2.2 Layout contents 1-2 1.3 Central Processing Unit (CPU 1-3 1.4 System memory 1-3 1.4.1 Overview 1-3 1.4.2 Memory configurations 1-4 1.5 Expansion slots 1-6 1.5.1 ...2: BIOS information 2.1 Managing and updating your BIOS 2-1 2.1.1 ASUS Update utility 2-1 2.1.2 ASUS EZ Flash 2 utility 2-2 2.1.3 ASUS CrashFree BIOS 3 utility 2-3 2.2 BIOS setup program 2-4 iii
Contents Notices...v Safety information vi About this guide vi M2N68-AM SE2 specifications summary viii Chapter 1: Product introduction 1.1 Before you proceed 1-1 1.2 Motherboard overview 1-2 1.2.1 Motherboard layout 1-2 1.2.2 Layout contents 1-2 1.3 Central Processing Unit (CPU 1-3 1.4 System memory 1-3 1.4.1 Overview 1-3 1.4.2 Memory configurations 1-4 1.5 Expansion slots 1-6 1.5.1 ...2: BIOS information 2.1 Managing and updating your BIOS 2-1 2.1.1 ASUS Update utility 2-1 2.1.2 ASUS EZ Flash 2 utility 2-2 2.1.3 ASUS CrashFree BIOS 3 utility 2-3 2.2 BIOS setup program 2-4 iii

User Manual
Page 4
... Time 2-4 2.3.2 System Date 2-4 2.3.3 IDE Configuration 2-5 2.3.4 Primary IDE Master/Slave 2-5 2.3.5 SATA 1-2 2-6 2.3.6 System Information 2-6 2.4 Advanced menu 2-7 2.4.1 JumperFree Configuration 2-7 2.4.2 CPU Configuration 2-9 2.4.3 Chipset 2-10 2.4.4 Onboard Devices Configuration 2-11 2.4.5 PCI PnP 2-11 2.4.6 USB Configuration 2-11 2.5 Power menu 2-12 2.5.1 Suspend Mode 2-12 2.5.2 ACPI 2.0 Support... Boot menu 2-14 2.6.1 Boot Device Priority 2-14 2.6.2 Boot Settings Configuration 2-14 2.6.3 Security 2-15 2.7 Tools menu 2-16 2.7.1 ASUS EZ Flash 2 2-16 2.8 Exit menu 2-16 iv
... Time 2-4 2.3.2 System Date 2-4 2.3.3 IDE Configuration 2-5 2.3.4 Primary IDE Master/Slave 2-5 2.3.5 SATA 1-2 2-6 2.3.6 System Information 2-6 2.4 Advanced menu 2-7 2.4.1 JumperFree Configuration 2-7 2.4.2 CPU Configuration 2-9 2.4.3 Chipset 2-10 2.4.4 Onboard Devices Configuration 2-11 2.4.5 PCI PnP 2-11 2.4.6 USB Configuration 2-11 2.5 Power menu 2-12 2.5.1 Suspend Mode 2-12 2.5.2 ACPI 2.0 Support... Boot menu 2-14 2.6.1 Boot Device Priority 2-14 2.6.2 Boot Settings Configuration 2-14 2.6.3 Security 2-15 2.7 Tools menu 2-16 2.7.1 ASUS EZ Flash 2 2-16 2.8 Exit menu 2-16 iv
User Manual
Page 8
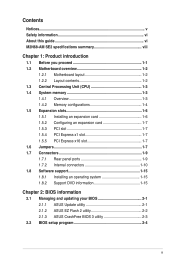
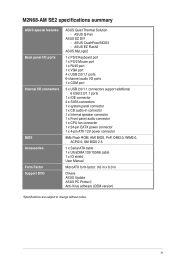
... memory of 256MB Supports RGB with max. Integrated programmable Shader model 3.0 DirectX 9 graphics processor Maximum shared memory of less than 3GB. M2N68-AM SE2 specifications summary CPU Chipset System bus Memory Graphics Expansion slots Storage Audio USB LAN AMD® Socket AM2+ / AM2 for AMD Phenom™FX / ...memory architecture 2 x 240-pin DIMM slots support unbuffered ECC and non-ECC DDR2 1066/800/667MHz memory modules Supports up to www.asus.com for the AM2+ CPU models. ** Refer to 10 USB 2.0/1.1 ports (6 ports at mid-board, 4 ports at the back panel) Realtek RTL8201CP Phy...
... memory of 256MB Supports RGB with max. Integrated programmable Shader model 3.0 DirectX 9 graphics processor Maximum shared memory of less than 3GB. M2N68-AM SE2 specifications summary CPU Chipset System bus Memory Graphics Expansion slots Storage Audio USB LAN AMD® Socket AM2+ / AM2 for AMD Phenom™FX / ...memory architecture 2 x 240-pin DIMM slots support unbuffered ECC and non-ECC DDR2 1066/800/667MHz memory modules Supports up to www.asus.com for the AM2+ CPU models. ** Refer to 10 USB 2.0/1.1 ports (6 ports at mid-board, 4 ports at the back panel) Realtek RTL8201CP Phy...
User Manual
Page 9
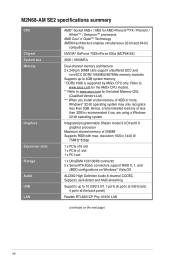
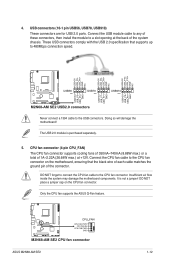
... Accessories Form Factor Support DVD ASUS Quiet Thermal Solution - ASUS Q-Fan ASUS EZ DIY - M2N68-AM SE2 specifications summary ASUS special features Back panel I/O ...ports Internal I /O ports 1 x COM port 3 x USB 2.0/1.1 connectors support additional 6 USB 2.0/1.1 ports 1 x IDE connector 2 x SATA connectors 1 x system panel connector 1 x CD audio-in connector 1 x Internal speaker connector 1 x Front panel audio connector 1 x CPU fan connector 1 x 24-pin EATX power connector 1 x 4-pin ATX...
... Accessories Form Factor Support DVD ASUS Quiet Thermal Solution - ASUS Q-Fan ASUS EZ DIY - M2N68-AM SE2 specifications summary ASUS special features Back panel I/O ...ports Internal I /O ports 1 x COM port 3 x USB 2.0/1.1 connectors support additional 6 USB 2.0/1.1 ports 1 x IDE connector 2 x SATA connectors 1 x system panel connector 1 x CD audio-in connector 1 x Internal speaker connector 1 x Front panel audio connector 1 x CPU fan connector 1 x 24-pin EATX power connector 1 x 4-pin ATX...
User Manual
Page 11
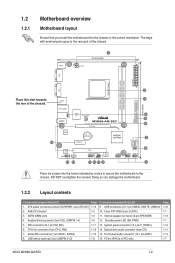
... CD) 15. The edge with external ports goes to the chassis. ATX power connectors (24-pin EATXPWR, 4-pin ATX12V) 2. DDR2 DIMM slots 4. System panel connector (10-1 pin F_PANEL) 14. AM2 CPU Socket 3. Internal speaker connector (4-pin SPEAKER) 12. USB device wake-...11 1-14 1-7 ASUS M2N68-AM SE2 1-2 Place this side towards the rear of the chassis. Place six screws into the chassis in the correct orientation. 1.2 1.2.1 Motherboard overview Motherboard layout Ensure that you install the motherboard into the holes indicated by circles to secure the motherboard to the rear ...
... CD) 15. The edge with external ports goes to the chassis. ATX power connectors (24-pin EATXPWR, 4-pin ATX12V) 2. DDR2 DIMM slots 4. System panel connector (10-1 pin F_PANEL) 14. AM2 CPU Socket 3. Internal speaker connector (4-pin SPEAKER) 12. USB device wake-...11 1-14 1-7 ASUS M2N68-AM SE2 1-2 Place this side towards the rear of the chassis. Place six screws into the chassis in the correct orientation. 1.2 1.2.1 Motherboard overview Motherboard layout Ensure that you install the motherboard into the holes indicated by circles to secure the motherboard to the rear ...

User Manual
Page 12
...socket designed for AMD® Phenom™FX / Phenom™ / Athlon™ / Sempron™ processors. Use a CPU that is designed for the AM2+ / AM2 socket. 1.4 System memory 1.4.1 Overview This motherboard comes with a 940-pin AM2+ / AM2 socket designed for the AMD Opteron™ processor. A DDR2 DIMM has the... A Channel B Sockets DIMM_A1 DIMM_B1 1-3 Chapter 1: Product introduction DDR2 DIMMs are notched differently to the 184-pin DDR DIMM. 1.3 Central Processing Unit (CPU) This motherboard comes with two Double Data Rate 2 (DDR2) Dual Inline Memory Modules (DIMM) sockets.
...socket designed for AMD® Phenom™FX / Phenom™ / Athlon™ / Sempron™ processors. Use a CPU that is designed for the AM2+ / AM2 socket. 1.4 System memory 1.4.1 Overview This motherboard comes with a 940-pin AM2+ / AM2 socket designed for the AMD Opteron™ processor. A DDR2 DIMM has the... A Channel B Sockets DIMM_A1 DIMM_B1 1-3 Chapter 1: Product introduction DDR2 DIMMs are notched differently to the 184-pin DDR DIMM. 1.3 Central Processing Unit (CPU) This motherboard comes with two Double Data Rate 2 (DDR2) Dual Inline Memory Modules (DIMM) sockets.
User Manual
Page 15
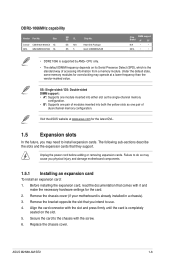
...Heat-Sink Package GL2L128M88BA25AB Chip DIMM support Brand A* B* N/A • • GEIL • • • DDR2 1066 is supported by AM2+ CPU only. • The default DIMM frequency depends on the slot. 5. Before installing the expansion card, read the documentation that they support. Visit the... chassis). 3. Align the card connector with the screw. 6. Remove the bracket opposite the slot that you physical injury and damage motherboard components. 1.5.1 Installing an expansion card To install an expansion card: 1. Secure the card to use. 4. ASUS M2N68-AM SE2 1-6
...Heat-Sink Package GL2L128M88BA25AB Chip DIMM support Brand A* B* N/A • • GEIL • • • DDR2 1066 is supported by AM2+ CPU only. • The default DIMM frequency depends on the slot. 5. Before installing the expansion card, read the documentation that they support. Visit the... chassis). 3. Align the card connector with the screw. 6. Remove the bracket opposite the slot that you physical injury and damage motherboard components. 1.5.1 Installing an expansion card To install an expansion card: 1. Secure the card to use. 4. ASUS M2N68-AM SE2 1-6
User Manual
Page 17
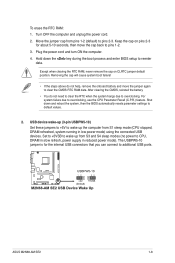
...After clearing the CMOS, reinstall the battery. • You do not help, remove the onboard battery and move the cap back to pins 2-3. ASUS M2N68-AM SE2 1-8 Removing the cap will cause system boot failure! • If the steps above do not need to clear the RTC when the system hangs ...Except when clearing the RTC RAM, never remove the cap on pins 2-3 for the internal USB connectors that you can connect to overclocking, use the CPU Parameter Recall (C.P.R.) feature. Turn OFF the computer and unplug the power cord. 2. To erase the RTC RAM: 1. Hold down and reboot the system...
...After clearing the CMOS, reinstall the battery. • You do not help, remove the onboard battery and move the cap back to pins 2-3. ASUS M2N68-AM SE2 1-8 Removing the cap will cause system boot failure! • If the steps above do not need to clear the RTC when the system hangs ...Except when clearing the RTC RAM, never remove the cap on pins 2-3 for the internal USB connectors that you can connect to overclocking, use the CPU Parameter Recall (C.P.R.) feature. Turn OFF the computer and unplug the power cord. 2. To erase the RTC RAM: 1. Hold down and reboot the system...
User Manual
Page 21
... is purchased separately. 5. Doing so will damage the motherboard! ASUS M2N68-AM SE2 1-12 4. Connect the CPU fan cable to the CPU fan connector on the CPU fan connector. DO NOT place a jumper cap on the motherboard, ensuring that supports up to the CPU fan connector. Only the CPU fan supports the ASUS Q-Fan feature. Never connect a 1394 cable to a slot...
... is purchased separately. 5. Doing so will damage the motherboard! ASUS M2N68-AM SE2 1-12 4. Connect the CPU fan cable to the CPU fan connector on the CPU fan connector. DO NOT place a jumper cap on the motherboard, ensuring that supports up to the CPU fan connector. Only the CPU fan supports the ASUS Q-Fan feature. Never connect a 1394 cable to a slot...
User Manual
Page 30
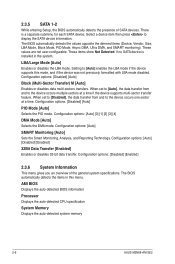
... the Smart Monitoring, Analysis, and Reporting Technology. AMI BIOS Displays the auto-detected BIOS information Processor Displays the auto-detected CPU specification System Memory Displays the auto-detected system memory 2-6 ASUS M2N68-AM SE2 Setting to the device occurs multiple sectors at a time. Configuration options: [Disabled] [Auto] Block (Multi-Sector Transfer) M [Auto] Enables or...
... the Smart Monitoring, Analysis, and Reporting Technology. AMI BIOS Displays the auto-detected BIOS information Processor Displays the auto-detected CPU specification System Memory Displays the auto-detected system memory 2-6 ASUS M2N68-AM SE2 Setting to the device occurs multiple sectors at a time. Configuration options: [Disabled] [Auto] Block (Multi-Sector Transfer) M [Auto] Enables or...
User Manual
Page 31
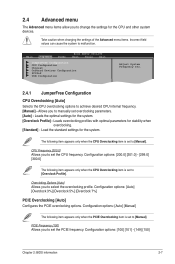
...Overcloking Options [Auto] Allows you to achieve desired CPU internal frequency. [Manual] - Loads overclocking profiles with optimal parameters for the CPU and other system devices. The following item appears only when the CPU Overclocking item is set the PCIE frequency. PCIE ... The Advanced menu items allow you to malfunction. Configuration options: [200.0] [201.0] - [299.0] [300.0] The following item appears only when the CPU Overclocking item is set overclocking parameters. [Auto] - Allows you to manually set to [Manual]. Configuration options: [100] [101] - [149] ...
...Overcloking Options [Auto] Allows you to achieve desired CPU internal frequency. [Manual] - Loads overclocking profiles with optimal parameters for the CPU and other system devices. The following item appears only when the CPU Overclocking item is set the PCIE frequency. PCIE ... The Advanced menu items allow you to malfunction. Configuration options: [200.0] [201.0] - [299.0] [300.0] The following item appears only when the CPU Overclocking item is set overclocking parameters. [Auto] - Allows you to manually set to [Manual]. Configuration options: [100] [101] - [149] ...

User Manual
Page 33
... AMD Secure Virtual Machine mode. Configuration options: [Enabled] [Disabled] Chapter 2: BIOS information 2-9 Configuration options: [Disabled] [Enabled] CPU Prefetching [Enabled] Enables or disables the CPU prefetching. Configuration options: [Disabled] [Enabled] Microcode Updation [Enabled] Allows you to set the memory voltage. tRDRD [Auto] Configuration ... Voltage [Auto] Allows you to enable or disable the microcode updation. Configuration options: [Auto] [1.35V] 2.4.2 CPU Configuration The items in this menu show the CPU-related information that the BIOS automatically detects.
... AMD Secure Virtual Machine mode. Configuration options: [Enabled] [Disabled] Chapter 2: BIOS information 2-9 Configuration options: [Disabled] [Enabled] CPU Prefetching [Enabled] Enables or disables the CPU prefetching. Configuration options: [Disabled] [Enabled] Microcode Updation [Enabled] Allows you to set the memory voltage. tRDRD [Auto] Configuration ... Voltage [Auto] Allows you to enable or disable the microcode updation. Configuration options: [Auto] [1.35V] 2.4.2 CPU Configuration The items in this menu show the CPU-related information that the BIOS automatically detects.
User Manual
Page 37
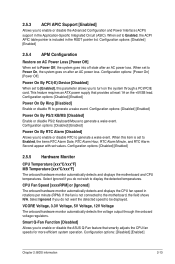
This feature requires an ATX power supply that smartly adjusts the CPU fan speeds for more efficient system operation. Configuration options: [Disabled]...APIC table pointer is included in the RSDT pointer list. When set to enable or disable the ASUS Q-Fan feature that provides at least 1A on after an AC power loss. When this parameter ...186;F] MB Temperature [xxxºC/xxxºF] The onboard hardware monitor automatically detects and displays the motherboard and CPU temperatures. Configuration options: [Disabled] [Enabled] Chapter 2: BIOS information 2-13 When set to ...
This feature requires an ATX power supply that smartly adjusts the CPU fan speeds for more efficient system operation. Configuration options: [Disabled]...APIC table pointer is included in the RSDT pointer list. When set to enable or disable the ASUS Q-Fan feature that provides at least 1A on after an AC power loss. When this parameter ...186;F] MB Temperature [xxxºC/xxxºF] The onboard hardware monitor automatically detects and displays the motherboard and CPU temperatures. Configuration options: [Disabled] [Enabled] Chapter 2: BIOS information 2-13 When set to ...


