
User Manual
Page 1
Motherboard
Motherboard

User Manual
Page 1
Motherboard M2N68-AM SE2
Motherboard M2N68-AM SE2
User Manual
Page 3
Contents Notices...v Safety information vi About this guide vi M2N68-AM SE2 specifications summary viii Chapter 1: Product introduction 1.1 Before you proceed 1-1 1.2 Motherboard overview 1-2 1.2.1 Motherboard layout 1-2 1.2.2 Layout contents 1-2 1.3 Central Processing Unit (CPU 1-3 1.4 System memory 1-3 1.4.1 Overview 1-3 1.4.2 Memory configurations 1-4 1.5 ... information 1-15 Chapter 2: BIOS information 2.1 Managing and updating your BIOS 2-1 2.1.1 ASUS Update utility 2-1 2.1.2 ASUS EZ Flash 2 utility 2-2 2.1.3 ASUS CrashFree BIOS 3 utility 2-3 2.2 BIOS setup program 2-4 iii
Contents Notices...v Safety information vi About this guide vi M2N68-AM SE2 specifications summary viii Chapter 1: Product introduction 1.1 Before you proceed 1-1 1.2 Motherboard overview 1-2 1.2.1 Motherboard layout 1-2 1.2.2 Layout contents 1-2 1.3 Central Processing Unit (CPU 1-3 1.4 System memory 1-3 1.4.1 Overview 1-3 1.4.2 Memory configurations 1-4 1.5 ... information 1-15 Chapter 2: BIOS information 2.1 Managing and updating your BIOS 2-1 2.1.1 ASUS Update utility 2-1 2.1.2 ASUS EZ Flash 2 utility 2-2 2.1.3 ASUS CrashFree BIOS 3 utility 2-3 2.2 BIOS setup program 2-4 iii
User Manual
Page 5
... this unit not expressly approved by one or more of the following two conditions: • This device may cause undesired operation. DO NOT throw the motherboard in municipal waste. Notices Federal Communications Commission Statement This device complies with Part 15 of parts and recycling.
... this unit not expressly approved by one or more of the following two conditions: • This device may cause undesired operation. DO NOT throw the motherboard in municipal waste. Notices Federal Communications Commission Statement This device complies with Part 15 of parts and recycling.
User Manual
Page 6
... the system. • When adding or removing devices to or from the existing system before you need when installing and configuring the motherboard. These devices could interrupt the grounding circuit. • Ensure that your retailer. vi Contact a qualified service technician or your dealer ...immediately. • To avoid short circuits, keep paper clips, screws, and staples away from the motherboard, ensure that all the manuals that the power cables for the devices are unplugged before using , contact your area. Operation safety •...
... the system. • When adding or removing devices to or from the existing system before you need when installing and configuring the motherboard. These devices could interrupt the grounding circuit. • Ensure that your retailer. vi Contact a qualified service technician or your dealer ...immediately. • To avoid short circuits, keep paper clips, screws, and staples away from the motherboard, ensure that all the manuals that the power cables for the devices are unplugged before using , contact your area. Operation safety •...
User Manual
Page 10
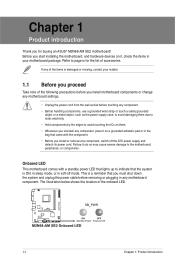
Refer to page ix for buying an ASUS® M2N68-AM SE2 motherboard! This is ON, in sleep mode, or in soft-off the ATX power supply and detach its power cord. Before you start installing the motherboard, and hardware devices on a grounded antistatic pad or in any motherboard component. Onboard LED This motherboard comes with the component. •...
Refer to page ix for buying an ASUS® M2N68-AM SE2 motherboard! This is ON, in sleep mode, or in soft-off the ATX power supply and detach its power cord. Before you start installing the motherboard, and hardware devices on a grounded antistatic pad or in any motherboard component. Onboard LED This motherboard comes with the component. •...
User Manual
Page 11
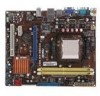
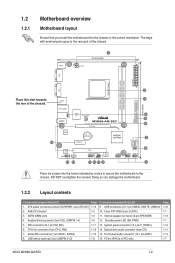
DO NOT overtighten the screws! ATX power connectors (24-pin EATXPWR, 4-pin ATX12V) 2. IDE connector (40-1 pin PRI_IDE) 6. 1.2 1.2.1 Motherboard overview Motherboard layout Ensure that you install the motherboard into the holes indicated by circles to secure the motherboard to the rear part of the...(4-pin CD) 15. PCIe x16/PCIe x1/PCI slots Page 1-12 1-7 1-13 1-1 1-14 1-11 1-14 1-7 ASUS M2N68-AM SE2 1-2 AM2 CPU Socket 3. Doing so can damage the motherboard. 1.2.2 Layout contents Connectors/Jumpers/Slots/LED 1. USB device wake-up (3-pin USBPW 5-10) Page 1-13 1-3 1-3 ...
DO NOT overtighten the screws! ATX power connectors (24-pin EATXPWR, 4-pin ATX12V) 2. IDE connector (40-1 pin PRI_IDE) 6. 1.2 1.2.1 Motherboard overview Motherboard layout Ensure that you install the motherboard into the holes indicated by circles to secure the motherboard to the rear part of the...(4-pin CD) 15. PCIe x16/PCIe x1/PCI slots Page 1-12 1-7 1-13 1-1 1-14 1-11 1-14 1-7 ASUS M2N68-AM SE2 1-2 AM2 CPU Socket 3. Doing so can damage the motherboard. 1.2.2 Layout contents Connectors/Jumpers/Slots/LED 1. USB device wake-up (3-pin USBPW 5-10) Page 1-13 1-3 1-3 ...

User Manual
Page 12
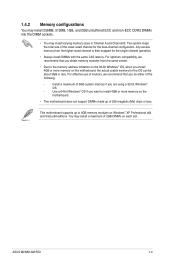
1.3 Central Processing Unit (CPU) This motherboard comes with two Double Data Rate 2 (DDR2) Dual Inline Memory Modules (DIMM) sockets. The AM2+ / AM2 socket has a different pinout from the 940-pin socket ...® Phenom™FX / Phenom™ / Athlon™ / Sempron™ processors. Use a CPU that is designed for the AM2+ / AM2 socket. 1.4 System memory 1.4.1 Overview This motherboard comes with a 940-pin AM2+ / AM2 socket designed for the AMD Opteron™ processor. DDR2 DIMMs are notched differently to the 184-pin DDR DIMM...
1.3 Central Processing Unit (CPU) This motherboard comes with two Double Data Rate 2 (DDR2) Dual Inline Memory Modules (DIMM) sockets. The AM2+ / AM2 socket has a different pinout from the 940-pin socket ...® Phenom™FX / Phenom™ / Athlon™ / Sempron™ processors. Use a CPU that is designed for the AM2+ / AM2 socket. 1.4 System memory 1.4.1 Overview This motherboard comes with a 940-pin AM2+ / AM2 socket designed for the AMD Opteron™ processor. DDR2 DIMMs are notched differently to the 184-pin DDR DIMM...
User Manual
Page 13
... • Due to the memory address limitation on the 32-bit Windows® OS, when you install 4GB or more memory on the motherboard. • This motherboard does not support DIMMs made up to install 4GB or more memory on each slot. Use a 64-bit Windows® OS if you ...8226; You may install a maximum of memory, we recommend that you do either of 256 megabits (Mb) chips or less. ASUS M2N68-AM SE2 1-4 For effective use of 2GB DIMMs on the motherboard, the actual usable memory for the single-channel operation. • Always install DIMMs with the same CAS latency. You may ...
... • Due to the memory address limitation on the 32-bit Windows® OS, when you install 4GB or more memory on the motherboard. • This motherboard does not support DIMMs made up to install 4GB or more memory on each slot. Use a 64-bit Windows® OS if you ...8226; You may install a maximum of memory, we recommend that you do either of 256 megabits (Mb) chips or less. ASUS M2N68-AM SE2 1-4 For effective use of 2GB DIMMs on the motherboard, the actual usable memory for the single-channel operation. • Always install DIMMs with the same CAS latency. You may ...
User Manual
Page 15
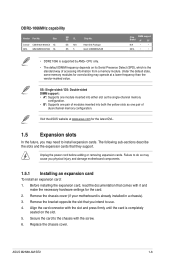
... Before installing the expansion card, read the documentation that comes with the screw. 6. Remove the chassis cover (if your motherboard is completely seated on its Serial Presence Detect (SPD), which is the standard way of dual-channel memory configuration. Heat-... on the slot. 5. Remove the bracket opposite the slot that they support. ASUS M2N68-AM SE2 1-6 The following sub-sections describe the slots and the expansion cards that you physical injury and damage motherboard components. 1.5.1 Installing an expansion card To install an expansion card: 1. Replace the...
... Before installing the expansion card, read the documentation that comes with the screw. 6. Remove the chassis cover (if your motherboard is completely seated on its Serial Presence Detect (SPD), which is the standard way of dual-channel memory configuration. Heat-... on the slot. 5. Remove the bracket opposite the slot that they support. ASUS M2N68-AM SE2 1-6 The following sub-sections describe the slots and the expansion cards that you physical injury and damage motherboard components. 1.5.1 Installing an expansion card To install an expansion card: 1. Replace the...
User Manual
Page 16
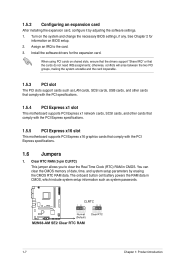
...shared slots, ensure that the drivers support "Share IRQ" or that comply with the PCI Express specifications. 1.5.5 PCI Express x16 slot This motherboard supports PCI Express x16 graphics cards that the cards do not need IRQ assignments; See Chapter 2 for the expansion card. Assign an ...information such as LAN cards, SCSI cards, USB cards, and other cards that comply with the PCI specifications. 1.5.4 PCI Express x1 slot This motherboard supports PCI Express x1 network cards, SCSI cards, and other cards that comply with the PCI Express specifications. 1.6 Jumpers 1. 1.5.2 Configuring an ...
...shared slots, ensure that the drivers support "Share IRQ" or that comply with the PCI Express specifications. 1.5.5 PCI Express x16 slot This motherboard supports PCI Express x16 graphics cards that the cards do not need IRQ assignments; See Chapter 2 for the expansion card. Assign an ...information such as LAN cards, SCSI cards, USB cards, and other cards that comply with the PCI specifications. 1.5.4 PCI Express x1 slot This motherboard supports PCI Express x1 network cards, SCSI cards, and other cards that comply with the PCI Express specifications. 1.6 Jumpers 1. 1.5.2 Configuring an ...
User Manual
Page 20
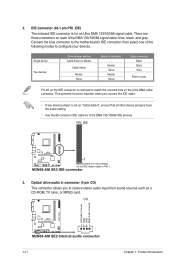
... connector to match the covered hole on the Ultra DMA cable connector. IDE connector (40-1 pin PRI_IDE) The onboard IDE connector is removed to the motherboard's IDE connector, then select one of device(s) - Master Slave Master Slave Cable connector Black Black Gray Black or gray Pin 20 on each Ultra DMA...
... connector to match the covered hole on the Ultra DMA cable connector. IDE connector (40-1 pin PRI_IDE) The onboard IDE connector is removed to the motherboard's IDE connector, then select one of device(s) - Master Slave Master Slave Cable connector Black Black Gray Black or gray Pin 20 on each Ultra DMA...
User Manual
Page 21
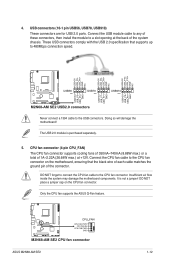
..., USB910) These connectors are for USB 2.0 ports. Doing so will damage the motherboard! Insufficient air flow inside the system may damage the motherboard components. DO NOT place a jumper cap on the motherboard, ensuring that supports up to 480Mbps connection speed. ASUS M2N68-AM SE2 1-12 These USB connectors comply with the USB 2.0 specification that the black...
..., USB910) These connectors are for USB 2.0 ports. Doing so will damage the motherboard! Insufficient air flow inside the system may damage the motherboard components. DO NOT place a jumper cap on the motherboard, ensuring that supports up to 480Mbps connection speed. ASUS M2N68-AM SE2 1-12 These USB connectors comply with the USB 2.0 specification that the black...
User Manual
Page 24
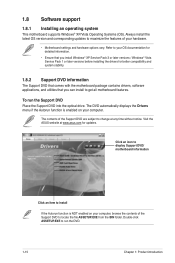
...on your OS documentation for detailed information. • Ensure that you can install to get all motherboard features. The contents of the Support DVD to change at www.asus.com for better compatibility and system stability. 1.8.2 Support DVD information The Support DVD that comes ...with the motherboard package contains drivers, software applications, and utilities that you install Windows® XP Service Pack 3 or ...
...on your OS documentation for detailed information. • Ensure that you can install to get all motherboard features. The contents of the Support DVD to change at www.asus.com for better compatibility and system stability. 1.8.2 Support DVD information The Support DVD that comes ...with the motherboard package contains drivers, software applications, and utilities that you install Windows® XP Service Pack 3 or ...
User Manual
Page 25
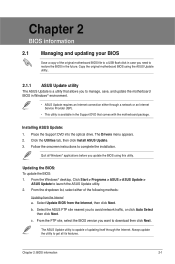
...). • This utility is a utility that comes with the motherboard package. Installing ASUS Update: 1. Click the Utilities tab, then click Install ASUS Update. 3. From the Windows® desktop, Click Start > Programs > ASUS > ASUS Update > ASUS Update to avoid network traffic, or click Auto Select then click... click Next. Quit all its features. Follow the onscreen instructions to manage, save, and update the motherboard BIOS in Windows® environment. • ASUS Update requires an Internet connection either of the following methods: Updating from the Internet, then click Next....
...). • This utility is a utility that comes with the motherboard package. Installing ASUS Update: 1. Click the Utilities tab, then click Install ASUS Update. 3. From the Windows® desktop, Click Start > Programs > ASUS > ASUS Update > ASUS Update to avoid network traffic, or click Auto Select then click... click Next. Quit all its features. Follow the onscreen instructions to manage, save, and update the motherboard BIOS in Windows® environment. • ASUS Update requires an Internet connection either of the following methods: Updating from the Internet, then click Next....
User Manual
Page 27
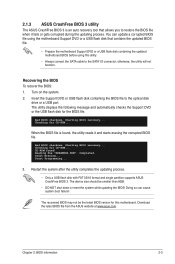
...: 1. Reading file "M2NAMSE2.ROM". Start Programming... 3. Doing so can update a corrupted BIOS file using this motherboard. Chapter 2: BIOS information 2-3 otherwise, the utility will not function. Bad BIOS checksum. Checking for the BIOS file...motherboard BIOS before using the motherboard Support DVD or a USB flash disk that allows you to restore the BIOS file when it and starts erasing the corrupted BIOS file. Start Erasing... CD-ROM found , the utility reads it fails or gets corrupted during the updating process. 2.1.3 ASUS CrashFree BIOS 3 utility The ASUS...
...: 1. Reading file "M2NAMSE2.ROM". Start Programming... 3. Doing so can update a corrupted BIOS file using this motherboard. Chapter 2: BIOS information 2-3 otherwise, the utility will not function. Bad BIOS checksum. Checking for the BIOS file...motherboard BIOS before using the motherboard Support DVD or a USB flash disk that allows you to restore the BIOS file when it and starts erasing the corrupted BIOS file. Start Erasing... CD-ROM found , the utility reads it fails or gets corrupted during the updating process. 2.1.3 ASUS CrashFree BIOS 3 utility The ASUS...
User Manual
Page 28
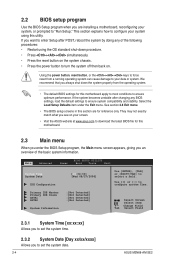
... motherboard apply to most conditions to ensure optimum performance. Main Advanced Power BIOS SETUP UTILITY Boot Tools Exit System Time 19:34:30] System Date [Wed 08/27/2008] IDE Configuration Use [ENTER], [TAB] or [SHIFT-TAB] to set the system date. 2-4 ASUS M2N68-AM SE2 ...] :[Not Detected] :[Not Detected] Select Screen Select Item +- 2.2 BIOS setup program Use the BIOS Setup program when you are installing a motherboard, reconfiguring your system using the OS standard shut-down the system properly from a running operating system can cause damage to your screen. •...
... motherboard apply to most conditions to ensure optimum performance. Main Advanced Power BIOS SETUP UTILITY Boot Tools Exit System Time 19:34:30] System Date [Wed 08/27/2008] IDE Configuration Use [ENTER], [TAB] or [SHIFT-TAB] to set the system date. 2-4 ASUS M2N68-AM SE2 ...] :[Not Detected] :[Not Detected] Select Screen Select Item +- 2.2 BIOS setup program Use the BIOS Setup program when you are installing a motherboard, reconfiguring your system using the OS standard shut-down the system properly from a running operating system can cause damage to your screen. •...
User Manual
Page 37
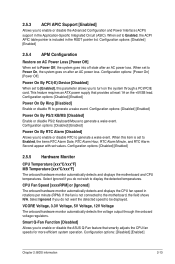
...[Disabled] [Enabled] Chapter 2: BIOS information 2-13 When set values. This feature requires an ATX power supply that smartly adjusts the CPU fan speeds for more efficient system operation. Select Ignored if ...be displayed. Smart Q-Fan Function [Disabled] Allows you to enable or disable the ASUS Q-Fan feature that provides at least 1A on AC Power Loss [Power Off] ... The onboard hardware monitor automatically detects and displays the motherboard and CPU temperatures. Select Ignored if you to enable or disable RTC to the motherboard, the field shows N/A. Configuration options: [Power On...
...[Disabled] [Enabled] Chapter 2: BIOS information 2-13 When set values. This feature requires an ATX power supply that smartly adjusts the CPU fan speeds for more efficient system operation. Select Ignored if ...be displayed. Smart Q-Fan Function [Disabled] Allows you to enable or disable the ASUS Q-Fan feature that provides at least 1A on AC Power Loss [Power Off] ... The onboard hardware monitor automatically detects and displays the motherboard and CPU temperatures. Select Ignored if you to enable or disable RTC to the motherboard, the field shows N/A. Configuration options: [Power On...


