
User Manual
Page 1
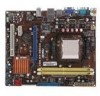
Motherboard M2N68-AM SE2
Motherboard M2N68-AM SE2
User Manual
Page 3
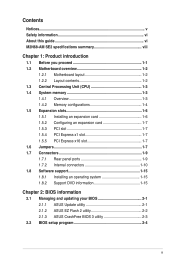
Contents Notices...v Safety information vi About this guide vi M2N68-AM SE2 specifications summary viii Chapter 1: Product introduction 1.1 Before you proceed 1-1 1.2 Motherboard overview 1-2 1.2.1 Motherboard layout 1-2 1.2.2 Layout contents 1-2 1.3 Central Processing Unit (CPU 1-3 1.4 System memory 1-3 1.4.1 Overview 1-3 1.4.2 Memory configurations 1-4 1.5 ... information 1-15 Chapter 2: BIOS information 2.1 Managing and updating your BIOS 2-1 2.1.1 ASUS Update utility 2-1 2.1.2 ASUS EZ Flash 2 utility 2-2 2.1.3 ASUS CrashFree BIOS 3 utility 2-3 2.2 BIOS setup program 2-4 iii
Contents Notices...v Safety information vi About this guide vi M2N68-AM SE2 specifications summary viii Chapter 1: Product introduction 1.1 Before you proceed 1-1 1.2 Motherboard overview 1-2 1.2.1 Motherboard layout 1-2 1.2.2 Layout contents 1-2 1.3 Central Processing Unit (CPU 1-3 1.4 System memory 1-3 1.4.1 Overview 1-3 1.4.2 Memory configurations 1-4 1.5 ... information 1-15 Chapter 2: BIOS information 2.1 Managing and updating your BIOS 2-1 2.1.1 ASUS Update utility 2-1 2.1.2 ASUS EZ Flash 2 utility 2-2 2.1.3 ASUS CrashFree BIOS 3 utility 2-3 2.2 BIOS setup program 2-4 iii
User Manual
Page 10
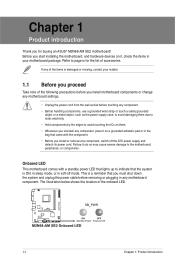
... damaging them due to static electricity • Hold components by the edges to page ix for buying an ASUS® M2N68-AM SE2 motherboard! The illustration below shows the location of accessories. Failure to do so may cause severe damage to indicate ... introduction Thank you must shut down the system and unplug the power cable before removing or plugging in any motherboard component. Refer to avoid touching the ICs on a grounded antistatic pad or in the bag that came with... Take note of the items is ON, in sleep mode, or in soft-off the ATX power supply and detach its power cord.
... damaging them due to static electricity • Hold components by the edges to page ix for buying an ASUS® M2N68-AM SE2 motherboard! The illustration below shows the location of accessories. Failure to do so may cause severe damage to indicate ... introduction Thank you must shut down the system and unplug the power cable before removing or plugging in any motherboard component. Refer to avoid touching the ICs on a grounded antistatic pad or in the bag that came with... Take note of the items is ON, in sleep mode, or in soft-off the ATX power supply and detach its power cord.
User Manual
Page 11
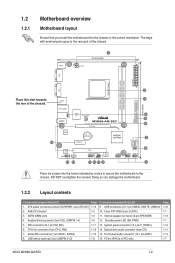
.../PCIe x1/PCI slots Page 1-12 1-7 1-13 1-1 1-14 1-11 1-14 1-7 ASUS M2N68-AM SE2 1-2 1.2 1.2.1 Motherboard overview Motherboard layout Ensure that you install the motherboard into the holes indicated by circles to secure the motherboard to the rear part of the chassis. DO NOT overtighten the screws! ATX power connectors (24-pin EATXPWR, 4-pin ATX12V) 2. IDE connector (40-1 pin...
.../PCIe x1/PCI slots Page 1-12 1-7 1-13 1-1 1-14 1-11 1-14 1-7 ASUS M2N68-AM SE2 1-2 1.2 1.2.1 Motherboard overview Motherboard layout Ensure that you install the motherboard into the holes indicated by circles to secure the motherboard to the rear part of the chassis. DO NOT overtighten the screws! ATX power connectors (24-pin EATXPWR, 4-pin ATX12V) 2. IDE connector (40-1 pin...
User Manual
Page 13
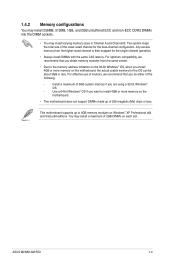
...and Vista x64 editions. The system maps the total size of 2GB DIMMs on the motherboard, the actual usable memory for the OS can be about 3GB or less. For effective use of the following: - ASUS M2N68-AM SE2 1-4 Any excess memory from the same vendor. • Due to install 4GB ...or more memory on each slot. This motherboard supports up of 256 megabits (Mb) chips or less. 1.4.2 Memory configurations You may ...
...and Vista x64 editions. The system maps the total size of 2GB DIMMs on the motherboard, the actual usable memory for the OS can be about 3GB or less. For effective use of the following: - ASUS M2N68-AM SE2 1-4 Any excess memory from the same vendor. • Due to install 4GB ...or more memory on each slot. This motherboard supports up of 256 megabits (Mb) chips or less. 1.4.2 Memory configurations You may ...
User Manual
Page 15
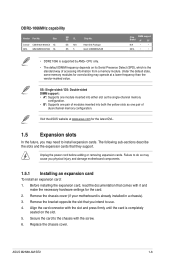
...intend to do so may operate at a lower frequency than the vendor-marked value. Secure the card to install expansion cards. ASUS M2N68-AM SE2 1-6 Align the card connector with the slot and press firmly until the card is already installed in a chassis). 3. Before ... the bracket opposite the slot that they support. The following sub-sections describe the slots and the expansion cards that you physical injury and damage motherboard components. 1.5.1 Installing an expansion card To install an expansion card: 1. Heat-Sink Package GL2L128M88BA25AB Chip DIMM support Brand A* B* N/A •...
...intend to do so may operate at a lower frequency than the vendor-marked value. Secure the card to install expansion cards. ASUS M2N68-AM SE2 1-6 Align the card connector with the slot and press firmly until the card is already installed in a chassis). 3. Before ... the bracket opposite the slot that they support. The following sub-sections describe the slots and the expansion cards that you physical injury and damage motherboard components. 1.5.1 Installing an expansion card To install an expansion card: 1. Heat-Sink Package GL2L128M88BA25AB Chip DIMM support Brand A* B* N/A •...
User Manual
Page 21
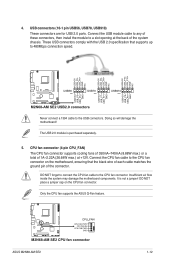
4. Connect the CPU fan cable to the CPU fan connector on the CPU fan connector. Insufficient air flow inside the system may damage the motherboard components. ASUS M2N68-AM SE2 1-12 These USB connectors comply with the USB 2.0 specification that the black wire of each cable matches the ground pin of the system chassis. DO...
4. Connect the CPU fan cable to the CPU fan connector on the CPU fan connector. Insufficient air flow inside the system may damage the motherboard components. ASUS M2N68-AM SE2 1-12 These USB connectors comply with the USB 2.0 specification that the black wire of each cable matches the ground pin of the system chassis. DO...
User Manual
Page 28
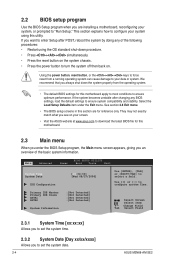
... at www.asus.com to turn the system off then back on the system chassis. • Press the power button to download the latest BIOS file for this section are installing a motherboard, reconfiguring your data or system. Change Field Tab Select Field 2.3.1 System Time [xx:...xx:xx] Allows you always shut down procedure. • Press ++ simultaneously. • Press the reset button on . We recommend that you to set the system date. 2-4 ASUS M2N68-AM SE2 Use [+] or...
... at www.asus.com to turn the system off then back on the system chassis. • Press the power button to download the latest BIOS file for this section are installing a motherboard, reconfiguring your data or system. Change Field Tab Select Field 2.3.1 System Time [xx:...xx:xx] Allows you always shut down procedure. • Press ++ simultaneously. • Press the reset button on . We recommend that you to set the system date. 2-4 ASUS M2N68-AM SE2 Use [+] or...


