
M1 Series Manual
Page 1
NOTEBOOK PC USER'S MANUAL Product Name: Notebook PC Manual Revision: 1.01 E671 Release Date: March 2001
NOTEBOOK PC USER'S MANUAL Product Name: Notebook PC Manual Revision: 1.01 E671 Release Date: March 2001
M1 Series Manual
Page 3
... av batteri. Use of used batteries according to the manufacturer's instructions. (English) VORSICHT! Eksplosionsfare ved fejlagtig håndtering. Reverse engineering or disassembly is intended for Notebook PC with the same or equivalent type recommended by Macrovision Corporation. Explosionsgetahr bei unsachgemäßen Austausch der Batterie. Explosionsfara vid felaktigt batteribyte. Ersatz...
... av batteri. Use of used batteries according to the manufacturer's instructions. (English) VORSICHT! Eksplosionsfare ved fejlagtig håndtering. Reverse engineering or disassembly is intended for Notebook PC with the same or equivalent type recommended by Macrovision Corporation. Explosionsgetahr bei unsachgemäßen Austausch der Batterie. Explosionsfara vid felaktigt batteribyte. Ersatz...

M1 Series Manual
Page 4
Safety Statements CTR 21 Approval (for Notebook PC with built-in Modem) Danish Dutch English Finnish French German Greek 4
Safety Statements CTR 21 Approval (for Notebook PC with built-in Modem) Danish Dutch English Finnish French German Greek 4
M1 Series Manual
Page 5
Safety Statements CTR 21 Approval (for Notebook PC with built-in Modem) Italian Portuguese Spanish Swedish 5
Safety Statements CTR 21 Approval (for Notebook PC with built-in Modem) Italian Portuguese Spanish Swedish 5

M1 Series Manual
Page 6
... that has an operating voltage to ground that convert chemical energy into electrical energy by the manufacturer or authorized retailers. 6 When using the Notebook PC modem, basic safety precautions should always be a remote risk of electric shock from other devices to reduce the risk of a gas ...Required for UL 1642 covering primary (nonrechargeable) and secondary (rechargeable) lithium batteries for example, near a swimming pool. • Do not use the Notebook PC in a wet basement or near a bath tub, wash bowl, kitchen sink or laundry tub, in the vicinity of injury to persons due...
... that has an operating voltage to ground that convert chemical energy into electrical energy by the manufacturer or authorized retailers. 6 When using the Notebook PC modem, basic safety precautions should always be a remote risk of electric shock from other devices to reduce the risk of a gas ...Required for UL 1642 covering primary (nonrechargeable) and secondary (rechargeable) lithium batteries for example, near a swimming pool. • Do not use the Notebook PC in a wet basement or near a bath tub, wash bowl, kitchen sink or laundry tub, in the vicinity of injury to persons due...

M1 Series Manual
Page 7
... ...21 Rear Side ...22 Front Side ...24 3. GETTING STARTED 25 Installing and Removing the Battery Pack 26 Using the Battery Pack 27 Before using your Notebook PC on the road 27 Battery Care ...27 Operating Systems 27 Support Software 27 Power Connection 28 Powering ON The... 29 The Power-On Self Test (POST 29 Save-to-Disk Partition 30 Restarting or Rebooting 30 Powering OFF the Notebook PC 30 Instant Launch Keys and Status Indicators 31 Using the Keyboard 32 Colored Hot Keys 32 Microsoft Windows™ Keys 33 Keyboard as a Numeric ...
... ...21 Rear Side ...22 Front Side ...24 3. GETTING STARTED 25 Installing and Removing the Battery Pack 26 Using the Battery Pack 27 Before using your Notebook PC on the road 27 Battery Care ...27 Operating Systems 27 Support Software 27 Power Connection 28 Powering ON The... 29 The Power-On Self Test (POST 29 Save-to-Disk Partition 30 Restarting or Rebooting 30 Powering OFF the Notebook PC 30 Instant Launch Keys and Status Indicators 31 Using the Keyboard 32 Colored Hot Keys 32 Microsoft Windows™ Keys 33 Keyboard as a Numeric ...

M1 Series Manual
Page 8
... Processor Upgrades 57 Hard Disk Drive ...57 Important Handling Note 57 Removing the Hard Disk Drive 57 Second Hard Disk Drive Module 58 Securing Your Notebook PC 59 Other Security Products 59 8
... Processor Upgrades 57 Hard Disk Drive ...57 Important Handling Note 57 Removing the Hard Disk Drive 57 Second Hard Disk Drive Module 58 Securing Your Notebook PC 59 Other Security Products 59 8

M1 Series Manual
Page 11
INTRODUCING THE NOTEBOOK PC About This User's Manual Caring Information Transportation Precautions 11 1.
INTRODUCING THE NOTEBOOK PC About This User's Manual Caring Information Transportation Precautions 11 1.
M1 Series Manual
Page 12
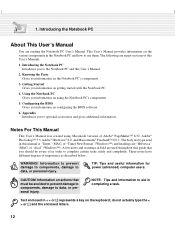
... A few notes and warnings in completing a task. do not actually type the < > or [ ] and the enclosed letters. 12 Introducing the Notebook PC About This User's Manual You are used in this manual is "Times" (MAC) or "Times New Roman" (Windows™) and headings are ...complete certain tasks safely and completely. CAUTION! Configuring the BIOS Gives you information on actions that you information on getting started with the Notebook PC. 4. Information on configuring the BIOS software. 6. This User's Manual provides information on the keyboard; The body text type used...
... A few notes and warnings in completing a task. do not actually type the < > or [ ] and the enclosed letters. 12 Introducing the Notebook PC About This User's Manual You are used in this manual is "Times" (MAC) or "Times New Roman" (Windows™) and headings are ...complete certain tasks safely and completely. CAUTION! Configuring the BIOS Gives you information on actions that you information on getting started with the Notebook PC. 4. Information on configuring the BIOS software. 6. This User's Manual provides information on the keyboard; The body text type used...
M1 Series Manual
Page 13
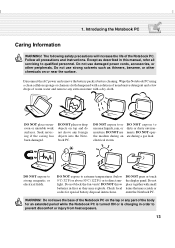
... or drop objects on uneven or unstable work surfaces. Do not block the fan vents! Check local codes for an extended period while the Notebook PC is turned ON or is charging in this manual, refer all precautions and instructions. DO NOT expose to extreme temperatures (below 0˚...qualified personnel. DO NOT expose to prevent discomfort or injury from heat exposure. 13 DO NOT press or touch the display panel. Wipe the Notebook PC using a clean cellulose sponge or chamois cloth dampened with a solution of nonabrasive detergent and a few drops of the body for special ...
... or drop objects on uneven or unstable work surfaces. Do not block the fan vents! Check local codes for an extended period while the Notebook PC is turned ON or is charging in this manual, refer all precautions and instructions. DO NOT expose to extreme temperatures (below 0˚...qualified personnel. DO NOT expose to prevent discomfort or injury from heat exposure. 13 DO NOT press or touch the display panel. Wipe the Notebook PC using a clean cellulose sponge or chamois cloth dampened with a solution of nonabrasive detergent and a few drops of the body for special ...

M1 Series Manual
Page 14
... and scratches. Be aware that the power adapter charges the battery pack as long as the one supplied with a diskette in use the Notebook PC on people or individual items). CAUTION! Close the display panel and check that the 1.44MB floppy disk drive does not contain a ...disk drives. Remove Floppy Disks Make sure that it is still ON. 1. Be careful not to use . Airplane Precautions Contact your Notebook PC and diskettes through airport magnetic detectors or expose them to protect the keyboard and display panel. Most airlines will allow electronic use battery...
... and scratches. Be aware that the power adapter charges the battery pack as long as the one supplied with a diskette in use the Notebook PC on people or individual items). CAUTION! Close the display panel and check that the 1.44MB floppy disk drive does not contain a ...disk drives. Remove Floppy Disks Make sure that it is still ON. 1. Be careful not to use . Airplane Precautions Contact your Notebook PC and diskettes through airport magnetic detectors or expose them to protect the keyboard and display panel. Most airlines will allow electronic use battery...
M1 Series Manual
Page 16
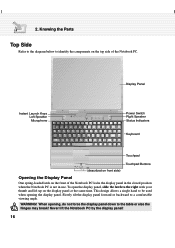
... Refer to the diagram below to the right with your thumb and lift up on the top side of the Notebook PC locks the display panel in the closed position when the Notebook PC is not in use. When opening the display panel. Display Panel Instant Launch Keys Left Speaker Microphone ~ `...Right Speaker Status Indicators Keyboard Touchpad Touchpad Buttons (described on front side) Opening the Display Panel One spring-loaded latch on the front of the Notebook PC. This design allows a single hand to be used when opening , do not force the display panel down to a comfortable viewing angle. ...
... Refer to the diagram below to the right with your thumb and lift up on the top side of the Notebook PC locks the display panel in the closed position when the Notebook PC is not in use. When opening the display panel. Display Panel Instant Launch Keys Left Speaker Microphone ~ `...Right Speaker Status Indicators Keyboard Touchpad Touchpad Buttons (described on front side) Opening the Display Panel One spring-loaded latch on the front of the Notebook PC. This design allows a single hand to be used when opening , do not force the display panel down to a comfortable viewing angle. ...
M1 Series Manual
Page 17
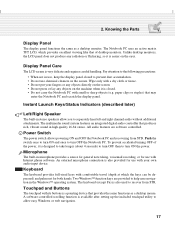
... audio controller that of the power, it is very delicate and requires careful handling. Push the switch once to turn OFF the Notebook PC. Keyboard The keyboard provides full-sized keys with comfortable travel (depth at which provides excellent viewing like that produces rich, vibrant...of desktop monitors. An external microphone connection is a pointing device that may enter the Notebook PC and scratch the display panel. Power Switch The power switch allows powering ON and OFF the Notebook PC and recovering from STR. Two Windows™ function keys are software controlled. ...
... audio controller that of the power, it is very delicate and requires careful handling. Push the switch once to turn OFF the Notebook PC. Keyboard The keyboard provides full-sized keys with comfortable travel (depth at which provides excellent viewing like that produces rich, vibrant...of desktop monitors. An external microphone connection is a pointing device that may enter the Notebook PC and scratch the display panel. Power Switch The power switch allows powering ON and OFF the Notebook PC and recovering from STR. Two Windows™ function keys are software controlled. ...
M1 Series Manual
Page 18
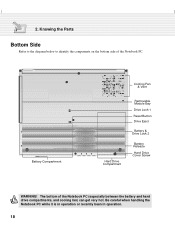
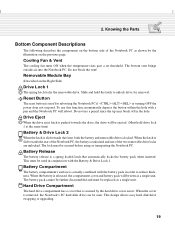
Be careful when handling the Notebook PC while it is in operation or recently been in operation. 18 Battery Compartment Cooling Fan & Vent Hard Drive Compartment Removable Module Bay Drive Lock 1 Reset Button Drive Eject Battery & Drive Lock 2 Battery Release Hard Drive Cover Screw WARNING! The bottom of the Notebook PC. 2. Knowing the Parts Bottom Side Refer to the diagram below to identify the components on the bottom side of the Notebook PC (especially between the battery and hard drive compartments, and cooling fan) can get very hot.
Be careful when handling the Notebook PC while it is in operation or recently been in operation. 18 Battery Compartment Cooling Fan & Vent Hard Drive Compartment Removable Module Bay Drive Lock 1 Reset Button Drive Eject Battery & Drive Lock 2 Battery Release Hard Drive Cover Screw WARNING! The bottom of the Notebook PC. 2. Knowing the Parts Bottom Side Refer to the diagram below to identify the components on the bottom side of the Notebook PC (especially between the battery and hard drive compartments, and cooling fan) can get very hot.
M1 Series Manual
Page 19
... automatically locks the battery pack when inserted. Knowing the Parts Bottom Component Descriptions The following describes the components on the bottom side of the Notebook PC as shown by the hard drive cover screw. Do not block the vent! Removable Module Bay (Described on the previous page. reset...lock must be replaced as a single unit. Battery Compartment The battery compartment's surface is used in order to unlock drive for rebooting the Notebook PC if or turning OFF the power does not respond. When the cover is pushed towards the rear of the two removable drive locks ...
... automatically locks the battery pack when inserted. Knowing the Parts Bottom Component Descriptions The following describes the components on the bottom side of the Notebook PC as shown by the hard drive cover screw. Do not block the vent! Removable Module Bay (Described on the previous page. reset...lock must be replaced as a single unit. Battery Compartment The battery compartment's surface is used in order to unlock drive for rebooting the Notebook PC if or turning OFF the power does not respond. When the cover is pushed towards the rear of the two removable drive locks ...
M1 Series Manual
Page 20
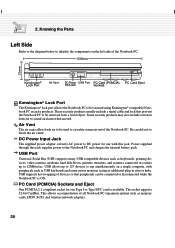
... Card (PCMCIA) Input Jack Sockets PC Card Eject K Kensington® Lock Port The Kensington® lock port allows the Notebook PC to be used to the Notebook PC and charges the internal battery pack. Knowing the Parts Left Side Refer to the diagram below to identify the components on... a single computer, with this jack supplies power to circulate warm air out of all Notebook PC expansion options such as memory cards, ISDN, SCSI, and wireless network adapters. 20 Power supplied through this jack. PC Card (PCMCIA) ...
... Card (PCMCIA) Input Jack Sockets PC Card Eject K Kensington® Lock Port The Kensington® lock port allows the Notebook PC to be used to the Notebook PC and charges the internal battery pack. Knowing the Parts Left Side Refer to the diagram below to identify the components on... a single computer, with this jack supplies power to circulate warm air out of all Notebook PC expansion options such as memory cards, ISDN, SCSI, and wireless network adapters. 20 Power supplied through this jack. PC Card (PCMCIA) ...
M1 Series Manual
Page 21
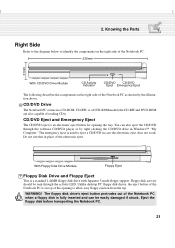
...Windows™ "My Computer." Knowing the Parts Right Side Refer to the diagram below to identify the components on the right side of the Notebook PC. 236mm 31mm With CD/DVD Drive Module CD Activity Indicator CD/DVD CD/DVD Eject Emergency Eject The following describes the components on ... and Floppy Eject This is fully inserted and can also eject the CD/DVD through the activity LED. Eject the floppy disk before transporting the Notebook PC. 21 WARNING! 2. The emergency eject is on the right side of the electronic eject. The floppy disk drive's eject button protrudes out ...
...Windows™ "My Computer." Knowing the Parts Right Side Refer to the diagram below to identify the components on the right side of the Notebook PC. 236mm 31mm With CD/DVD Drive Module CD Activity Indicator CD/DVD CD/DVD Eject Emergency Eject The following describes the components on ... and Floppy Eject This is fully inserted and can also eject the CD/DVD through the activity LED. Eject the floppy disk before transporting the Notebook PC. 21 WARNING! 2. The emergency eject is on the right side of the electronic eject. The floppy disk drive's eject button protrudes out ...

M1 Series Manual
Page 22
...in connector allows convenient use without a dongle. The built-in connector allows convenient use IrDA technology to share a printer between several closely placed Notebook PCs and even send files to 63 units on the rear side of 400 Mbits/sec and can have wireless connection to a network anywhere ... RJ-45 LAN port supports an RJ-45 Ethernet cable. Small offices can use without a network. The interface IEEE1394 has a bandwidth of the Notebook PC as iLINK (Sony) or FireWire (Apple). It is a high speed serial bus like SCSI but has simple connections and hot-plugging capabilities ...
...in connector allows convenient use without a dongle. The built-in connector allows convenient use IrDA technology to share a printer between several closely placed Notebook PCs and even send files to 63 units on the rear side of 400 Mbits/sec and can have wireless connection to a network anywhere ... RJ-45 LAN port supports an RJ-45 Ethernet cable. Small offices can use without a network. The interface IEEE1394 has a bandwidth of the Notebook PC as iLINK (Sony) or FireWire (Apple). It is a high speed serial bus like SCSI but has simple connections and hot-plugging capabilities ...

M1 Series Manual
Page 23
This feature can also be used for dual-view or dual-application support to exit the Notebook PC. Do not block the air vents or else overheating may occur! 23 This port also supports connection of the supplied floppy disk drive module ...
This feature can also be used for dual-view or dual-application support to exit the Notebook PC. Do not block the air vents or else overheating may occur! 23 This port also supports connection of the supplied floppy disk drive module ...
M1 Series Manual
Page 24
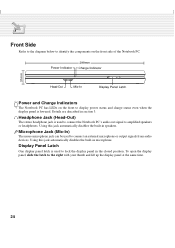
...-In) The mono microphone jack can be used to display power status and charge status even when the display panel is used to connect the Notebook PC's audio out signal to the right with your thumb and lift up the display panel at the same time. 24 Details are described in... the closed position. Power Indicator 299mm Charge Indicator 31mm Head-Out Mic-In Display Panel Latch Power and Charge Indicators The Notebook PC has LEDs on the front side of the Notebook PC. Front Side Refer to the diagram below to lock the display panel in section 3.
...-In) The mono microphone jack can be used to display power status and charge status even when the display panel is used to connect the Notebook PC's audio out signal to the right with your thumb and lift up the display panel at the same time. 24 Details are described in... the closed position. Power Indicator 299mm Charge Indicator 31mm Head-Out Mic-In Display Panel Latch Power and Charge Indicators The Notebook PC has LEDs on the front side of the Notebook PC. Front Side Refer to the diagram below to lock the display panel in section 3.


