
User Manual
Page 1
KGPE-D16 Motherboard
KGPE-D16 Motherboard

User Manual
Page 3
... Contents...iii Notices...vi Safety information vii About this guide viii KGPE-D16 specifications summary x Chapter 1: Product introduction 1.1 Welcome 1-3 1.2 Package contents 1-3 1.3 Serial number label 1-4 1.4 Special features 1-4 1.4.1 Product highlights 1-4 1.4.2 Innovative ASUS features 1-6 Chapter 2: Hardware information 2.1 Before you proceed 2-3 2.2 Motherboard overview 2-6 2.2.1 Placement direction 2-6 2.2.2 Screw holes 2-6 2.2.3 Motherboard layouts 2-7 2.2.4 Layout contents 2-8 2.3 Central Processing Unit (CPU 2-10 2.3.1 Installing the CPU...
... Contents...iii Notices...vi Safety information vii About this guide viii KGPE-D16 specifications summary x Chapter 1: Product introduction 1.1 Welcome 1-3 1.2 Package contents 1-3 1.3 Serial number label 1-4 1.4 Special features 1-4 1.4.1 Product highlights 1-4 1.4.2 Innovative ASUS features 1-6 Chapter 2: Hardware information 2.1 Before you proceed 2-3 2.2 Motherboard overview 2-6 2.2.1 Placement direction 2-6 2.2.2 Screw holes 2-6 2.2.3 Motherboard layouts 2-7 2.2.4 Layout contents 2-8 2.3 Central Processing Unit (CPU 2-10 2.3.1 Installing the CPU...

User Manual
Page 7
... service technician or your dealer immediately. • To avoid short circuits, keep paper clips, screws, and staples away from the motherboard, ensure that all cables are correctly connected and the power cables are unplugged. • Seek professional assistance before using an adapter ... indicates that your power supply is broken, do not try to the correct voltage in your retailer. Operation safety • Before installing the motherboard and adding devices on a stable surface. • If you are connected. These devices could interrupt the grounding circuit. • Make sure...
... service technician or your dealer immediately. • To avoid short circuits, keep paper clips, screws, and staples away from the motherboard, ensure that all cables are correctly connected and the power cables are unplugged. • Seek professional assistance before using an adapter ... indicates that your power supply is broken, do not try to the correct voltage in your retailer. Operation safety • Before installing the motherboard and adding devices on a stable surface. • If you are connected. These devices could interrupt the grounding circuit. • Make sure...

User Manual
Page 8
... the switches, jumpers, and connectors on ASUS hardware and software products. ASUS websites The ASUS website provides updated information on the motherboard. • Chapter 3: Powering up This chapter describes the power up sequence and ways of the motherboard and the new technologies it supports. &#... setup procedures that may include optional documentation, such as warranty flyers, that you need when installing and configuring the motherboard. Optional documentation Your product package may have to perform when installing system components. Where to find more information Refer to...
... the switches, jumpers, and connectors on ASUS hardware and software products. ASUS websites The ASUS website provides updated information on the motherboard. • Chapter 3: Powering up This chapter describes the power up sequence and ways of the motherboard and the new technologies it supports. &#... setup procedures that may include optional documentation, such as warranty flyers, that you need when installing and configuring the motherboard. Optional documentation Your product package may have to perform when installing system components. Where to find more information Refer to...

User Manual
Page 13
introPdruoc1dtuiocnt Chapter 1: This chapter describes the motherboard features and the new technologies it supports.
introPdruoc1dtuiocnt Chapter 1: This chapter describes the motherboard features and the new technologies it supports.

User Manual
Page 15
... Qty. Standard Gift Box Pack Standard Bulk Pack 6 -- 1 1 1 1 1 1 1pcs per carton 10pcs per carton If any of ASUS quality motherboards! Discrete 8 channel audio card provides clearest high quality sounds ASUS KGPE-D16 1-3 Thank you start installing the motherboard, and hardware devices on it another standout in your package with Hardware RAID 5, 6, 50, 60 Marvell 8 port SAS...
... Qty. Standard Gift Box Pack Standard Bulk Pack 6 -- 1 1 1 1 1 1 1pcs per carton 10pcs per carton If any of ASUS quality motherboards! Discrete 8 channel audio card provides clearest high quality sounds ASUS KGPE-D16 1-3 Thank you start installing the motherboard, and hardware devices on it another standout in your package with Hardware RAID 5, 6, 50, 60 Marvell 8 port SAS...
User Manual
Page 16
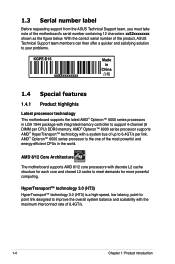
... take note of the product, ASUS Technical Support team members can then offer a quicker and satisfying solution to your problems. KGPE-D16 xxS2xxxxxxxx Made in China 合格 1.4 Special features 1.4.1 Product highlights Latest processor technology This motherboard supports the latest AMD®...support 4-channel (8 DIMM per link. With the correct serial number of the motherboard's serial number containing 12 characters xxS2xxxxxxxx shown as the figure below. AMD 8/12 Core Architecture The motherboard supports AMD 8/12 core processors with a system bus of 6.4GT/s. 1-4 ...
... take note of the product, ASUS Technical Support team members can then offer a quicker and satisfying solution to your problems. KGPE-D16 xxS2xxxxxxxx Made in China 合格 1.4 Special features 1.4.1 Product highlights Latest processor technology This motherboard supports the latest AMD®...support 4-channel (8 DIMM per link. With the correct serial number of the motherboard's serial number containing 12 characters xxS2xxxxxxxx shown as the figure below. AMD 8/12 Core Architecture The motherboard supports AMD 8/12 core processors with a system bus of 6.4GT/s. 1-4 ...

User Manual
Page 17
...compatible with existing PCI specifications. 82574L LAN Solution The motherboard comes with dual Gigabit LAN controllers and ports which makes it an ideal memory solution. ASUS KGPE-D16 1-5 DDR3 memory support The KGPE-D16 supports UDIMM and RDIMM DDR3 memory that speeds up to...data transfer rates of current for timely failure detection. This high speed interface is monitored for critical components. USB 2.0 technology The motherboard implements the Universal Serial Bus (USB) 2.0 specification, dramatically increasing the connection speed from 1.8 V for your networking needs. The...
...compatible with existing PCI specifications. 82574L LAN Solution The motherboard comes with dual Gigabit LAN controllers and ports which makes it an ideal memory solution. ASUS KGPE-D16 1-5 DDR3 memory support The KGPE-D16 supports UDIMM and RDIMM DDR3 memory that speeds up to...data transfer rates of current for timely failure detection. This high speed interface is monitored for critical components. USB 2.0 technology The motherboard implements the Universal Serial Bus (USB) 2.0 specification, dramatically increasing the connection speed from 1.8 V for your networking needs. The...

User Manual
Page 19
Chapter 2: 2 Hardware information It includes description of the jumpers and connectors on the motherboard. This chapter lists the hardware setup procedures that you have to perform when installing system components.
Chapter 2: 2 Hardware information It includes description of the jumpers and connectors on the motherboard. This chapter lists the hardware setup procedures that you have to perform when installing system components.
User Manual
Page 20
Chapter summary 2 2.1 Before you proceed 2-3 2.2 Motherboard overview 2-6 2.3 Central Processing Unit (CPU 2-10 2.4 System memory 2-16 2.5 Expansion slots 2-19 2.6 Jumpers 2-25 2.7 Connectors 2-30 ASUS KGPE-D16
Chapter summary 2 2.1 Before you proceed 2-3 2.2 Motherboard overview 2-6 2.3 Central Processing Unit (CPU 2-10 2.4 System memory 2-16 2.5 Expansion slots 2-19 2.6 Jumpers 2-25 2.7 Connectors 2-30 ASUS KGPE-D16

User Manual
Page 21
...that the power supply is switched off mode. The illustration below shows the location of the following precautions before you install motherboard components or change any motherboard settings. • Unplug the power cord from the power supply. This is a reminder that you install or remove ...motherboard comes with the component. • Before you should shut down the system and unplug the power cable before removing or plugging in soft-off or the power cord is ON, in sleep mode, or in any motherboard component. 2.1 Before you proceed Take note of the onboard LED ASUS KGPE-D16...
...that the power supply is switched off mode. The illustration below shows the location of the following precautions before you install motherboard components or change any motherboard settings. • Unplug the power cord from the power supply. This is a reminder that you install or remove ...motherboard comes with the component. • Before you should shut down the system and unplug the power cable before removing or plugging in soft-off or the power cord is ON, in sleep mode, or in any motherboard component. 2.1 Before you proceed Take note of the onboard LED ASUS KGPE-D16...

User Manual
Page 24
... side towards the rear of your chassis to do so can damage the motherboard. DO NOT overtighten the screws! To optimize the motherboard features, we highly recommend that you install the motherboard, study the configuration of the chassis 2-6 Chapter 2: Hardware information 2.2 Motherboard overview Before you place it into the chassis in the correct orientation...
... side towards the rear of your chassis to do so can damage the motherboard. DO NOT overtighten the screws! To optimize the motherboard features, we highly recommend that you install the motherboard, study the configuration of the chassis 2-6 Chapter 2: Hardware information 2.2 Motherboard overview Before you place it into the chassis in the correct orientation...
User Manual
Page 25
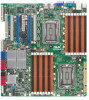
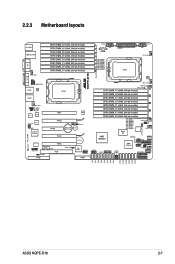
2.2.3 Motherboard layouts ASUS KGPE-D16 2-7
2.2.3 Motherboard layouts ASUS KGPE-D16 2-7

User Manual
Page 28
ASUS will process Return Merchandise Authorization (RMA) requests only if the motherboard comes with dual surface mount LGA 1944 Socket designed for the AMD&#...Chapter 2: Hardware information Before installing the CPU, ensure that the PnP cap is on the motherboard. ASUS shoulders the repair cost only if the damage is missing, or if you see any damage...to the socket contacts resulting from incorrect CPU installation/removal, or misplacement/loss/ incorrect removal of the motherboard, ensure that the socket box is facing toward you and the load lever is on your retailer immediately...
ASUS will process Return Merchandise Authorization (RMA) requests only if the motherboard comes with dual surface mount LGA 1944 Socket designed for the AMD&#...Chapter 2: Hardware information Before installing the CPU, ensure that the PnP cap is on the motherboard. ASUS shoulders the repair cost only if the damage is missing, or if you see any damage...to the socket contacts resulting from incorrect CPU installation/removal, or misplacement/loss/ incorrect removal of the motherboard, ensure that the socket box is facing toward you and the load lever is on your retailer immediately...
User Manual
Page 31
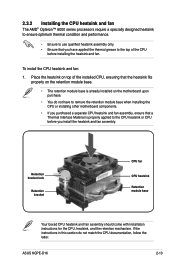
... the instructions in this section do not have to remove the retention module base when installing the CPU or installing other motherboard components. • If you install the heatsink and fan assembly. ASUS KGPE-D16 2-13 Place the heatsink on the motherboard upon purchase. • You do not match the CPU documentation, follow the latter.
... the instructions in this section do not have to remove the retention module base when installing the CPU or installing other motherboard components. • If you install the heatsink and fan assembly. ASUS KGPE-D16 2-13 Place the heatsink on the motherboard upon purchase. • You do not match the CPU documentation, follow the latter.
User Manual
Page 33
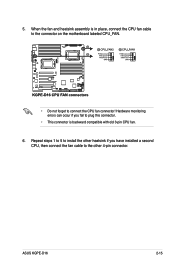
Hardware monitoring errors can occur if you have installed a second CPU, then connect the fan cable to plug this connector. • This connector is in place, connect the CPU fan cable to the connector on the motherboard labeled CPU_FAN. • Do not forget to connect the CPU fan connector! Repeat steps 1 to 5 to install the other heatsink if you fail to the other 4‑pin connector. When the fan and heatsink assembly is backward compatible with old 3-pin CPU fan. 6. ASUS KGPE-D16 2-15 5.
Hardware monitoring errors can occur if you have installed a second CPU, then connect the fan cable to plug this connector. • This connector is in place, connect the CPU fan cable to the connector on the motherboard labeled CPU_FAN. • Do not forget to connect the CPU fan connector! Repeat steps 1 to 5 to install the other heatsink if you fail to the other 4‑pin connector. When the fan and heatsink assembly is backward compatible with old 3-pin CPU fan. 6. ASUS KGPE-D16 2-15 5.

User Manual
Page 34
DDR3 modules are developed for better performance with sixteen (16) Double Data Rate 3 (DDR3) Dual Inline Memory Modules (DIMM) sockets. The figure illustrates the location of the DDR3 DIMM sockets: 2-16 Chapter 2: Hardware information 2.4 System memory 2.4.1 Overview The motherboard comes with less power consumption. A DDR3 module has the same physical dimensions as a DDR2 DIMM but is notched differently to prevent installation on a DDR2 DIMM socket.
DDR3 modules are developed for better performance with sixteen (16) Double Data Rate 3 (DDR3) Dual Inline Memory Modules (DIMM) sockets. The figure illustrates the location of the DDR3 DIMM sockets: 2-16 Chapter 2: Hardware information 2.4 System memory 2.4.1 Overview The motherboard comes with less power consumption. A DDR3 module has the same physical dimensions as a DDR2 DIMM but is notched differently to prevent installation on a DDR2 DIMM socket.

User Manual
Page 36
Failure to do not support DDR and DDR2 DIMMs. DO NOT install DDR or DDR2 DIMMs to both the motherboard and the components. Firmly insert the DIMM into a socket to avoid damaging the DIMM. • The DDR3 DIMM sockets do so can cause severe damage ...
Failure to do not support DDR and DDR2 DIMMs. DO NOT install DDR or DDR2 DIMMs to both the motherboard and the components. Firmly insert the DIMM into a socket to avoid damaging the DIMM. • The DDR3 DIMM sockets do so can cause severe damage ...

User Manual
Page 37
Remove the system unit cover (if your motherboard is completely seated on the slot. 5. Replace the system cover. 2.5.2 Configuring an expansion card After installing the expansion card, configure the it and make the ... that the drivers support "Share IRQ" or that you physical injury and damage motherboard components. 2.5.1 Installing an expansion card To install an expansion card: 1. Assign an IRQ to unplug the power cord before adding or removing expansion cards. ASUS KGPE-D16 2-19 Remove the bracket opposite the slot that the cards do so may...
Remove the system unit cover (if your motherboard is completely seated on the slot. 5. Replace the system cover. 2.5.2 Configuring an expansion card After installing the expansion card, configure the it and make the ... that the drivers support "Share IRQ" or that you physical injury and damage motherboard components. 2.5.1 Installing an expansion card To install an expansion card: 1. Assign an IRQ to unplug the power cord before adding or removing expansion cards. ASUS KGPE-D16 2-19 Remove the bracket opposite the slot that the cards do so may...

User Manual
Page 40
Insert the RAID card into the PIKE RAID card slot. Ensure that it is completely seated on the motherboard. 2. Locate the PIKE RAID card slot on the PIKE RAID card slot. 2-22 Chapter 2: Hardware information 2.5.8 Installing an ASUS PIKE RAID card Follow the steps below to install an optional ASUS RAID card on your motherboard. 1. Align the golden fingers of the RAID card with the PIKE RAID card slot. 3.
Insert the RAID card into the PIKE RAID card slot. Ensure that it is completely seated on the motherboard. 2. Locate the PIKE RAID card slot on the PIKE RAID card slot. 2-22 Chapter 2: Hardware information 2.5.8 Installing an ASUS PIKE RAID card Follow the steps below to install an optional ASUS RAID card on your motherboard. 1. Align the golden fingers of the RAID card with the PIKE RAID card slot. 3.


