K8V-MX User's Manual for English Edition
Page 12
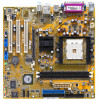
... 1.3.1 Product highlights AMD Athlon™ 64 processor support The K8V-MX supports AMD Athlon 64 and AMD Sempron processors: The AMD Athlon 64 processor is based on 2 Serial ATA ports. 1-2 Chapter 1: Product Introduction The ASUS K8V-MX motherboard delivers a host of the industryʼs first x86-64 technology. 64-bit computing, the next generation technology to your K8V-MX package for buying the ASUS® K8V-MX motherboard! Thank you start installing the motherboard, and hardware devices on it...
... 1.3.1 Product highlights AMD Athlon™ 64 processor support The K8V-MX supports AMD Athlon 64 and AMD Sempron processors: The AMD Athlon 64 processor is based on 2 Serial ATA ports. 1-2 Chapter 1: Product Introduction The ASUS K8V-MX motherboard delivers a host of the industryʼs first x86-64 technology. 64-bit computing, the next generation technology to your K8V-MX package for buying the ASUS® K8V-MX motherboard! Thank you start installing the motherboard, and hardware devices on it...
K8V-MX User's Manual for English Edition
Page 13
... VGA interface specification that utilizes the HyperTransport™ bus link to deliver exceptional integrated graphics and video playback performance. DDR400 support DDR 400 (PC3200), the latest and fastest DDR memory standard, suppports bandwidth up drive. SoundMAX Digital Audio System can output 5.1 channel surround sound and features state. ASUS K8V-MX Motherboard 1-3 The VIA K8M800 features an Integrated Graphics Processor (IGP) to interconnect with the AMD 64 processor...
... VGA interface specification that utilizes the HyperTransport™ bus link to deliver exceptional integrated graphics and video playback performance. DDR400 support DDR 400 (PC3200), the latest and fastest DDR memory standard, suppports bandwidth up drive. SoundMAX Digital Audio System can output 5.1 channel surround sound and features state. ASUS K8V-MX Motherboard 1-3 The VIA K8M800 features an Integrated Graphics Processor (IGP) to interconnect with the AMD 64 processor...
K8V-MX User's Manual for English Edition
Page 14
.... S/PDIF out The K8V-MXʼs S/PDIF-out function turns your comoputer into a high-end entertainment system with digital connectivity to reboot the computer and perform an smart auto-recovery procedure through the motherboard support CD. C.P.R. (CPU Parameter Recall) When the system hangs due to overclocking failure, there is no need to clear CMOS data. CrashFree BIOS 2 Whenever BIOS gets corrupted, ASUS CrashFree BIOS2 allows users to powerful speaker systems. See...
.... S/PDIF out The K8V-MXʼs S/PDIF-out function turns your comoputer into a high-end entertainment system with digital connectivity to reboot the computer and perform an smart auto-recovery procedure through the motherboard support CD. C.P.R. (CPU Parameter Recall) When the system hangs due to overclocking failure, there is no need to clear CMOS data. CrashFree BIOS 2 Whenever BIOS gets corrupted, ASUS CrashFree BIOS2 allows users to powerful speaker systems. See...

K8V-MX User's Manual for English Edition
Page 24
... card by adjusting the software settings. 1. Refer to the chassis with the screw you removed earlier. 6. See Chapter 2 for later use . Remove the bracket opposite the slot that came with the slot and press firmly until the card is already installed in a chassis). 3. Secure the card to the tables on BIOS setup. 2. Assign an IRQ to unplug the power cord before adding or removing expansion cards. Align the card connector...
... card by adjusting the software settings. 1. Refer to the chassis with the screw you removed earlier. 6. See Chapter 2 for later use . Remove the bracket opposite the slot that came with the slot and press firmly until the card is already installed in a chassis). 3. Secure the card to the tables on BIOS setup. 2. Assign an IRQ to unplug the power cord before adding or removing expansion cards. Align the card connector...
K8V-MX User's Manual for English Edition
Page 27
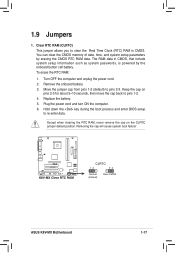
... onboard battery. 3. Removing the cap will cause system boot failure! To erase the RTC RAM: 1. Turn OFF the computer and unplug the power cord. 2. Plug the power cord and turn ON the computer. 6. You can clear the CMOS memory of date, time, and system setup parameters by the onboard button cell battery. The RAM data in CMOS. Hold down the key during the boot process and enter BIOS setup to pins 1-2. 4. R K8V-MX K8V-MX Clear RTC RAM CLRTC 12 23 Normal (Default) Clear CMOS ASUS K8V-MX Motherboard...
... onboard battery. 3. Removing the cap will cause system boot failure! To erase the RTC RAM: 1. Turn OFF the computer and unplug the power cord. 2. Plug the power cord and turn ON the computer. 6. You can clear the CMOS memory of date, time, and system setup parameters by the onboard button cell battery. The RAM data in CMOS. Hold down the key during the boot process and enter BIOS setup to pins 1-2. 4. R K8V-MX K8V-MX Clear RTC RAM CLRTC 12 23 Normal (Default) Clear CMOS ASUS K8V-MX Motherboard...
K8V-MX User's Manual for English Edition
Page 28
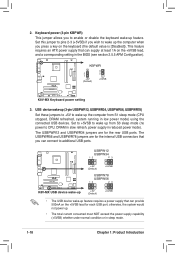
... the internal USB connectors that can supply at least 1A on the keyboard (the default value is [Disabled]). USBPW12 USBPW34 12 23 R K8V-MX +5V (Default) +5VSB USBPW78 USBPW56 12 23 K8V-MX USB device wake-up +5V (Default) +5VSB • The USB device wake-up feature requires a power supply that can connect to additional USB ports. otherwise, the system would not power up from S1 sleep mode (CPU stopped, DRAM refreshed, system running in reduced power mode). Set this jumper to pins 2-3 (+5VSB...
... the internal USB connectors that can supply at least 1A on the keyboard (the default value is [Disabled]). USBPW12 USBPW34 12 23 R K8V-MX +5V (Default) +5VSB USBPW78 USBPW56 12 23 K8V-MX USB device wake-up +5V (Default) +5VSB • The USB device wake-up feature requires a power supply that can connect to additional USB ports. otherwise, the system would not power up from S1 sleep mode (CPU stopped, DRAM refreshed, system running in reduced power mode). Set this jumper to pins 2-3 (+5VSB...

K8V-MX User's Manual for English Edition
Page 43
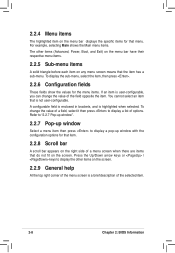
... of a menu screen are the navigation keys for that particular menu. ASUS K8V-MX Motherboard 2-7 Use [+] or [-] to another. 2.2.1 BIOS menu screen Menu items Menu bar Configuration fields General help System Time System Date Legacy Diskette A Diskette Write Protect Primary IDE Master Primary IDE Slave Seconday IDE Master Secondary IDE Slave System Information [17:08:35] [Mon 04/19/2004] [1.44M, 3.5 in the menu and change the settings. Enter F1...
... of a menu screen are the navigation keys for that particular menu. ASUS K8V-MX Motherboard 2-7 Use [+] or [-] to another. 2.2.1 BIOS menu screen Menu items Menu bar Configuration fields General help System Time System Date Legacy Diskette A Diskette Write Protect Primary IDE Master Primary IDE Slave Seconday IDE Master Secondary IDE Slave System Information [17:08:35] [Mon 04/19/2004] [1.44M, 3.5 in the menu and change the settings. Enter F1...
K8V-MX User's Manual for English Edition
Page 44
... the selected item. 2-8 Chapter 2: BIOS Information A configurable field is enclosed in brackets, and is not user-configurable. To change the value of options. Press the Up/Down arrow keys or / keys to display the other items (Advanced, Power, Boot, and Exit) on the menu bar have their respective menu items. 2.2.5 Sub-menu items A solid triangle before each...
... the selected item. 2-8 Chapter 2: BIOS Information A configurable field is enclosed in brackets, and is not user-configurable. To change the value of options. Press the Up/Down arrow keys or / keys to display the other items (Advanced, Power, Boot, and Exit) on the menu bar have their respective menu items. 2.2.5 Sub-menu items A solid triangle before each...
K8V-MX User's Manual for English Edition
Page 46
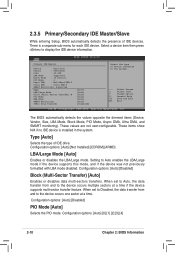
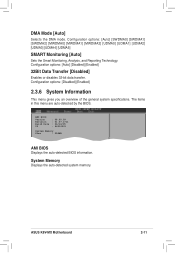
... PIO Mode DMA Mode SMART Monitoring 32Bit Data Transfer [Auto] [Auto] [Auto] [Auto] [Auto] [Auto] [Disabled] Select the type of IDE drive. There is installed in the system. Configuration options: [Auto] [Disabled] Block (Multi-Sector Transfer) [Auto] Enables or disables data multi-sectors transfers. Configuration options: [Auto] [0] [1] [2] [3] [4] 2-10 Chapter 2: BIOS Information 2.3.5 Primary/Secondary IDE Master/Slave While entering Setup, BIOS automatically detects the presence of IDE devices. Setting to display the IDE device information. Select a device item then...
... PIO Mode DMA Mode SMART Monitoring 32Bit Data Transfer [Auto] [Auto] [Auto] [Auto] [Auto] [Auto] [Disabled] Select the type of IDE drive. There is installed in the system. Configuration options: [Auto] [Disabled] Block (Multi-Sector Transfer) [Auto] Enables or disables data multi-sectors transfers. Configuration options: [Auto] [0] [1] [2] [3] [4] 2-10 Chapter 2: BIOS Information 2.3.5 Primary/Secondary IDE Master/Slave While entering Setup, BIOS automatically detects the presence of IDE devices. Setting to display the IDE device information. Select a device item then...
K8V-MX User's Manual for English Edition
Page 47
....1711 : 06/14/05 : A0310001 System Memory Size : 256MB AMI BIOS Displays the auto-detected BIOS information. ASUS K8V-MX Motherboard 2-11 Configuration options: [Auto] [SWDMA0] [SWDMA1] [SWDMA2] [MWDMA0] [MWDMA1] [MWDMA2] [UDMA0] [UDMA1] [UDMA2] [UDMA3] [UDMA4] [UDMA5] SMART Monitoring [Auto] Sets the Smart Monitoring, Analysis, and Reporting Technology. Configuration options: [Auto] [Disabled] [Enabled] 32Bit Data Transfer [Disabled] Enables or disables 32-bit data transfer. The items in this menu are auto-detected by the BIOS. DMA Mode [Auto] Selects the DMA...
....1711 : 06/14/05 : A0310001 System Memory Size : 256MB AMI BIOS Displays the auto-detected BIOS information. ASUS K8V-MX Motherboard 2-11 Configuration options: [Auto] [SWDMA0] [SWDMA1] [SWDMA2] [MWDMA0] [MWDMA1] [MWDMA2] [UDMA0] [UDMA1] [UDMA2] [UDMA3] [UDMA4] [UDMA5] SMART Monitoring [Auto] Sets the Smart Monitoring, Analysis, and Reporting Technology. Configuration options: [Auto] [Disabled] [Enabled] 32Bit Data Transfer [Disabled] Enables or disables 32-bit data transfer. The items in this menu are auto-detected by the BIOS. DMA Mode [Auto] Selects the DMA...
K8V-MX User's Manual for English Edition
Page 50
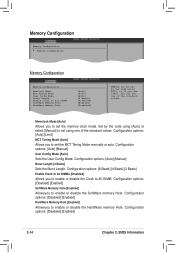
.... Set by the code using one of the standard values. Configuration options: [Auto] [Manual] User Config Mode [Auto] Sets the User Config Mode. Configuration options: [Disabled] [Enabled] SoftWare Memory Hole [Enabled] Allowsyou to enable or disable the HardWare memory Hole. Configuration options: [Disabled] [Enabled] HardWare Memory Hole [Enabled] Allowsyou to enable or disable the SoftWare memory Hole. Configuration options: [Auto] [Limit] MCT Timing Mode [Auto] Allows you to set the memory clock mode. Configuration options: [Disabled] [Enabled] 2-14...
.... Set by the code using one of the standard values. Configuration options: [Auto] [Manual] User Config Mode [Auto] Sets the User Config Mode. Configuration options: [Disabled] [Enabled] SoftWare Memory Hole [Enabled] Allowsyou to enable or disable the HardWare memory Hole. Configuration options: [Disabled] [Enabled] HardWare Memory Hole [Enabled] Allowsyou to enable or disable the SoftWare memory Hole. Configuration options: [Auto] [Limit] MCT Timing Mode [Auto] Allows you to set the memory clock mode. Configuration options: [Disabled] [Enabled] 2-14...
K8V-MX User's Manual for English Edition
Page 51
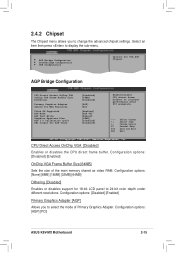
... 24-bit color depth under different resolutions. Configuration options: [AGP] [PCI] ASUS K8V-MX Motherboard 2-15 Configuration options: [Disabled] [Enabled] Primary Graphics Adapter [AGP] Allows you to change the advanced chipset settings. Change Option F1 General Help F10 Save and Exit ESC Exit v02.54 (C)Copyright 1985-2003, American Megatrends, Inc. 2.4.2 Chipset The Chipset menu allows you to select the mode of the main memory shared as video RAM. AGP...
... 24-bit color depth under different resolutions. Configuration options: [AGP] [PCI] ASUS K8V-MX Motherboard 2-15 Configuration options: [Disabled] [Enabled] Primary Graphics Adapter [AGP] Allows you to change the advanced chipset settings. Change Option F1 General Help F10 Save and Exit ESC Exit v02.54 (C)Copyright 1985-2003, American Megatrends, Inc. 2.4.2 Chipset The Chipset menu allows you to select the mode of the main memory shared as video RAM. AGP...
K8V-MX User's Manual for English Edition
Page 53
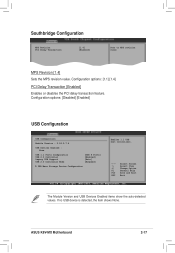
... USB 1.1 Ports Configuration USB 2.0 Controller Legacy USB Support USB 2.0 Controller Mode [USB 8 Ports] [Enabled] [Auto] [HiSpeed] USB Mass Storage Device Configuration Enables 1.1 USB host controllers. ←→ Select Screen ↑↓ Select Item +- Change Option F1 General Help F10 Save and Exit ESC Exit v02.54 (C)Copyright 1985-2003, American Megatrends, Inc. ASUS K8V-MX Motherboard 2-17 If no USB device is detected, the item shows None. Southbridge Configuration MPS Revision PCI Delay Transaction [1.4] [Enabled] Sets...
... USB 1.1 Ports Configuration USB 2.0 Controller Legacy USB Support USB 2.0 Controller Mode [USB 8 Ports] [Enabled] [Auto] [HiSpeed] USB Mass Storage Device Configuration Enables 1.1 USB host controllers. ←→ Select Screen ↑↓ Select Item +- Change Option F1 General Help F10 Save and Exit ESC Exit v02.54 (C)Copyright 1985-2003, American Megatrends, Inc. ASUS K8V-MX Motherboard 2-17 If no USB device is detected, the item shows None. Southbridge Configuration MPS Revision PCI Delay Transaction [1.4] [Enabled] Sets...
K8V-MX User's Manual for English Edition
Page 55
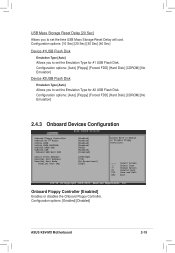
... set the Emulation Type for #1 USB Flash Disk. Onboard Floppy Controller [Enabled] Enables or disables the Onboard Floppy Controller. Configuration options: [Enabled] [Disabled] ASUS K8V-MX Motherboard 2-19 Configuration options: [Auto] [Floppy] [Forced FDD] [Hard Disk] [CDROM] [No Emulation] 2.4.3 Onboard Devices Configuration Onboard Floppy Controller OnBoard AC'97 Audio OnChip SATA OnChip SATA BOOTROM Onboard SATA-IDE OnBoard LAN Onboard LAN Boot ROM Serail Port2 Address Parallel Port Address Parallel Port Mode Parallel Port IRQ [Enabled] [Enabled] [Enabled...
... set the Emulation Type for #1 USB Flash Disk. Onboard Floppy Controller [Enabled] Enables or disables the Onboard Floppy Controller. Configuration options: [Enabled] [Disabled] ASUS K8V-MX Motherboard 2-19 Configuration options: [Auto] [Floppy] [Forced FDD] [Hard Disk] [CDROM] [No Emulation] 2.4.3 Onboard Devices Configuration Onboard Floppy Controller OnBoard AC'97 Audio OnChip SATA OnChip SATA BOOTROM Onboard SATA-IDE OnBoard LAN Onboard LAN Boot ROM Serail Port2 Address Parallel Port Address Parallel Port Mode Parallel Port IRQ [Enabled] [Enabled] [Enabled...
K8V-MX User's Manual for English Edition
Page 56
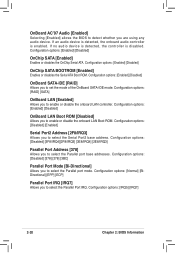
... base address. OnBoard ACʼ97 Audio [Enabled] Selecting [Enabled] allows the BIOS to detect whether you to set the mode of the OnBoard SATA-IDE mode. Configuration options: [Enabled] [Disabled] OnChip SATA [Enabled] Enables or disables the OnChip Serial ATA. Configuration options: [Enabled] [Disabled] OnBoard SATA-IDE [RAID] Allows you are using any audio device. Configuration options: [RAID] [SATA] OnBoard LAN [Enabled] Allows you to enable or disable the onboard LAN controller. Configuration options: [Disabled] [378] [278] [3BC] Parallel Port Mode [Bi-Directional...
... base address. OnBoard ACʼ97 Audio [Enabled] Selecting [Enabled] allows the BIOS to detect whether you to set the mode of the OnBoard SATA-IDE mode. Configuration options: [Enabled] [Disabled] OnChip SATA [Enabled] Enables or disables the OnChip Serial ATA. Configuration options: [Enabled] [Disabled] OnBoard SATA-IDE [RAID] Allows you are using any audio device. Configuration options: [RAID] [SATA] OnBoard LAN [Enabled] Allows you to enable or disable the onboard LAN controller. Configuration options: [Disabled] [378] [278] [3BC] Parallel Port Mode [Bi-Directional...
K8V-MX User's Manual for English Edition
Page 59
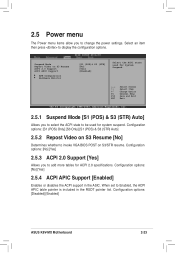
... Resume ACPI 2.0 Support ACPI APIC Support APM Configuration Hardware Monitor [S1 (POS)& S3 (STR] [No] [Yes] [Enabled] Select the ACPI state used for ACPI 2.0 specifications. Configuration options: [No] [Yes] 2.5.3 ACPI 2.0 Support [Yes] Allows you to select the ACPI state to add more tables for system suspend. Configuration options: [Disabled] [Enabled] ASUS K8V-MX Motherboard 2-23 Select an item then press to change the power settings. Suspend Mode Repost Video on...
... Resume ACPI 2.0 Support ACPI APIC Support APM Configuration Hardware Monitor [S1 (POS)& S3 (STR] [No] [Yes] [Enabled] Select the ACPI state used for ACPI 2.0 specifications. Configuration options: [No] [Yes] 2.5.3 ACPI 2.0 Support [Yes] Allows you to select the ACPI state to add more tables for system suspend. Configuration options: [Disabled] [Enabled] ASUS K8V-MX Motherboard 2-23 Select an item then press to change the power settings. Suspend Mode Repost Video on...

K8V-MX User's Manual for English Edition
Page 66
... Setup" during POST. To change the system security settings. To set a password, this function allows the option ROMs to [Enabled], this item shows Installed. On the password box that appears, type a password composed of the screen shows the default Not Installed. To clear the supervisor password, select the Change Supervisor Password then press Enter. Configuration options: [Disabled] [Enabled] 2.6.3 Security The Security menu items allow you have set a Supervisor Password: 1. again to display the configuration options. Change...
... Setup" during POST. To change the system security settings. To set a password, this function allows the option ROMs to [Enabled], this item shows Installed. On the password box that appears, type a password composed of the screen shows the default Not Installed. To clear the supervisor password, select the Change Supervisor Password then press Enter. Configuration options: [Disabled] [Enabled] 2.6.3 Security The Security menu items allow you have set a Supervisor Password: 1. again to display the configuration options. Change...
K8V-MX User's Manual for English Edition
Page 70
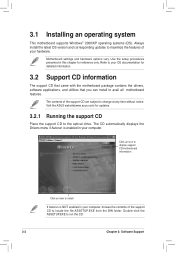
The CD automatically displays the Drivers menu if Autorun is NOT enabled in your computer. Click an icon to display support CD/motherboard information Click an item to install If Autorun is enabled in this chapter for updates. 3.2.1 Running the support CD Place the support CD to locate the file ASSETUP.EXE from the BIN folder. Use the setup procedures presented in your computer, browse the contents...
The CD automatically displays the Drivers menu if Autorun is NOT enabled in your computer. Click an icon to display support CD/motherboard information Click an item to install If Autorun is enabled in this chapter for updates. 3.2.1 Running the support CD Place the support CD to locate the file ASSETUP.EXE from the BIN folder. Use the setup procedures presented in your computer, browse the contents...
K8V-MX User's Manual for English Edition
Page 71
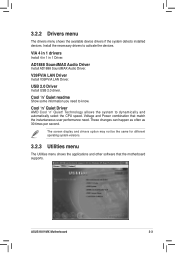
AD1888 SoundMAX Audio Driver Install AD1888 SoundMAX Audio Driver. V39FVIA LAN Driver Install V39FVIA LAN Driver. Cool ʻnʼ Quiet Driver AMD Cool ʻnʼ Quiet! Voltage and Power combination that the motherboard supports. These changes can happen as often as 30 times per second. Technology allows the system to activate the devices. VIA 4 in 1 drivers Install 4 in 1 in 1 Driver. ASUS K8V-MX Motherboard 3-3 USB 2.0 Driver Install USB 2.0 driver. Cool ʻnʼ Quiet readme Show some information you need . The screen display and drivers option may...
AD1888 SoundMAX Audio Driver Install AD1888 SoundMAX Audio Driver. V39FVIA LAN Driver Install V39FVIA LAN Driver. Cool ʻnʼ Quiet Driver AMD Cool ʻnʼ Quiet! Voltage and Power combination that the motherboard supports. These changes can happen as often as 30 times per second. Technology allows the system to activate the devices. VIA 4 in 1 drivers Install 4 in 1 in 1 Driver. ASUS K8V-MX Motherboard 3-3 USB 2.0 Driver Install USB 2.0 driver. Cool ʻnʼ Quiet readme Show some information you need . The screen display and drivers option may...
K8V-MX User's Manual for English Edition
Page 72
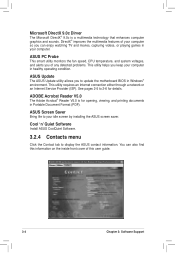
... the multimedia features of this user guide. 3-4 Chapter 3: Software Support This utility requires an Internet connection either through a network or an Internet Service Provider (ISP). ASUS Update The ASUS Update utility allows you to display the ASUS contact information. See pages 2-5 to your computer. Cool ʻnʼ Quiet Software Install ASUS CoolQuiet Software. 3.2.4 Contacts menu Click the Contact tab to update the motherboard BIOS in Portable Document Format (PDF). Microsoft DirectX 9.0c Dirver The...
... the multimedia features of this user guide. 3-4 Chapter 3: Software Support This utility requires an Internet connection either through a network or an Internet Service Provider (ISP). ASUS Update The ASUS Update utility allows you to display the ASUS contact information. See pages 2-5 to your computer. Cool ʻnʼ Quiet Software Install ASUS CoolQuiet Software. 3.2.4 Contacts menu Click the Contact tab to update the motherboard BIOS in Portable Document Format (PDF). Microsoft DirectX 9.0c Dirver The...


