
User Guide
Page 3
... Notices vi Safety information vii About this guide viii Typography ix K8N-DRE specifications summary x Chapter 1: Product introduction 1.1 Welcome 1-1 1.2 Package contents 1-1 1.3 Special features 1-2 1.3.1 Product highlights 1-2 1.3.2 Innovative ASUS features 1-4 Chapter 2: Hardware information 2.1 Before you proceed 2-1 Onboard LEDs 2-1 2.2 Motherboard overview 2-2 2.2.1 Placement direction 2-2 2.2.2 Screw holes 2-2 2.2.3 Motherboard layout 2-3 2.2.4 Heatsink plates 2-4 2.2.5 Layout Contents 2-7 2.3 Central Processing Unit (CPU 2-9 2.3.1 Overview 2-9 2.3.2 Installing the...
... Notices vi Safety information vii About this guide viii Typography ix K8N-DRE specifications summary x Chapter 1: Product introduction 1.1 Welcome 1-1 1.2 Package contents 1-1 1.3 Special features 1-2 1.3.1 Product highlights 1-2 1.3.2 Innovative ASUS features 1-4 Chapter 2: Hardware information 2.1 Before you proceed 2-1 Onboard LEDs 2-1 2.2 Motherboard overview 2-2 2.2.1 Placement direction 2-2 2.2.2 Screw holes 2-2 2.2.3 Motherboard layout 2-3 2.2.4 Heatsink plates 2-4 2.2.5 Layout Contents 2-7 2.3 Central Processing Unit (CPU 2-9 2.3.1 Overview 2-9 2.3.2 Installing the...

User Guide
Page 15
... package with the list below. 1.2 Package contents Check your motherboard package for the following items. Motherboard Cables Accessories Application CD Documentation ASUS K8N-DRE motherboard 4 x Serial ATA signal cables (dual plugs) 2 x Serial ATA power cables (dual plugs) 1 x SCSI Ultra320 cable (SCSI model only) 1 x 3-in-1 IDE and floppy cable I/O shield 2 x Copper heatsink 2 x Support plates for buying an ASUS® K8N-DRE motherboard!
... package with the list below. 1.2 Package contents Check your motherboard package for the following items. Motherboard Cables Accessories Application CD Documentation ASUS K8N-DRE motherboard 4 x Serial ATA signal cables (dual plugs) 2 x Serial ATA power cables (dual plugs) 1 x SCSI Ultra320 cable (SCSI model only) 1 x 3-in-1 IDE and floppy cable I/O shield 2 x Copper heatsink 2 x Support plates for buying an ASUS® K8N-DRE motherboard!

User Guide
Page 24
2.2.4 Heatsink plates Two heatsink plates come with the motherboard package. To install the heatsink plates: 1. Standoffs 3. Adhesive pad 2. Match the holes of the CPU heatsinks. Peel off the adhesive pads that came with the motherboard package. Press the adhesive pad flat on the heatsink plate. 2-4 Chapter 2: Hardware information These plates support the weight of the adhesive pad with the heatsink plate standoffs.
2.2.4 Heatsink plates Two heatsink plates come with the motherboard package. To install the heatsink plates: 1. Standoffs 3. Adhesive pad 2. Match the holes of the CPU heatsinks. Peel off the adhesive pads that came with the motherboard package. Press the adhesive pad flat on the heatsink plate. 2-4 Chapter 2: Hardware information These plates support the weight of the adhesive pad with the heatsink plate standoffs.

User Guide
Page 25
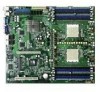
Position the heatsink plate underneath the motherboard and match the motherboard CPU1 heatsink holes with the heatsink plate standoffs. 7. Locate the heatsink holes on the motherboard. 6. Press the heatsink plate flat under the motherboard. 4. Peel off the adhesive pad cover. 5. ASUS K8N-DRE 2-5
Position the heatsink plate underneath the motherboard and match the motherboard CPU1 heatsink holes with the heatsink plate standoffs. 7. Locate the heatsink holes on the motherboard. 6. Press the heatsink plate flat under the motherboard. 4. Peel off the adhesive pad cover. 5. ASUS K8N-DRE 2-5

User Guide
Page 26
Standoffs 8. Even if you are not installing a second processor now, we recommend that you want to section "2.2.2 Screw Holes" for the illustration. 2-6 Chapter 2: Hardware information Repeat steps 1-7 if you install the second heatsink plate. 9. Secure the motherboard with ten (10) screws. The heatsink plate standoffs appears as shown when installed. Refer to install a second processor in CPU2 socket.
Standoffs 8. Even if you are not installing a second processor now, we recommend that you want to section "2.2.2 Screw Holes" for the illustration. 2-6 Chapter 2: Hardware information Repeat steps 1-7 if you install the second heatsink plate. 9. Secure the motherboard with ten (10) screws. The heatsink plate standoffs appears as shown when installed. Refer to install a second processor in CPU2 socket.

User Guide
Page 31
Make sure that you installed a second processor, repeat steps 1-2 to install the second heatsink. ASUS K8N-DRE 2-11 Secure the heatsink with the heatsink standoffs. 2. 2.3.3 Installing the heatsink The AMD Opteron™ 64 processors require a specially designed heatsink to install the CPU heatsink. 1. Place the heatsink on top of the installed CPU, making sure that the screw holes are matched with...
Make sure that you installed a second processor, repeat steps 1-2 to install the second heatsink. ASUS K8N-DRE 2-11 Secure the heatsink with the heatsink standoffs. 2. 2.3.3 Installing the heatsink The AMD Opteron™ 64 processors require a specially designed heatsink to install the CPU heatsink. 1. Place the heatsink on top of the installed CPU, making sure that the screw holes are matched with...
