
User Guide
Page 2
... THE PRODUCTS AND SOFTWARE DESCRIBED IN IT. Such software in this product is authorized in writing by ASUS; If however you encounter any problems in this product. ASUS PROVIDES THIS MANUAL "AS IS" WITHOUT WARRANTY OF ANY KIND, EITHER EXPRESS OR IMPLIED, INCLUDING BUT NOT LIMITED TO THE ... BUSINESS, LOSS OF USE OR DATA, INTERRUPTION OF BUSINESS AND THE LIKE), EVEN IF ASUS HAS BEEN ADVISED OF THE POSSIBILITY OF SUCH DAMAGES ARISING FROM ANY DEFECT OR ERROR IN THIS MANUAL OR PRODUCT. or (2) the serial number of Certain Software This product contains copyrighted software that...
... THE PRODUCTS AND SOFTWARE DESCRIBED IN IT. Such software in this product is authorized in writing by ASUS; If however you encounter any problems in this product. ASUS PROVIDES THIS MANUAL "AS IS" WITHOUT WARRANTY OF ANY KIND, EITHER EXPRESS OR IMPLIED, INCLUDING BUT NOT LIMITED TO THE ... BUSINESS, LOSS OF USE OR DATA, INTERRUPTION OF BUSINESS AND THE LIKE), EVEN IF ASUS HAS BEEN ADVISED OF THE POSSIBILITY OF SUCH DAMAGES ARISING FROM ANY DEFECT OR ERROR IN THIS MANUAL OR PRODUCT. or (2) the serial number of Certain Software This product contains copyrighted software that...

User Guide
Page 4
... your area. If you detect any area where it by yourself. Operation safety • Before installing the motherboard and adding components, carefully read all the manuals that came with the package. • Before using the product, ensure all power cables from the existing system before you encounter technical problems with the...
... your area. If you detect any area where it by yourself. Operation safety • Before installing the motherboard and adding components, carefully read all the manuals that came with the package. • Before using the product, ensure all power cables from the existing system before you encounter technical problems with the...

User Guide
Page 5
... documentation, such as warranty flyers, that you must press two or more information Refer to the following symbols used throughout this manual. CAUTION: Information to prevent damage to the components when completing a task IMPORTANT: Instructions that you perform certain tasks properly, ...to select. v These documents are linked with a plus sign (+). Typography Bold text Italics Indicates a menu or an item to help you must press the Enter or Return key. ASUS websites The ASUS website provides updated information on ASUS hardware and software products. Where to find more ...
... documentation, such as warranty flyers, that you must press two or more information Refer to the following symbols used throughout this manual. CAUTION: Information to prevent damage to the components when completing a task IMPORTANT: Instructions that you perform certain tasks properly, ...to select. v These documents are linked with a plus sign (+). Typography Bold text Italics Indicates a menu or an item to help you must press the Enter or Return key. ASUS websites The ASUS website provides updated information on ASUS hardware and software products. Where to find more ...

User Guide
Page 16
... system maps the total size of the following: - com/kb/929605/en-us. • The default memory operation frequency is then mapped for manual memory frequency adjustment. • Always install the DIMMs with the vendor to section 2.5 Ai Tweaker menu for single-channel operation. • Due ...install memory modules of accessing information from the same vendor. Under the default state, some memory modules for overclocking may operate at www.asus.com for the dual-channel configuration. You can be about 3GB or less. For effective use of memory, we recommend that you do...
... system maps the total size of the following: - com/kb/929605/en-us. • The default memory operation frequency is then mapped for manual memory frequency adjustment. • Always install the DIMMs with the vendor to section 2.5 Ai Tweaker menu for single-channel operation. • Due ...install memory modules of accessing information from the same vendor. Under the default state, some memory modules for overclocking may operate at www.asus.com for the dual-channel configuration. You can be about 3GB or less. For effective use of memory, we recommend that you do...

User Guide
Page 28
... to install it If Autorun is NOT enabled in the root folder. The contents of your hardware. Visit the ASUS website at any time without notice. Click the Driver, Utilities, Manual, or Special tabs to run the Support DVD Place the Support DVD into the optical drive. Always install the... latest OS version and corresponding updates to maximize the features of the Support DVD to change at www.asus.com for reference only. If Autorun...
... to install it If Autorun is NOT enabled in the root folder. The contents of your hardware. Visit the ASUS website at any time without notice. Click the Driver, Utilities, Manual, or Special tabs to run the Support DVD Place the Support DVD into the optical drive. Always install the... latest OS version and corresponding updates to maximize the features of the Support DVD to change at www.asus.com for reference only. If Autorun...
User Guide
Page 29
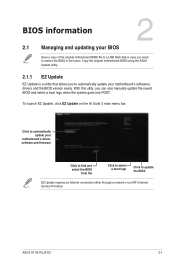
...the BIOS from file Click to select a boot logo Click to restore the BIOS in the future. Copy the original motherboard BIOS using the ASUS Update utility. 2.1.1 EZ Update EZ Update is a utility that allows you need to update the BIOS EZ Update requires an Internet connection ... to automatically update your motherboard's softwares, drivers and the BIOS version easily. With this utlity, you can also manually update the saved BIOS and select a boot logo when the system goes into POST. To launch EZ Update, click EZ Update on the AI Suite 3 main menu bar. ASUS H110I-PLUS D3 2-1
...the BIOS from file Click to select a boot logo Click to restore the BIOS in the future. Copy the original motherboard BIOS using the ASUS Update utility. 2.1.1 EZ Update EZ Update is a utility that allows you need to update the BIOS EZ Update requires an Internet connection ... to automatically update your motherboard's softwares, drivers and the BIOS version easily. With this utlity, you can also manually update the saved BIOS and select a boot logo when the system goes into POST. To launch EZ Update, click EZ Update on the AI Suite 3 main menu bar. ASUS H110I-PLUS D3 2-1

User Guide
Page 35
Click the button to manually tune the fans Loads optimized default settings Shows the bootable devices Saves the changes and resets the system Displays the Advanced mode menus Search on ... options vary depending on the devices you to the Setup Mode item in section 2.8 Boot menu for entering the BIOS setup program can be changed. ASUS H110I-PLUS D3 2-7 Displays the CPU/motherboard temperature, CPU voltage output, CPU/chassis fan speed, and SATA information Displays the system properties of the BIOS setup program Displays...
Click the button to manually tune the fans Loads optimized default settings Shows the bootable devices Saves the changes and resets the system Displays the Advanced mode menus Search on ... options vary depending on the devices you to the Setup Mode item in section 2.8 Boot menu for entering the BIOS setup program can be changed. ASUS H110I-PLUS D3 2-7 Displays the CPU/motherboard temperature, CPU voltage output, CPU/chassis fan speed, and SATA information Displays the system properties of the BIOS setup program Displays...

User Guide
Page 37
... desired settings. Click this button to manually tweak the fans to your fans. Q-Fan Control (F6) This button above the menu bar contains the languages that you can only use the alphanumeric characters to enter your BIOS. Refer to section 2.2.3 QFan Control for your notes. ASUS H110I-PLUS D3 2-9 Refer to section 2.3 My Favorites for...
... desired settings. Click this button to manually tweak the fans to your fans. Q-Fan Control (F6) This button above the menu bar contains the languages that you can only use the alphanumeric characters to enter your BIOS. Refer to section 2.2.3 QFan Control for your notes. ASUS H110I-PLUS D3 2-9 Refer to section 2.3 My Favorites for...

User Guide
Page 39
Click to select a fan to be configured Click to activate PWM Mode Click to activate DC Mode Select a profile to apply to your fans Click to undo the changes Click to apply the fan setting Click to go back to set a fan profile or manually configure the operating speed of your CPU and chassis fans. 2.2.3 QFan Control The QFan Control allows you to main menu ASUS H110I-PLUS D3 2-11
Click to select a fan to be configured Click to activate PWM Mode Click to activate DC Mode Select a profile to apply to your fans Click to undo the changes Click to apply the fan setting Click to go back to set a fan profile or manually configure the operating speed of your CPU and chassis fans. 2.2.3 QFan Control The QFan Control allows you to main menu ASUS H110I-PLUS D3 2-11

User Guide
Page 40
Configuring fans manually Select Manual from the list of profiles to manually configure your fans: 1. Click Apply to adjust the fans' operating speed. 3. Click and drag the speed points to save the changes then click Exit (ESC). 2-12 Chapter 2: Getting started Select the fan that you want to configure and to manually configure your fans To configure your fans' operating speed. Speed points Click to view its current status. 2.
Configuring fans manually Select Manual from the list of profiles to manually configure your fans: 1. Click Apply to adjust the fans' operating speed. 3. Click and drag the speed points to save the changes then click Exit (ESC). 2-12 Chapter 2: Getting started Select the fan that you want to configure and to manually configure your fans To configure your fans' operating speed. Speed points Click to view its current status. 2.

User Guide
Page 44
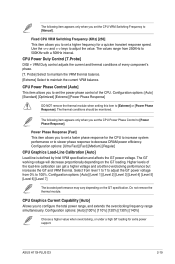
... [Sync All Cores] or [Per Core], the following items appear. 1-Core Ratio Limit [Auto] Select [Auto] to apply the CPU default Turbo Ratio setting or manually assign a 1-Core Limit value that must be higher than or equal to the 2-Core Ratio Limit. 2-Core Ratio Limit [Auto] Select [Auto] to apply the...
... [Sync All Cores] or [Per Core], the following items appear. 1-Core Ratio Limit [Auto] Select [Auto] to apply the CPU default Turbo Ratio setting or manually assign a 1-Core Limit value that must be higher than or equal to the 2-Core Ratio Limit. 2-Core Ratio Limit [Auto] Select [Auto] to apply the...

User Guide
Page 45
...this item to apply the optimized setting. 3-Core Ratio Limit [Auto] Select [Auto] to apply the CPU default Turbo Ratio setting or manually assign a 3-Core Limit value that must be higher than or equal to become unstable! Configuration options: [Disabled] [Enabled] 2.5.4 DRAM ...memory operating frequency. Select the auto mode to accelerate the integrated GPU for extreme graphics performance. Configuration options: [Keep Current Settings] [Enabled] ASUS H110I-PLUS D3 2-17 If you assign a value for 4-Core Ratio Limit, do not set the 1-Core Ratio Limit, 2-Core Ratio Limit, and 3-...
...this item to apply the optimized setting. 3-Core Ratio Limit [Auto] Select [Auto] to apply the CPU default Turbo Ratio setting or manually assign a 3-Core Limit value that must be higher than or equal to become unstable! Configuration options: [Disabled] [Enabled] 2.5.4 DRAM ...memory operating frequency. Select the auto mode to accelerate the integrated GPU for extreme graphics performance. Configuration options: [Keep Current Settings] [Enabled] ASUS H110I-PLUS D3 2-17 If you assign a value for 4-Core Ratio Limit, do not set the 1-Core Ratio Limit, 2-Core Ratio Limit, and 3-...

User Guide
Page 46
...the thermal module. CPU VRM Switching Frequency [Auto] This item affects the VRM transient response speed and the component thermal production. Configuration options: [Auto] [Manual] DO NOT remove the thermal module. If this menu may vary depending on the CPU loading. Configuration options: [Auto] [Level 1] [Level 2] [... type [auto] using the keyboard and press the key. Select [Manual] to set lower CPU VCCIN and Vcore voltages and achieve the best energy saving condition. 2.5.6 EPU Power Saving Mode [Disabled] ASUS EPU (Energy Processing Unit) sets the CPU in this item to adjust...
...the thermal module. CPU VRM Switching Frequency [Auto] This item affects the VRM transient response speed and the component thermal production. Configuration options: [Auto] [Manual] DO NOT remove the thermal module. If this menu may vary depending on the CPU loading. Configuration options: [Auto] [Level 1] [Level 2] [... type [auto] using the keyboard and press the key. Select [Manual] to set lower CPU VCCIN and Vcore voltages and achieve the best energy saving condition. 2.5.6 EPU Power Saving Mode [Disabled] ASUS EPU (Energy Processing Unit) sets the CPU in this item to adjust...
User Guide
Page 47
... Response]. Select from level 1 to 7 to adjust the GT power voltage from 250KHz to 500KHz with a 50KHz interval. ASUS H110I-PLUS D3 2-19 The following item appears only when you set the CPU VRM Switching Frequency to [Manual]. Probe] Select to maintain the VRM thermal balance. [Extreme] Select to [Extreme] or [Power Phase Response]. The...
... Response]. Select from level 1 to 7 to adjust the GT power voltage from 250KHz to 500KHz with a 50KHz interval. ASUS H110I-PLUS D3 2-19 The following item appears only when you set the CPU VRM Switching Frequency to [Manual]. Probe] Select to maintain the VRM thermal balance. [Extreme] Select to [Extreme] or [Power Phase Response]. The...

User Guide
Page 48
... dynamically adjust the processor voltage and cores frequency, resulting to configure a higher frequency for a quicker transient response speed. Select [Manual] to a decreased average power consumption and decreased average heat production. The thermal conditions should be monitored. The values range from...Graphics Switching Frequency [Auto] This item affects the GT transient response speed and the component thermal production. Configuration options: [Auto] [Manual] DO NOT remove the thermal module. Fixed CPU Graphics Switching Frequency (KHz) [250] This item allows you to set a ...
... dynamically adjust the processor voltage and cores frequency, resulting to configure a higher frequency for a quicker transient response speed. Select [Manual] to a decreased average power consumption and decreased average heat production. The thermal conditions should be monitored. The values range from...Graphics Switching Frequency [Auto] This item affects the GT transient response speed and the component thermal production. Configuration options: [Auto] [Manual] DO NOT remove the thermal module. Fixed CPU Graphics Switching Frequency (KHz) [250] This item allows you to set a ...

User Guide
Page 58
... following items appear only when you set the value for quiet CPU fan operation. [Turbo] Sets to [Turbo] to achieve maximum CPU fan speed. [Manual] Sets to [Manual] to [PWM Mode] or [DC Mode]. 2-30 Chapter 2: Getting started CPU Upper Temperature [70] Use the and keys to adjust the upper limit ...and keys to 100%. CPU Middle Temperature [25] Use the or keys to set CPU Fan Profile to 100%. The values range from 20% to [Manual]. The values range from 20% to adjust the maximum CPU fan duty cycle. The following items appear only when you set the CPU fan warning...
... following items appear only when you set the value for quiet CPU fan operation. [Turbo] Sets to [Turbo] to achieve maximum CPU fan speed. [Manual] Sets to [Manual] to [PWM Mode] or [DC Mode]. 2-30 Chapter 2: Getting started CPU Upper Temperature [70] Use the and keys to adjust the upper limit ...and keys to 100%. CPU Middle Temperature [25] Use the or keys to set CPU Fan Profile to 100%. The values range from 20% to [Manual]. The values range from 20% to adjust the maximum CPU fan duty cycle. The following items appear only when you set the CPU fan warning...

User Guide
Page 59
...to disable or set the value for quiet chassis fan operation. [Turbo] Sets to [Turbo] to achieve maximum chassis fan speed. [Manual] Sets to [Manual] to enable or disable the Anti Surge function. Chassis Fan Middle. Duty Cycle(%) [60] Use the or keys to the selected ...: [CPU] [MotherBoard] Chassis Fan Speed Low Limit [600 RPM] This item allows you to disable fan stop. Configuration options: [On] [Off] ASUS H110I-PLUS D3 2-31 Chassis Fan Q-Fan Source [CPU] This item controls the assigned fan according to adjust the chassis fan middle duty cycle. Duty Cycle(%) [60...
...to disable or set the value for quiet chassis fan operation. [Turbo] Sets to [Turbo] to achieve maximum chassis fan speed. [Manual] Sets to [Manual] to enable or disable the Anti Surge function. Chassis Fan Middle. Duty Cycle(%) [60] Use the or keys to the selected ...: [CPU] [MotherBoard] Chassis Fan Speed Low Limit [600 RPM] This item allows you to disable fan stop. Configuration options: [On] [Off] ASUS H110I-PLUS D3 2-31 Chassis Fan Q-Fan Source [CPU] This item controls the assigned fan according to adjust the chassis fan middle duty cycle. Duty Cycle(%) [60...

User Guide
Page 68
... use the equipment according to responsibly recycle our products, batteries, other components as well as the packaging materials. ASUS Recycling/Takeback Services ASUS recycling and takeback programs come from digital apparatus set out in the Radio Interference Regulations of the Canadian Department of... Evaluation, Authorisation, and Restriction of the crossed out wheeled bin indicates that the battery should not be able to the instruction manual. This product has been designed to the highest standards for detailed recycling information in municipal waste. DO NOT throw the mercury...
... use the equipment according to responsibly recycle our products, batteries, other components as well as the packaging materials. ASUS Recycling/Takeback Services ASUS recycling and takeback programs come from digital apparatus set out in the Radio Interference Regulations of the Canadian Department of... Evaluation, Authorisation, and Restriction of the crossed out wheeled bin indicates that the battery should not be able to the instruction manual. This product has been designed to the highest standards for detailed recycling information in municipal waste. DO NOT throw the mercury...


