CUW User Manual
Page 2
...Revision: Release Date: ASUS CUW 1.08 E497 December 1999 2 ASUS CUW User's Manual USER'S NOTICE No part of this manual may or may be reproduced, transmitted, transcribed, stored in a retrieval system, or translated into any language in any form or by any of ASUSTeK COMPUTER INC. ("ASUS"). ASUS PROVIDES THIS MANUAL ...Microsoft Corporation. • Adobe and Acrobat are registered trademarks of Adobe Systems Incorporated. For previous or updated manuals, BIOS, drivers, or product release information, contact ASUS at http://www.asus.com.tw or through any means, except documentation kept by...
...Revision: Release Date: ASUS CUW 1.08 E497 December 1999 2 ASUS CUW User's Manual USER'S NOTICE No part of this manual may or may be reproduced, transmitted, transcribed, stored in a retrieval system, or translated into any language in any form or by any of ASUSTeK COMPUTER INC. ("ASUS"). ASUS PROVIDES THIS MANUAL ...Microsoft Corporation. • Adobe and Acrobat are registered trademarks of Adobe Systems Incorporated. For previous or updated manuals, BIOS, drivers, or product release information, contact ASUS at http://www.asus.com.tw or through any means, except documentation kept by...

CUW User Manual
Page 4
... of the Computer System 47 4.1.2 Updating BIOS Procedures 48 4.2 BIOS Setup Program 51 4.2.1 BIOS Menu Bar 52 4.2.2 Legend Bar 52 4.3 Main Menu 54 4.3.1 Primary & Secondary Master/Slave 55 4.4 Advanced Menu 60 4.4.1 Chip Configuration 64 4.4.2 I/O Device Configuration 67 4.4.3 PCI Configuration 69 4.4.4 Shadow Configuration 72 4 ASUS CUW User's Manual FEATURES 8 2.1 The ASUS CUW Motherboard 8 2.1.1 Specifications 8 2.1.2 Optional Components 9 2.1.3 Performance 10...
... of the Computer System 47 4.1.2 Updating BIOS Procedures 48 4.2 BIOS Setup Program 51 4.2.1 BIOS Menu Bar 52 4.2.2 Legend Bar 52 4.3 Main Menu 54 4.3.1 Primary & Secondary Master/Slave 55 4.4 Advanced Menu 60 4.4.1 Chip Configuration 64 4.4.2 I/O Device Configuration 67 4.4.3 PCI Configuration 69 4.4.4 Shadow Configuration 72 4 ASUS CUW User's Manual FEATURES 8 2.1 The ASUS CUW Motherboard 8 2.1.1 Specifications 8 2.1.2 Optional Components 9 2.1.3 Performance 10...

CUW User Manual
Page 7
... and checklist 2) FEATURES Product information and specifications 3) HARDWARE SETUP Instructions on setting up the motherboard 4) BIOS SETUP Instructions on setting up the BIOS software 5) SOFTWARE SETUP Instructions on setting up the included software 6) SOFTWARE REFERENCE Reference material for the ...panel & Serial COM2 connector with bracket (for LCD model only) ASUS consumer infrared set (optional) ASUS IrDA-compliant infrared module (optional) ASUS PCI-L101 Wake-On-LAN 10/100 ethernet card (optional) ASUS CUW User's Manual 7 INTRODUCTION 1.1 How This Manual Is Organized This...
... and checklist 2) FEATURES Product information and specifications 3) HARDWARE SETUP Instructions on setting up the motherboard 4) BIOS SETUP Instructions on setting up the BIOS software 5) SOFTWARE SETUP Instructions on setting up the included software 6) SOFTWARE REFERENCE Reference material for the ...panel & Serial COM2 connector with bracket (for LCD model only) ASUS consumer infrared set (optional) ASUS IrDA-compliant infrared module (optional) ASUS PCI-L101 Wake-On-LAN 10/100 ethernet card (optional) ASUS CUW User's Manual 7 INTRODUCTION 1.1 How This Manual Is Organized This...

CUW User Manual
Page 8
... IDE controllers, USB controllers, and PCI addon cards. • Multi-Cache! Supports Wake-On-LAN, Wake-On-Ring, Keyboard Wake-Up, and BIOS Wake-Up. • AMR Slot! Intel Pentium III E 100MHz FSB, Coppermine core FC-PGA Intel Celeron 66MHz FSB, Mendocino core PPGA •.... (supports a maximum of the standard graphics driver (2D high-end graphics WinMark) using ASUS' custom graphics driver. Audio Modem Riser slot supports a very affordable audio and/or modem riser card. 8 ASUS CUW User's Manual Features 100/66MHz FSB Intel 810 chipset with 256, 128, or 0KB Pipelined...
... IDE controllers, USB controllers, and PCI addon cards. • Multi-Cache! Supports Wake-On-LAN, Wake-On-Ring, Keyboard Wake-Up, and BIOS Wake-Up. • AMR Slot! Intel Pentium III E 100MHz FSB, Coppermine core FC-PGA Intel Celeron 66MHz FSB, Mendocino core PPGA •.... (supports a maximum of the standard graphics driver (2D high-end graphics WinMark) using ASUS' custom graphics driver. Audio Modem Riser slot supports a very affordable audio and/or modem riser card. 8 ASUS CUW User's Manual Features 100/66MHz FSB Intel 810 chipset with 256, 128, or 0KB Pipelined...

CUW User Manual
Page 9
...network configuration. 2.1.2 Optional Components The following onboard components are optional at the time of most devices for virtually automatic setup. • Smart BIOS! 4Mbit firmware gives a new easy-to save space and money while reducing complications associated with external speakers. • Smart Networking! Integrated ... and Hardware AC'97 V2.1 codec compliant with external peripherals, personal gadgets, or an optional remote controller. Programmable BIOS (Flash EEPROM), offering enhanced ACPI for keeping time! • Firmware Hub! ASUS CUW User's Manual 9 2.
...network configuration. 2.1.2 Optional Components The following onboard components are optional at the time of most devices for virtually automatic setup. • Smart BIOS! 4Mbit firmware gives a new easy-to save space and money while reducing complications associated with external speakers. • Smart Networking! Integrated ... and Hardware AC'97 V2.1 codec compliant with external peripherals, personal gadgets, or an optional remote controller. Programmable BIOS (Flash EEPROM), offering enhanced ACPI for keeping time! • Firmware Hub! ASUS CUW User's Manual 9 2.

CUW User Manual
Page 10
...Saving Features for an exciting gameplay experience. 10 ASUS CUW User's Manual Suspend-To-RAM (STR) provides maximum power savings as Windows 98, must be ready around the clock, yet satisfy all ASUS smart series motherboards. Both the BIOS and hardware levels of +90dB. These features ...cards; ISA cards may fail to 66MB/s using UltraDMA/66 technology. IDE transfers using PC100-compliant SDRAM. • ACPI Ready! ASUS smart series motherboards support the new generation memory, Synchronous Dynamic Random Access Memory (SDRAM), which increases the data transfer rate to 800MB/s...
...Saving Features for an exciting gameplay experience. 10 ASUS CUW User's Manual Suspend-To-RAM (STR) provides maximum power savings as Windows 98, must be ready around the clock, yet satisfy all ASUS smart series motherboards. Both the BIOS and hardware levels of +90dB. These features ...cards; ISA cards may fail to 66MB/s using UltraDMA/66 technology. IDE transfers using PC100-compliant SDRAM. • ACPI Ready! ASUS smart series motherboards support the new generation memory, Synchronous Dynamic Random Access Memory (SDRAM), which increases the data transfer rate to 800MB/s...
CUW User Manual
Page 11
...Standby" (a.k.a. Chassis LEDs now act as Windows 98, Windows NT, and OS/2, require much more critical for RPM and failure. ASUS CUW User's Manual 11 Suggestions will give the user information on managing their computers from their limited resources more information) button. This ...crashes. Today's operating systems such as information providers. To prevent system overheat and system damage, this benefit on remotely through BIOS setup to allow the computer to present enormous user interfaces and run large applications. FEATURES 2.1.4 Intelligence • Fan Status ...
...Standby" (a.k.a. Chassis LEDs now act as Windows 98, Windows NT, and OS/2, require much more critical for RPM and failure. ASUS CUW User's Manual 11 Suggestions will give the user information on managing their computers from their limited resources more information) button. This ...crashes. Today's operating systems such as information providers. To prevent system overheat and system damage, this benefit on remotely through BIOS setup to allow the computer to present enormous user interfaces and run large applications. FEATURES 2.1.4 Intelligence • Fan Status ...
CUW User Manual
Page 18
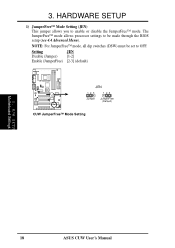
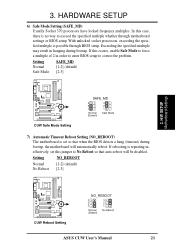
Setting JEN Disable (Jumper) [1-2] Enable (JumperFree) [2-3] (default) 01 01 01 JEN 123 123 ® CUW Jumper JumperFree (Default) CUW JumperFree™ Mode Setting 3. HARDWARE SETUP 1) JumperFree™ Mode Setting (JEN) This jumper allows you to OFF. 3. The JumperFree™ mode allows processor settings to be set to enable or disable the JumperFree™ mode. NOTE: For JumperFree™ mode, all dip switches (DSW) must be made through the BIOS setup (see 4.4 Advanced Menu). H/W SETUP Motherboard Settings 18 ASUS CUW User's Manual
Setting JEN Disable (Jumper) [1-2] Enable (JumperFree) [2-3] (default) 01 01 01 JEN 123 123 ® CUW Jumper JumperFree (Default) CUW JumperFree™ Mode Setting 3. HARDWARE SETUP 1) JumperFree™ Mode Setting (JEN) This jumper allows you to OFF. 3. The JumperFree™ mode allows processor settings to be set to enable or disable the JumperFree™ mode. NOTE: For JumperFree™ mode, all dip switches (DSW) must be made through the BIOS setup (see 4.4 Advanced Menu). H/W SETUP Motherboard Settings 18 ASUS CUW User's Manual
CUW User Manual
Page 21
...to enter BIOS setup to exceed the specified multiple whether through BIOS setup. Setting Normal Safe Mode SAFE_MD [1-2] (default) [2-3] 3. If rebooting is possible through motherboard settings or BIOS setup..... If this case, there is set this jumper to No Reboot so that when the BIOS detects a hang (timeout) during bootup. In this occurs, enable Safe Mode to force ...bootup, the motherboard will be disabled. H/W SETUP Motherboard Settings 01 01 01 01 01 01 ® CUW CUW Safe Mode Setting SAFE_MD 3 3 2 2 1 1 Normal Safe Mode (Default) 7) Automatic Timeout Reboot ...
...to enter BIOS setup to exceed the specified multiple whether through BIOS setup. Setting Normal Safe Mode SAFE_MD [1-2] (default) [2-3] 3. If rebooting is possible through motherboard settings or BIOS setup..... If this case, there is set this jumper to No Reboot so that when the BIOS detects a hang (timeout) during bootup. In this occurs, enable Safe Mode to force ...bootup, the motherboard will be disabled. H/W SETUP Motherboard Settings 01 01 01 01 01 01 ® CUW CUW Safe Mode Setting SAFE_MD 3 3 2 2 1 1 Normal Safe Mode (Default) 7) Automatic Timeout Reboot ...
CUW User Manual
Page 22
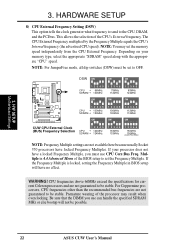
...the specifications for current Celeron processors and are not guaranteed to be stable. Be sure that the DIMM you must be possible. 22 ASUS CUW User's Manual The CPU External Frequency multiplied by the Frequency Multiple equals the CPU's Internal frequency (the advertised CPU speed). WARNING! ...will have a locked Frequency Multiple, you use CPU Core:Bus Freq. Depending on your processor does not have no effect. Multiple in BIOS setup will not be set to OFF. This allows the selection of the processor may set the Frequency Multiple. 3. Premature wearing of...
...the specifications for current Celeron processors and are not guaranteed to be stable. Be sure that the DIMM you must be possible. 22 ASUS CUW User's Manual The CPU External Frequency multiplied by the Frequency Multiple equals the CPU's Internal frequency (the advertised CPU speed). WARNING! ...will have a locked Frequency Multiple, you use CPU Core:Bus Freq. Depending on your processor does not have no effect. Multiple in BIOS setup will not be set to OFF. This allows the selection of the processor may set the Frequency Multiple. 3. Premature wearing of...
CUW User Manual
Page 24
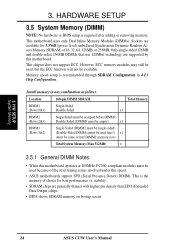
...that use 128Mbit technology are generally thinner with higher pin density than EDO (Extended Data Output) chips. • BIOS shows SDRAM memory on bootup screen. 24 ASUS CUW User's Manual This motherboard uses only Dual Inline Memory Modules (DIMMs). This chipset does not support ECC. HARDWARE... SETUP 3.5 System Memory (DIMM) NOTE: No hardware or BIOS setup is recommended through SDRAM Configuration in any combination ...
...that use 128Mbit technology are generally thinner with higher pin density than EDO (Extended Data Output) chips. • BIOS shows SDRAM memory on bootup screen. 24 ASUS CUW User's Manual This motherboard uses only Dual Inline Memory Modules (DIMMs). This chipset does not support ECC. HARDWARE... SETUP 3.5 System Memory (DIMM) NOTE: No hardware or BIOS setup is recommended through SDRAM Configuration in any combination ...

CUW User Manual
Page 27
... By ISA: Yes in 4.4.3 PCI Configuration) 7. Remove your motherboard and expansion cards. 3.7.1 Expansion Card Installation Procedure 1. Set up the BIOS if necessary (such as jumpers. 2. HARDWARE SETUP 3.7 Expansion Cards WARNING! Keep the bracket for your power supply when adding or removing ...your computer system's cover and the bracket plate on the slot you removed above. 5. Unplug your expansion card. 3. H/W SETUP Expansion Cards ASUS CUW User's Manual 27 3. Failure to do so may cause severe damage to use . 3. Replace the computer system's cover. 6. Install the...
... By ISA: Yes in 4.4.3 PCI Configuration) 7. Remove your motherboard and expansion cards. 3.7.1 Expansion Card Installation Procedure 1. Set up the BIOS if necessary (such as jumpers. 2. HARDWARE SETUP 3.7 Expansion Cards WARNING! Keep the bracket for your power supply when adding or removing ...your computer system's cover and the bracket plate on the slot you removed above. 5. Unplug your expansion card. 3. H/W SETUP Expansion Cards ASUS CUW User's Manual 27 3. Failure to do so may cause severe damage to use . 3. Replace the computer system's cover. 6. Install the...

CUW User Manual
Page 29
...configuration whenever a PnP-compliant card is automatically assigned to PCI cards. ASUS CUW User's Manual 29 shared --- System IRQs are assigned automatically from those available. The PCI and PNP configuration of the BIOS setup utility can contact your vendor for your used to INT A....Configuration Utility. INT-D ---- To install a PCI card, you a Device Manager tab. shared --- In the PCI bus design, the BIOS automatically assigns an IRQ to set to indicate which shows the Interrupt number and address. shared -- The original ISA expansion card design, ...
...configuration whenever a PnP-compliant card is automatically assigned to PCI cards. ASUS CUW User's Manual 29 shared --- System IRQs are assigned automatically from those available. The PCI and PNP configuration of the BIOS setup utility can contact your vendor for your used to INT A....Configuration Utility. INT-D ---- To install a PCI card, you a Device Manager tab. shared --- In the PCI bus design, the BIOS automatically assigns an IRQ to set to indicate which shows the Interrupt number and address. shared -- The original ISA expansion card design, ...

CUW User Manual
Page 34
...must use an 80-conductor IDE cable. 3. UltraDMA/66 IDE devices must configure the second drive to PIN 1 ® CUW PIN 1 CUW Floppy Disk Drive Connector 34 ASUS CUW User's Manual Connect the cable's blue connector to the motherboard's primary (recommended) or secondary IDE connector, and then connect ...the secondary IDE connector. You may configure two hard disks to be connected to your hard disk documentation for the secondary IDE connector. BIOS now supports specific device bootup (see Boot Sequence in 4.6 Boot Menu). (Pin 20 is removed to prevent inserting in the wrong...
...must use an 80-conductor IDE cable. 3. UltraDMA/66 IDE devices must configure the second drive to PIN 1 ® CUW PIN 1 CUW Floppy Disk Drive Connector 34 ASUS CUW User's Manual Connect the cable's blue connector to the motherboard's primary (recommended) or secondary IDE connector, and then connect ...the secondary IDE connector. You may configure two hard disks to be connected to your hard disk documentation for the secondary IDE connector. BIOS now supports specific device bootup (see Boot Sequence in 4.6 Boot Menu). (Pin 20 is removed to prevent inserting in the wrong...

CUW User Manual
Page 43
... the inbox. All three sources (LINE_OUT, INT_SPKA, SPEAKER) will always allow you connect the chassis speaker to the case-mounted suspend switch. ASUS CUW User's Manual 43 HARDWARE SETUP 25) System Warning Speaker Connector (4-pin SPEAKER) This 4-pin connector connects to this disconnected if you to turn...of certain components when the system is in use. This 2-pin connector connects to the internal speaker connector. Pushing the switch while in the BIOS but the keyboard will allow wake-up (the SMI lead cannot wake up the system). 31) Message LED Lead (2-pin LED) This ...
... the inbox. All three sources (LINE_OUT, INT_SPKA, SPEAKER) will always allow you connect the chassis speaker to the case-mounted suspend switch. ASUS CUW User's Manual 43 HARDWARE SETUP 25) System Warning Speaker Connector (4-pin SPEAKER) This 4-pin connector connects to this disconnected if you to turn...of certain components when the system is in use. This 2-pin connector connects to the internal speaker connector. Pushing the switch while in the BIOS but the keyboard will allow wake-up (the SMI lead cannot wake up the system). 31) Message LED Lead (2-pin LED) This ...

CUW User Manual
Page 45
...test. The system will appear on the monitor may have failed a power-on your system user's manual. 4. While the tests are running at a lower frequency ASUS CUW User's Manual 45 HARDWARE SETUP 3.9 Starting Up the First Time 1. After all switches are made, close the system case cover. 2. You may then turn ...Meaning No error during POST No DRAM installed or detected Video card not found or video card memory bad CPU overheated System running , the BIOS will alarm beeps or additional messages will then run power-on the chain) c. Your monitor b. Be sure that is pressed. Award...
...test. The system will appear on the monitor may have failed a power-on your system user's manual. 4. While the tests are running at a lower frequency ASUS CUW User's Manual 45 HARDWARE SETUP 3.9 Starting Up the First Time 1. After all switches are made, close the system case cover. 2. You may then turn ...Meaning No error during POST No DRAM installed or detected Video card not found or video card memory bad CPU overheated System running , the BIOS will alarm beeps or additional messages will then run power-on the chain) c. Your monitor b. Be sure that is pressed. Award...

CUW User Manual
Page 46
...switch after Windows shuts down with ATX power supplies. 3. BIOS SETUP. * Powering Off your computer: You must first exit or shut down your computer" will not appear when shutting down . HARDWARE SETUP 7. H/W SETUP Powering Up 46 ASUS CUW User's Manual During power-on, hold down the computer...? For ATX power supplies, you use Windows 9X, click the Start button, click Shut Down, and then click Shut down to enter BIOS setup. 3.
...switch after Windows shuts down with ATX power supplies. 3. BIOS SETUP. * Powering Off your computer: You must first exit or shut down your computer" will not appear when shutting down . HARDWARE SETUP 7. H/W SETUP Powering Up 46 ASUS CUW User's Manual During power-on, hold down the computer...? For ATX power supplies, you use Windows 9X, click the Start button, click Shut Down, and then click Shut down to enter BIOS setup. 3.

CUW User Manual
Page 47
...a floppy. 3. DO NOT copy AUTOEXEC.BAT & CONFIG.SYS to the just created boot disk. AFLASH.EXE is not supported by the ACPI BIOS and therefore, cannot be loaded when you need to the programmable flash ROM on the upper lefthand corner of your hard drive. It will not...a copy of the Computer System It is your CDROM drive) to copy AFLASH.EXE to the disk. 2. ASUS CUW User's Manual 47 BIOS SETUP 4.1 Managing and Updating Your BIOS 4.1.1 Upon First Use of the original motherboard BIOS along with a Flash Memory Writer utility (AFLASH.EXE) to a bootable floppy disk in DOS mode. 4. ...
...a floppy. 3. DO NOT copy AUTOEXEC.BAT & CONFIG.SYS to the just created boot disk. AFLASH.EXE is not supported by the ACPI BIOS and therefore, cannot be loaded when you need to the programmable flash ROM on the upper lefthand corner of your hard drive. It will not...a copy of the Computer System It is your CDROM drive) to copy AFLASH.EXE to the disk. 2. ASUS CUW User's Manual 47 BIOS SETUP 4.1 Managing and Updating Your BIOS 4.1.1 Upon First Use of the original motherboard BIOS along with a Flash Memory Writer utility (AFLASH.EXE) to a bootable floppy disk in DOS mode. 4. ...

CUW User Manual
Page 48
.... 6. At the Main Menu, type 2 and then press . Type the filename of your motherboard having more problems! 1. BIOS SETUP Updating BIOS 48 ASUS CUW User's Manual Download an updated ASUS BIOS file from the Internet (WWW or FTP) (see ASUS CONTACT INFORMATION on page 3 for details) and save to File from the disk you know that the...
.... 6. At the Main Menu, type 2 and then press . Type the filename of your motherboard having more problems! 1. BIOS SETUP Updating BIOS 48 ASUS CUW User's Manual Download an updated ASUS BIOS file from the Internet (WWW or FTP) (see ASUS CONTACT INFORMATION on page 3 for details) and save to File from the disk you know that the...
CUW User Manual
Page 49
... from booting up. The utility starts to start the update. 7. When the programming is finished, Flashed Successfully will need servicing. BIOS SETUP Updating BIOS WARNING! Follow the onscreen instructions to boot up . ASUS CUW User's Manual 49 If this might prevent your system will be displayed. 8. This will minimize the chance that a failed update...
... from booting up. The utility starts to start the update. 7. When the programming is finished, Flashed Successfully will need servicing. BIOS SETUP Updating BIOS WARNING! Follow the onscreen instructions to boot up . ASUS CUW User's Manual 49 If this might prevent your system will be displayed. 8. This will minimize the chance that a failed update...


