

User Guide
Page 1
Motherboard B150M-C D3 B150M-C D3/CSM
Motherboard B150M-C D3 B150M-C D3/CSM
User Guide
Page 3
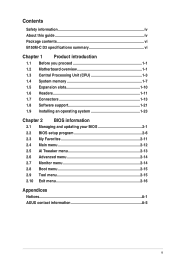
Contents Safety information iv About this guide iv Package contents vi B150M-C D3 specifications summary vi Chapter 1 Product introduction 1.1 Before you proceed 1-1 1.2 Motherboard overview 1-1 1.3 Central Processing Unit (CPU 1-3 1.4 System memory 1-7 1.5 Expansion slots 1-10 1.6 Headers 1-11 1.7 Connectors 1-13 1.8 Software support 1-21 1.9 Installing an operating system 1-23 Chapter 2...12 2.5 Ai Tweaker menu 2-13 2.6 Advanced menu 2-14 2.7 Monitor menu 2-14 2.8 Boot menu 2-15 2.9 Tool menu 2-15 2.10 Exit menu 2-16 Appendices Notices...A-1 ASUS contact information A-5 iii
Contents Safety information iv About this guide iv Package contents vi B150M-C D3 specifications summary vi Chapter 1 Product introduction 1.1 Before you proceed 1-1 1.2 Motherboard overview 1-1 1.3 Central Processing Unit (CPU 1-3 1.4 System memory 1-7 1.5 Expansion slots 1-10 1.6 Headers 1-11 1.7 Connectors 1-13 1.8 Software support 1-21 1.9 Installing an operating system 1-23 Chapter 2...12 2.5 Ai Tweaker menu 2-13 2.6 Advanced menu 2-14 2.7 Monitor menu 2-14 2.8 Boot menu 2-15 2.9 Tool menu 2-15 2.10 Exit menu 2-16 Appendices Notices...A-1 ASUS contact information A-5 iii

User Guide
Page 4
.... Contact a qualified service technician or your retailer. If you add a device. • Before connecting or removing signal cables from the motherboard, ensure that all the manuals that the power cables for the devices are unplugged before the signal cables are also provided. iv Operation safety... • Before installing the motherboard and adding components, carefully read all power cables are not damaged. How this guide This user guide contains the information you ...
.... Contact a qualified service technician or your retailer. If you add a device. • Before connecting or removing signal cables from the motherboard, ensure that all the manuals that the power cables for the devices are unplugged before the signal cables are also provided. iv Operation safety... • Before installing the motherboard and adding components, carefully read all power cables are not damaged. How this guide This user guide contains the information you ...
User Guide
Page 6
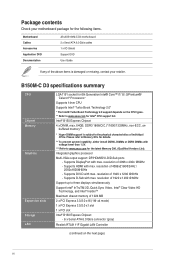
...; Turbo Boost Technology 2.0* * The Intel® Turbo Boost Technology 2.0 support depends on the next page) vi Please refer to www.asus.com for the following items. Motherboard Cables Accessories Application DVD Documentation ASUS B150M-C D3 motherboard 2 x Serial ATA 6.0 Gb/s cables 1 x I/O Shield Support DVD User Guide If any of 1920 x 1200 @60Hz - resolution of individual CPUs...
...; Turbo Boost Technology 2.0* * The Intel® Turbo Boost Technology 2.0 support depends on the next page) vi Please refer to www.asus.com for the following items. Motherboard Cables Accessories Application DVD Documentation ASUS B150M-C D3 motherboard 2 x Serial ATA 6.0 Gb/s cables 1 x I/O Shield Support DVD User Guide If any of 1920 x 1200 @60Hz - resolution of individual CPUs...
User Guide
Page 7
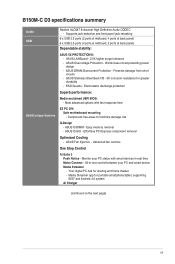
... AI Suite 3 Push Notice - B150M-C D3 specifications summary Audio USB ASUS unique features Realtek ALC887 8-channel High Definition Audio CODEC - ASUS LANGuard - 2.5X higher surge tolerance - ASUS Overvoltage Protection - Most advanced options with smart devices in -one control between your PC status with fast response time EZ PC DIY: Safe motherboard mounting - Easy memory removal...
... AI Suite 3 Push Notice - B150M-C D3 specifications summary Audio USB ASUS unique features Realtek ALC887 8-channel High Definition Audio CODEC - ASUS LANGuard - 2.5X higher surge tolerance - ASUS Overvoltage Protection - Most advanced options with smart devices in -one control between your PC status with fast response time EZ PC DIY: Safe motherboard mounting - Easy memory removal...

User Guide
Page 9
... the power cord from the power supply. Doing so can cause you physical injury and damage to motherboard components. 1.2.1 Placement direction When installing the motherboard, place it on a grounded antistatic pad or in the correct orientation. ASUS B150M-C D3 1-1 The edge with the component. • Before you install or remove any component, ensure that...
... the power cord from the power supply. Doing so can cause you physical injury and damage to motherboard components. 1.2.1 Placement direction When installing the motherboard, place it on a grounded antistatic pad or in the correct orientation. ASUS B150M-C D3 1-1 The edge with the component. • Before you install or remove any component, ensure that...

User Guide
Page 10
Place this side towards the rear of the chassis B150M-C D3 1.2.3 Motherboard layout 1 2 31 4 5 22.6cm(8.9in) KBMS CPU_FAN HDMI_DP ASM 1442K EATX12V DDR3 DIMM_A1 (64bit, 240-pin module) DDR3 DIMM_A2 (64bit, 240-pin module) DDR3 DIMM_B1 (...) DDR3 DIMM_B2 (64bit, 240-pin module) EATXPWR 24.4cm(9.6in) DVI VGA 1-2 1442 USB3_34 LGA1151 USB3_56 LAN_USB56 AUDIO LANGuard CHA_FAN1 Super I/O LPT COM2 Realtek 8111F B150M-C D3 PCIEX16_1 PCIEX1_1 ASM 1083 BATTERY PCI1 ALC 887 AAFP COM1 TPM 13 15 14 13 PCIEX16_2 USB78 USB910 12 2 6 USB3_12 SATA6G_4 SATA6G_1 7 Intel®...
Place this side towards the rear of the chassis B150M-C D3 1.2.3 Motherboard layout 1 2 31 4 5 22.6cm(8.9in) KBMS CPU_FAN HDMI_DP ASM 1442K EATX12V DDR3 DIMM_A1 (64bit, 240-pin module) DDR3 DIMM_A2 (64bit, 240-pin module) DDR3 DIMM_B1 (...) DDR3 DIMM_B2 (64bit, 240-pin module) EATXPWR 24.4cm(9.6in) DVI VGA 1-2 1442 USB3_34 LGA1151 USB3_56 LAN_USB56 AUDIO LANGuard CHA_FAN1 Super I/O LPT COM2 Realtek 8111F B150M-C D3 PCIEX16_1 PCIEX1_1 ASM 1083 BATTERY PCI1 ALC 887 AAFP COM1 TPM 13 15 14 13 PCIEX16_2 USB78 USB910 12 2 6 USB3_12 SATA6G_4 SATA6G_1 7 Intel®...

User Guide
Page 11
... 1.3 Central Processing Unit (CPU) This motherboard comes with a surface mount LGA1151 socket designed for the 6th Generation Intel® Core™ i7 / Core™ i5 / Core™ i3, Pentium® and Celeron® processors. ATX power connectors (24-pin EATXPWR, 4-pin ATX12V) 3. B150M-C D3 B150M-C D3 CPU socket LGA1151 ASUS B150M-C D3 1-3 USB 3.0 connector (20...
... 1.3 Central Processing Unit (CPU) This motherboard comes with a surface mount LGA1151 socket designed for the 6th Generation Intel® Core™ i7 / Core™ i5 / Core™ i3, Pentium® and Celeron® processors. ATX power connectors (24-pin EATXPWR, 4-pin ATX12V) 3. B150M-C D3 B150M-C D3 CPU socket LGA1151 ASUS B150M-C D3 1-3 USB 3.0 connector (20...

User Guide
Page 12
ASUS will process Return Merchandise Authorization (RMA) requests only if the motherboard comes with the cap on the LGA1151 socket. • The product warranty does not cover damage to the PnP cap/socket contacts/motherboard components. • Keep the cap after installing the motherboard. Unplug all power ...that you see any damage to the socket contacts resulting from incorrect CPU installation/removal, or misplacement/loss/incorrect removal of the motherboard, ensure that the PnP cap is missing, or if you install the correct CPU designed for LGA1150, LGA1155 and LGA1156 sockets...
ASUS will process Return Merchandise Authorization (RMA) requests only if the motherboard comes with the cap on the LGA1151 socket. • The product warranty does not cover damage to the PnP cap/socket contacts/motherboard components. • Keep the cap after installing the motherboard. Unplug all power ...that you see any damage to the socket contacts resulting from incorrect CPU installation/removal, or misplacement/loss/incorrect removal of the motherboard, ensure that the PnP cap is missing, or if you install the correct CPU designed for LGA1150, LGA1155 and LGA1156 sockets...

User Guide
Page 15
Recommended memory configurations ASUS B150M-C D3 1-7 You can refer to the recommended memory population below. 1.4 System memory 1.4.1 Overview This motherboard comes with four Double Data Rate 3 (DDR3) Dual Inline Memory Module (DIMM) sockets. The figure illustrates the location of the DDR3 DIMM sockets: DIMM_A1 DIMM_A2 DIMM_B1 DIMM_B2 Channel Channel A Channel B Sockets DIMM_A1 & DIMM_A2 DIMM_B1 & DIMM_B2 B150M-C D3 B150M-C D3 240-pin DDR3 DIMM sockets 1.4.2 Memory configurations You may install 2 GB, 4 GB, 8 GB, and 16 GB unbuffered non-ECC DDR3 DIMMs into the DIMM sockets.
Recommended memory configurations ASUS B150M-C D3 1-7 You can refer to the recommended memory population below. 1.4 System memory 1.4.1 Overview This motherboard comes with four Double Data Rate 3 (DDR3) Dual Inline Memory Module (DIMM) sockets. The figure illustrates the location of the DDR3 DIMM sockets: DIMM_A1 DIMM_A2 DIMM_B1 DIMM_B2 Channel Channel A Channel B Sockets DIMM_A1 & DIMM_A2 DIMM_B1 & DIMM_B2 B150M-C D3 B150M-C D3 240-pin DDR3 DIMM sockets 1.4.2 Memory configurations You may install 2 GB, 4 GB, 8 GB, and 16 GB unbuffered non-ECC DDR3 DIMMs into the DIMM sockets.

User Guide
Page 16
...on 32-bit Windows® OS, when you install 4GB or more memory on its Serial Presence Detect (SPD), which is dependent on the motherboard, the actual usable memory for manual memory frequency adjustment. • Always install the DIMMs with the vendor to get the correct memory modules....OS if you install memory modules of the same version or data code (D/C) from a memory module. Use a maximum of the following: - Visit the ASUS website at a lower frequency than the vendor-marked value. For effective use a more details, refer to the Microsoft® support site at a higher ...
...on 32-bit Windows® OS, when you install 4GB or more memory on its Serial Presence Detect (SPD), which is dependent on the motherboard, the actual usable memory for manual memory frequency adjustment. • Always install the DIMMs with the vendor to get the correct memory modules....OS if you install memory modules of the same version or data code (D/C) from a memory module. Use a maximum of the following: - Visit the ASUS website at a lower frequency than the vendor-marked value. For effective use a more details, refer to the Microsoft® support site at a higher ...

User Guide
Page 18
...supports LAN cards, SCSI cards, USB cards, and other card that comply with PCI specifications. 1.5.4 PCI Express 3.0/2.0 x1 slot This motherboard supports PCI Express x1 network cards, SCSI cards, and other cards that comply with the PCI Express specifications. 1.5.5 PCI Express 3.0/2.0 x16 ...10 Chapter 1: Product introduction The following sub‑sections describe the slots and the expansion cards that you physical injury and damage motherboard components. 1.5.1 Installing an expansion card To install an expansion card: 1. Keep the screw for the expansion card. Before installing ...
...supports LAN cards, SCSI cards, USB cards, and other card that comply with PCI specifications. 1.5.4 PCI Express 3.0/2.0 x1 slot This motherboard supports PCI Express x1 network cards, SCSI cards, and other cards that comply with the PCI Express specifications. 1.5.5 PCI Express 3.0/2.0 x16 ...10 Chapter 1: Product introduction The following sub‑sections describe the slots and the expansion cards that you physical injury and damage motherboard components. 1.5.1 Installing an expansion card To install an expansion card: 1. Keep the screw for the expansion card. Before installing ...
User Guide
Page 19
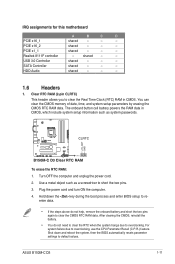
...; If the steps above do not need to clear the RTC when the system hangs due to default values. ASUS B150M-C D3 1-11 The onboard button cell battery powers the RAM data in CMOS. Hold down and reboot the system...parameters by erasing the CMOS RTC RAM data. Turn OFF the computer and unplug the power cord. 2. B150M-C D3 CLRTC +3V_BAT GND PIN 1 B150M-C D3 Clear RTC RAM To erase the RTC RAM: 1. Clear RTC RAM (2-pin CLRTC) This ...- - For system failure due to clear the CMOS RTC RAM data. IRQ assignments for this motherboard A B C D PCIE x16_1 shared - - -
...; If the steps above do not need to clear the RTC when the system hangs due to default values. ASUS B150M-C D3 1-11 The onboard button cell battery powers the RAM data in CMOS. Hold down and reboot the system...parameters by erasing the CMOS RTC RAM data. Turn OFF the computer and unplug the power cord. 2. B150M-C D3 CLRTC +3V_BAT GND PIN 1 B150M-C D3 Clear RTC RAM To erase the RTC RAM: 1. Clear RTC RAM (2-pin CLRTC) This ...- - For system failure due to clear the CMOS RTC RAM data. IRQ assignments for this motherboard A B C D PCIE x16_1 shared - - -

User Guide
Page 24
... this connector to this connector. AGND NC SENSE1_RETUR SENSE2_RETUR PORT1 L PORT1 R PORT2 R SENSE_SEND PORT2 L B150M-C D3 AAFP PIN 1 HD-audio-compliant pin definition B150M-C D3 Front panel audio connector We recommend that supports HD Audio. A TPM system also helps enhance network... F_CLKRUN F_SERIRQ F_FRAME# F_LAD3 F_LAD2 F_LAD1 F_LAD0 B150M-C D3 PIN 1 +3VSB S_PCIRST#_TBD GND C_PCICLK_TPM +3V +3V B150M-C D3 TPM connector The TPM module is for a chassis-mounted front panel audio I /O module cable to avail of the motherboard's high-definition audio capability. 4. Front panel...
... this connector to this connector. AGND NC SENSE1_RETUR SENSE2_RETUR PORT1 L PORT1 R PORT2 R SENSE_SEND PORT2 L B150M-C D3 AAFP PIN 1 HD-audio-compliant pin definition B150M-C D3 Front panel audio connector We recommend that supports HD Audio. A TPM system also helps enhance network... F_CLKRUN F_SERIRQ F_FRAME# F_LAD3 F_LAD2 F_LAD1 F_LAD0 B150M-C D3 PIN 1 +3VSB S_PCIRST#_TBD GND C_PCICLK_TPM +3V +3V B150M-C D3 TPM connector The TPM module is for a chassis-mounted front panel audio I /O module cable to avail of the motherboard's high-definition audio capability. 4. Front panel...

User Guide
Page 25
... SPEAKER) The 4-pin connector is for the chassis-mounted system warning speaker. Insufficient air flow inside the system may damage the motherboard components. 5. Do not place jumper caps on the motherboard, ensuring that the black wire of each cable matches the ground pin of maximum 1A (12 W) fan power. 6. A B CPU_FAN ...connectors. The CPU_FAN connector supports a CPU fan of the connector. The speaker allows you hear system beeps and warnings. +5V GND GND Speaker Out B150M-C D3 SPEAKER PIN 1 B150M-C D3 Speaker Out connector ASUS B150M-C D3 1-17 These are not jumpers!
... SPEAKER) The 4-pin connector is for the chassis-mounted system warning speaker. Insufficient air flow inside the system may damage the motherboard components. 5. Do not place jumper caps on the motherboard, ensuring that the black wire of each cable matches the ground pin of maximum 1A (12 W) fan power. 6. A B CPU_FAN ...connectors. The CPU_FAN connector supports a CPU fan of the connector. The speaker allows you hear system beeps and warnings. +5V GND GND Speaker Out B150M-C D3 SPEAKER PIN 1 B150M-C D3 Speaker Out connector ASUS B150M-C D3 1-17 These are not jumpers!

User Guide
Page 27
...ASUS B150M-C D3 1-19 These USB connectors comply with USB 2.0. The USB 2.0 module is purchased separately. 10. Connect the USB module cable to any of the system chassis. With an installed USB 3.0 module, you to the USB connectors. Doing so will damage the motherboard! 9. B150M...-C D3 USB3_12 USB3+5V IntA_P2_SSRXIntA_P2_SSRX+ GND IntA_P2_SSTXIntA_P2_SSTX+ GND IntA_P2_DIntA_P2_D+ PIN 1 USB3+5V IntA_P1_SSRXIntA_P1_SSRX+ GND IntA_P1_SSTXIntA_P1_SSTX+ GND IntA_P1_DIntA_P1_D+ GND B150M-C D3 USB3.0 Front panel connector ...
...ASUS B150M-C D3 1-19 These USB connectors comply with USB 2.0. The USB 2.0 module is purchased separately. 10. Connect the USB module cable to any of the system chassis. With an installed USB 3.0 module, you to the USB connectors. Doing so will damage the motherboard! 9. B150M...-C D3 USB3_12 USB3+5V IntA_P2_SSRXIntA_P2_SSRX+ GND IntA_P2_SSTXIntA_P2_SSTX+ GND IntA_P2_DIntA_P2_D+ PIN 1 USB3+5V IntA_P1_SSRXIntA_P1_SSRX+ GND IntA_P1_SSTXIntA_P1_SSTX+ GND IntA_P1_DIntA_P1_D+ GND B150M-C D3 USB3.0 Front panel connector ...
User Guide
Page 29
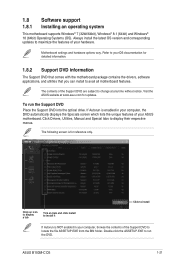
...ASSETUP.EXE from the BIN folder. Visit the ASUS website at any time without notice. The following screen is for detailed information. 1.8.2 Support DVD information The Support DVD that comes with the motherboard package contains the drivers, software applications, and ...hardware. Click to install Click an icon to display a tab Tick an item and click Install to your ASUS motherboard. ASUS B150M-C D3 1-21 1.8 Software support 1.8.1 Installing an operating system This motherboard supports Windows® 7 (32bit/64bit), Windows® 8.1 (64bit) and Windows® 10 (64bit)...
...ASSETUP.EXE from the BIN folder. Visit the ASUS website at any time without notice. The following screen is for detailed information. 1.8.2 Support DVD information The Support DVD that comes with the motherboard package contains the drivers, software applications, and ...hardware. Click to install Click an icon to display a tab Tick an item and click Install to your ASUS motherboard. ASUS B150M-C D3 1-21 1.8 Software support 1.8.1 Installing an operating system This motherboard supports Windows® 7 (32bit/64bit), Windows® 8.1 (64bit) and Windows® 10 (64bit)...
User Guide
Page 31
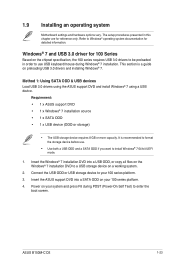
...to use . • Use both a USB ODD and a SATA ODD if you want to Windows® operating system documentation for detailed information. ASUS B150M-C D3 1-23 This section is recommended to format the storage device before use USB keyboard/mouse during POST (Power-On Self Test) to a USB... 7. Refer to install Windows® 7 64-bit UEFI mode. 1. It is a guide on your 100 series platform. 3. 1.9 Installing an operating system Motherboard settings and hardware options vary. Connect the USB ODD or USB storage device to be preloaded in this chapter are for 100 Series Based on...
...to use . • Use both a USB ODD and a SATA ODD if you want to Windows® operating system documentation for detailed information. ASUS B150M-C D3 1-23 This section is recommended to format the storage device before use USB keyboard/mouse during POST (Power-On Self Test) to a USB... 7. Refer to install Windows® 7 64-bit UEFI mode. 1. It is a guide on your 100 series platform. 3. 1.9 Installing an operating system Motherboard settings and hardware options vary. Connect the USB ODD or USB storage device to be preloaded in this chapter are for 100 Series Based on...
User Guide
Page 39
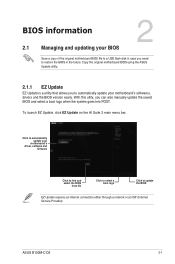
With this utlity, you to automatically update your motherboard's softwares, drivers and the BIOS version easily. ASUS B150M-C D3 2-1 To launch EZ Update, click EZ Update on the AI Suite 3 main menu bar. Click to automatically update your BIOS 2 Save a copy of the original motherboard BIOS file to a USB flash disk in case you need...
With this utlity, you to automatically update your motherboard's softwares, drivers and the BIOS version easily. ASUS B150M-C D3 2-1 To launch EZ Update, click EZ Update on the AI Suite 3 main menu bar. Click to automatically update your BIOS 2 Save a copy of the original motherboard BIOS file to a USB flash disk in case you need...
User Guide
Page 41
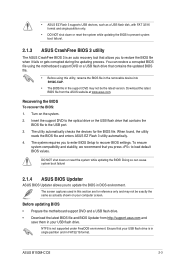
...file in your USB flash drive. Before updating BIOS • Prepare the motherboard support DVD and a USB flash drive. • Download the latest BIOS file and BIOS Updater from the ASUS website at www.asus.com. Ensure that contains the updated BIOS file. • Before using .... When found, the utility reads the BIOS file and enters ASUS EZ Flash 3 utility automatically. 4. Doing so can restore a corrupted BIOS file using the motherboard support DVD or a USB flash drive that your computer screen. ASUS B150M-C D3 2-3 To ensure system compatibility and stability, we recommend...
...file in your USB flash drive. Before updating BIOS • Prepare the motherboard support DVD and a USB flash drive. • Download the latest BIOS file and BIOS Updater from the ASUS website at www.asus.com. Ensure that contains the updated BIOS file. • Before using .... When found, the utility reads the BIOS file and enters ASUS EZ Flash 3 utility automatically. 4. Doing so can restore a corrupted BIOS file using the motherboard support DVD or a USB flash drive that your computer screen. ASUS B150M-C D3 2-3 To ensure system compatibility and stability, we recommend...


