Asus B150M-ET Support and Manuals
Get Help and Manuals for this Asus item

View All Support Options Below
Free Asus B150M-ET manuals!
Problems with Asus B150M-ET?
Ask a Question
Free Asus B150M-ET manuals!
Problems with Asus B150M-ET?
Ask a Question
Popular Asus B150M-ET Manual Pages
Win7 Installation guideEnglish - Page 1
... Braswell platform
DE164_100_Series_Windows_7_Setup_Guide.indd 1
1 2015/8/7 14:35:26 It is a guide on your 100 series and Braswell platform.
3.
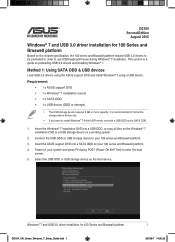
Method 1: Using SATA ODD & USB devices
Load USB 3.0 drivers using the ASUS support DVD and install Windows® 7 using a USB device. Insert the Windows® 7 installation DVD into a SATA ODD on a working system.
2.
This section is...
Win7 Installation guideEnglish - Page 2
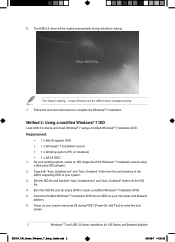
... ISO file.
4. The "Setup is loaded correctly.
7. screen will be loaded automatically during POST (Power-On Self Test) to enter the boot
screen.
2
Windows® 7 and USB 3.0 driver installation for 100 Series and Braswell platform
DE164_100_Series_Windows_7_Setup_Guide.indd 2
2015/8/7 14:35:26 Requirement: • 1 x ASUS support DVD • 1 x Windows® 7 installation source •...
Win7 Installation guideEnglish - Page 3
... 3
3 2015/8/7 14:35:26 The "Setup is loaded correctly.
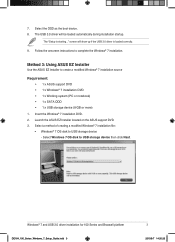
9. Method 3: Using ASUS EZ Installer
Use the ASUS EZ Installer to complete the Windows® 7 installation. Select Windows 7 OS disk to USB storage device - Launch the ASUS EZ Installer located on the ASUS support DVD. 3.
7. The USB 3.0 driver will show up if the USB 3.0 driver is starting..." Select a method of creating...
Motherboard Pin Definition.English - Page 3

... is removed or replaced.
Hold down and reboot the system, then the BIOS automatically resets parameter settings to short the two pins.
3.
Connect one end of date, time, and system setup parameters by erasing ... to clear the Real Time Clock (RTC) RAM in CMOS, which include system setup information such as system passwords.
+3V_BAT GND
CLRTC
PIN 1
To erase the RTC RAM:
1. Plug the...
Motherboard Pin Definition.English - Page 9
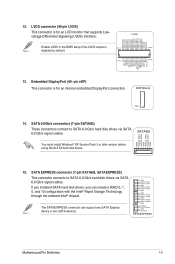
...setup if the LVDS output is
PIN 1
PIN 20
disabled by default. EDP(Back)
PIN 1
14. LVDS
voltage Differential Signaling (LVDS) interface. pin eDP) This connector is for an LCD monitor that supports Low- If you installed SATA hard disk drives, you can support...via SATA 6.0 Gb/s signal cables.
SATA6G
You must install Windows® XP Service Pack 3 or later version before using Serial ATA ...
Motherboard Pin Definition.English - Page 12

... chassis-mounted system warning speaker.
The speaker allows you turn on the operating system settings. The chassis intrusion sensor or switch sends a high-level signal to this connector ... for the system power LED. System panel connector (20-3 pin F_PANEL)
This connector supports several chassis-mounted functions.
• System power LED (4-pin +PWR_LED-)
PANEL
+PWR_LED...or replaced.
Motherboard Pin Definition.English - Page 13
...install an M.2 (NGFF) SSD module.
• This socket supports M Key and 2242/2260/2280/22110 or 2242/2260/22110 storage devices by models.
• When using Intel® Desktop Responsiveness technologies with PCIe/SATA M.2 device, ensure to install...F_LAD0
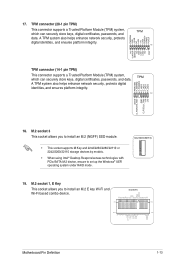
This connector supports a Trusted Platform Module (TPM) system, which can securely store keys, digital certificates, passwords, and data. ...
Motherboard Pin Definition.English - Page 17
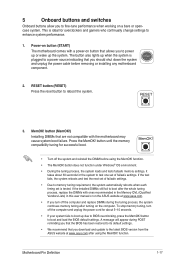
... settings. MemOK! If the installed DIMMs still fail to boot after the whole tuning process, replace the DIMMs with a power-on the ASUS website at www.asus.com after turning on a bare or opencase system. Power-on button (START)
The motherboard comes with ones recommended in the Memory QVL (Qualified Vendors Lists) in this user manual...
Motherboard Pin Definition.English - Page 18
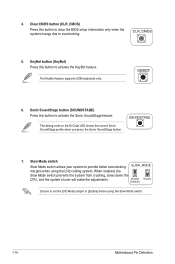
... SoundStage button. Ensure to set the LN2 Mode jumper to [Enable] before using the LN2 cooling system. SOUNDSTAGE
7. Slow Mode switch Slow Mode switch allows your system to overclocking.
5.
The KeyBot feature supports USB keyboards only.
KEBOT
6. KeyBot button (KeyBot) Press this button to clear the BIOS setup information only when the systems...
Intel 100 Series Ai Suite3 ManualEnglish - Page 2

..., select the Utilities tab and
click or tap AI Suite 3. 3. Follow the succeeding onscreen instructions. If the ASUS motherboard support DVD main menu did not appear, try the following: a.
b. Installing AI Suite 3
AI Suite 3 is for reference only and vary with models.
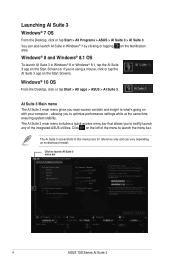
3. Windows® 8 and Windows® 8.1 OS
1. On the lower left corner of the...
Intel 100 Series Ai Suite3 ManualEnglish - Page 4
..., click or tap the AI Suite 3 app on motherboard model.
Windows® 10 OS
From the Desktop, click or tap Start > All apps > ASUS > AI Suite 3. Click on the left of the integrated ASUS utilities. You can also launch AI Suite in this manual are for reference only and can vary depending on the...
Intel 100 Series Ai Suite3 ManualEnglish - Page 5
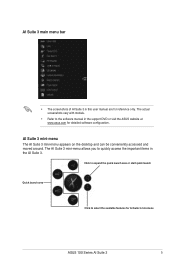
... features for detailed software configuration. The AI Suite 3 mini-menu allows you to the software manual in the support DVD or visit the ASUS website at www.asus.com for AI Suite 3 mini-menu
ASUS 100 Series AI Suite 3
5
The actual screenshots vary with models.
• Refer to quickly access the important items in this user...
Intel 100 Series Ai Suite3 ManualEnglish - Page 8

... before adjusting CPU voltage settings.
Launching TurboV EVO
To launch TurboV EVO, click on the next system boot.
TurboV EVO
ASUS TurboV EVO allows you to manually adjust the CPU frequency,... CPU VCCIO Voltage,
and PCH Core Voltage
Click to save your customized overclocking settings and manually load the profile after Windows starts.
It also provides the Auto Tuning function that...
Intel 100 Series Ai Suite3 ManualEnglish - Page 11
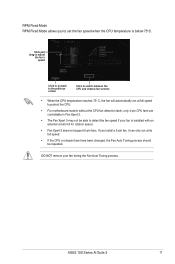
If you to set the fan speed when the CPU temperature is installed with an external control kit for rotation speed.
• Fan Xpert 3 does not support 2-pin fans. ASUS 100 Series AI Suite 3
11 ... 75o C, the fan will automatically run at full speed to protect the CPU.
• For motherboard models without the CPU fan detection latch, only 4-pin CPU fans are controllable in Fan Xpert 3.
•...
Intel 100 Series Ai Suite3 ManualEnglish - Page 14
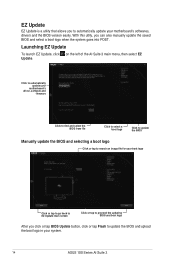
... BIOS and select a boot logo when the system goes into POST. Click to automatically update your
motherboard's driver, software and
firmware
Click to find and select the BIOS from file
Click to select a boot logo
Click to update the BIOS
Manually update the BIOS and selecting a boot logo
Click or tap to search an image file...
Asus B150M-ET Reviews
We have not received any reviews for Asus yet.