User Guide
Page 3
... information iv About this guide iv Package contents vi B150M-A specifications summary vi Chapter 1 Product introduction 1.1 Before you proceed 1-1 1.2 Motherboard overview 1-1 1.3 Central Processing Unit (CPU 1-3 1.4 System memory 1-7 1.5 Expansion slots 1-10 1.6 Headers 1-11 1.7 Connectors 1-12 1.8 Software support 1-22 Chapter 2 BIOS information 2.1 Managing and updating your BIOS 2-1 2.2 BIOS setup program 2-6 2.3 My Favorites 2-9 2.4 Main menu 2-10 2.5 Ai...
... information iv About this guide iv Package contents vi B150M-A specifications summary vi Chapter 1 Product introduction 1.1 Before you proceed 1-1 1.2 Motherboard overview 1-1 1.3 Central Processing Unit (CPU 1-3 1.4 System memory 1-7 1.5 Expansion slots 1-10 1.6 Headers 1-11 1.7 Connectors 1-12 1.8 Software support 1-22 Chapter 2 BIOS information 2.1 Managing and updating your BIOS 2-1 2.2 BIOS setup program 2-6 2.3 My Favorites 2-9 2.4 Main menu 2-10 2.5 Ai...
User Guide
Page 4
... it may be exposed to moisture. • Place the product on the motherboard. • Chapter 2: BIOS information This chapter discusses changing system settings through the BIOS Setup menus. How this guide This user guide contains the information you are using an adapter or extension cord...before relocating the system. • When adding or removing devices to or from the system, ensure that the power cables for the BIOS parameters are also provided. Operation safety • Before installing the motherboard and adding components, carefully read all power cables are connected....
... it may be exposed to moisture. • Place the product on the motherboard. • Chapter 2: BIOS information This chapter discusses changing system settings through the BIOS Setup menus. How this guide This user guide contains the information you are using an adapter or extension cord...before relocating the system. • When adding or removing devices to or from the system, ensure that the power cables for the BIOS parameters are also provided. Operation safety • Before installing the motherboard and adding components, carefully read all power cables are connected....
User Guide
Page 7
...Pipe music or movies from your PC to get rid of unnecessary junk files UEFI BIOS - ASUS Anti Surge (continued on the battlefield Media Streamer - Protects against LAN surges, lightning strikes and static-electricity discharges...portable smartphone/tablet, supporting iOS 7 and Android 4.0 systems ASUS Exclusive Features - ASUS AI Charger - B150M-A specifications summary LAN USB ASUS special features Realtek® RTL8111H Gigabit LAN controller Intel® B150 Express Chipset - ASUS LANGuard - Superb Performance ASUS Fan Xpert 2+ - featuring speedy USB 3.0 transmission Gaming...
...Pipe music or movies from your PC to get rid of unnecessary junk files UEFI BIOS - ASUS Anti Surge (continued on the battlefield Media Streamer - Protects against LAN surges, lightning strikes and static-electricity discharges...portable smartphone/tablet, supporting iOS 7 and Android 4.0 systems ASUS Exclusive Features - ASUS AI Charger - B150M-A specifications summary LAN USB ASUS special features Realtek® RTL8111H Gigabit LAN controller Intel® B150 Express Chipset - ASUS LANGuard - Superb Performance ASUS Fan Xpert 2+ - featuring speedy USB 3.0 transmission Gaming...

User Guide
Page 8
ASUS CrashFree BIOS 3 - Stylish Fanless Design: PCH heatsink 1 x PS/2 keyboard port (purple) 1 x PS/2 mouse port (green) 1 x DVI-D port 1 x RGB port 1 x HDMI port 1 x 5Gb/s USB Type C port 2 x USB 2.0/1.1 ports 2 x USB 3.0/2.0 ports (blue, Type A) 1 x LAN (RJ-45) port 3 x 8-channel audio I /O ports Internal connectors EZ DIY Push Notice - featuring friendly graphics user interface - ASUS Q-DIMM - B150M-A specifications summary...
ASUS CrashFree BIOS 3 - Stylish Fanless Design: PCH heatsink 1 x PS/2 keyboard port (purple) 1 x PS/2 mouse port (green) 1 x DVI-D port 1 x RGB port 1 x HDMI port 1 x 5Gb/s USB Type C port 2 x USB 2.0/1.1 ports 2 x USB 3.0/2.0 ports (blue, Type A) 1 x LAN (RJ-45) port 3 x 8-channel audio I /O ports Internal connectors EZ DIY Push Notice - featuring friendly graphics user interface - ASUS Q-DIMM - B150M-A specifications summary...
User Guide
Page 9
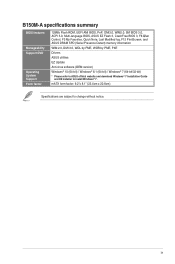
B150M-A specifications summary BIOS features Manageability Support DVD Operating System Support Form factor 128Mb Flash ROM, UEFI AMI BIOS, PnP, DMI3.0, WfM2.0, SM BIOS 3.0, ACPI 5.0, Multi-language BIOS, ASUS EZ Flash 3, CrashFree BIOS 3, F6 Qfan Control, F3 My Favorites, Quick Note, Last Modified log, F12 PrintScreen, and ASUS DRAM SPD (Serial Presence Detect) memory information WfM 2.0, DMI 3.0, WOL by...
B150M-A specifications summary BIOS features Manageability Support DVD Operating System Support Form factor 128Mb Flash ROM, UEFI AMI BIOS, PnP, DMI3.0, WfM2.0, SM BIOS 3.0, ACPI 5.0, Multi-language BIOS, ASUS EZ Flash 3, CrashFree BIOS 3, F6 Qfan Control, F3 My Favorites, Quick Note, Last Modified log, F12 PrintScreen, and ASUS DRAM SPD (Serial Presence Detect) memory information WfM 2.0, DMI 3.0, WOL by...

User Guide
Page 12
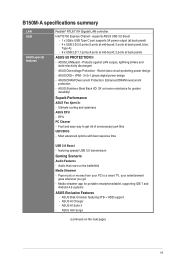
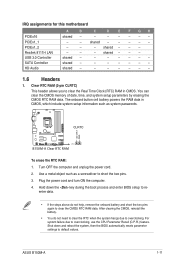
Place this side towards the rear of the chassis B150M-A 1.2.3 Motherboard layout 12 3 20.1cm(7.9in) 2 4 KBMS HDMI ASM 1442K ATX12V CPU_FAN DIGI +VRM CHA_FAN2 DDR4 DIMM_A1 (64bit, 288-pin module) DDR4 DIMM_A1 (64bit, ... DDR4 DIMM_A1 (64bit, 288-pin module) DDR4 DIMM_A1 (64bit, 288-pin module) EATXPWR 23.4cm(9.2in) DVI VGA USB_C1 USB3_56 LGA1151 LAN_USB78 BATTERY 1 AUDIO CHA_FAN1 B150M-A PCIEX16 Realtek 8111H ALC 887 PCIEX1_1 PCIEX1_2 Super I/O Intel® B150 SATA6G_5 SATA6G_6 SATA6G_3 SATA6G_4 5 SATA6G_2 AAFP COM SPDIF_OUT LPT USB910 USB1112 USB3_12 TPM CLRTC...
Place this side towards the rear of the chassis B150M-A 1.2.3 Motherboard layout 12 3 20.1cm(7.9in) 2 4 KBMS HDMI ASM 1442K ATX12V CPU_FAN DIGI +VRM CHA_FAN2 DDR4 DIMM_A1 (64bit, 288-pin module) DDR4 DIMM_A1 (64bit, ... DDR4 DIMM_A1 (64bit, 288-pin module) DDR4 DIMM_A1 (64bit, 288-pin module) EATXPWR 23.4cm(9.2in) DVI VGA USB_C1 USB3_56 LGA1151 LAN_USB78 BATTERY 1 AUDIO CHA_FAN1 B150M-A PCIEX16 Realtek 8111H ALC 887 PCIEX1_1 PCIEX1_2 Super I/O Intel® B150 SATA6G_5 SATA6G_6 SATA6G_3 SATA6G_4 5 SATA6G_2 AAFP COM SPDIF_OUT LPT USB910 USB1112 USB3_12 TPM CLRTC...
User Guide
Page 20
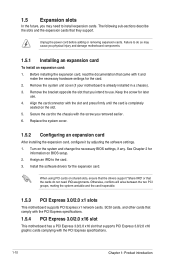
... "Share IRQ" or that the cards do so may need IRQ assignments. Keep the screw for information on the system and change the necessary BIOS settings, if any. See Chapter 2 for later use . Install the software drivers for the card. 2. The following sub‑sections describe ... graphic cards complying with the screw you may cause you intend to install expansion cards. Failure to do not need to use . 4. Turn on BIOS setup. 2. Assign an IRQ to the chassis with the PCI Express specifications. 1-10 Chapter 1: Product introduction Remove the bracket opposite the slot that...
... "Share IRQ" or that the cards do so may need IRQ assignments. Keep the screw for information on the system and change the necessary BIOS settings, if any. See Chapter 2 for later use . Install the software drivers for the card. 2. The following sub‑sections describe ... graphic cards complying with the screw you may cause you intend to install expansion cards. Failure to do not need to use . 4. Turn on BIOS setup. 2. Assign an IRQ to the chassis with the PCI Express specifications. 1-10 Chapter 1: Product introduction Remove the bracket opposite the slot that...
User Guide
Page 21
... This header allows you to overclocking, use the CPU Parameter Recall (C.P.R.) feature. Hold down and reboot the system, then the BIOS automatically resets parameter settings to re- The onboard button cell battery powers the RAM data in CMOS. shared - - - - ... clear the RTC when the system hangs due to short the two pins. 3. Shut down the key during the boot process and enter BIOS setup to default values. ASUS B150M-A 1-11 shared - - - - --- shared - - - - --- 1.6 Headers 1. shared - - --- - - - Use a metal object such as system passwords. Turn OFF ...
... This header allows you to overclocking, use the CPU Parameter Recall (C.P.R.) feature. Hold down and reboot the system, then the BIOS automatically resets parameter settings to re- The onboard button cell battery powers the RAM data in CMOS. shared - - - - ... clear the RTC when the system hangs due to short the two pins. 3. Shut down the key during the boot process and enter BIOS setup to default values. ASUS B150M-A 1-11 shared - - - - --- shared - - - - --- 1.6 Headers 1. shared - - --- - - - Use a metal object such as system passwords. Turn OFF ...
User Guide
Page 24
... compliant allowing playback of the Intel® 100 series chipset, all USB devices connected to three displays under Windows® OS environment, two displays under BIOS, and one display under DOS. • Intel® display architecture design supports the following maximum supported pixel clocks (Pixel Clock = H total x V Total x Frame Rate (Screen...
... compliant allowing playback of the Intel® 100 series chipset, all USB devices connected to three displays under Windows® OS environment, two displays under BIOS, and one display under DOS. • Intel® display architecture design supports the following maximum supported pixel clocks (Pixel Clock = H total x V Total x Frame Rate (Screen...
User Guide
Page 28
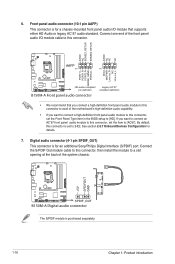
...install the module to [HD]. Front panel audio connector (10-1 pin AAFP) This connector is set the Front Panel Type item in the BIOS setup to this connector. Digital audio connector (4-1 pin SPDIF_OUT) This connector is purchased separately. 1-18 Chapter 1: Product introduction AGND NC SENSE1_RETUR ...NC NC AAFP PIN 1 PIN 1 MIC2 MICPWR Line out_R NC Line out_L PORT1 L PORT1 R PORT2 R SENSE_SEND PORT2 L B150M-A HD-audio-compliant pin definition B150M-A Front panel audio connector Legacy AC'97 compliant definition • We recommend that supports either HD Audio or legacy AC`97 ...
...install the module to [HD]. Front panel audio connector (10-1 pin AAFP) This connector is set the Front Panel Type item in the BIOS setup to this connector. Digital audio connector (4-1 pin SPDIF_OUT) This connector is purchased separately. 1-18 Chapter 1: Product introduction AGND NC SENSE1_RETUR ...NC NC AAFP PIN 1 PIN 1 MIC2 MICPWR Line out_R NC Line out_L PORT1 L PORT1 R PORT2 R SENSE_SEND PORT2 L B150M-A HD-audio-compliant pin definition B150M-A Front panel audio connector Legacy AC'97 compliant definition • We recommend that supports either HD Audio or legacy AC`97 ...
User Guide
Page 30
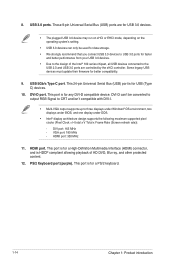
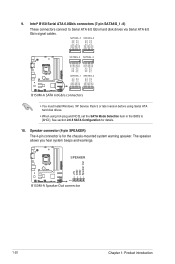
.../s connectors • You must install Windows. The speaker allows you hear system beeps and warnings. +5V GND GND Speaker Out SPEAKER B150M-A PIN 1 B150M-A Speaker Out connector 1-20 Chapter 1: Product introduction XP Service Pack 3 or later version before using Serial ATA hard disk drives. •...; When using hot-plug and NCQ, set the SATA Mode Selection item in the BIOS to Serial ATA 6.0 Gb/s hard disk drives via Serial ATA 6.0 Gb...
.../s connectors • You must install Windows. The speaker allows you hear system beeps and warnings. +5V GND GND Speaker Out SPEAKER B150M-A PIN 1 B150M-A Speaker Out connector 1-20 Chapter 1: Product introduction XP Service Pack 3 or later version before using Serial ATA hard disk drives. •...; When using hot-plug and NCQ, set the SATA Mode Selection item in the BIOS to Serial ATA 6.0 Gb/s hard disk drives via Serial ATA 6.0 Gb...

User Guide
Page 33
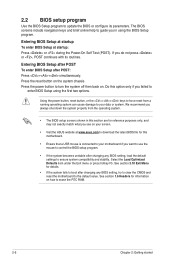
... BIOS file to a USB flash disk in case you can also manually update the saved BIOS and select a boot logo when the system goes into POST. To launch EZ Update, click EZ Update on the AI Suite 3 main menu bar. BIOS information 2 2.1 Managing and updating your motherboard's softwares, drivers and the BIOS version easily. ASUS B150M...
... BIOS file to a USB flash disk in case you can also manually update the saved BIOS and select a boot logo when the system goes into POST. To launch EZ Update, click EZ Update on the AI Suite 3 main menu bar. BIOS information 2 2.1 Managing and updating your motherboard's softwares, drivers and the BIOS version easily. ASUS B150M...
User Guide
Page 34
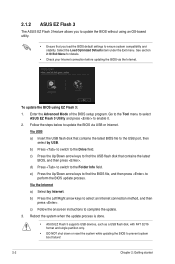
...keys to find the USB flash disk that contains the latest BIOS, and then press . b) Press the Left/Right arrow keys to the Folder Info field. 2.1.2 ASUS EZ Flash 3 The ASUS EZ Flash 3 feature allows you load the BIOS default settings to ensure system compatibility and stability. Reboot the system... Getting started Via the Internet a) Select by USB. To update the BIOS using an OS‑based utility. • Ensure that contains the latest BIOS file to perform the BIOS update process. Go to the Tool menu to select ASUS EZ Flash 3 Utility and press to the Drive field. Follow the ...
...keys to find the USB flash disk that contains the latest BIOS, and then press . b) Press the Left/Right arrow keys to the Folder Info field. 2.1.2 ASUS EZ Flash 3 The ASUS EZ Flash 3 feature allows you load the BIOS default settings to ensure system compatibility and stability. Reboot the system... Getting started Via the Internet a) Select by USB. To update the BIOS using an OS‑based utility. • Ensure that contains the latest BIOS file to perform the BIOS update process. Go to the Tool menu to select ASUS EZ Flash 3 Utility and press to the Drive field. Follow the ...
User Guide
Page 35
... it fails or gets corrupted during the updating process. The screen captures used in this utility, rename the BIOS file in the removable device into B15A4.CAP. • The BIOS file in DOS environment. ASUS B150M-A 2-3 Ensure that your USB flash drive is in single partition and in your computer has a DVD optical drive...
... it fails or gets corrupted during the updating process. The screen captures used in this utility, rename the BIOS file in the removable device into B15A4.CAP. • The BIOS file in DOS environment. ASUS B150M-A 2-3 Ensure that your USB flash drive is in single partition and in your computer has a DVD optical drive...
User Guide
Page 36
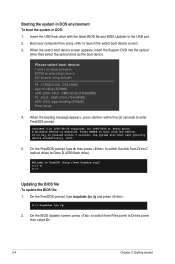
... d: then press to switch the disk from Drive C (optical drive) to Drives panel then select D:. 2-4 Chapter 2: Getting started On the BIOS Updater screen, press to switch from the DVD/CD. Peter Anvin A Bootable DVD/CD is pressed within five (5) seconds to boot from Files ...D:/> bupdater /pc /g 2. Boot your computer then press to boot using defaults P2: ST3808110AS (76319MB) aigo miniking (250MB) UEFI: (FAT) ASUS DRW-2014L1T(4458MB) P1: ASUS DRW-2014L1T(4458MB) UEFI: (FAT) aigo miniking (250MB) Enter Setup 4. When the select boot device screen appears, insert the Support DVD into...
... d: then press to switch the disk from Drive C (optical drive) to Drives panel then select D:. 2-4 Chapter 2: Getting started On the BIOS Updater screen, press to switch from the DVD/CD. Peter Anvin A Bootable DVD/CD is pressed within five (5) seconds to boot from Files ...D:/> bupdater /pc /g 2. Boot your computer then press to boot using defaults P2: ST3808110AS (76319MB) aigo miniking (250MB) UEFI: (FAT) ASUS DRW-2014L1T(4458MB) P1: ASUS DRW-2014L1T(4458MB) UEFI: (FAT) aigo miniking (250MB) Enter Setup 4. When the select boot device screen appears, insert the Support DVD into...

User Guide
Page 37
When BIOS update is not supported due to security regulations. 5. Restart your computer. See section 2.10 Exit Menu for DOS V1.30 [2014/01/01] Current ROM BOARD: B150M-A VER: 0308 (H :00 B :00) DATE: 08/14/2015 PATH: C:\ Update ROM BOARD: Unknown VER: Unknown DATE: Unknown ...] Exit [V] Drive Info Files panel 3. ASUS B150M-A 2-5 Select Yes then press . DO NOT shut down or reset the system while updating the BIOS to confirm the BIOS update. Drives panel ASUSTeK BIOS Updater for details. After the BIOS Updater checks the selected BIOS file, select Yes to prevent system boot ...
When BIOS update is not supported due to security regulations. 5. Restart your computer. See section 2.10 Exit Menu for DOS V1.30 [2014/01/01] Current ROM BOARD: B150M-A VER: 0308 (H :00 B :00) DATE: 08/14/2015 PATH: C:\ Update ROM BOARD: Unknown VER: Unknown DATE: Unknown ...] Exit [V] Drive Info Files panel 3. ASUS B150M-A 2-5 Select Yes then press . DO NOT shut down or reset the system while updating the BIOS to confirm the BIOS update. Drives panel ASUSTeK BIOS Updater for details. After the BIOS Updater checks the selected BIOS file, select Yes to prevent system boot ...
User Guide
Page 38
... at startup To enter BIOS Setup at www.asus.com to download the latest BIOS file for information on the system chassis. Press the power button to turn the system off then back on your screen. • Visit the ASUS website at startup: Press or during the Power-On Self Test (POST). ...We recommend you see on . See section 1.6 Headers for this motherboard. • Ensure that a USB mouse is connected to your data or system. The BIOS screens include navigation keys and brief online...
... at startup To enter BIOS Setup at www.asus.com to download the latest BIOS file for information on the system chassis. Press the power button to turn the system off then back on your screen. • Visit the ASUS website at startup: Press or during the Power-On Self Test (POST). ...We recommend you see on . See section 1.6 Headers for this motherboard. • Ensure that a USB mouse is connected to your data or system. The BIOS screens include navigation keys and brief online...
User Guide
Page 39
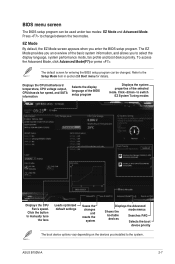
... properties of the basic system information, and allows you to change between the two modes. Click to the system. The default screen for details. ASUS B150M-A 2-7 BIOS menu screen The BIOS setup program can be used under two modes: EZ Mode and Advanced Mode. To access the Advanced Mode, click Advanced Mode(F7) or... Shows the mode menus bootable Searches FAQ devices Selects the boot device priority The boot device options vary depending on the devices you enter the BIOS setup program. Refer to the Setup Mode item in section 2.8 Boot menu for entering the...
... properties of the basic system information, and allows you to change between the two modes. Click to the system. The default screen for details. ASUS B150M-A 2-7 BIOS menu screen The BIOS setup program can be used under two modes: EZ Mode and Advanced Mode. To access the Advanced Mode, click Advanced Mode(F7) or... Shows the mode menus bootable Searches FAQ devices Selects the boot device priority The boot device options vary depending on the devices you enter the BIOS setup program. Refer to the Setup Mode item in section 2.8 Boot menu for entering the...
User Guide
Page 40
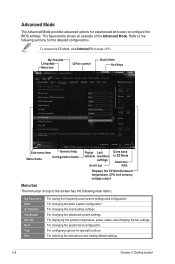
... Quick Note Hot Keys Sub-menu item General help Menu items Configuration fields Popup Last window modified settings Scroll bar Goes back to configure the BIOS settings. Advanced Mode The Advanced Mode provides advanced options for special functions For selecting the exit options and loading default settings 2-8 Chapter 2: Getting started To...
... Quick Note Hot Keys Sub-menu item General help Menu items Configuration fields Popup Last window modified settings Scroll bar Goes back to configure the BIOS settings. Advanced Mode The Advanced Mode provides advanced options for special functions For selecting the exit options and loading default settings 2-8 Chapter 2: Getting started To...
User Guide
Page 41
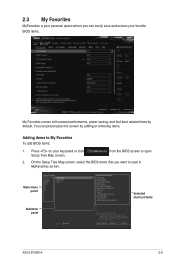
... by adding or removing items. Adding items to open 2. from the BIOS screen to My Favorites To add BIOS items: 1. You can easily save in MyFavorites screen. Main menu panel Submenu panel Selected shortcut items ASUS B150M-A 2-9 On the Setup Tree Map screen, select the BIOS items that you can personalize this screen by default.
... by adding or removing items. Adding items to open 2. from the BIOS screen to My Favorites To add BIOS items: 1. You can easily save in MyFavorites screen. Main menu panel Submenu panel Selected shortcut items ASUS B150M-A 2-9 On the Setup Tree Map screen, select the BIOS items that you can personalize this screen by default.


