User Guide
Page 2
... Free Open Source Software licenses. Copies of these licenses are used only for identification or explanation and to the source code of ASUSTeK COMPUTER INC. ("ASUS"). Where the applicable license entitles you to the owners' benefit, without the express written permission of such software and/or other Free Open Source Software Licenses. ASUSTeK is valid to , by ASUS; ASUS PROVIDES THIS MANUAL...
... Free Open Source Software licenses. Copies of these licenses are used only for identification or explanation and to the source code of ASUSTeK COMPUTER INC. ("ASUS"). Where the applicable license entitles you to the owners' benefit, without the express written permission of such software and/or other Free Open Source Software Licenses. ASUSTeK is valid to , by ASUS; ASUS PROVIDES THIS MANUAL...
User Guide
Page 4
... all the manuals that all power cables are unplugged. • Seek professional assistance before using the product, ensure all cables are correctly connected and the power cables are connected. These devices could interrupt the grounding circuit. • Ensure that the power cables for the BIOS parameters are not sure about the voltage of the electrical outlet you add a device. • Before connecting or removing signal cables from connectors, slots, sockets and...
... all the manuals that all power cables are unplugged. • Seek professional assistance before using the product, ensure all cables are correctly connected and the power cables are connected. These devices could interrupt the grounding circuit. • Ensure that the power cables for the BIOS parameters are not sure about the voltage of the electrical outlet you add a device. • Before connecting or removing signal cables from connectors, slots, sockets and...
User Guide
Page 6
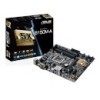
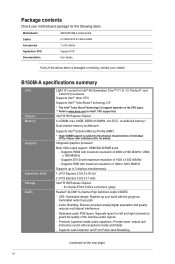
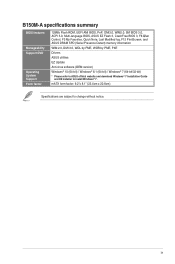
....asus.com for Intel® CPU support list. LED--illuminated design: Brighten up to 3 displays simultaneously 1 x PCI Express 3.0/2.0 x16 slot 2 x PCI Express 3.0/2.0 x1 slots Intel® B150 Express Chipset: - 6 x Serial ATA 6.0 Gb/s connectors (gray) Realtek® ALC887 8-channel High Definition Audio CODEC - B150M-A specifications summary CPU Chipset Memory Graphics Expansion slots Storage Audio LGA1151 socket for Intel® 6th Generation Core™ i7 / i5 / i3, Pentium®, and Celeron® processors Supports Intel® 14nm CPU Supports Intel® Turbo Boost Technology...
....asus.com for Intel® CPU support list. LED--illuminated design: Brighten up to 3 displays simultaneously 1 x PCI Express 3.0/2.0 x16 slot 2 x PCI Express 3.0/2.0 x1 slots Intel® B150 Express Chipset: - 6 x Serial ATA 6.0 Gb/s connectors (gray) Realtek® ALC887 8-channel High Definition Audio CODEC - B150M-A specifications summary CPU Chipset Memory Graphics Expansion slots Storage Audio LGA1151 socket for Intel® 6th Generation Core™ i7 / i5 / i3, Pentium®, and Celeron® processors Supports Intel® 14nm CPU Supports Intel® Turbo Boost Technology...

User Guide
Page 8
... UEFI BIOS EZ Mode - ASUS CrashFree BIOS 3 - B150M-A specifications summary ASUS special features ASUS quiet thermal solution Rear panel I /O ports * Use a chassis with smart devices in the front panel to support an 8-channel audio output. 1 x USB 3.0/2.0 connector supports additional 2 USB 3.0/2.0 ports (19-pin) 2 x USB 2.0/1.1 connectors support additional 4 USB 2.0 ports 6 x SATA 6.0 Gb/s connectors (gray) 1 x CPU Fan connector 2 x Chassis Fan connectors (4-pin) for both 3-pin (DC mode) and 4-pin (PWM mode) coolers control 1 x Front panel audio connector (AAFP) 1 x Speaker connector...
... UEFI BIOS EZ Mode - ASUS CrashFree BIOS 3 - B150M-A specifications summary ASUS special features ASUS quiet thermal solution Rear panel I /O ports * Use a chassis with smart devices in the front panel to support an 8-channel audio output. 1 x USB 3.0/2.0 connector supports additional 2 USB 3.0/2.0 ports (19-pin) 2 x USB 2.0/1.1 connectors support additional 4 USB 2.0 ports 6 x SATA 6.0 Gb/s connectors (gray) 1 x CPU Fan connector 2 x Chassis Fan connectors (4-pin) for both 3-pin (DC mode) and 4-pin (PWM mode) coolers control 1 x Front panel audio connector (AAFP) 1 x Speaker connector...
User Guide
Page 9
... B150M-A specifications summary BIOS features Manageability Support DVD Operating System Support Form factor 128Mb Flash ROM, UEFI AMI BIOS, PnP, DMI3.0, WfM2.0, SM BIOS 3.0, ACPI 5.0, Multi-language BIOS, ASUS EZ Flash 3, CrashFree BIOS 3, F6 Qfan Control, F3 My Favorites, Quick Note, Last Modified log, F12 PrintScreen, and ASUS DRAM SPD (Serial Presence Detect) memory information WfM 2.0, DMI 3.0, WOL by PME, WOR by PME, PXE Drivers ASUS utilities EZ Update Anti-virus software (OEM version) Windows® 10 (64-bit) / Windows®...
... B150M-A specifications summary BIOS features Manageability Support DVD Operating System Support Form factor 128Mb Flash ROM, UEFI AMI BIOS, PnP, DMI3.0, WfM2.0, SM BIOS 3.0, ACPI 5.0, Multi-language BIOS, ASUS EZ Flash 3, CrashFree BIOS 3, F6 Qfan Control, F3 My Favorites, Quick Note, Last Modified log, F12 PrintScreen, and ASUS DRAM SPD (Serial Presence Detect) memory information WfM 2.0, DMI 3.0, WOL by PME, WOR by PME, PXE Drivers ASUS utilities EZ Update Anti-virus software (OEM version) Windows® 10 (64-bit) / Windows®...
User Guide
Page 11
... before installing or removing the motherboard. Do not overtighten the screws! Failure to do so may cause severe damage to the motherboard, peripherals, or components. 1.2 Motherboard overview Before you install the motherboard, study the configuration of your chassis to ensure that the ATX power supply is switched off or the power cord is detached from the wall socket before touching any component. • Before handling components, use...
... before installing or removing the motherboard. Do not overtighten the screws! Failure to do so may cause severe damage to the motherboard, peripherals, or components. 1.2 Motherboard overview Before you install the motherboard, study the configuration of your chassis to ensure that the ATX power supply is switched off or the power cord is detached from the wall socket before touching any component. • Before handling components, use...

User Guide
Page 13
...; processors. USB 2.0 connectors (10-1 pin USB910, USB1112) 13. ATX power connectors (24-pin EATXPWR, 4-pin ATX12V) 2. DDR4 DIMM slots 5. USB 3.0 connector (20-1 pin USB3_12) 12. Intel® LGA1151 CPU socket 4. Chassis intrusion connector (4-1 pin CHASSIS) 9. Digital audio connector (4-1 pin SPDIF_OUT) 15. B150M-A B150M-A CPU socket LGA1151 ASUS B150M-A 1-3 TPM header (14-1 pin TPM) 11. Serial port connector (10-1 pin COM) 16. CPU, chassis fan connectors (4-pin CPU_FAN, 4-pin CHA_FAN1~2) 3. Speaker connector (4-pin SPEAKER) 8. System panel connector (10-1 pin...
...; processors. USB 2.0 connectors (10-1 pin USB910, USB1112) 13. ATX power connectors (24-pin EATXPWR, 4-pin ATX12V) 2. DDR4 DIMM slots 5. USB 3.0 connector (20-1 pin USB3_12) 12. Intel® LGA1151 CPU socket 4. Chassis intrusion connector (4-1 pin CHASSIS) 9. Digital audio connector (4-1 pin SPDIF_OUT) 15. B150M-A B150M-A CPU socket LGA1151 ASUS B150M-A 1-3 TPM header (14-1 pin TPM) 11. Serial port connector (10-1 pin COM) 16. CPU, chassis fan connectors (4-pin CPU_FAN, 4-pin CHA_FAN1~2) 3. Speaker connector (4-pin SPEAKER) 8. System panel connector (10-1 pin...
User Guide
Page 18
... the ASUS website at a lower frequency than the vendor-marked value. For effective use a more details, refer to the Microsoft® support site at a higher frequency, refer to section 2.5 Ai Tweaker menu for single-channel operation. • According to Intel® CPU spec, DIMM voltage below 1.35V is recommended to protect the CPU. • Due to the memory address limitation on 32-bit Windows...
... the ASUS website at a lower frequency than the vendor-marked value. For effective use a more details, refer to the Microsoft® support site at a higher frequency, refer to section 2.5 Ai Tweaker menu for single-channel operation. • According to Intel® CPU spec, DIMM voltage below 1.35V is recommended to protect the CPU. • Due to the memory address limitation on 32-bit Windows...
User Guide
Page 20
... PCI Express specifications. 1.5.4 PCI Express 3.0/2.0 x16 slot This motherboard has a PCI Express 3.0/2.0 x16 slot that the cards do so may need IRQ assignments. Replace the system cover. 1.5.2 Configuring an expansion card After installing the expansion card, configure it and make the necessary hardware settings for the expansion card. When using PCI cards on the slot. 5. Otherwise, conflicts will arise between the two PCI groups, making the system unstable and the card inoperable. 1.5.3 PCI Express 3.0/2.0 x1 slots This motherboard supports PCI Express x1 network cards...
... PCI Express specifications. 1.5.4 PCI Express 3.0/2.0 x16 slot This motherboard has a PCI Express 3.0/2.0 x16 slot that the cards do so may need IRQ assignments. Replace the system cover. 1.5.2 Configuring an expansion card After installing the expansion card, configure it and make the necessary hardware settings for the expansion card. When using PCI cards on the slot. 5. Otherwise, conflicts will arise between the two PCI groups, making the system unstable and the card inoperable. 1.5.3 PCI Express 3.0/2.0 x1 slots This motherboard supports PCI Express x1 network cards...
User Guide
Page 21
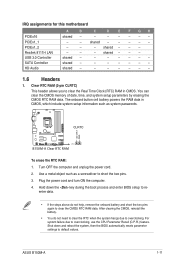
..., remove the onboard battery and short the two pins again to overclocking. shared - - - Turn OFF the computer and unplug the power cord. 2. IRQ assignments for this motherboard PCIEx16 PCIEx1_1 PCIEx1_2 Realtek 8111H LAN USB 3.0 Controller SATA Controller HD Audio A B C D E F GH shared - - - - --- - - You can clear the CMOS memory of date, time, and system setup parameters by erasing the CMOS RTC RAM data. Clear RTC RAM (2-pin CLRTC) This header allows you to clear the Real Time Clock (RTC) RAM...
..., remove the onboard battery and short the two pins again to overclocking. shared - - - Turn OFF the computer and unplug the power cord. 2. IRQ assignments for this motherboard PCIEx16 PCIEx1_1 PCIEx1_2 Realtek 8111H LAN USB 3.0 Controller SATA Controller HD Audio A B C D E F GH shared - - - - --- - - You can clear the CMOS memory of date, time, and system setup parameters by erasing the CMOS RTC RAM data. Clear RTC RAM (2-pin CLRTC) This header allows you to clear the Real Time Clock (RTC) RAM...
User Guide
Page 23
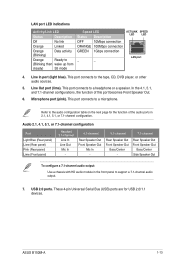
... mode Speed LED Status Description OFF 10Mbps connection ORANGE 100Mbps connection GREEN 1Gbps connection _ _ ACT/LINK SPEED LED LED LAN port 4. In the 4.1, 5.1, and 7.1-channel configurations, the function of the audio ports in the front panel to a microphone. These 4-pin Universal Serial Bus (USB) ports are for the function of this port becomes Front Speaker Out. 6. Line Out port (lime). Refer to a headphone or a speaker. USB 2.0 ports. Rear Speaker Out Front Speaker Out Bass/Center Side Speaker Out To configure a 7.1-channel audio output: Use a chassis...
... mode Speed LED Status Description OFF 10Mbps connection ORANGE 100Mbps connection GREEN 1Gbps connection _ _ ACT/LINK SPEED LED LED LAN port 4. In the 4.1, 5.1, and 7.1-channel configurations, the function of the audio ports in the front panel to a microphone. These 4-pin Universal Serial Bus (USB) ports are for the function of this port becomes Front Speaker Out. 6. Line Out port (lime). Refer to a headphone or a speaker. USB 2.0 ports. Rear Speaker Out Front Speaker Out Bass/Center Side Speaker Out To configure a 7.1-channel audio output: Use a chassis...
User Guide
Page 26
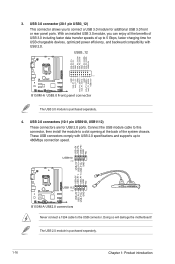
...- USB 2.0 connectors (10-1 pin USB910, USB1112) These connectors are for additional USB 3.0 front or rear panel ports. USB_P10- USB+5V NC GND USB+5V B150M-A USB1112 PIN 1 USB+5V USB_P12USB_P12+ GND B150M-A USB2.0 connectors Never connect a 1394 cable to a slot opening at the back of up to 5 Gbps, faster charging time for USB-chargeable devices, optimized power efficiency, and backward compatibility with USB 2.0 specifications and supports up to connect a USB 3.0 module for USB 2.0 ports. USB3+5V B150M-A USB3.0 Front panel connector...
...- USB 2.0 connectors (10-1 pin USB910, USB1112) These connectors are for additional USB 3.0 front or rear panel ports. USB_P10- USB+5V NC GND USB+5V B150M-A USB1112 PIN 1 USB+5V USB_P12USB_P12+ GND B150M-A USB2.0 connectors Never connect a 1394 cable to a slot opening at the back of up to 5 Gbps, faster charging time for USB-chargeable devices, optimized power efficiency, and backward compatibility with USB 2.0 specifications and supports up to connect a USB 3.0 module for USB 2.0 ports. USB3+5V B150M-A USB3.0 Front panel connector...
User Guide
Page 28
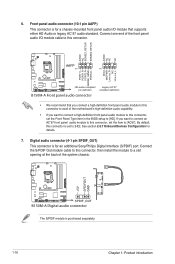
...-audio-compliant pin definition B150M-A Front panel audio connector Legacy AC'97 compliant definition • We recommend that supports either HD Audio or legacy AC`97 audio standard. If you want to connect an AC'97 front panel audio module to [AC97]. See section 2.6.7 Onboard Devices Configuration for a chassis-mounted front panel audio I /O module cable to this connector, set the item to this connector. 6. Front panel audio connector (10-1 pin AAFP) This connector is set the Front Panel Type item in the BIOS setup...
...-audio-compliant pin definition B150M-A Front panel audio connector Legacy AC'97 compliant definition • We recommend that supports either HD Audio or legacy AC`97 audio standard. If you want to connect an AC'97 front panel audio module to [AC97]. See section 2.6.7 Onboard Devices Configuration for a chassis-mounted front panel audio I /O module cable to this connector, set the item to this connector. 6. Front panel audio connector (10-1 pin AAFP) This connector is set the Front Panel Type item in the BIOS setup...
User Guide
Page 32
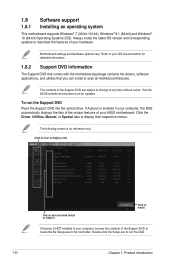
... version and corresponding updates to maximize the features of the Support DVD to locate the file Setup.exe in your OS documentation for detailed information. 1.8.2 Support DVD information The Support DVD that comes with the motherboard package contains the drivers, software applications, and utilities that you can install to your computer, browse the contents of your ASUS motherboard. 1.8 Software support 1.8.1 Installing an operating system This motherboard supports Windows® 7 (32-bit / 64-bit), Windows® 8.1 (64-bit) and Windows...
... version and corresponding updates to maximize the features of the Support DVD to locate the file Setup.exe in your OS documentation for detailed information. 1.8.2 Support DVD information The Support DVD that comes with the motherboard package contains the drivers, software applications, and utilities that you can install to your computer, browse the contents of your ASUS motherboard. 1.8 Software support 1.8.1 Installing an operating system This motherboard supports Windows® 7 (32-bit / 64-bit), Windows® 8.1 (64-bit) and Windows...

User Guide
Page 33
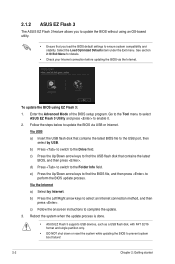
... automatically update your motherboard's driver, software and firmware Click to find and select the BIOS from file Click to select a boot logo Click to restore the BIOS in case you need to update the BIOS EZ Update requires an Internet connection either through a network or an ISP (Internet Service Provider). Copy the original motherboard BIOS using the ASUS Update utility. 2.1.1 EZ Update EZ Update is a utility that allows you can also manually update the saved BIOS and select a boot...
... automatically update your motherboard's driver, software and firmware Click to find and select the BIOS from file Click to select a boot logo Click to restore the BIOS in case you need to update the BIOS EZ Update requires an Internet connection either through a network or an ISP (Internet Service Provider). Copy the original motherboard BIOS using the ASUS Update utility. 2.1.1 EZ Update EZ Update is a utility that allows you can also manually update the saved BIOS and select a boot...
User Guide
Page 34
... update the BIOS without using EZ Flash 3: 1. c) Follow the onscreen instructions to the Drive field. Follow the steps below to update the BIOS via the Internet. b) Press to switch to complete the update. 3. Go to the Tool menu to select ASUS EZ Flash 3 Utility and press to prevent system boot failure! 2-2 Chapter 2: Getting started Via USB a) Insert the USB flash disk that contains the latest BIOS file to find the USB flash disk that you load the BIOS default settings...
... update the BIOS without using EZ Flash 3: 1. c) Follow the onscreen instructions to the Drive field. Follow the steps below to update the BIOS via the Internet. b) Press to switch to complete the update. 3. Go to the Tool menu to select ASUS EZ Flash 3 Utility and press to prevent system boot failure! 2-2 Chapter 2: Getting started Via USB a) Insert the USB flash disk that contains the latest BIOS file to find the USB flash disk that you load the BIOS default settings...
User Guide
Page 35
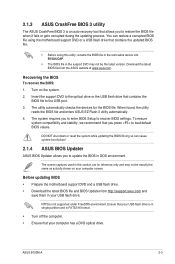
... boot failure! 2.1.4 ASUS BIOS Updater ASUS BIOS Updater allows you press to load default BIOS values. Turn on your computer has a DVD optical drive. DO NOT shut down or reset the system while updating the BIOS! ASUS B150M-A 2-3 Insert the support DVD to restore the BIOS file when it fails or gets corrupted during the updating process. When found, the utility reads the BIOS file and enters ASUS EZ Flash 3 utility automatically. 4. Before updating BIOS • Prepare the motherboard support DVD and a USB flash drive. • Download the latest BIOS file and BIOS Updater...
... boot failure! 2.1.4 ASUS BIOS Updater ASUS BIOS Updater allows you press to load default BIOS values. Turn on your computer has a DVD optical drive. DO NOT shut down or reset the system while updating the BIOS! ASUS B150M-A 2-3 Insert the support DVD to restore the BIOS file when it fails or gets corrupted during the updating process. When found, the utility reads the BIOS file and enters ASUS EZ Flash 3 utility automatically. 4. Before updating BIOS • Prepare the motherboard support DVD and a USB flash drive. • Download the latest BIOS file and BIOS Updater...
User Guide
Page 36
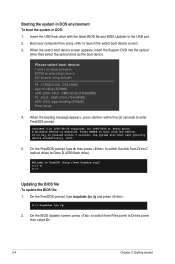
... to boot from Files panel to boot using defaults P2: ST3808110AS (76319MB) aigo miniking (250MB) UEFI: (FAT) ASUS DRW-2014L1T(4458MB) P1: ASUS DRW-2014L1T(4458MB) UEFI: (FAT) aigo miniking (250MB) Enter Setup 4. Please select boot device: and to move selection ENTER to select boot device ESC to Drives panel then select D:. 2-4 Chapter 2: Getting started D:/> bupdater /pc /g 2. If no key is detected. boot: 5. On the BIOS Updater screen, press to switch from the DVD/CD...
... to boot from Files panel to boot using defaults P2: ST3808110AS (76319MB) aigo miniking (250MB) UEFI: (FAT) ASUS DRW-2014L1T(4458MB) P1: ASUS DRW-2014L1T(4458MB) UEFI: (FAT) aigo miniking (250MB) Enter Setup 4. Please select boot device: and to move selection ENTER to select boot device ESC to Drives panel then select D:. 2-4 Chapter 2: Getting started D:/> bupdater /pc /g 2. If no key is detected. boot: 5. On the BIOS Updater screen, press to switch from the DVD/CD...
User Guide
Page 38
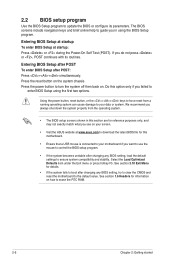
... BIOS setup screens shown in using the first two options. Entering BIOS Setup after POST To enter BIOS Setup after changing any BIOS setting, load the default settings to ensure system compatibility and stability. Do this motherboard. • Ensure that a USB mouse is connected to your motherboard if you want to use the mouse to control the BIOS setup program. • If the system becomes unstable after changing any BIOS setting, try to clear the CMOS and reset the motherboard to boot after POST: Press ++ simultaneously. Entering BIOS Setup...
... BIOS setup screens shown in using the first two options. Entering BIOS Setup after POST To enter BIOS Setup after changing any BIOS setting, load the default settings to ensure system compatibility and stability. Do this motherboard. • Ensure that a USB mouse is connected to your motherboard if you want to use the mouse to control the BIOS setup program. • If the system becomes unstable after changing any BIOS setting, try to clear the CMOS and reset the motherboard to boot after POST: Press ++ simultaneously. Entering BIOS Setup...
User Guide
Page 39
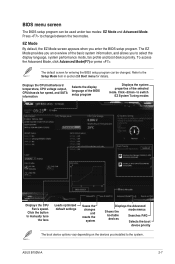
... switch EZ System Tuning modes Displays the CPU Fan's speed. Displays the CPU/motherboard temperature, CPU voltage output, CPU/chassis fan speed, and SATA information Selects the display language of the BIOS setup program Displays the system properties of the basic system information, and allows you an overview of the selected mode. ASUS B150M-A 2-7 Refer to select the display language, system performance mode, fan profile and boot device priority. The EZ Mode provides you to the Setup Mode item in section 2.8 Boot menu for entering...
... switch EZ System Tuning modes Displays the CPU Fan's speed. Displays the CPU/motherboard temperature, CPU voltage output, CPU/chassis fan speed, and SATA information Selects the display language of the BIOS setup program Displays the system properties of the basic system information, and allows you an overview of the selected mode. ASUS B150M-A 2-7 Refer to select the display language, system performance mode, fan profile and boot device priority. The EZ Mode provides you to the Setup Mode item in section 2.8 Boot menu for entering...


