AP1720-E2 English version manual
Page 12
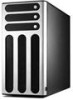
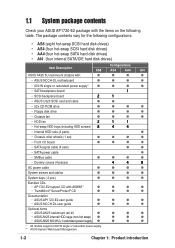
...SATA hard disk drives) • AI4 (four internal SATA/IDE hard disk drives) Item Description Configurations AS8 AS4 AA4 AI4 ASUS AK25 5U rackmount chassis with: • ASUS NCCH-DL motherboard • 600 W single or redundant power supply* • SATA backplane board 1 &#...contents Check your ASUS AP1720-E2 package with ASWM** • TrendMicro® ServerProtect® CD Documentation • ASUS AP1720-E2 user guide • ASUS NCCH-DL user guide Optional items • ASUS AK25 rackmount rail kit • ASUS AK25 internal HDD cage (non-hot swap) • ASUS AK25 600 ...
...SATA hard disk drives) • AI4 (four internal SATA/IDE hard disk drives) Item Description Configurations AS8 AS4 AA4 AI4 ASUS AK25 5U rackmount chassis with: • ASUS NCCH-DL motherboard • 600 W single or redundant power supply* • SATA backplane board 1 &#...contents Check your ASUS AP1720-E2 package with ASWM** • TrendMicro® ServerProtect® CD Documentation • ASUS AP1720-E2 user guide • ASUS NCCH-DL user guide Optional items • ASUS AK25 rackmount rail kit • ASUS AK25 internal HDD cage (non-hot swap) • ASUS AK25 600 ...
AP1720-E2 English version manual
Page 13
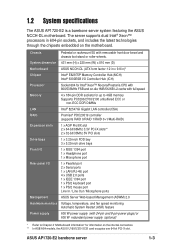
...Headphone port 1 x Microphone port Rear panel I /O Controller Hub (ICH) Processor Socket 604 for information on the internal connectors. ** In AS8/AS4 models, the ASUS U160/U320 SCSI card occupies one 64-bit PCI-X slot. The server supports dual Intel® Xeon™ processors in )* Chipset Intel®... 600 W power supply (with removable front door bezel and chassis foot stand or roller-wheels. ASUS AP1720-E2 barebone server 1-3 System dimension 431 mm (H) x 220 mm (W) x 510 mm (D) Motherboard ASUS NCCH-DL (ATX form factor: 12 in x 9.8 in 604-pin sockets, and includes the...
...Headphone port 1 x Microphone port Rear panel I /O Controller Hub (ICH) Processor Socket 604 for information on the internal connectors. ** In AS8/AS4 models, the ASUS U160/U320 SCSI card occupies one 64-bit PCI-X slot. The server supports dual Intel® Xeon™ processors in )* Chipset Intel®... 600 W power supply (with removable front door bezel and chassis foot stand or roller-wheels. ASUS AP1720-E2 barebone server 1-3 System dimension 431 mm (H) x 220 mm (W) x 510 mm (D) Motherboard ASUS NCCH-DL (ATX form factor: 12 in x 9.8 in 604-pin sockets, and includes the...
AP1720-E2 English version manual
Page 16
... models Power supply module PS/2 mouse port PS/2 keyboard port Serial ports Parallel port USB ports Microphone port Line Out port SCSI connectors* * On AS8/AS4 configuration only.
... models Power supply module PS/2 mouse port PS/2 keyboard port Serial ports Parallel port USB ports Microphone port Line Out port SCSI connectors* * On AS8/AS4 configuration only.
AP1720-E2 English version manual
Page 20
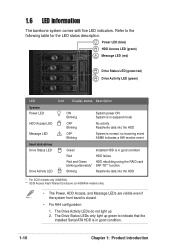
... monitor event Green Installed HDD is in suspend mode No activity Read/write data into the HDD * For SCSI models only (AS8/AS4) ** SCSI Access Fault-Tolerant Enclosure (on AS8/AS4 models only) • The Power, HDD Access, and Message LEDs are visible even if the system front bezel is closed. •...
... monitor event Green Installed HDD is in suspend mode No activity Read/write data into the HDD * For SCSI models only (AS8/AS4) ** SCSI Access Fault-Tolerant Enclosure (on AS8/AS4 models only) • The Power, HDD Access, and Message LEDs are visible even if the system front bezel is closed. •...

AP1720-E2 English version manual
Page 39
2.7 Hard disk drives 2.7.1 Installing a hot-swap SATA/SCSI hard disk drive If you purchased an AS8, AS4, or AA4 configured model, follow these instructions to access the hot-swap drive trays. 2. Spring lock Tray lever 3. The drive tray ejects slightly after you .... An empty drive tray requires a metal bracket for support. Firmly hold the tray lever and pull the drive tray out of the bay. 4. Metal bracket ASUS AP1720-E2 barebone server 2-19 Open the front bezel to install a hot-swap SATA or SCSI hard disk drive (HDD). 1. Release a drive tray by pushing the spring...
2.7 Hard disk drives 2.7.1 Installing a hot-swap SATA/SCSI hard disk drive If you purchased an AS8, AS4, or AA4 configured model, follow these instructions to access the hot-swap drive trays. 2. Spring lock Tray lever 3. The drive tray ejects slightly after you .... An empty drive tray requires a metal bracket for support. Firmly hold the tray lever and pull the drive tray out of the bay. 4. Metal bracket ASUS AP1720-E2 barebone server 2-19 Open the front bezel to install a hot-swap SATA or SCSI hard disk drive (HDD). 1. Release a drive tray by pushing the spring...
AP1720-E2 English version manual
Page 48
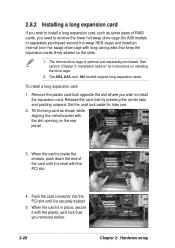
... is in place, secure it is level with the slot opening on installing the drive cage. 2. When the card is optional and separately purchased. The AS4, AA4, and AI4 models support long expansion cards.
... is in place, secure it is level with the slot opening on installing the drive cage. 2. When the card is optional and separately purchased. The AS4, AA4, and AI4 models support long expansion cards.
AP1720-E2 English version manual
Page 54
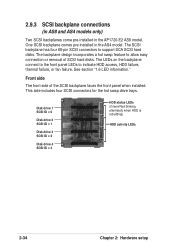
... easy connection or removal of the SCSI backplane faces the front panel when installed. One SCSI backplane comes pre-installed in the AP1720-E2 AS8 model. 2.9.3 SCSI backplane connections (in AS8 and AS4 models only) Two SCSI backplanes come pre-installed in the AS4 model. Front side The front side of SCSI hard disks.
... easy connection or removal of the SCSI backplane faces the front panel when installed. One SCSI backplane comes pre-installed in the AP1720-E2 AS8 model. 2.9.3 SCSI backplane connections (in AS8 and AS4 models only) Two SCSI backplanes come pre-installed in the AS4 model. Front side The front side of SCSI hard disks.
AP1720-E2 English version manual
Page 78
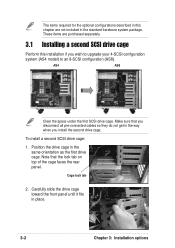
... faces the rear panel. Carefully slide the drive cage toward the front panel until it fits in the same orientation as the first drive cage. AS4 AS8 Clear the space under the first SCSI drive cage. To install a second SCSI drive cage: 1. Position the drive cage in place. 3-2 Chapter 3: Installation options... install the second drive cage. Cage lock tab 2. These items are not included in the way when you wish to upgrade your 4-SCSI configuration system (AS4 model) to an 8-SCSI configuration (AS8).
... faces the rear panel. Carefully slide the drive cage toward the front panel until it fits in the same orientation as the first drive cage. AS4 AS8 Clear the space under the first SCSI drive cage. To install a second SCSI drive cage: 1. Position the drive cage in place. 3-2 Chapter 3: Installation options... install the second drive cage. Cage lock tab 2. These items are not included in the way when you wish to upgrade your 4-SCSI configuration system (AS4 model) to an 8-SCSI configuration (AS8).
AP1720-E2 English version manual
Page 81
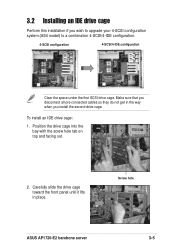
Position the drive cage into the bay with the screw hole tab on top and facing out. 2. Screw hole ASUS AP1720-E2 barebone server 3-5 Make sure that you disconnect all pre-connected cables so they do not get in place. Carefully slide the drive cage toward the ...front panel until it fits in the way when you wish to upgrade your 4-SCSI configuration system (AS4 model) to a combination 4-SCSI/4-IDE configuration. 4-SCSI configuration 4-SCSI/4-IDE configuration Clear the space under the first SCSI drive cage. To install an IDE ...
Position the drive cage into the bay with the screw hole tab on top and facing out. 2. Screw hole ASUS AP1720-E2 barebone server 3-5 Make sure that you disconnect all pre-connected cables so they do not get in place. Carefully slide the drive cage toward the ...front panel until it fits in the way when you wish to upgrade your 4-SCSI configuration system (AS4 model) to a combination 4-SCSI/4-IDE configuration. 4-SCSI configuration 4-SCSI/4-IDE configuration Clear the space under the first SCSI drive cage. To install an IDE ...