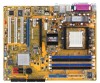
A8R-MVP User's Manual for English Edtion
Page 4
...switch 3-2 Chapter 4: BIOS setup 4.1 Managing and updating your BIOS 4-1 4.1.1 ASUS Update utility 4-1 4.1.2 Creating a bootable floppy disk 4-4 4.1.3 ASUS EZ Flash utility 4-5 4.1.4 AFUDOS utility 4-6 4.1.5 ASUS CrashFree BIOS 2 utility 4-9 4.2 BIOS setup program 4-11 4.2.1 BIOS menu ...screen 4-12 4.2.2 Menu bar 4-12 4.2.3 Navigation keys 4-12 4.2.4 Menu items 4-13 4.2.5 Sub-menu items 4-13 4.2.6 Configuration fields 4-13 4.2.7 Pop-up window...
...switch 3-2 Chapter 4: BIOS setup 4.1 Managing and updating your BIOS 4-1 4.1.1 ASUS Update utility 4-1 4.1.2 Creating a bootable floppy disk 4-4 4.1.3 ASUS EZ Flash utility 4-5 4.1.4 AFUDOS utility 4-6 4.1.5 ASUS CrashFree BIOS 2 utility 4-9 4.2 BIOS setup program 4-11 4.2.1 BIOS menu ...screen 4-12 4.2.2 Menu bar 4-12 4.2.3 Navigation keys 4-12 4.2.4 Menu items 4-13 4.2.5 Sub-menu items 4-13 4.2.6 Configuration fields 4-13 4.2.7 Pop-up window...
A8R-MVP User's Manual for English Edtion
Page 33
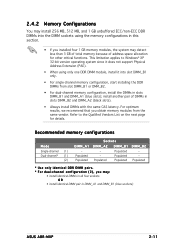
... DMM_B2. • For dual-channel memory configuration, install the DIMMs in slots DIMM_B1 and DIMM_A1 (blue slots); Refer to Windows® XP 32-bit version operating system since it into slot DIMM_B1 only. • For single-channel memory configuration, start...* For dual-channel configuration (2), you may detect less than 3 GB of total memory because of DIMMs in DIMM_A1 and DIMM_B1 (blue sockets) ASUS A8R-MVP 2-11 Recommended memory configurations Mode Single-channel (1) Dual-channel* (1) (2) DIMM_A1 - install another pair of address space allocation for details. Populated ...
... DMM_B2. • For dual-channel memory configuration, install the DIMMs in slots DIMM_B1 and DIMM_A1 (blue slots); Refer to Windows® XP 32-bit version operating system since it into slot DIMM_B1 only. • For single-channel memory configuration, start...* For dual-channel configuration (2), you may detect less than 3 GB of total memory because of DIMMs in DIMM_A1 and DIMM_B1 (blue sockets) ASUS A8R-MVP 2-11 Recommended memory configurations Mode Single-channel (1) Dual-channel* (1) (2) DIMM_A1 - install another pair of address space allocation for details. Populated ...
A8R-MVP User's Manual for English Edtion
Page 44
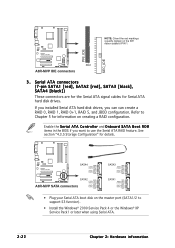
... Windows® 2000 Service Pack 4 or the Windows® XP Service Pack1 or later when using Serial ATA. 2-22 Chapter 2: Hardware information A8R-MVP ® SATA4 GND RSATA_TXP4 RSATA_TXN4 GND RSATA_RXP4 RSATA_RXN4 GND A8R-MVP...O n b o a r d S A T A B o o t R O M items in the BIOS if you can can create a RAID 0, RAID 1, RAID 0+1, RAID 5, and JBOD configuration. Refer to PIN 1. PRI_IDE SEC_IDE A8R-MVP ® A8R-MVP IDE connectors PIN 1 3. NOTE: Orient the red markings (usually zigzag) on the IDE ribbon cable to Chapter 5 for information on the master port (SATA1/2 to...
... Windows® 2000 Service Pack 4 or the Windows® XP Service Pack1 or later when using Serial ATA. 2-22 Chapter 2: Hardware information A8R-MVP ® SATA4 GND RSATA_TXP4 RSATA_TXN4 GND RSATA_RXP4 RSATA_RXN4 GND A8R-MVP...O n b o a r d S A T A B o o t R O M items in the BIOS if you can can create a RAID 0, RAID 1, RAID 0+1, RAID 5, and JBOD configuration. Refer to PIN 1. PRI_IDE SEC_IDE A8R-MVP ® A8R-MVP IDE connectors PIN 1 3. NOTE: Orient the red markings (usually zigzag) on the IDE ribbon cable to Chapter 5 for information on the master port (SATA1/2 to...
A8R-MVP User's Manual for English Edtion
Page 54
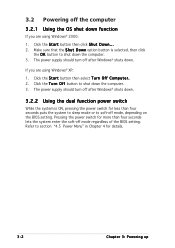
... r n O f f C o m p u t e r . 2. 3.2 Powering off the computer 3.2.1 Using the OS shut down function If you are using Windows® XP: 1. Click the S t a r t button then click S h u t D o w n . . . 2. If you are using Windows® 2000: 1. Click the T u r n O f f button to section "4.5 Power Menu" in Chapter 4 for details. 3-2 Chapter 3: Powering up Refer to...enter the soft-off mode regardless of the BIOS setting. The power supply should turn off after Windows® shuts down . 3.2.2 Using the dual function power switch While the system is selected, then click the O...
... r n O f f C o m p u t e r . 2. 3.2 Powering off the computer 3.2.1 Using the OS shut down function If you are using Windows® XP: 1. Click the S t a r t button then click S h u t D o w n . . . 2. If you are using Windows® 2000: 1. Click the T u r n O f f button to section "4.5 Power Menu" in Chapter 4 for details. 3-2 Chapter 3: Powering up Refer to...enter the soft-off mode regardless of the BIOS setting. The power supply should turn off after Windows® shuts down . 3.2.2 Using the dual function power switch While the system is selected, then click the O...
A8R-MVP User's Manual for English Edtion
Page 57
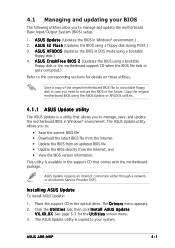
... i l i t i e s screen menu. 3. The D r i v e r s menu appears. 2. A S U S A F U D O S (Updates the BIOS in Windows® environment. X X . ASUS A8R-MVP 4-1 Place the support CD in the future. A S U S E Z F l a s h (Updates the BIOS using a bootable floppy disk.) 4. See page 5-3 for details on these utilities... the BIOS file fails or gets corrupted.) Refer to manage and update the motherboard Basic Input/Output System (BIOS) setup. 1. Installing ASUS Update To install ASUS Update: 1. A S U S U p d a t e (Updates the BIOS in the support CD that allows you need ...
... i l i t i e s screen menu. 3. The D r i v e r s menu appears. 2. A S U S A F U D O S (Updates the BIOS in Windows® environment. X X . ASUS A8R-MVP 4-1 Place the support CD in the future. A S U S E Z F l a s h (Updates the BIOS using a bootable floppy disk.) 4. See page 5-3 for details on these utilities... the BIOS file fails or gets corrupted.) Refer to manage and update the motherboard Basic Input/Output System (BIOS) setup. 1. Installing ASUS Update To install ASUS Update: 1. A S U S U p d a t e (Updates the BIOS in the support CD that allows you need ...
A8R-MVP User's Manual for English Edtion
Page 58
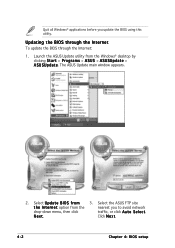
... S t a r t > P r o g r a m s > A S U S > A S U S U p d a t e > A S U S U p d a t e. Click N e x t. 4-2 Chapter 4: BIOS setup N e x t. Select the ASUS FTP site t h e I O S f r o m 3. The ASUS Update main window appears. 2. Quit all Windows® applications before you to avoid network drop-down menu, then click traffic, or click A u t o S e l e c t. Updating the BIOS through the Internet To update the BIOS through the Internet: 1. Launch the ASUS Update utility from the nearest you...
... S t a r t > P r o g r a m s > A S U S > A S U S U p d a t e > A S U S U p d a t e. Click N e x t. 4-2 Chapter 4: BIOS setup N e x t. Select the ASUS FTP site t h e I O S f r o m 3. The ASUS Update main window appears. 2. Quit all Windows® applications before you to avoid network drop-down menu, then click traffic, or click A u t o S e l e c t. Updating the BIOS through the Internet To update the BIOS through the Internet: 1. Launch the ASUS Update utility from the nearest you...

A8R-MVP User's Manual for English Edtion
Page 59
... the utility to complete the update process. Click Next. 5. Select U p d a t e B I O S f r o m a f i l e option from the Windows® desktop by clicking S t a r t > P r o g r a m s > A S U S > A S U S U p d a t e > A S U S U p d a t e. Locate the BIOS file from the O p e n window, then click S a v e. 4. Follow the screen instructions to avail all its features. ASUS A8R-MVP 4-3 4. The ASUS Update main window appears. 2. From the FTP site, select the BIOS version that you wish to...
... the utility to complete the update process. Click Next. 5. Select U p d a t e B I O S f r o m a f i l e option from the Windows® desktop by clicking S t a r t > P r o g r a m s > A S U S > A S U S U p d a t e > A S U S U p d a t e. Locate the BIOS file from the O p e n window, then click S a v e. 4. Follow the screen instructions to avail all its features. ASUS A8R-MVP 4-3 4. The ASUS Update main window appears. 2. From the FTP site, select the BIOS version that you wish to...
A8R-MVP User's Manual for English Edtion
Page 60
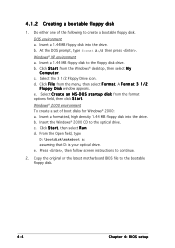
...; 2000 environment To create a set of the following to create a bootable floppy disk. Insert the Windows® 2000 CD to the floppy disk drive. Click S t a r t, then select R u n. DOS environment a. Click F i l e from the Windows® desktop, then select M y C o m p u t e r. Select C r e a t e a n M S - b. Copy the original...environment a. d. Insert a formatted, high density 1.44 MB floppy disk into the drive. e. Do either one of boot disks for Windows® 2000: a. Select the 3 1/2 Floppy Drive icon. Press , then follow screen instructions to the bootable floppy disk. 4-4...
...; 2000 environment To create a set of the following to create a bootable floppy disk. Insert the Windows® 2000 CD to the floppy disk drive. Click S t a r t, then select R u n. DOS environment a. Click F i l e from the Windows® desktop, then select M y C o m p u t e r. Select C r e a t e a n M S - b. Copy the original...environment a. d. Insert a formatted, high density 1.44 MB floppy disk into the drive. e. Do either one of boot disks for Windows® 2000: a. Select the 3 1/2 Floppy Drive icon. Press , then follow screen instructions to the bootable floppy disk. 4-4...
A8R-MVP User's Manual for English Edtion
Page 69
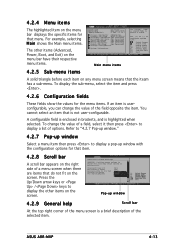
.... A configurable field is not user-configurable. Advanced PCI/PnP Settings WARNING: Setting wrong values in brackets, and is a brief description of options. ASUS A8R-MVP 4-13 For example, selecting M a i n shows the Main menu items. The other items on the screen. To display the sub-menu, ... [+] or [-] to select a field. You cannot select an item that the iteam has a sub-menu. Refer to "4.2.7 Pop-up window." 4.2.7 Pop-up window Select a menu item then press to display a list of the selected item. Plug And Play O/S PCI Latency Timer Allocate IRQ to display...
.... A configurable field is not user-configurable. Advanced PCI/PnP Settings WARNING: Setting wrong values in brackets, and is a brief description of options. ASUS A8R-MVP 4-13 For example, selecting M a i n shows the Main menu items. The other items on the screen. To display the sub-menu, ... [+] or [-] to select a field. You cannot select an item that the iteam has a sub-menu. Refer to "4.2.7 Pop-up window." 4.2.7 Pop-up window Select a menu item then press to display a list of the selected item. Plug And Play O/S PCI Latency Timer Allocate IRQ to display...
A8R-MVP User's Manual for English Edtion
Page 99
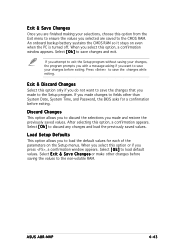
... changes, the program prompts you with a message asking if you made and restore the previously saved values. Select [ O k ] to discard the selections you press , a confirmation window appears. ASUS A8R-MVP 4-43 When you to load default values. Discard Changes This option allows you select this option, a confirmation appears. After selecting this option, a confirmation...
... changes, the program prompts you with a message asking if you made and restore the previously saved values. Select [ O k ] to discard the selections you press , a confirmation window appears. ASUS A8R-MVP 4-43 When you to load default values. Discard Changes This option allows you select this option, a confirmation appears. After selecting this option, a confirmation...
A8R-MVP User's Manual for English Edtion
Page 103
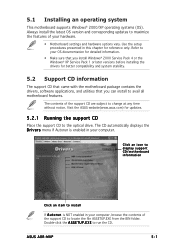
.... ASUS A8R-MVP 5-1 Refer to your computer, browse the contents of the support CD are subject to avail all motherboard features. Double-click the A S S E T U P . 5.1 Installing an operating system This motherboard supports Windows® 2000/XP operating systems (OS). Visit the ASUS website(www.asus.com... the setup procedures presented in your OS documentation for detailed information. • Make sure that you install Windows® 2000 Service Pack 4 or the Windows® XP Service Pack 1 or later versions before installing the drivers for updates. 5.2.1 Running the support...
.... ASUS A8R-MVP 5-1 Refer to your computer, browse the contents of the support CD are subject to avail all motherboard features. Double-click the A S S E T U P . 5.1 Installing an operating system This motherboard supports Windows® 2000/XP operating systems (OS). Visit the ASUS website(www.asus.com... the setup procedures presented in your OS documentation for detailed information. • Make sure that you install Windows® 2000 Service Pack 4 or the Windows® XP Service Pack 1 or later versions before installing the drivers for updates. 5.2.1 Running the support...
A8R-MVP User's Manual for English Edtion
Page 105
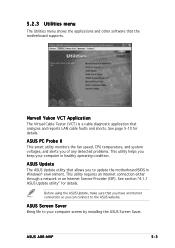
...helps you keep your computer screen by installing the ASUS Screen Saver. See section "4.1.1 ASUS Update utility" for details. ASUS A8R-MVP 5-3 ASUS Update The ASUS Update utility that you have an Internet connection so ...you to update the motherboard BIOS in healthy operating condition. See page 5-10 for details. ASUS Screen Saver Bring life to the ASUS.... Before using the ASUS Update, make sure that allows you can connect to your computer in...
...helps you keep your computer screen by installing the ASUS Screen Saver. See section "4.1.1 ASUS Update utility" for details. ASUS A8R-MVP 5-3 ASUS Update The ASUS Update utility that you have an Internet connection so ...you to update the motherboard BIOS in healthy operating condition. See page 5-10 for details. ASUS Screen Saver Bring life to the ASUS.... Before using the ASUS Update, make sure that allows you can connect to your computer in...
A8R-MVP User's Manual for English Edtion
Page 110
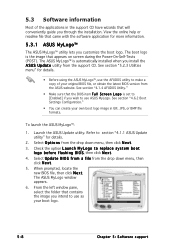
...x t. View the online help or readme file that will conveniently guide you through the installation. Select O p t i o n s from the ASUS website. The ASUS MyLogo window appears. 6. From the left window pane, select the folder that contains the image you intend to use the AFUDOS utility to section... "4.1.1 ASUS Update utility" for details. 2. See section "4.6.2 Boot Settings Configuration." • You can create your original ...
...x t. View the online help or readme file that will conveniently guide you through the installation. Select O p t i o n s from the ASUS website. The ASUS MyLogo window appears. 6. From the left window pane, select the folder that contains the image you intend to use the AFUDOS utility to section... "4.1.1 ASUS Update utility" for details. 2. See section "4.6.2 Boot Settings Configuration." • You can create your original ...
A8R-MVP User's Manual for English Edtion
Page 111
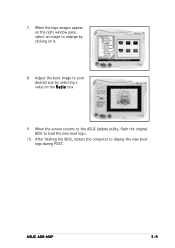
Adjust the boot image to load the new boot logo. 10. When the screen returns to the ASUS Update utility, flash the original BIOS to your desired size by clicking on the right window pane, select an image to display the new boot logo during POST. After flashing the BIOS, restart the computer to enlarge by selecting a value on the R a t i o box. 9. 7. ASUS A8R-MVP 5-9 When the logo images appear on it. 8.
Adjust the boot image to load the new boot logo. 10. When the screen returns to the ASUS Update utility, flash the original BIOS to your desired size by clicking on the right window pane, select an image to display the new boot logo during POST. After flashing the BIOS, restart the computer to enlarge by selecting a value on the R a t i o box. 9. 7. ASUS A8R-MVP 5-9 When the logo images appear on it. 8.
A8R-MVP User's Manual for English Edtion
Page 112
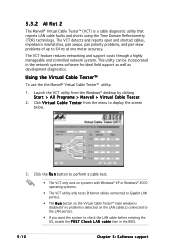
.... 3. Click the R u n button to perform a cable test. • The VCT only runs on systems with Windows® XP or Windows® 2000 operating systems. • The VCT utility only tests Ethernet cables connected to Gigabit LAN port(s). • The... k L A N c a b l e item in the network systems software for ideal field support as well as development diagnostics. Click V i r t u a l C a b l e T e s t e r from the Windows® desktop by clicking Start > All Programs > Marvell > Virtual Cable Tester. 2. Using the Virtual Cable Tester™ To use the the Marvell® Virtual Cable...
.... 3. Click the R u n button to perform a cable test. • The VCT only runs on systems with Windows® XP or Windows® 2000 operating systems. • The VCT utility only tests Ethernet cables connected to Gigabit LAN port(s). • The... k L A N c a b l e item in the network systems software for ideal field support as well as development diagnostics. Click V i r t u a l C a b l e T e s t e r from the Windows® desktop by clicking Start > All Programs > Marvell > Virtual Cable Tester. 2. Using the Virtual Cable Tester™ To use the the Marvell® Virtual Cable...
A8R-MVP User's Manual for English Edtion
Page 113
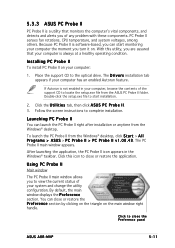
... components. To launch the PC Probe II from the Windows® desktop. After launching the application, the PC Probe II icon appears in your system and change the utility configuration. You can close the Preference panel ASUS A8R-MVP 5-11 PC Probe II senses fan rotations, CPU temperature..., and system voltages, among others. 5.3.3 ASUS PC Probe II PC Probe II is not enabled in the Windows® taskbar. Because PC Probe II is always at a...
... components. To launch the PC Probe II from the Windows® desktop. After launching the application, the PC Probe II icon appears in your system and change the utility configuration. You can close the Preference panel ASUS A8R-MVP 5-11 PC Probe II senses fan rotations, CPU temperature..., and system voltages, among others. 5.3.3 ASUS PC Probe II PC Probe II is not enabled in the Windows® taskbar. Because PC Probe II is always at a...
A8R-MVP User's Manual for English Edtion
Page 114
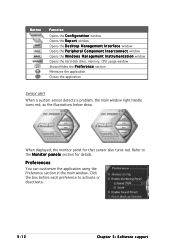
... You can customize the application using the Preference section in the main window. When displayed, the monitor panel for details. Button Function Opens the C o n f i g u r a t i o n window Opens the R e p o r t window Opens the D e s k t o p M a n a g e m e n t I n t e r f a c e window Opens the P e r i p h e r a l C o m p o n e n t I n t e r c o n n e c t window Opens the W i n d o w s M a n a g e m e n t I n s t r u m e n t a t i o n window Opens the hard disk drive, memory, CPU usage window Shows/Hides the P r e f e r e n c e section Minimizes the application Closes the application...
... You can customize the application using the Preference section in the main window. When displayed, the monitor panel for details. Button Function Opens the C o n f i g u r a t i o n window Opens the R e p o r t window Opens the D e s k t o p M a n a g e m e n t I n t e r f a c e window Opens the P e r i p h e r a l C o m p o n e n t I n t e r c o n n e c t window Opens the W i n d o w s M a n a g e m e n t I n s t r u m e n t a t i o n window Opens the hard disk drive, memory, CPU usage window Shows/Hides the P r e f e r e n c e section Minimizes the application Closes the application...
A8R-MVP User's Manual for English Edtion
Page 115
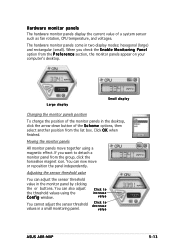
... C o n f i g window. If you check the E n a b l e M o n i t o r i n g P a n e l option from the group, click the horseshoe magnet icon. You can also adjust the threshold values using a magnetic effect. Click to increase value Click to detach a monitor panel from the P r e f e r e n c e section, the monitor panels appear on your computer's desktop. When you want to decrease value ASUS A8R-MVP 5-13...
... C o n f i g window. If you check the E n a b l e M o n i t o r i n g P a n e l option from the group, click the horseshoe magnet icon. You can also adjust the threshold values using a magnetic effect. Click to increase value Click to detach a monitor panel from the P r e f e r e n c e section, the monitor panels appear on your computer's desktop. When you want to decrease value ASUS A8R-MVP 5-13...
A8R-MVP User's Manual for English Edtion
Page 116
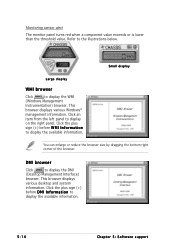
... reduce the browser size by dragging the bottom right corner of the browser. This browser displays various desktop and system information. This browser displays various Windows® management information. Small display Large display WMI browser Click to display on the right panel. Monitoring sensor alert The monitor panel turns red when...
... reduce the browser size by dragging the bottom right corner of the browser. This browser displays various desktop and system information. This browser displays various Windows® management information. Small display Large display WMI browser Click to display on the right panel. Monitoring sensor alert The monitor panel turns red when...
A8R-MVP User's Manual for English Edtion
Page 117
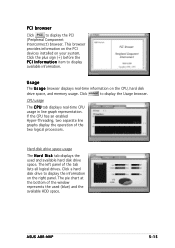
... displays the used (blue) and the available HDD space. The left panel of the window represents the used and available hard disk drive space. The pie chart at the bottom of the tab lists all logical drives. ASUS A8R-MVP 5-15 PCI browser Click to display available information. This browser provides information on the...
... displays the used (blue) and the available HDD space. The left panel of the window represents the used and available hard disk drive space. The pie chart at the bottom of the tab lists all logical drives. ASUS A8R-MVP 5-15 PCI browser Click to display available information. This browser provides information on the...


