Motherboard DIY Troubleshooting Guide
Page 4
... 2.1.2 Using AFLASH to update the BIOS 2-4 2.1.3 Recovering the BIOS with CrashFree BIOS 2 ....... 2-7 2.2 BIOS Setup program 2-9 2.2.1 BIOS menu bar 2-9 2.2.2 Legend bar 2-10 2.3 Main Menu 2-11 2.3.1 Primary and Secondary ... Chapter 3: Software support 3.1 Install an operating system 3-2 3.2 Support CD information 3-2 3.2.1 Running the support CD 3-2 3.2.2 Drivers menu 3-3 3.2.3 Utilities menu 3-3 3.2.4 ASUS Contact Information 3-4 3.3 ASUS Instant Music Lite 3-5 3.4 RAID 0 / RAID 1 / RAID 0 + 1 Configurations 3-7 3.4.1 Install the Serial ATA (SATA) hard disks 3-8 3.4.2 Enter VIA...
... 2.1.2 Using AFLASH to update the BIOS 2-4 2.1.3 Recovering the BIOS with CrashFree BIOS 2 ....... 2-7 2.2 BIOS Setup program 2-9 2.2.1 BIOS menu bar 2-9 2.2.2 Legend bar 2-10 2.3 Main Menu 2-11 2.3.1 Primary and Secondary ... Chapter 3: Software support 3.1 Install an operating system 3-2 3.2 Support CD information 3-2 3.2.1 Running the support CD 3-2 3.2.2 Drivers menu 3-3 3.2.3 Utilities menu 3-3 3.2.4 ASUS Contact Information 3-4 3.3 ASUS Instant Music Lite 3-5 3.4 RAID 0 / RAID 1 / RAID 0 + 1 Configurations 3-7 3.4.1 Install the Serial ATA (SATA) hard disks 3-8 3.4.2 Enter VIA...

Motherboard DIY Troubleshooting Guide
Page 27
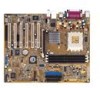
1.10.4 Wi-Fi slot The Wi-Fi (Wireless Fidelity) slot supports the ASUS WiFi-b™ module. The Wi-Fi slot conforms to the Institute of Electrical and Electronics Engineers (IEEE) 802.11b/g standard for product updates. ASUS A7V600 SE Motherboard 1-17 Visit the ASUS website (www.asus.com) for wireless devices operating in the 2.4 GHz frequency band. A7V600 SE ® WIFI A7V600 SE WIRELESS Connectors ASUS WiFi-b™ Setup • The PCI 6 slot and the Wi-Fi slot can not be used at the same time. • The ASUS WiFi-b™ module is purchased separately.
1.10.4 Wi-Fi slot The Wi-Fi (Wireless Fidelity) slot supports the ASUS WiFi-b™ module. The Wi-Fi slot conforms to the Institute of Electrical and Electronics Engineers (IEEE) 802.11b/g standard for product updates. ASUS A7V600 SE Motherboard 1-17 Visit the ASUS website (www.asus.com) for wireless devices operating in the 2.4 GHz frequency band. A7V600 SE ® WIFI A7V600 SE WIRELESS Connectors ASUS WiFi-b™ Setup • The PCI 6 slot and the Wi-Fi slot can not be used at the same time. • The ASUS WiFi-b™ module is purchased separately.
Motherboard DIY Troubleshooting Guide
Page 29
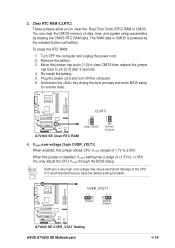
... data. Setting to a very high core voltage may adjust the CPU VCORE through the BIOS Setup. A7V600 SE OVER_VOLT1 12 23 Enable Disable (Default) ® A7V600 SE OVER_VOLT Setting ASUS A7V600 SE Motherboard 1-19 The RAM data in CMOS. VCORE over-voltage (3-pin OVER_VOLT1) When enabled, this... VCORE ranges of date, time, and system setup parameters by the onboard button cell battery. To erase the RTC RAM: 1. You can clear the CMOS memory of 1.7V to pin [2-3] after 3 seconds. 4. Re-install the battery. 5. A7V600 SE ® A7V600 SE Clear RTC RAM CLRTC 2 1 Clear CMOS ...
... data. Setting to a very high core voltage may adjust the CPU VCORE through the BIOS Setup. A7V600 SE OVER_VOLT1 12 23 Enable Disable (Default) ® A7V600 SE OVER_VOLT Setting ASUS A7V600 SE Motherboard 1-19 The RAM data in CMOS. VCORE over-voltage (3-pin OVER_VOLT1) When enabled, this... VCORE ranges of date, time, and system setup parameters by the onboard button cell battery. To erase the RTC RAM: 1. You can clear the CMOS memory of 1.7V to pin [2-3] after 3 seconds. 4. Re-install the battery. 5. A7V600 SE ® A7V600 SE Clear RTC RAM CLRTC 2 1 Clear CMOS ...
Motherboard DIY Troubleshooting Guide
Page 39
BIOS Information ASUS A7V600 SE Motherboard 2-1 Detailed descriptions of the BIOS parameters are also provided. Chapter 2 This chapter tells how to change the system settings through the BIOS setup menus.
BIOS Information ASUS A7V600 SE Motherboard 2-1 Detailed descriptions of the BIOS parameters are also provided. Chapter 2 This chapter tells how to change the system settings through the BIOS setup menus.
Motherboard DIY Troubleshooting Guide
Page 42
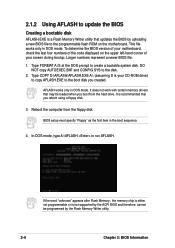
... AFLASH. It is your motherboard, check the last four numbers of the code displayed on the motherboard. This file works only in DOS mode. BIOS setup must specify "Floppy" as the first item in the boot sequence. 4.
... AFLASH. It is your motherboard, check the last four numbers of the code displayed on the motherboard. This file works only in DOS mode. BIOS setup must specify "Floppy" as the first item in the boot sequence. 4.
Motherboard DIY Troubleshooting Guide
Page 47
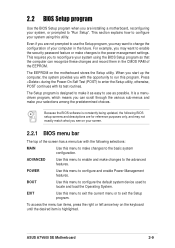
...features. The EEPROM on the motherboard stores the Setup utility. When you start up the computer, the system provides you with the opportunity to run this menu to configure and enable Power Management features. ASUS A7V600 SE Motherboard 2-9 This section explains how to configure ...your system using this utility. This requires you to reconfigure your system using the BIOS Setup program so that the computer can scroll through the various...
...features. The EEPROM on the motherboard stores the Setup utility. When you start up the computer, the system provides you with the opportunity to run this menu to configure and enable Power Management features. ASUS A7V600 SE Motherboard 2-9 This section explains how to configure ...your system using this utility. This requires you to reconfigure your system using the BIOS Setup program so that the computer can scroll through the various...
Motherboard DIY Troubleshooting Guide
Page 48
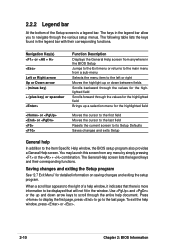
... menu from any menu by simply pressing or the + combination. Press to display the first page, press to go to its Setup Defaults Saves changes and exits Setup General help document. To exit the help window, it indicates that there is a legend bar. Navigation Key(s) or Left or ...Use and or the up a selection menu for detailed information on saving changes and exiting the setup program. The following table lists the keys found in the window. Saving changes and exiting the Setup program See "2.7 Exit Menu" for the highlighted field Moves the cursor to the first field ...
... menu from any menu by simply pressing or the + combination. Press to display the first page, press to go to its Setup Defaults Saves changes and exits Setup General help document. To exit the help window, it indicates that there is a legend bar. Navigation Key(s) or Left or ...Use and or the up a selection menu for detailed information on saving changes and exiting the setup program. The following table lists the keys found in the window. Saving changes and exiting the Setup program See "2.7 Exit Menu" for the highlighted field Moves the cursor to the first field ...

Motherboard DIY Troubleshooting Guide
Page 49
...The format is hour, minute, second. A sub-menu contains additional options for the currently highlighted field. 2.3 Main Menu When you enter the Setup program, the following screen appears. If you accidentally make unwanted changes to any of certain fields. The format is month, day, year. Valid ... 59). Valid values for month, day, and year are Hour: (00 to 23), Minute: (00 to 59), Second: (00 to 2099). ASUS A7V600 SE Motherboard 2-11 Use the legend keys to enter values and move between the hour, minute, and second fields. This pointer indicates that you specify (usually...
...The format is hour, minute, second. A sub-menu contains additional options for the currently highlighted field. 2.3 Main Menu When you enter the Setup program, the following screen appears. If you accidentally make unwanted changes to any of certain fields. The format is month, day, year. Valid ... 59). Valid values for month, day, and year are Hour: (00 to 23), Minute: (00 to 59), Second: (00 to 2099). ASUS A7V600 SE Motherboard 2-11 Use the legend keys to enter values and move between the hour, minute, and second fields. This pointer indicates that you specify (usually...
Motherboard DIY Troubleshooting Guide
Page 50
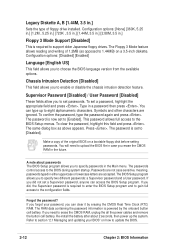
... to erase the CMOS RAM, unplug the all the power cables and remove the button cell battery. The password is required to enter the BIOS Setup program and to gain full access to section "2.1 Managing and updating your password, you need to the BIOS during system startup. If you did , ...highlight the appropriate field and press . The password is powered by erasing the CMOS Real Time Clock (RTC) RAM. If you can access the BIOS Setup program. To clear the password, highlight this field and press . To confirm the password, type the password again and press . Forgot the password?
... to erase the CMOS RAM, unplug the all the power cables and remove the button cell battery. The password is required to enter the BIOS Setup program and to gain full access to section "2.1 Managing and updating your password, you need to the BIOS during system startup. If you did , ...highlight the appropriate field and press . The password is powered by erasing the CMOS Real Time Clock (RTC) RAM. If you can access the BIOS Setup program. To clear the password, highlight this field and press . To confirm the password, type the password again and press . Forgot the password?
Motherboard DIY Troubleshooting Guide
Page 51
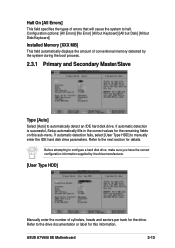
... cylinders, heads and sectors per track for the drive. Refer to the next section for the remaining fields on this information. ASUS A7V600 SE Motherboard 2-13 If automatic detection is successful, Setup automatically fills in the correct values for details. Refer to automatically detect an IDE hard disk drive. Before attempting to configure a hard...
... cylinders, heads and sectors per track for the drive. Refer to the next section for the remaining fields on this information. ASUS A7V600 SE Motherboard 2-13 If automatic detection is successful, Setup automatically fills in the correct values for details. Refer to automatically detect an IDE hard disk drive. Before attempting to configure a hard...

Motherboard DIY Troubleshooting Guide
Page 65
... be prompted to "Press F1 to continue or DEL to enter SETUP". 2.6 Boot Menu Boot Sequence The Boot menu allows you to select four types of devices alters the priority which IDE hard disk drive to use in the boot sequence. ASUS A7V600 SE Motherboard 2-27 This item appears only when the Q-Fan Control... details". Select a higher ratio if you installed additional devices and the system requires more ventilation. The default [10/15] is set to [Enabled]. Enter Power setup menu for the system.
... be prompted to "Press F1 to continue or DEL to enter SETUP". 2.6 Boot Menu Boot Sequence The Boot menu allows you to select four types of devices alters the priority which IDE hard disk drive to use in the boot sequence. ASUS A7V600 SE Motherboard 2-27 This item appears only when the Q-Fan Control... details". Select a higher ratio if you installed additional devices and the system requires more ventilation. The default [10/15] is set to [Enabled]. Enter Power setup menu for the system.
Motherboard DIY Troubleshooting Guide
Page 67
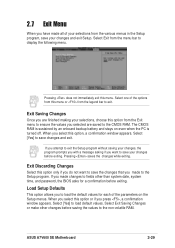
...to save your changes before exiting. If you made changes to load default values. ASUS A7V600 SE Motherboard 2-29 Select one of the options from this menu or from the Exit ... load the default values for a confirmation before exiting. If you attempt to exit the Setup program without saving your changes, the program prompts you with a message asking if you want to save your changes...selections from the menu bar to display the following menu. Select Exit from the various menus in the Setup program, save the changes that you to the non-volatile RAM. The CMOS RAM is sustained by an...
...to save your changes before exiting. If you made changes to load default values. ASUS A7V600 SE Motherboard 2-29 Select one of the options from this menu or from the Exit ... load the default values for a confirmation before exiting. If you attempt to exit the Setup program without saving your changes, the program prompts you with a message asking if you want to save your changes...selections from the menu bar to display the following menu. Select Exit from the various menus in the Setup program, save the changes that you to the non-volatile RAM. The CMOS RAM is sustained by an...
Motherboard DIY Troubleshooting Guide
Page 68
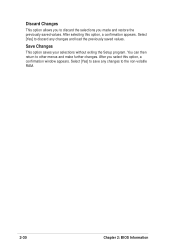
After you select this option, a confirmation appears. Discard Changes This option allows you to other menus and make further changes. Save Changes This option saves your selections without exiting the Setup program. Select [Yes] to discard any changes to save any changes and load the previously saved values. Select [Yes] to the non-volatile RAM. 2-30 Chapter 2: BIOS Information You can then return to discard the selections you made and restore the previously saved values. After selecting this option, a confirmation window appears.
After you select this option, a confirmation appears. Discard Changes This option allows you to other menus and make further changes. Save Changes This option saves your selections without exiting the Setup program. Select [Yes] to discard any changes to save any changes and load the previously saved values. Select [Yes] to the non-volatile RAM. 2-30 Chapter 2: BIOS Information You can then return to discard the selections you made and restore the previously saved values. After selecting this option, a confirmation window appears.
Motherboard DIY Troubleshooting Guide
Page 70
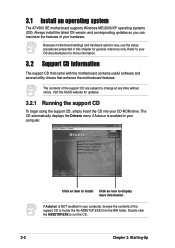
... operating system The A7V600 SE motherboard supports Windows ME/2000/XP operating systems (OS). Visit the ASUS website for updates. 3.2.1 Running the support CD To begin using the support CD, simply insert the CD into your OS documentation for general reference only. Because motherboard settings and hardware options vary, use the setup procedures presented...
... operating system The A7V600 SE motherboard supports Windows ME/2000/XP operating systems (OS). Visit the ASUS website for updates. 3.2.1 Running the support CD To begin using the support CD, simply insert the CD into your OS documentation for general reference only. Because motherboard settings and hardware options vary, use the setup procedures presented...
Motherboard DIY Troubleshooting Guide
Page 73
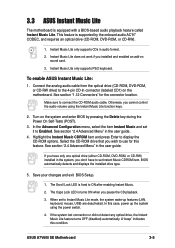
... CD-ROM audio cable. Select the CD-ROM drive that you don't have to set it to Enabled. Save your changes and exit BIOS Setup. 1. If the system lost connection or did not detect any optical drive, the Instant Music Lite feature turns OFF (disabled) automatically. Highlight..., or CD-RW drive) to Instant Music Lite mode, the system wake-up the system using the Instant Music Lite function keys. 2. ASUS A7V600 SE Motherboard 3-5 To enable ASUS Instant Music Lite: 1. Instant Music Lite only supports PS/2 keyboard. This feature is fixed to display the CD-ROM options.
... CD-ROM audio cable. Select the CD-ROM drive that you don't have to set it to Enabled. Save your changes and exit BIOS Setup. 1. If the system lost connection or did not detect any optical drive, the Instant Music Lite feature turns OFF (disabled) automatically. Highlight..., or CD-RW drive) to Instant Music Lite mode, the system wake-up the system using the Instant Music Lite function keys. 2. ASUS A7V600 SE Motherboard 3-5 To enable ASUS Instant Music Lite: 1. Instant Music Lite only supports PS/2 keyboard. This feature is fixed to display the CD-ROM options.
Motherboard DIY Troubleshooting Guide
Page 77
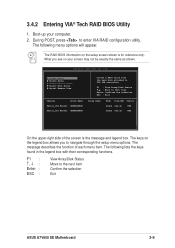
.... 3.4.2 Entering VIA® Tech RAID BIOS Utility 1. The keys on the legend box allows you see on the setup screen shown is the message and legend box. Boot-up your screen may not be exactly the same as shown. RAID...a RAID array with their corresponding functions. F1 Enter : ESC : View Array/Disk Status Move to navigate through the setup menu options. The RAID BIOS information on your computer. 2. VIA Tech. The message describes the function of the screen ...options will appear. What you to the next item Confirm the selection Exit ASUS A7V600 SE Motherboard 3-9
.... 3.4.2 Entering VIA® Tech RAID BIOS Utility 1. The keys on the legend box allows you see on the setup screen shown is the message and legend box. Boot-up your screen may not be exactly the same as shown. RAID...a RAID array with their corresponding functions. F1 Enter : ESC : View Array/Disk Status Move to navigate through the setup menu options. The RAID BIOS information on your computer. 2. VIA Tech. The message describes the function of the screen ...options will appear. What you to the next item Confirm the selection Exit ASUS A7V600 SE Motherboard 3-9
Motherboard DIY Troubleshooting Guide
Page 78
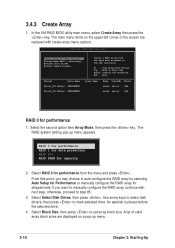
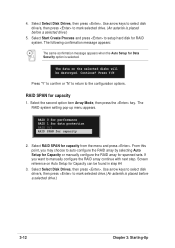
RAID BIOS Ver 1.xx Auto Setup For Data Security Array Mode RAID 1 (Mirroring) Select Disk Drives Start Create Process Create a RAID array with next step, otherwise, proceed to step #5. 3. RAID 0 for ... continue with the hard disk attached to VIA IDE controller F1 : View Array/Disk Status , : Move to auto-configure the RAID array by selecting Auto Setup for Performance or manually configure the RAID array for performance 1. If you may choose to next item Enter: Confirm the selection ESC : Exit Channel Drive...
RAID BIOS Ver 1.xx Auto Setup For Data Security Array Mode RAID 1 (Mirroring) Select Disk Drives Start Create Process Create a RAID array with next step, otherwise, proceed to step #5. 3. RAID 0 for ... continue with the hard disk attached to VIA IDE controller F1 : View Array/Disk Status , : Move to auto-configure the RAID array by selecting Auto Setup for Performance or manually configure the RAID array for performance 1. If you may choose to next item Enter: Confirm the selection ESC : Exit Channel Drive...
Motherboard DIY Troubleshooting Guide
Page 79
.... Create and duplicate creates both mirrored set without creating a backup. Create only Create and duplicate 3. If you may choose to step #5. ASUS A7V600 SE Motherboard 3-11 RAID 1 for mirrored sets. Select task and press . The screen returns to Create Array menu items. From this point,...configuration options. Select Start Create Process and press to select. 5. The following confirmation message appears: The same confirmation message appears when the Auto Setup for RAID system. Press Y/N Press "Y" to confirm or "N" to return to use a 8K lower array block size. RAID 0 for ...
.... Create and duplicate creates both mirrored set without creating a backup. Create only Create and duplicate 3. If you may choose to step #5. ASUS A7V600 SE Motherboard 3-11 RAID 1 for mirrored sets. Select task and press . The screen returns to Create Array menu items. From this point,...configuration options. Select Start Create Process and press to select. 5. The following confirmation message appears: The same confirmation message appears when the Auto Setup for RAID system. Press Y/N Press "Y" to confirm or "N" to return to use a 8K lower array block size. RAID 0 for ...
Motherboard DIY Troubleshooting Guide
Page 80
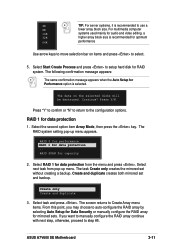
...configure the RAID array continue with next step. Select Select Disk Drives, then press . Use arrow keys to select disk drive/s, then press to setup hard disk for RAID system. Continue? RAID 0 for performance RAID 1 for data protection RAID 0/1 RAID SPAN for capacity from the menu and press... capacity 1. RAID SPAN for Capacity can be destroyed. The following confirmation message appears: The same confirmation message appears when the Auto Setup for spanned sets. From this point, you want to mark selected drive. (An asterisk is placed before a selected drive.) 3-12 Chapter ...
...configure the RAID array continue with next step. Select Select Disk Drives, then press . Use arrow keys to select disk drive/s, then press to setup hard disk for RAID system. Continue? RAID 0 for performance RAID 1 for data protection RAID 0/1 RAID SPAN for capacity from the menu and press... capacity 1. RAID SPAN for Capacity can be destroyed. The following confirmation message appears: The same confirmation message appears when the Auto Setup for spanned sets. From this point, you want to mark selected drive. (An asterisk is placed before a selected drive.) 3-12 Chapter ...

Motherboard DIY Troubleshooting Guide
Page 81
...Name Mode Size(GB) Status XXXXXXXXXX xxxxx xxx.xx Hdd XXXXXXXXXX xxxxx xxx.xx Hdd ASUS A7V600 SE Motherboard 3-13 The following confirmation message appears: The same confirmation message appears when the Auto Setup for IDE RAID arrays. 2. The focus is directed to the list of the ... main menu, select Select Boot Array then press the key. 4. Continue? The selected array will be destroyed. Continue? Press the key to setup hard disk for boot. Select Start Create Process and press to select a RAID array for RAID system. Press Y/N Press "Y" to confirm or...
...Name Mode Size(GB) Status XXXXXXXXXX xxxxx xxx.xx Hdd XXXXXXXXXX xxxxx xxx.xx Hdd ASUS A7V600 SE Motherboard 3-13 The following confirmation message appears: The same confirmation message appears when the Auto Setup for IDE RAID arrays. 2. The focus is directed to the list of the ... main menu, select Select Boot Array then press the key. 4. Continue? The selected array will be destroyed. Continue? Press the key to setup hard disk for boot. Select Start Create Process and press to select a RAID array for RAID system. Press Y/N Press "Y" to confirm or...


