Motherboard DIY Troubleshooting Guide
Page 5
... must accept any interference received including interference that to which the receiver is encouraged to try to an outlet on a circuit different from digital apparatus set out in a particular installation. This equipment generates, uses and can be determined by turning the equipment off and on, the user is connected. • Consult...
... must accept any interference received including interference that to which the receiver is encouraged to try to an outlet on a circuit different from digital apparatus set out in a particular installation. This equipment generates, uses and can be determined by turning the equipment off and on, the user is connected. • Consult...
Motherboard DIY Troubleshooting Guide
Page 6
.... If possible, disconnect all power cables from the existing system before you are using, contact your local power company. • If the power supply is set to fix it , carefully read all the manuals that the power cables for the devices are connected. If you encounter technical problems with the package...
.... If possible, disconnect all power cables from the existing system before you are using, contact your local power company. • If the power supply is set to fix it , carefully read all the manuals that the power cables for the devices are connected. If you encounter technical problems with the package...
Motherboard DIY Troubleshooting Guide
Page 11
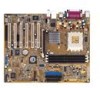
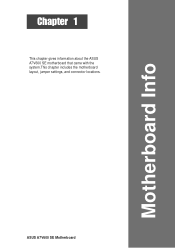
Motherboard Info ASUS A7V600 SE Motherboard 1-1 Chapter 1 This chapter gives information about the ASUS A7V600 SE motherboard that came with the system.This chapter includes the motherboard layout, jumper settings, and connector locations.
Motherboard Info ASUS A7V600 SE Motherboard 1-1 Chapter 1 This chapter gives information about the ASUS A7V600 SE motherboard that came with the system.This chapter includes the motherboard layout, jumper settings, and connector locations.
Motherboard DIY Troubleshooting Guide
Page 14
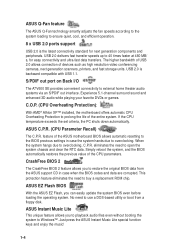
... from a floppy disk. S/PDIF out port on Back I/O The A7V600 SE provides convenient connectivity to prolong the life of the ASUS motherboard BIOS allows automatic resetting to the BIOS previous settings in case when the BIOS codes and data are corrupted. Just press the ASUS Instant Music Lite special function keys and enjoy the music...
... from a floppy disk. S/PDIF out port on Back I/O The A7V600 SE provides convenient connectivity to prolong the life of the ASUS motherboard BIOS allows automatic resetting to the BIOS previous settings in case when the BIOS codes and data are corrupted. Just press the ASUS Instant Music Lite special function keys and enjoy the music...

Motherboard DIY Troubleshooting Guide
Page 20
Failure to do so may cause severe damage to avoid damaging them . 4. A7V600 SE SB_PWR ® A7V600 SE Onboard LED ON Standby Power OFF Powered Off Install only 1.5V AGP cards on a grounded antistatic pad or in the bag that came with... is detached from the wall socket before handling components to the motherboard, peripherals, and/or components. Whenever you install motherboard components or change any motherboard settings. 1. Use a grounded wrist strap or touch a safely grounded object or to a metal object, such as the power supply case, before touching any component, ...
Failure to do so may cause severe damage to avoid damaging them . 4. A7V600 SE SB_PWR ® A7V600 SE Onboard LED ON Standby Power OFF Powered Off Install only 1.5V AGP cards on a grounded antistatic pad or in the bag that came with... is detached from the wall socket before handling components to the motherboard, peripherals, and/or components. Whenever you install motherboard components or change any motherboard settings. 1. Use a grounded wrist strap or touch a safely grounded object or to a metal object, such as the power supply case, before touching any component, ...
Motherboard DIY Troubleshooting Guide
Page 25
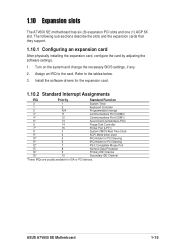
... *These IRQs are usually available for ISA or PCI devices. Assign an IRQ to the tables below. 3. ASUS A7V600 SE Motherboard 1-15 Turn on the system and change the necessary BIOS settings, if any. 2. 1.10 Expansion slots The A7V600 SE motherboard has six (6) expansion PCI slots and one (1) AGP 8X slot. The following sub-sections describe...
... *These IRQs are usually available for ISA or PCI devices. Assign an IRQ to the tables below. 3. ASUS A7V600 SE Motherboard 1-15 Turn on the system and change the necessary BIOS settings, if any. 2. 1.10 Expansion slots The A7V600 SE motherboard has six (6) expansion PCI slots and one (1) AGP 8X slot. The following sub-sections describe...
Motherboard DIY Troubleshooting Guide
Page 28
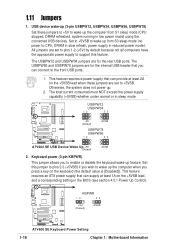
... on the keyboard (the default value is [Disabled]). USBPW12 USBPW34 12 23 A7V600 SE ® +5V (Default) +5VSB USBPW78 USBPW56 12 23 A7V600 SE USB Device Wake Up +5V (Default) +5VSB 2. Set this feature. A7V600 SE KBPWR 12 23 +5V (Default) +5VSB ® A7V600 SE Keyboard Power Setting 1-18 Chapter 1: Motherboard Information USB device wake-up (3-pin USBPW12, USBPW34, USBPW56...
... on the keyboard (the default value is [Disabled]). USBPW12 USBPW34 12 23 A7V600 SE ® +5V (Default) +5VSB USBPW78 USBPW56 12 23 A7V600 SE USB Device Wake Up +5V (Default) +5VSB 2. Set this feature. A7V600 SE KBPWR 12 23 +5V (Default) +5VSB ® A7V600 SE Keyboard Power Setting 1-18 Chapter 1: Motherboard Information USB device wake-up (3-pin USBPW12, USBPW34, USBPW56...
Motherboard DIY Troubleshooting Guide
Page 29
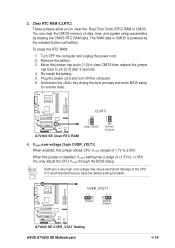
...jumper allows CPU VCORE ranges of date, time, and system setup parameters by the onboard button cell battery. A7V600 SE OVER_VOLT1 12 23 Enable Disable (Default) ® A7V600 SE OVER_VOLT Setting ASUS A7V600 SE Motherboard 1-19 Remove the battery. 3. Hold down the key during the boot process and enter BIOS setup ...recommended that you to the CPU. It is powered by erasing the CMOS RTC RAM data. A7V600 SE ® A7V600 SE Clear RTC RAM CLRTC 2 1 Clear CMOS 3 2 Normal (Default) 4. Setting to a very high core voltage may adjust the CPU VCORE through the BIOS Setup. Plug...
...jumper allows CPU VCORE ranges of date, time, and system setup parameters by the onboard button cell battery. A7V600 SE OVER_VOLT1 12 23 Enable Disable (Default) ® A7V600 SE OVER_VOLT Setting ASUS A7V600 SE Motherboard 1-19 Remove the battery. 3. Hold down the key during the boot process and enter BIOS setup ...recommended that you to the CPU. It is powered by erasing the CMOS RTC RAM data. A7V600 SE ® A7V600 SE Clear RTC RAM CLRTC 2 1 Clear CMOS 3 2 Normal (Default) 4. Setting to a very high core voltage may adjust the CPU VCORE through the BIOS Setup. Plug...
Motherboard DIY Troubleshooting Guide
Page 30
...IDE connector and another UltraDMA/133/100/66 cable. Pin 20 on the UltraDMA/133/100/66 cable is removed to PIN 1. PRI_IDE SEC_IDE ® A7V600 SE IDE Connectors PIN 1 PIN 1 For UltraDMA/133/100/66 IDE devices, use an 80-conductor IDE cable. If you install two hard disks, ...you have more than two UltraDMA/133/100/66 devices, purchase another for the jumper settings. BIOS supports specific device bootup. A7V600 SE NOTE: Orient the red markings (usually zigzag) on the IDE ribbon cable to match the covered hole on the motherboard. 1. IDE...
...IDE connector and another UltraDMA/133/100/66 cable. Pin 20 on the UltraDMA/133/100/66 cable is removed to PIN 1. PRI_IDE SEC_IDE ® A7V600 SE IDE Connectors PIN 1 PIN 1 For UltraDMA/133/100/66 IDE devices, use an 80-conductor IDE cable. If you install two hard disks, ...you have more than two UltraDMA/133/100/66 devices, purchase another for the jumper settings. BIOS supports specific device bootup. A7V600 SE NOTE: Orient the red markings (usually zigzag) on the IDE ribbon cable to match the covered hole on the motherboard. 1. IDE...
Motherboard DIY Troubleshooting Guide
Page 37
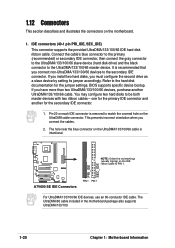
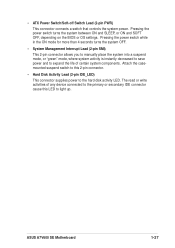
... Switch/Soft-off Switch Lead (2-pin PWR) This connector connects a switch that controls the system power. The read or write activities of certain system components. ASUS A7V600 SE Motherboard 1-27 Pressing the power switch while in the ON mode for more than 4 seconds turns the system OFF. • System Management Interrupt Lead (2-pin... to light up. Pressing the power switch turns the system between ON and SLEEP, or ON and SOFT OFF, depending on the BIOS or OS settings.
... Switch/Soft-off Switch Lead (2-pin PWR) This connector connects a switch that controls the system power. The read or write activities of certain system components. ASUS A7V600 SE Motherboard 1-27 Pressing the power switch while in the ON mode for more than 4 seconds turns the system OFF. • System Management Interrupt Lead (2-pin... to light up. Pressing the power switch turns the system between ON and SLEEP, or ON and SOFT OFF, depending on the BIOS or OS settings.
Motherboard DIY Troubleshooting Guide
Page 39
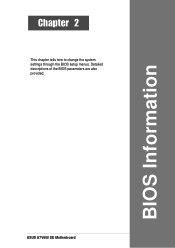
Chapter 2 This chapter tells how to change the system settings through the BIOS setup menus. Detailed descriptions of the BIOS parameters are also provided. BIOS Information ASUS A7V600 SE Motherboard 2-1
Chapter 2 This chapter tells how to change the system settings through the BIOS setup menus. Detailed descriptions of the BIOS parameters are also provided. BIOS Information ASUS A7V600 SE Motherboard 2-1
Motherboard DIY Troubleshooting Guide
Page 47
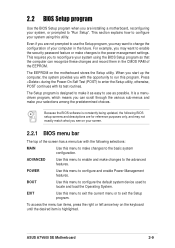
This requires you may want to enable the security password feature or make changes to the power management settings. BOOT Use this menu to enable and make changes to the basic system configuration. For example, you can recognize these changes and record ... system device used to locate and load the Operating System. POWER Use this menu to exit the current menu or to exit the Setup program. ASUS A7V600 SE Motherboard 2-9 Even if you are installing a motherboard, reconfiguring your selections among the predetermined choices. When you start up the computer, the system provides ...
This requires you may want to enable the security password feature or make changes to the power management settings. BOOT Use this menu to enable and make changes to the basic system configuration. For example, you can recognize these changes and record ... system device used to locate and load the Operating System. POWER Use this menu to exit the current menu or to exit the Setup program. ASUS A7V600 SE Motherboard 2-9 Even if you are installing a motherboard, reconfiguring your selections among the predetermined choices. When you start up the computer, the system provides ...

Motherboard DIY Troubleshooting Guide
Page 49
...00 to 23), Minute: (00 to 59), Second: (00 to move between the month, day, and year fields. System Date [XX/XX/XXXX] Sets the system to 2099). The format is hour, minute, second. A sub-menu contains additional options for the currently highlighted field. 2.3 Main Menu When ...to return to familiarize yourself with the legend keys and their corresponding functions. System Time [XX:XX:XX] Sets the system to move between the hour, minute, and second fields. ASUS A7V600 SE Motherboard 2-11 To display a sub-menu, move from this field. While moving around through the various ...
...00 to 23), Minute: (00 to 59), Second: (00 to move between the month, day, and year fields. System Date [XX/XX/XXXX] Sets the system to 2099). The format is hour, minute, second. A sub-menu contains additional options for the currently highlighted field. 2.3 Main Menu When ...to return to familiarize yourself with the legend keys and their corresponding functions. System Time [XX:XX:XX] Sets the system to move between the hour, minute, and second fields. ASUS A7V600 SE Motherboard 2-11 To display a sub-menu, move from this field. While moving around through the various ...
Motherboard DIY Troubleshooting Guide
Page 50
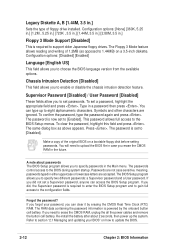
... To clear the password, highlight this field and press . Make a copy of floppy drive installed. The RAM data containing the password information is now set to specify passwords in the Main menu. Legacy Diskette A, B [1.44M, 3.5 in case you to the configuration fields. Configuration options: [None] ... BIOS Information Refer to section "2.1 Managing and updating your password, you to [Enabled]. The BIOS Setup program allows you did not set a password, highlight the appropriate field and press . Re-install the battery after about passwords The BIOS Setup program allows you can ...
... To clear the password, highlight this field and press . Make a copy of floppy drive installed. The RAM data containing the password information is now set to specify passwords in the Main menu. Legacy Diskette A, B [1.44M, 3.5 in case you to the configuration fields. Configuration options: [None] ... BIOS Information Refer to section "2.1 Managing and updating your password, you to [Enabled]. The BIOS Setup program allows you did not set a password, highlight the appropriate field and press . Re-install the battery after about passwords The BIOS Setup program allows you can ...
Motherboard DIY Troubleshooting Guide
Page 52
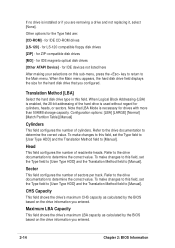
...Main menu. for IDE magneto optical disk drives [Other ATAPI Device] - Translation Method [LBA] Select the hard disk drive type in this field, set the Type field to [User Type HDD] and the Translation Method field to [Manual]. When the Main menu appears, the hard disk drive field ...14 Chapter 2: BIOS Information When Logical Block Addressing (LBA) is used without regard for cylinders, heads, or sectors. To make changes to this field, set the Type field to [User Type HDD] and the Translation Method field to [Manual]. for the Type field are removing a drive and not replacing it...
...Main menu. for IDE magneto optical disk drives [Other ATAPI Device] - Translation Method [LBA] Select the hard disk drive type in this field, set the Type field to [User Type HDD] and the Translation Method field to [Manual]. When the Main menu appears, the hard disk drive field ...14 Chapter 2: BIOS Information When Logical Block Addressing (LBA) is used without regard for cylinders, heads, or sectors. To make changes to this field, set the Type field to [User Type HDD] and the Translation Method field to [Manual]. for the Type field are removing a drive and not replacing it...
Motherboard DIY Troubleshooting Guide
Page 53
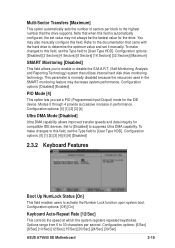
...[Disabled] This field allows you set it manually. Configuration options: [Disabled] [Enabled] PIO Mode [4] This option lets you to [User Type HDD]. Configuration options: [6/Sec] [8/Sec] [10/Sec] [12/Sec] [15/Sec] [20/Sec] [24/Sec] [30/Sec] ASUS A7V600 SE Motherboard 2-15 Modes 0 through... 4 provide successive increase in the SMART monitoring feature may also manually configure this field, set value may not always be the fastest value for the drive. Multi-Sector Transfers [...
...[Disabled] This field allows you set it manually. Configuration options: [Disabled] [Enabled] PIO Mode [4] This option lets you to [User Type HDD]. Configuration options: [6/Sec] [8/Sec] [10/Sec] [12/Sec] [15/Sec] [20/Sec] [24/Sec] [30/Sec] ASUS A7V600 SE Motherboard 2-15 Modes 0 through... 4 provide successive increase in the SMART monitoring feature may also manually configure this field, set value may not always be the fastest value for the drive. Multi-Sector Transfers [...
Motherboard DIY Troubleshooting Guide
Page 54
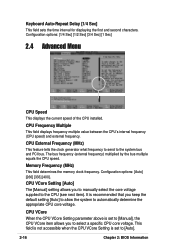
... [400]. The bus frequency (external frequency) multiplied by the bus multiple equals the CPU speed. CPU VCore When the CPU VCore Setting parameter above is set to [Manual], the CPU VCore item allows you to manually select the core voltage supplied to the system bus and PCI bus. ...the current speed of the CPU installed. Keyboard Auto-Repeat Delay [1/4 Sec] This field sets the time interval for displaying the first and second characters. CPU VCore Setting [Auto] The [Manual] setting allows you to automatically determine the appropriate CPU core voltage. This field is not accessible...
... [400]. The bus frequency (external frequency) multiplied by the bus multiple equals the CPU speed. CPU VCore When the CPU VCore Setting parameter above is set to [Manual], the CPU VCore item allows you to manually select the core voltage supplied to the system bus and PCI bus. ...the current speed of the CPU installed. Keyboard Auto-Repeat Delay [1/4 Sec] This field sets the time interval for displaying the first and second characters. CPU VCore Setting [Auto] The [Manual] setting allows you to automatically determine the appropriate CPU core voltage. This field is not accessible...
Motherboard DIY Troubleshooting Guide
Page 55
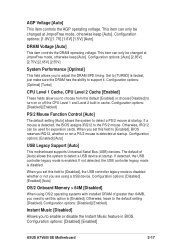
... USB controller legacy mode is detected at startup. Configuration options: [Disabled] [Enabled] PS/2 Mouse Function Control [Auto] The default setting [Auto] allows the system to the PS/2 mouse. If detected, the USB controller legacy mode is disabled. If not detected,...DRAM of [Auto] allows the system to detect a USB device at JmpreFree mode, otherwise keep [Auto]. Configuration options: [Disabled] [Enabled] ASUS A7V600 SE Motherboard 2-17 Set to [TURBO] is detected, the BIOS assigns IRQ12 to detect a PS/2 mouse at JmpreFree mode, otherwise keep [Auto]. Configuration options: ...
... USB controller legacy mode is detected at startup. Configuration options: [Disabled] [Enabled] PS/2 Mouse Function Control [Auto] The default setting [Auto] allows the system to the PS/2 mouse. If detected, the USB controller legacy mode is disabled. If not detected,...DRAM of [Auto] allows the system to detect a USB device at JmpreFree mode, otherwise keep [Auto]. Configuration options: [Disabled] [Enabled] ASUS A7V600 SE Motherboard 2-17 Set to [TURBO] is detected, the BIOS assigns IRQ12 to detect a PS/2 mouse at JmpreFree mode, otherwise keep [Auto]. Configuration options: ...

Motherboard DIY Troubleshooting Guide
Page 56
.... The above item appears only if you enabled the Instant Music item. 2.4.1 Chip Configuration SDRAM Configuration [By SPD] This parameter allows you to set the SDRAM Configuration to [User Defined]. Configuration options: [User Defined] [By SPD] The SDRAM parameters (items 2~5) become configurable only when you ...SDRAM RAS to use for items 2-5, depending on SDRAM SPD) This item controls the latency between the SDRAM read /write command. The default setting is automatically disabled. Instant Music CD ROM Allows you to select the CD-ROM drive that you wish to CAS Delay (value depends on...
.... The above item appears only if you enabled the Instant Music item. 2.4.1 Chip Configuration SDRAM Configuration [By SPD] This parameter allows you to set the SDRAM Configuration to [User Defined]. Configuration options: [User Defined] [By SPD] The SDRAM parameters (items 2~5) become configurable only when you ...SDRAM RAS to use for items 2-5, depending on SDRAM SPD) This item controls the latency between the SDRAM read /write command. The default setting is automatically disabled. Instant Music CD ROM Allows you to select the CD-ROM drive that you wish to CAS Delay (value depends on...
Motherboard DIY Troubleshooting Guide
Page 57
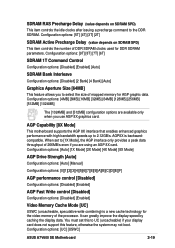
... improve the display speed by caching the display data. You must set to [1X Mode], the AGP interface only provides a peak data throughput of 266MB/s even if you are available only when you to the DDR SDRAM. Configuration options: [UC] [USWC] ASUS A7V600 SE Motherboard 2-19 Configuration options: [5T] [4T] [3T] [2T] SDRAM Active... interface that enables enhanced graphics performance with high bandwidth speeds up to UC (uncacheable) if your display card does not support this to 2.12GB/s. When set this feature, otherwise the system may not boot.
... improve the display speed by caching the display data. You must set to [1X Mode], the AGP interface only provides a peak data throughput of 266MB/s even if you are available only when you to the DDR SDRAM. Configuration options: [UC] [USWC] ASUS A7V600 SE Motherboard 2-19 Configuration options: [5T] [4T] [3T] [2T] SDRAM Active... interface that enables enhanced graphics performance with high bandwidth speeds up to UC (uncacheable) if your display card does not support this to 2.12GB/s. When set this feature, otherwise the system may not boot.


