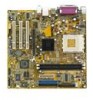
A7V400-MX SE user's manual for English version
Page 2
... explanation and to the owners' benefit, without the express written permission of the product is authorized in writing by ASUS; SPECIFICATIONS AND INFORMATION CONTAINED IN THIS MANUAL ARE FURNISHED FOR INFORMATIONAL USE ONLY, AND ARE SUBJECT TO CHANGE AT ANY TIME WITHOUT NOTICE, AND SHOULD NOT... BE CONSTRUED AS A COMMITMENT BY ASUS. No part of this manual, including the products and software described in it, may be reproduced, transmitted, transcribed, stored in a retrieval system, or translated into...
... explanation and to the owners' benefit, without the express written permission of the product is authorized in writing by ASUS; SPECIFICATIONS AND INFORMATION CONTAINED IN THIS MANUAL ARE FURNISHED FOR INFORMATIONAL USE ONLY, AND ARE SUBJECT TO CHANGE AT ANY TIME WITHOUT NOTICE, AND SHOULD NOT... BE CONSTRUED AS A COMMITMENT BY ASUS. No part of this manual, including the products and software described in it, may be reproduced, transmitted, transcribed, stored in a retrieval system, or translated into...
A7V400-MX SE user's manual for English version
Page 6
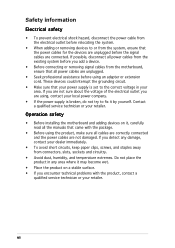
... the motherboard, ensure that your power supply is broken, do not try to the correct voltage in any area where it , carefully read all the manuals that the power cables for the devices are unplugged before the signal cables are connected. Contact a qualified service technician or your retailer. Do not place...
... the motherboard, ensure that your power supply is broken, do not try to the correct voltage in any area where it , carefully read all the manuals that the power cables for the devices are unplugged before the signal cables are connected. Contact a qualified service technician or your retailer. Do not place...
A7V400-MX SE user's manual for English version
Page 36
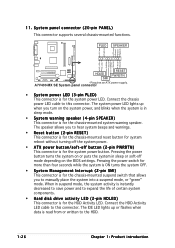
... for the chassis-mounted reset button for the HDD Activity LED. PLED SPEAKER +5 V PLED +5V Ground Ground Speaker HD_LED+ HD_LEDExtSMI# Ground PWRBIN Ground Reset Ground A7V400-MX SE RESET HDLED PWRBTN SMI * Requires an ATX power supply. When in suspend mode, the system activity is for system reboot without turning off the system... chassis-mounted system warning speaker. System panel connector (20-pin PANEL) This connector supports several chassis-mounted functions. Connect the HDD Activity LED cable to manually place the system into a suspend mode, or "green" mode.
... for the chassis-mounted reset button for the HDD Activity LED. PLED SPEAKER +5 V PLED +5V Ground Ground Speaker HD_LED+ HD_LEDExtSMI# Ground PWRBIN Ground Reset Ground A7V400-MX SE RESET HDLED PWRBTN SMI * Requires an ATX power supply. When in suspend mode, the system activity is for system reboot without turning off the system... chassis-mounted system warning speaker. System panel connector (20-pin PANEL) This connector supports several chassis-mounted functions. Connect the HDD Activity LED cable to manually place the system into a suspend mode, or "green" mode.
A7V400-MX SE user's manual for English version
Page 47
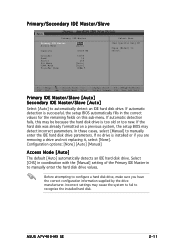
.../Slave [Auto] Secondary IDE Master/Slave [Auto] Select [Auto] to manually enter the hard disk drive values. In these cases, select [Manual] to select. Configuration options: [None] [Auto] [Manual] Access Mode [Auto] The default [Auto] automatically detects an IDE hard disk drive. ASUS A7V400-MX SE 2-11 Primary/Secondary IDE Master/Slave Primary IDE Master Primary IDE...
.../Slave [Auto] Secondary IDE Master/Slave [Auto] Select [Auto] to manually enter the hard disk drive values. In these cases, select [Manual] to select. Configuration options: [None] [Auto] [Manual] Access Mode [Auto] The default [Auto] automatically detects an IDE hard disk drive. ASUS A7V400-MX SE 2-11 Primary/Secondary IDE Master/Slave Primary IDE Master Primary IDE...

A7V400-MX SE user's manual for English version
Page 48
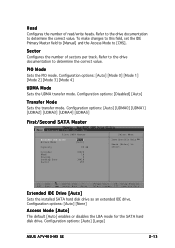
... the number of cylinders. Refer to active. Access Mode [Auto] Select the hard disk drive type from the hard disk. [Manual] and [CHS] Settings Primary IDE Master Primary IDE Master Access Mode [Manual] [CHS] Capacity 40020 MB Cylinder Head Sector PIO Mode UDMA Mode Transfer Mode [19158] [ 16] [ 255] [ Auto] [...to the Main menu. The Main menu displays the hard disk drive field with more than 504 MB storage capacity. Select [CHS] to make manual entries for this information. Note that you can write or read data from this sub-menu, press the key to return to partition and format...
... the number of cylinders. Refer to active. Access Mode [Auto] Select the hard disk drive type from the hard disk. [Manual] and [CHS] Settings Primary IDE Master Primary IDE Master Access Mode [Manual] [CHS] Capacity 40020 MB Cylinder Head Sector PIO Mode UDMA Mode Transfer Mode [19158] [ 16] [ 255] [ Auto] [...to the Main menu. The Main menu displays the hard disk drive field with more than 504 MB storage capacity. Select [CHS] to make manual entries for this information. Note that you can write or read data from this sub-menu, press the key to return to partition and format...
A7V400-MX SE user's manual for English version
Page 49
To make changes to this field, set the IDE Primary Master field to [Manual] and the Access Mode to determine the correct value. Configuration options: [Auto] [Mode 0] [Mode 1] [Mode 2] [Mode 3] [Mode 4] UDMA Mode Sets the UDMA transfer ...the correct value. PIO Mode Sets the PIO mode. Configuration options: [Disabled] [Auto] Transfer Mode Sets the transfer mode. Configuration options: [Auto] [Large] ASUS A7V400-MX SE 2-13 Refer to the drive documentation to select. Head Configures the number of sectors per track. Configuration options: [Auto] [None] Access Mode [Auto] The ...
To make changes to this field, set the IDE Primary Master field to [Manual] and the Access Mode to determine the correct value. Configuration options: [Auto] [Mode 0] [Mode 1] [Mode 2] [Mode 3] [Mode 4] UDMA Mode Sets the UDMA transfer ...the correct value. PIO Mode Sets the PIO mode. Configuration options: [Disabled] [Auto] Transfer Mode Sets the transfer mode. Configuration options: [Auto] [Large] ASUS A7V400-MX SE 2-13 Refer to the drive documentation to select. Head Configures the number of sectors per track. Configuration options: [Auto] [None] Access Mode [Auto] The ...
A7V400-MX SE user's manual for English version
Page 52
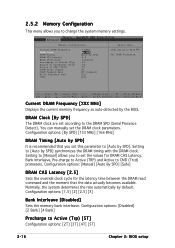
... read command and the moment that you to set according to [Auto by SPD] It is recommended that the data actually becomes available. Setting to [Manual] allows you set the DRAM clock parameters. Configuration options: [1.5] [2] [2.5] [3] Bank Interleave [Disabled] Sets the memory bank interleave. F1 : Help...DRAM CAS Latency Bank Interleave Pre-charge to Active (Trp) Active to Precharge (Tras) Active to CMD (Trcd) prameters. Configuration options: [Manual] [Auto By SPD] [Safe] DRAM CAS Latency [2.5] Sets the override clock cycle for DRAM CAS Latency, Bank Interleave, Pre-charge ...
... read command and the moment that you to set according to [Auto by SPD] It is recommended that the data actually becomes available. Setting to [Manual] allows you set the DRAM clock parameters. Configuration options: [1.5] [2] [2.5] [3] Bank Interleave [Disabled] Sets the memory bank interleave. F1 : Help...DRAM CAS Latency Bank Interleave Pre-charge to Active (Trp) Active to Precharge (Tras) Active to CMD (Trcd) prameters. Configuration options: [Manual] [Auto By SPD] [Safe] DRAM CAS Latency [2.5] Sets the override clock cycle for DRAM CAS Latency, Bank Interleave, Pre-charge ...
A7V400-MX SE user's manual for English version
Page 54
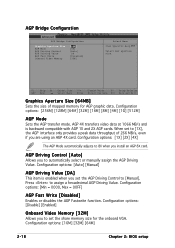
... [Disabled] Enables or disables the AGP Fastwrite function. Configuration options: [16M] [32M] [64M] 2-18 Chapter 2: BIOS setup Configuration options: [Auto] [Manual] AGP Driving Value [DA] This item is backward compatible with AGP 1X and 2X AGP cards. Configuration options: [1X] [2X] [4X] The AGP ...data throughput of mapped memory for the onboard VGA. AGP Driving Control [Auto] Allows you to set to automatically select or manually assign the AGP Driving Value. AGP Bridge Configuration AGP Bridge Configuration Graphics Aperture Size AGP Mode AGP Driving Control AGP Driving Value...
... [Disabled] Enables or disables the AGP Fastwrite function. Configuration options: [16M] [32M] [64M] 2-18 Chapter 2: BIOS setup Configuration options: [Auto] [Manual] AGP Driving Value [DA] This item is backward compatible with AGP 1X and 2X AGP cards. Configuration options: [1X] [2X] [4X] The AGP ...data throughput of mapped memory for the onboard VGA. AGP Driving Control [Auto] Allows you to set to automatically select or manually assign the AGP Driving Value. AGP Bridge Configuration AGP Bridge Configuration Graphics Aperture Size AGP Mode AGP Driving Control AGP Driving Value...
A7V400-MX SE user's manual for English version
Page 55
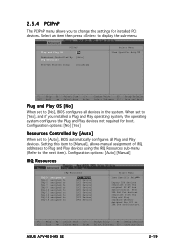
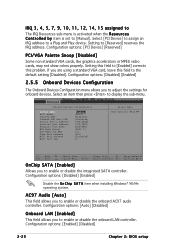
...: Change Value F5 : Setup Defaults ESC : Exit →← : Select Menu Enter : Select Sub-menu F10 : Save and Exit ASUS A7V400-MX SE 2-19 Configuration options: [Auto] [Manual] IRQ Resources IRQ Resources IRQ-3 assigned to IRQ-4 assigned to IRQ-5 assigned to IRQ-7 assigned to IRQ-9 assigned to IRQ-10 assigned to...devices compliant with the Plug and Play standard whether designed for PCI or ISA bus architecture. Setting this item to [Manual], allows manual assignment of IRQ addresses to Plug and Play devices using the IRQ Resources sub-menu (Refer to change the settings for boot...
...: Change Value F5 : Setup Defaults ESC : Exit →← : Select Menu Enter : Select Sub-menu F10 : Save and Exit ASUS A7V400-MX SE 2-19 Configuration options: [Auto] [Manual] IRQ Resources IRQ Resources IRQ-3 assigned to IRQ-4 assigned to IRQ-5 assigned to IRQ-7 assigned to IRQ-9 assigned to IRQ-10 assigned to...devices compliant with the Plug and Play standard whether designed for PCI or ISA bus architecture. Setting this item to [Manual], allows manual assignment of IRQ addresses to Plug and Play devices using the IRQ Resources sub-menu (Refer to change the settings for boot...
A7V400-MX SE user's manual for English version
Page 56
... IRQ Resources sub-menu is activated when the R e s o u r c e s C o n t r o l l e d b y item is set to a Plug and Play device. Select [PCI Device] to assign an IRQ address to [Manual]. Setting this field to [Reserved] reserves the IRQ address. Setting to [Enabled] corrects this field to adjust the settings for onboard devices. Configuration options: [PCI...
... IRQ Resources sub-menu is activated when the R e s o u r c e s C o n t r o l l e d b y item is set to a Plug and Play device. Select [PCI Device] to assign an IRQ address to [Manual]. Setting this field to [Reserved] reserves the IRQ address. Setting to [Enabled] corrects this field to adjust the settings for onboard devices. Configuration options: [PCI...

A7V400-MX SE user's manual for English version
Page 61
...the system. Configuration options: [Disabled] [Enabled] Video Off Option [Suspend -> Off ] Determines when to activate the video off feature for manual setup. Configuration options: [Disabled] [Enabled] USB Resume from S3/S4/S5 [Disabled] When set to [Enabled], this parameter allows you to... system after an AC power loss. [Off] leaves your system off mode. Configuration options: [Last State] [Power On] [Power Off] ASUS A7V400-MX SE 2-25 When this item is in sleep mode. Configuration options: [Suspend] [Instant-off the system. Configuration options: [Disabled] [Enabled] Power...
...the system. Configuration options: [Disabled] [Enabled] Video Off Option [Suspend -> Off ] Determines when to activate the video off feature for manual setup. Configuration options: [Disabled] [Enabled] USB Resume from S3/S4/S5 [Disabled] When set to [Enabled], this parameter allows you to... system after an AC power loss. [Off] leaves your system off mode. Configuration options: [Last State] [Power On] [Power Off] ASUS A7V400-MX SE 2-25 When this item is in sleep mode. Configuration options: [Suspend] [Instant-off the system. Configuration options: [Disabled] [Enabled] Power...


