A7S-VM User Manual
Page 2
... printed on the following page. For previous or updated manuals, BIOS, drivers, or product release information, contact ASUS at http://www.asus.com.tw or through any means, except documentation kept by ASUS; Product Name: ASUS A7S-VM Manual Revision: 1.03 E762 Release Date: April 2001 2 ASUS A7S-VM User's Manual SPECIFICATIONS AND INFORMATION CONTAINED IN THIS MANUAL ARE FURNISHED...
... printed on the following page. For previous or updated manuals, BIOS, drivers, or product release information, contact ASUS at http://www.asus.com.tw or through any means, except documentation kept by ASUS; Product Name: ASUS A7S-VM Manual Revision: 1.03 E762 Release Date: April 2001 2 ASUS A7S-VM User's Manual SPECIFICATIONS AND INFORMATION CONTAINED IN THIS MANUAL ARE FURNISHED...

A7S-VM User Manual
Page 4
... 2.2.1 Component Locations 13 3. INTRODUCTION 7 1.1 How This Manual Is Organized 7 1.2 Item Checklist 7 2. BIOS SETUP 41 4.1 Managing and Updating Your BIOS 41 4.1.1 Upon First Use of the Computer System 41 4.1.2 Updating BIOS Procedures 43 4.2 BIOS Setup Program 45 4.2.1 BIOS Menu Bar 46 4.2.2 Legend Bar 46 4 ASUS A7S-VM User's Manual HARDWARE SETUP 14 3.1 Motherboard Layout 14 3.2 Layout Contents 15 3.3 Hardware...
... 2.2.1 Component Locations 13 3. INTRODUCTION 7 1.1 How This Manual Is Organized 7 1.2 Item Checklist 7 2. BIOS SETUP 41 4.1 Managing and Updating Your BIOS 41 4.1.1 Upon First Use of the Computer System 41 4.1.2 Updating BIOS Procedures 43 4.2 BIOS Setup Program 45 4.2.1 BIOS Menu Bar 46 4.2.2 Legend Bar 46 4 ASUS A7S-VM User's Manual HARDWARE SETUP 14 3.1 Motherboard Layout 14 3.2 Layout Contents 15 3.3 Hardware...

A7S-VM User Manual
Page 7
... reference 1.2 Item Checklist Check that your retailer. 1. SOFTWARE REFERENCE 7. APPENDIX Manual information and checklist Production information and specifications Instructions on LAN models only) (1) User's Manual ASUS A7S-VM User's Manual 7 FEATURES 3. INTRODUCTION 2. SOFTWARE SETUP 6. Instructions on setting up the BIOS Instructions on setting up the included software Reference material for two 3.5" floppy disk drives...
... reference 1.2 Item Checklist Check that your retailer. 1. SOFTWARE REFERENCE 7. APPENDIX Manual information and checklist Production information and specifications Instructions on LAN models only) (1) User's Manual ASUS A7S-VM User's Manual 7 FEATURES 3. INTRODUCTION 2. SOFTWARE SETUP 6. Instructions on setting up the BIOS Instructions on setting up the included software Reference material for two 3.5" floppy disk drives...

A7S-VM User Manual
Page 8
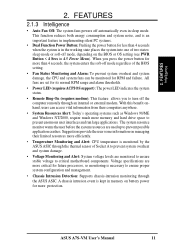
... & 4, Bus Master IDE DMA Mode 2, and Enhanced IDE devices, such as CPU and system voltages, temperatures, and fan status through BIOS setup when the JumperFree™ mode is designed with select features and interfaces to offer value and flexibility. 2.1.1 Specifications • Processor: ...Support: Equipped with two connectors that complements the powers of frequency and Vcore voltage through the onboard hardware ASUS ASIC and the bundled ASUS PC Probe. 8 ASUS A7S-VM User's Manual The chipset integrates the Ultra-AGP technology and 128-bit 2D/3D graphic engine to deliver ...
... & 4, Bus Master IDE DMA Mode 2, and Enhanced IDE devices, such as CPU and system voltages, temperatures, and fan status through BIOS setup when the JumperFree™ mode is designed with select features and interfaces to offer value and flexibility. 2.1.1 Specifications • Processor: ...Support: Equipped with two connectors that complements the powers of frequency and Vcore voltage through the onboard hardware ASUS ASIC and the bundled ASUS PC Probe. 8 ASUS A7S-VM User's Manual The chipset integrates the Ultra-AGP technology and 128-bit 2D/3D graphic engine to deliver ...

A7S-VM User Manual
Page 9
...slots that support Bus Master PCI cards, such as SCSI or LAN cards, with 133MB/s maximum throughput. • Smart BIOS: 2Mb firmware provides Vcore and CPU/SDRAM frequency adjustments, boot block write protection, and HD/SCSI/MO/ZIP/CD/Floppy ...boot selection. • Enhanced ACPI and Anti-Boot Virus Protection: Programmable BIOS (Flash EEPROM) that offers enhanced ACPI for Windows 98 compatibility, built-in firmware-based virus protection, and autodetection of... diagnostic display area, system status LEDs, USB ports, and hot keys. ASUS A7S-VM User's Manual 9
...slots that support Bus Master PCI cards, such as SCSI or LAN cards, with 133MB/s maximum throughput. • Smart BIOS: 2Mb firmware provides Vcore and CPU/SDRAM frequency adjustments, boot block write protection, and HD/SCSI/MO/ZIP/CD/Floppy ...boot selection. • Enhanced ACPI and Anti-Boot Virus Protection: Programmable BIOS (Flash EEPROM) that offers enhanced ACPI for Windows 98 compatibility, built-in firmware-based virus protection, and autodetection of... diagnostic display area, system status LEDs, USB ports, and hot keys. ASUS A7S-VM User's Manual 9

A7S-VM User Manual
Page 10
...coded connectors and descriptive icons make identification easy as Windows 98/2000/Millenium. • PC'99 Compliant: Both the BIOS and hardware levels of ASUS smart series motherboards are based on the following high-level goals: Support for Plugn-Play compatibility and power management for ...80-conductor cable). • Concurrent PCI: Concurrent PCI allows multiple PCI transfers from PCI master busses to the memory and processor. 10 ASUS A7S-VM User's Manual 2. The new PC'99 requirements for systems and components are PC'99 compliant. UltraDMA/100 is backward compatible with energy ...
...coded connectors and descriptive icons make identification easy as Windows 98/2000/Millenium. • PC'99 Compliant: Both the BIOS and hardware levels of ASUS smart series motherboards are based on the following high-level goals: Support for Plugn-Play compatibility and power management for ...80-conductor cable). • Concurrent PCI: Concurrent PCI allows multiple PCI transfers from PCI master busses to the memory and processor. 10 ASUS A7S-VM User's Manual 2. The new PC'99 requirements for systems and components are PC'99 compliant. UltraDMA/100 is backward compatible with energy ...
A7S-VM User Manual
Page 11
... off mode regardless of two states: sleep mode or soft-off the computer remotely through the ASUS ASIC. Suggestions provide the user some information on the BIOS or OS setting (see PWR Button < 4 Secs in 4.5 Power Menu). ASUS A7S-VM User's Manual 11 This function reduces both energy consumption and system noise, and is an...
... off mode regardless of two states: sleep mode or soft-off the computer remotely through the ASUS ASIC. Suggestions provide the user some information on the BIOS or OS setting (see PWR Button < 4 Secs in 4.5 Power Menu). ASUS A7S-VM User's Manual 11 This function reduces both energy consumption and system noise, and is an...
A7S-VM User Manual
Page 14
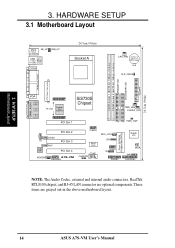
... 3 PCI Slot 4 MODEM A7S-VM AAPANEL USBP2 ASUS ASIC COM2 CHASSIS WOL_CON CIR USBP1 IR PANEL Flash EEPROM (Programable BIOS) Super I/O WOR SMB AFPANEL NOTE: The Audio Codec, external and internal audio connectors, RealTek RTL8100 chipset, and RJ-45 LAN connector are grayed out in the above motherboard layout. 14 ASUS A7S-VM User's Manual H/W SETUP Motherboard...
... 3 PCI Slot 4 MODEM A7S-VM AAPANEL USBP2 ASUS ASIC COM2 CHASSIS WOL_CON CIR USBP1 IR PANEL Flash EEPROM (Programable BIOS) Super I/O WOR SMB AFPANEL NOTE: The Audio Codec, external and internal audio connectors, RealTek RTL8100 chipset, and RJ-45 LAN connector are grayed out in the above motherboard layout. 14 ASUS A7S-VM User's Manual H/W SETUP Motherboard...
A7S-VM User Manual
Page 16
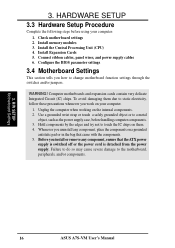
...came with the components. 5. Computer motherboards and expansion cards contain very delicate Integrated Circuit (IC) chips. H/W SETUP Motherboard Settings 16 ASUS A7S-VM User's Manual WARNING! Use a grounded wrist strap or touch a safely grounded object or to static electricity, follow these precautions whenever ... Failure to do so may cause severe damage to change motherboard function settings through the switches and/or jumpers. Configure the BIOS parameter settings 3.4 Motherboard Settings This section tells you work on a grounded antistatic pad or in the bag that theATX power ...
...came with the components. 5. Computer motherboards and expansion cards contain very delicate Integrated Circuit (IC) chips. H/W SETUP Motherboard Settings 16 ASUS A7S-VM User's Manual WARNING! Use a grounded wrist strap or touch a safely grounded object or to static electricity, follow these precautions whenever ... Failure to do so may cause severe damage to change motherboard function settings through the switches and/or jumpers. Configure the BIOS parameter settings 3.4 Motherboard Settings This section tells you work on a grounded antistatic pad or in the bag that theATX power ...
A7S-VM User Manual
Page 18
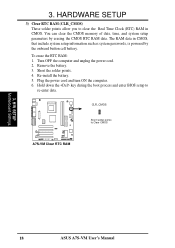
The RAM data in CMOS. Remove the battery. 3. H/W SETUP Motherboard Settings 18 ASUS A7S-VM User's Manual Plug the power cord and turn ON the computer. 6. To erase the RTC RAM: 1. Re-install the battery. 5. 3. HARDWARE SETUP 3) Clear RTC RAM (..., is powered by erasing the CMOS RTC RAM data. Short the solder points. 4. Hold down the key during the boot process and enter BIOS setup to Clear CMOS A7S-VM A7S-VM Clear RTC RAM 3. You can clear the CMOS memory of date, time, and system setup parameters by the onboard button cell battery. CLR_CMOS...
The RAM data in CMOS. Remove the battery. 3. H/W SETUP Motherboard Settings 18 ASUS A7S-VM User's Manual Plug the power cord and turn ON the computer. 6. To erase the RTC RAM: 1. Re-install the battery. 5. 3. HARDWARE SETUP 3) Clear RTC RAM (..., is powered by erasing the CMOS RTC RAM data. Short the solder points. 4. Hold down the key during the boot process and enter BIOS setup to Clear CMOS A7S-VM A7S-VM Clear RTC RAM 3. You can clear the CMOS memory of date, time, and system setup parameters by the onboard button cell battery. CLR_CMOS...

A7S-VM User Manual
Page 19
.... WARNING! Make sure that have more than EDO (Extended Data Output) chips. • BIOS shows SDRAM memory on the motherboard. double-sided come in 16, 32, 64,128, 256MB; H/W SETUP System Memory ASUS A7S-VM User's Manual 19 Install memory in 32, 64, 128, 256, 512MB. 3. compliant DIMMs.... • ASUS motherboards support Serial Presence Detect (SPD) DIMMs. This is the memory of the DIMM takes ...
.... WARNING! Make sure that have more than EDO (Extended Data Output) chips. • BIOS shows SDRAM memory on the motherboard. double-sided come in 16, 32, 64,128, 256MB; H/W SETUP System Memory ASUS A7S-VM User's Manual 19 Install memory in 32, 64, 128, 256, 512MB. 3. compliant DIMMs.... • ASUS motherboards support Serial Presence Detect (SPD) DIMMs. This is the memory of the DIMM takes ...

A7S-VM User Manual
Page 23
... cover and the bracket plate on the slot you removed earlier. 5. H/W SETUP Expansion Cards ASUS A7S-VM User's Manual 23 WARNING! Install the necessary software drivers for the card before installing it. 2. Replace the system cover. 6. Change the necessary BIOS settings, if any necessary hardware settings for the expansion card. 3. 3. Unplug the system power...
... cover and the bracket plate on the slot you removed earlier. 5. H/W SETUP Expansion Cards ASUS A7S-VM User's Manual 23 WARNING! Install the necessary software drivers for the card before installing it. 2. Replace the system cover. 6. Change the necessary BIOS settings, if any necessary hardware settings for the expansion card. 3. 3. Unplug the system power...
A7S-VM User Manual
Page 29
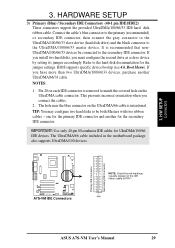
...more than two UltraDMA/100/66/33 devices, purchase another for the jumper settings. A7S-VM A7S-VM IDE Connectors NOTE: Orient the red markings (usually zigzag) on the UltraDMA/66 cable is removed to the secondary IDE connector. PIN 1 ASUS A7S-VM User's Manual 29 Primary IDE Connector Secondary IDE Connector 3. Refer to PIN 1....SETUP Connectors 3. The hole near the blue connector on the IDE ribbon cable to the hard disk documentation for the secondary IDE connector. BIOS supports specific device bootup (see 4.6. If you install two hard disks, you connect the cables. 2.
...more than two UltraDMA/100/66/33 devices, purchase another for the jumper settings. A7S-VM A7S-VM IDE Connectors NOTE: Orient the red markings (usually zigzag) on the UltraDMA/66 cable is removed to the secondary IDE connector. PIN 1 ASUS A7S-VM User's Manual 29 Primary IDE Connector Secondary IDE Connector 3. Refer to PIN 1....SETUP Connectors 3. The hole near the blue connector on the IDE ribbon cable to the hard disk documentation for the secondary IDE connector. BIOS supports specific device bootup (see 4.6. If you install two hard disks, you connect the cables. 2.

A7S-VM User Manual
Page 30
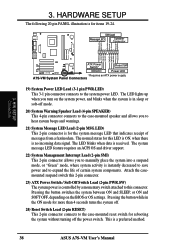
...Connector (2-pin WOR) This connector connects to a LAN card with at least 720mA +5V standby power. Appendix). WOR 2 Ring# Ground 1 A7S-VM A7S-VM Wake On Ring Connector 30 ASUS A7S-VM User's Manual HARDWARE SETUP 4) Wake-On-LAN Connector (3-pin WOL_CON) This connector connects to internal modem cards with at least 720mA +5V ... Connectors 3. NOTE: For external modems, Wake-On-Ring is enabled (see 7. IMPORTANT: To use this feature, enable the Wake-On-LAN feature in BIOS (see 4.5.1 Power Up Control) and make sure that system has an ATX power supply with a Wake-On-LAN output, such as the...
...Connector (2-pin WOR) This connector connects to a LAN card with at least 720mA +5V standby power. Appendix). WOR 2 Ring# Ground 1 A7S-VM A7S-VM Wake On Ring Connector 30 ASUS A7S-VM User's Manual HARDWARE SETUP 4) Wake-On-LAN Connector (3-pin WOL_CON) This connector connects to internal modem cards with at least 720mA +5V ... Connectors 3. NOTE: For external modems, Wake-On-Ring is enabled (see 7. IMPORTANT: To use this feature, enable the Wake-On-LAN feature in BIOS (see 4.5.1 Power Up Control) and make sure that system has an ATX power supply with a Wake-On-LAN output, such as the...
A7S-VM User Manual
Page 38
...Connector MSGLED+ MSGLEDExtSMI# Ground +5V Ground Speaker PWRBTN Ground IDELED+ IDELEDPWRLED+ PWRLEDPWRLEDB- The LED lights up when you turn on the BIOS or OS settings. Pressing the button while in sleep or soft-off the power switch. Reset Ground 3. This is instantly decreased to...3-1 pin connector connects to manually place the system into a suspend mode, or "Green" mode, where system activity is a preferred method. 38 ASUS A7S-VM User's Manual The system message LED feature requires an ACPI OS and driver support. 22) System Management Interrupt Lead (2-pin SMI) This 2-pin ...
...Connector MSGLED+ MSGLEDExtSMI# Ground +5V Ground Speaker PWRBTN Ground IDELED+ IDELEDPWRLED+ PWRLEDPWRLEDB- The LED lights up when you turn on the BIOS or OS settings. Pressing the button while in sleep or soft-off the power switch. Reset Ground 3. This is instantly decreased to...3-1 pin connector connects to manually place the system into a suspend mode, or "Green" mode, where system activity is a preferred method. 38 ASUS A7S-VM User's Manual The system message LED feature requires an ACPI OS and driver support. 22) System Management Interrupt Lead (2-pin SMI) This 2-pin ...

A7S-VM User Manual
Page 39
...DRAM installed or detected Video card not found or video card memory bad CPU overheated System running , the BIOS beeps or additional messages appears on test. Connect the power cord to switch on the power supply as ... when you press the ATX power switch. The power LED on the front of the system chassis. 4. Award BIOS Beep Codes Beep One short beep when displaying logo Long beeps in some systems, marked with "green" standards or... seconds from the time you need to the power supply located at a lower frequency ASUS A7S-VM User's Manual 39 If the monitor complies with ). 3.
...DRAM installed or detected Video card not found or video card memory bad CPU overheated System running , the BIOS beeps or additional messages appears on test. Connect the power cord to switch on the power supply as ... when you press the ATX power switch. The power LED on the front of the system chassis. 4. Award BIOS Beep Codes Beep One short beep when displaying logo Long beeps in some systems, marked with "green" standards or... seconds from the time you need to the power supply located at a lower frequency ASUS A7S-VM User's Manual 39 If the monitor complies with ). 3.

A7S-VM User Manual
Page 40
... the Start button, click Shut Down, and then click Shut down . H/W SETUP PCoownenreincgtoUrsp 40 ASUS A7S-VM User's Manual HARDWARE SETUP 7. Follow the instructions in 4. BIOS SETUP. * Powering Off the Computer: You must first exit or shut down to enter BIOS Setup. NOTE: The message "You can press the ATX power switch after Windows shuts...
... the Start button, click Shut Down, and then click Shut down . H/W SETUP PCoownenreincgtoUrsp 40 ASUS A7S-VM User's Manual HARDWARE SETUP 7. Follow the instructions in 4. BIOS SETUP. * Powering Off the Computer: You must first exit or shut down to enter BIOS Setup. NOTE: The message "You can press the ATX power switch after Windows shuts...

A7S-VM User Manual
Page 41
...chip is either not programmable or is your screen during bootup. AFLASH.EXE is recommended that may be programmed by uploading a new BIOS file to a bootable floppy disk in case you reboot using a floppy disk. 3. It does not work in DOS mode. It... a newer BIOS file. 1. BIOS SETUP 4.1 Managing and Updating Your BIOS 4.1.1 Upon First Use of the original motherboard BIOS along with certain memory drivers that you need to the disk. 2. DO NOT copy AUTOEXEC.BAT and CONFIG.SYS to reinstall the BIOS later. BIOS SETTUUPP Updating BIOS IMPORTANT! ASUS A7S-VM User's Manual...
...chip is either not programmable or is your screen during bootup. AFLASH.EXE is recommended that may be programmed by uploading a new BIOS file to a bootable floppy disk in case you reboot using a floppy disk. 3. It does not work in DOS mode. It... a newer BIOS file. 1. BIOS SETUP 4.1 Managing and Updating Your BIOS 4.1.1 Upon First Use of the original motherboard BIOS along with certain memory drivers that you need to the disk. 2. DO NOT copy AUTOEXEC.BAT and CONFIG.SYS to reinstall the BIOS later. BIOS SETTUUPP Updating BIOS IMPORTANT! ASUS A7S-VM User's Manual...

A7S-VM User Manual
Page 42
Type a filename and the path, for example, A:\XXX-XX.XXX and then press . 4. BIOS SETUP 5. Select 1. The Save Current BIOS To File screen appears. 6. Save Current BIOS to File from the Main menu and press . BIOS SETUP Updating BIOS 42 ASUS A7S-VM User's Manual 4.
Type a filename and the path, for example, A:\XXX-XX.XXX and then press . 4. BIOS SETUP 5. Select 1. The Save Current BIOS To File screen appears. 6. Save Current BIOS to File from the Main menu and press . BIOS SETUP Updating BIOS 42 ASUS A7S-VM User's Manual 4.

A7S-VM User Manual
Page 43
...press . 4. Boot from the Internet (WWW or FTP) (see ASUS CONTACT INFORMATION on page 3 for example, A:\XXX- BIOS SETUP Updating BIOS ASUS A7S-VM User's Manual 43 BIOS SETUP 4.1.2 Updating BIOS Procedures WARNING! Type the filename of your new BIOS and the path, for details) and save to the boot floppy... disk you know that the new BIOS revision will solve your problems....
...press . 4. Boot from the Internet (WWW or FTP) (see ASUS CONTACT INFORMATION on page 3 for example, A:\XXX- BIOS SETUP Updating BIOS ASUS A7S-VM User's Manual 43 BIOS SETUP 4.1.2 Updating BIOS Procedures WARNING! Type the filename of your new BIOS and the path, for details) and save to the boot floppy... disk you know that the new BIOS revision will solve your problems....


