
A7N8X-E Deluxe User's Manual
Page 37
... computer. 6. Hold down the key during the boot process and enter BIOS setup to pins 1-2. 4. Serial ATA setting (3-pin SATA_EN1) This jumper enables or disables the Serial ATA controllers. A7N8X-E ® A7N8X-E SATA Setting SATA_EN1 12 Enable (Default) 23 Disable ASUS A7N8X-E Deluxe motherboard 2-17 Replace the battery. 5. A7N8X-E ® A7N8X-E Clear RTC RAM CLRTC1 12 23 Normal (Default...
... computer. 6. Hold down the key during the boot process and enter BIOS setup to pins 1-2. 4. Serial ATA setting (3-pin SATA_EN1) This jumper enables or disables the Serial ATA controllers. A7N8X-E ® A7N8X-E SATA Setting SATA_EN1 12 Enable (Default) 23 Disable ASUS A7N8X-E Deluxe motherboard 2-17 Replace the battery. 5. A7N8X-E ® A7N8X-E Clear RTC RAM CLRTC1 12 23 Normal (Default...

A7N8X-E Deluxe User Manual
Page 37
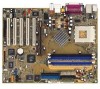
... battery. Remove the battery. 3. Replace the battery. 5. Hold down the key during the boot process and enter BIOS setup to pins 2-3. A7N8X-E ® A7N8X-E SATA Setting SATA_EN1 12 Enable (Default) 23 Disable ASUS A7N8X-E Deluxe motherboard 2-17 The RAM data in CMOS. A7N8X-E ® A7N8X-E Clear RTC RAM CLRTC1 12 23 Normal (Default) Clear CMOS 6. Move the jumper caps...
... battery. Remove the battery. 3. Replace the battery. 5. Hold down the key during the boot process and enter BIOS setup to pins 2-3. A7N8X-E ® A7N8X-E SATA Setting SATA_EN1 12 Enable (Default) 23 Disable ASUS A7N8X-E Deluxe motherboard 2-17 The RAM data in CMOS. A7N8X-E ® A7N8X-E Clear RTC RAM CLRTC1 12 23 Normal (Default) Clear CMOS 6. Move the jumper caps...


