
User Manual
Page 3
Eee Docking (on selected models 3-7 Access...3-7 Sharing...3-8 Experience...3-8 Tools ...3-8 Chapter 4: System Recovery System Recovery...4-2 Boot Booster...4-5 Appendix Declarations and Safety Statements A-2 Federal Communications Commission Statement A-2 FCC ... Safety Notices...A-7 REACH Notice...A-8 Power Safety Requirement A-8 Global Environmental Regulation Compliance and Declaration .........A-9 Takeback Services A-9 Nordic Lithium Cautions (for lithium-ion batteries A-10 Copyright Information...A-12 Limitation of Liability...A-13 Service and Support...A-13 ASUS Eee PC iii
Eee Docking (on selected models 3-7 Access...3-7 Sharing...3-8 Experience...3-8 Tools ...3-8 Chapter 4: System Recovery System Recovery...4-2 Boot Booster...4-5 Appendix Declarations and Safety Statements A-2 Federal Communications Commission Statement A-2 FCC ... Safety Notices...A-7 REACH Notice...A-8 Power Safety Requirement A-8 Global Environmental Regulation Compliance and Declaration .........A-9 Takeback Services A-9 Nordic Lithium Cautions (for lithium-ion batteries A-10 Copyright Information...A-12 Limitation of Liability...A-13 Service and Support...A-13 ASUS Eee PC iii

User Manual
Page 16
... be removed from a fixed object. 1-8 Chapter 1: Knowing the Parts Right Side Refer to the diagram below to identify the components on this side of the Eee PC. 12 3 45 1 Headphone Output Jack 2 Microphone Jack The microphone jack is designed to connect the microphone used for voice narrations or simple audio recordings. 3 USB Port...-pin RJ-45 LAN port supports a standard Ethernet cable for connection to a local network. 5 Kensington® Lock port The Kensington® lock port allows the Eee PC to be secured using Kensington® compatible security products.
... be removed from a fixed object. 1-8 Chapter 1: Knowing the Parts Right Side Refer to the diagram below to identify the components on this side of the Eee PC. 12 3 45 1 Headphone Output Jack 2 Microphone Jack The microphone jack is designed to connect the microphone used for voice narrations or simple audio recordings. 3 USB Port...-pin RJ-45 LAN port supports a standard Ethernet cable for connection to a local network. 5 Kensington® Lock port The Kensington® lock port allows the Eee PC to be secured using Kensington® compatible security products.
User Manual
Page 17
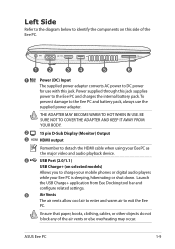
...Refer to the diagram below to identify the components on selected models) Allows you to charge your mobile phones or digital audio players while your Eee PC is sleeping, hibernating or shut down. BE SURE NOT TO COVER THE ADAPTER AND KEEP IT AWAY FROM YOUR BODY. 2 15 pin D-Sub...the air vents or else overheating may occur. Power supplied through this jack. ASUS Eee PC 1-9 THE ADAPTER MAY BECOME WARM TO HOT WHEN IN USE. Ensure that paper, books, clothing, cables, or other objects do not block any of the Eee PC. 12 34 5 6 1 Power (DC) Input The supplied power adapter converts ...
...Refer to the diagram below to identify the components on selected models) Allows you to charge your mobile phones or digital audio players while your Eee PC is sleeping, hibernating or shut down. BE SURE NOT TO COVER THE ADAPTER AND KEEP IT AWAY FROM YOUR BODY. 2 15 pin D-Sub...the air vents or else overheating may occur. Power supplied through this jack. ASUS Eee PC 1-9 THE ADAPTER MAY BECOME WARM TO HOT WHEN IN USE. Ensure that paper, books, clothing, cables, or other objects do not block any of the Eee PC. 12 34 5 6 1 Power (DC) Input The supplied power adapter converts ...

User Manual
Page 31
Select Connect to the Internet. Click Connect. 10. ASUS Eee PC 2-9 Enter your user name and password. Click Connect to connect to the Internet and click Next. 8. Click the network icon in the taskbar and click the connection you just created. 12. Select Broadband (PPPoE) and click Next. 9. Click Close to finish the configuration. 11. 7. Enter your User name and, Password, and Connection name.
Select Connect to the Internet. Click Connect. 10. ASUS Eee PC 2-9 Enter your user name and password. Click Connect to connect to the Internet and click Next. 8. Click the network icon in the taskbar and click the connection you just created. 12. Select Broadband (PPPoE) and click Next. 9. Click Close to finish the configuration. 11. 7. Enter your User name and, Password, and Connection name.


