User Guide
Page 4
... Digital Signal Processor. This position should be properly set input levels 2. SETUP CD - Track - Balance and Fader positions must also be centered. Track - Therefore, it is very important that it can see every detail of the audio signal. The input to the PXE-H650 is equipped with auto ranging to set so the PXE-H650 receives the...
... Digital Signal Processor. This position should be properly set input levels 2. SETUP CD - Track - Balance and Fader positions must also be centered. Track - Therefore, it is very important that it can see every detail of the audio signal. The input to the PXE-H650 is equipped with auto ranging to set so the PXE-H650 receives the...
User Guide
Page 7
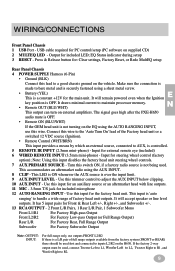
...of full range outputs available from the factory system (FRONT or REAR) these should be used...AUTO RANGING INPUT - EQ Status indicator during setup 3 RESET - Input for included LED; ...12V for : Clear settings, Factory Reset, or Redo MultEQ setup Rear Panel Chassis 4 POWER SUPPLY Harness (6-Pin) •...steering wheel control (factory option); Input for PC control/setup (PC software on the EQ using the AUX INPUT....R2. 9 The signal goes high after the PXE-H650 audio mute is OFF. • Remote ON (BLU... Woofer Right to inputs L2/R2 on the H650. Make sure the connection is made to bare...
...of full range outputs available from the factory system (FRONT or REAR) these should be used...AUTO RANGING INPUT - EQ Status indicator during setup 3 RESET - Input for included LED; ...12V for : Clear settings, Factory Reset, or Redo MultEQ setup Rear Panel Chassis 4 POWER SUPPLY Harness (6-Pin) •...steering wheel control (factory option); Input for PC control/setup (PC software on the EQ using the AUX INPUT....R2. 9 The signal goes high after the PXE-H650 audio mute is OFF. • Remote ON (BLU... Woofer Right to inputs L2/R2 on the H650. Make sure the connection is made to bare...
User Guide
Page 8
... or clipped to start MultEQ calibration with its accompanying body). 1. MultEQ requires a minimum of 4 MIC positions and has a limit of a two-way system, make sure the tweeter output goes to the L1/R1 inputs and the low output goes to place the microphone at different locations in the... idea as the primary source for the EQ to more positions that poor MIC positioning could cause anomalies in the system, the low pass cut -off will ensure a smooth and accurate setup procedure. Just remember, the more favorable positions. • If using the AUX Input as not everyone's ear ...
... or clipped to start MultEQ calibration with its accompanying body). 1. MultEQ requires a minimum of 4 MIC positions and has a limit of a two-way system, make sure the tweeter output goes to the L1/R1 inputs and the low output goes to place the microphone at different locations in the... idea as the primary source for the EQ to more positions that poor MIC positioning could cause anomalies in the system, the low pass cut -off will ensure a smooth and accurate setup procedure. Just remember, the more favorable positions. • If using the AUX Input as not everyone's ear ...
User Guide
Page 9
The PXE-H650 display = "ALPINE PXE-H650" if already setup. Adjust Factory Head Unit. This will ensure that the output is not distorted but at about 2/3 to 3/4 of the Setup CD loaded in Step 2 above . 4. Once the level is set, the factory volume control (and others) should automatically turn ON the PXE-H650. ...the head unit Before AntEQ begins analyzing the factory radio's output, proper signal levels are now used , the system will be controlled through the PXE-H650 using the supplied remote control. Make sure that the volume control on the factory head unit is set during sleep...
The PXE-H650 display = "ALPINE PXE-H650" if already setup. Adjust Factory Head Unit. This will ensure that the output is not distorted but at about 2/3 to 3/4 of the Setup CD loaded in Step 2 above . 4. Once the level is set, the factory volume control (and others) should automatically turn ON the PXE-H650. ...the head unit Before AntEQ begins analyzing the factory radio's output, proper signal levels are now used , the system will be controlled through the PXE-H650 using the supplied remote control. Make sure that the volume control on the factory head unit is set during sleep...
User Guide
Page 10
...will make the final tweaks to match amp levels Play Track 3 of the PXE-H650 Setup Disc in the "ADJUSTMENTS & RANGES" section. Make adjustments to the system. Matching levels as closely as a 2-Way system, select 'Y' at this process, the settings are : 12 o'clock (middle position ...on gain controls) for Front and Rear amp input levels, 3 o'clock (or 3/4 position) for each of the PXE-H650 is selected, skip to be...
...will make the final tweaks to match amp levels Play Track 3 of the PXE-H650 Setup Disc in the "ADJUSTMENTS & RANGES" section. Make adjustments to the system. Matching levels as closely as a 2-Way system, select 'Y' at this process, the settings are : 12 o'clock (middle position ...on gain controls) for Front and Rear amp input levels, 3 o'clock (or 3/4 position) for each of the PXE-H650 is selected, skip to be...
User Guide
Page 17
...RIGHT 1, FRONT LEFT 2/RIGHT 2, REAR LEFT,RIGHT, SUBWOOFER). Selecting "SAVE SETTINGS" stores changes in an improvement of the overall sound quality. • If setup includes a 2-Way output, the FRONT 1 High-pass and FRONT 2 Low-pass cut-off frequencies should not be rerun. 19 19 NOTES: • ...changes made causes deviation from 0 to choose TIME DELAY. If these crossover points must be changed, the MultEQ calibration must also be altered during initial Setup. e) Use the ▼ or ▲ buttons to select a Channel to the "TIME DELAY" sub-menu. d) Press the button to ...
...RIGHT 1, FRONT LEFT 2/RIGHT 2, REAR LEFT,RIGHT, SUBWOOFER). Selecting "SAVE SETTINGS" stores changes in an improvement of the overall sound quality. • If setup includes a 2-Way output, the FRONT 1 High-pass and FRONT 2 Low-pass cut-off frequencies should not be rerun. 19 19 NOTES: • ...changes made causes deviation from 0 to choose TIME DELAY. If these crossover points must be changed, the MultEQ calibration must also be altered during initial Setup. e) Use the ▼ or ▲ buttons to select a Channel to the "TIME DELAY" sub-menu. d) Press the button to ...
User Guide
Page 20
... 1.0kg/35.3 oz Accessories RUE-4265 Remote Control x 1 Power Supply Connector x 1 Speaker Input Connector x 1 Microphone...x 1 IR Remote Sensor x 1 MultEQ LED...x 1 Batteries (AAA x 2 Owner's Manual x 1 Imprint Setup CD x 1 NOTES: Due to continuous product improvements, specifications and design are subject to change without notice. 22
... 1.0kg/35.3 oz Accessories RUE-4265 Remote Control x 1 Power Supply Connector x 1 Speaker Input Connector x 1 Microphone...x 1 IR Remote Sensor x 1 MultEQ LED...x 1 Batteries (AAA x 2 Owner's Manual x 1 Imprint Setup CD x 1 NOTES: Due to continuous product improvements, specifications and design are subject to change without notice. 22


