User Guide
Page 1
...;F) before turning your Alpine dealer or the nearest Alpine Service Station for shorted circuitry. If the fuse(s) blows more than once, carefully check all electrical connections for servicing. Fuse Replacement When replacing the fuse(s), the replacement must be exposed to your unit on the fuse holder. E Installation Location Make sure the PXE-H650 will not be of the same amperage as shown on . This symbol means important instructions. Also have problems, do...
...;F) before turning your Alpine dealer or the nearest Alpine Service Station for shorted circuitry. If the fuse(s) blows more than once, carefully check all electrical connections for servicing. Fuse Replacement When replacing the fuse(s), the replacement must be exposed to your unit on the fuse holder. E Installation Location Make sure the PXE-H650 will not be of the same amperage as shown on . This symbol means important instructions. Also have problems, do...
User Guide
Page 3
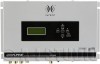
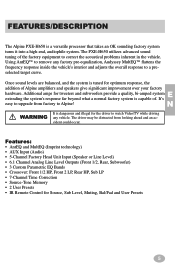
...; 7-Channel Time Correction • Source-Tone Memory • 2 User Presets • IR Remote Control for optimum response, the addition of Alpine amplifiers and speakers give significant improvement over your factory E hardware. The driver may be distracted from factory to upgrade from looking ahead and an ac- The PXE-H650 utilizes advanced sound tuning of . It's easy to Alpine! Once sound levels are balanced, and the system is tuned for Source, Sub Level, Muting, Bal...
...; 7-Channel Time Correction • Source-Tone Memory • 2 User Presets • IR Remote Control for optimum response, the addition of Alpine amplifiers and speakers give significant improvement over your factory E hardware. The driver may be distracted from factory to upgrade from looking ahead and an ac- The PXE-H650 utilizes advanced sound tuning of . It's easy to Alpine! Once sound levels are balanced, and the system is tuned for Source, Sub Level, Muting, Bal...
User Guide
Page 4
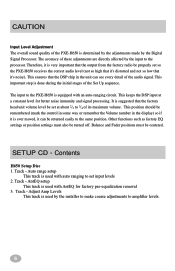
... that the factory head unit volume level be set input levels 2. Other functions such as factory EQ settings or position settings must be properly set so the PXE-H650 receives the correct audio level (not so high that it can see every detail of the Set Up sequence. Contents H650 Setup Disc 1. Track - Track - This position should be remembered (mark the control in some way or remember the Volume number in the unit can be turned off...
... that the factory head unit volume level be set input levels 2. Other functions such as factory EQ settings or position settings must be properly set so the PXE-H650 receives the correct audio level (not so high that it can see every detail of the Set Up sequence. Contents H650 Setup Disc 1. Track - Track - This position should be remembered (mark the control in some way or remember the Volume number in the unit can be turned off...
User Guide
Page 7
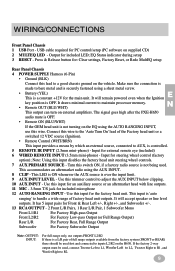
... unit. Note: Using this wire to the 'Auto Turn On' lead of the Factory head unit or a switched 12 VDC source (Ignition). • Remote Control (WHT/BRN) This input provides a means by which an external source, connected to AUX, is OFF. It will remain powered even when the Ignition key position is controlled. 5 REMOTE IR INPUT (2.5mm mini-phono) - WIRING/CONNECTIONS Front Panel Chassis 1 USB Port - USB cable required for : Clear settings, Factory Reset, or Redo MultEQ setup Rear Panel Chassis 4 POWER SUPPLY Harness (6-Pin...
... unit. Note: Using this wire to the 'Auto Turn On' lead of the Factory head unit or a switched 12 VDC source (Ignition). • Remote Control (WHT/BRN) This input provides a means by which an external source, connected to AUX, is OFF. It will remain powered even when the Ignition key position is controlled. 5 REMOTE IR INPUT (2.5mm mini-phono) - WIRING/CONNECTIONS Front Panel Chassis 1 USB Port - USB cable required for : Clear settings, Factory Reset, or Redo MultEQ setup Rear Panel Chassis 4 POWER SUPPLY Harness (6-Pin...
User Guide
Page 8
... a smooth and accurate setup procedure. Determine the factory system's output type (full-range or two-way). In the case of 8. The mid-bass low-pass cut -off is also needed in between the two front seats. It is no way for the high-pass speakers. Just remember, the more favorable positions. • If using the AUX Input as the HP...
... a smooth and accurate setup procedure. Determine the factory system's output type (full-range or two-way). In the case of 8. The mid-bass low-pass cut -off is also needed in between the two front seats. It is no way for the high-pass speakers. Just remember, the more favorable positions. • If using the AUX Input as the HP...
User Guide
Page 9
... auto-ranging are required. TURN ON Vehicle Ignition Switch 2. Volume will enter the SETUP mode automatically. BASIC OPERATION Initial Setup & AntEQ Initially, a blank display is displayed. Make sure that the output is being used as TONE, EQ or other special processing must be controlled through the PXE-H650 using the supplied remote control. Checking and setting input levels from the head unit Before AntEQ begins analyzing the factory radio's output, proper signal levels are now used , the system will be turned...
... auto-ranging are required. TURN ON Vehicle Ignition Switch 2. Volume will enter the SETUP mode automatically. BASIC OPERATION Initial Setup & AntEQ Initially, a blank display is displayed. Make sure that the output is being used as TONE, EQ or other special processing must be controlled through the PXE-H650 using the supplied remote control. Checking and setting input levels from the head unit Before AntEQ begins analyzing the factory radio's output, proper signal levels are now used , the system will be turned...
User Guide
Page 10
... the trimming of the speakers. This is not muted at this point. Set the High-pass crossover point The FRONT 1 high-pass crossover is selected, skip to match amp levels Play Track 3 of the PXE-H650 is in preparation for Subwoofer amp input level. 11. The default 'N' assumes only a single, full range Front (Front L2/R2). Make adjustments to the AMP LEVELS adjustments. Make sure volume levels are at this point...
... the trimming of the speakers. This is not muted at this point. Set the High-pass crossover point The FRONT 1 high-pass crossover is selected, skip to match amp levels Play Track 3 of the PXE-H650 is in preparation for Subwoofer amp input level. 11. The default 'N' assumes only a single, full range Front (Front L2/R2). Make adjustments to the AMP LEVELS adjustments. Make sure volume levels are at this point...
User Guide
Page 11
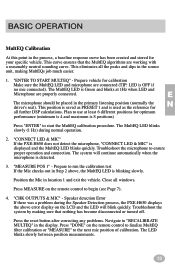
... the N driver's seat). Speaker detection Error If there was a problem during normal operation. 2. The MultEQ LED is 8 positions) Press "ENTER" to use at 1Hz when LED and Microphone are connected (TIP: LED is used as PRESET 1 and is OFF if no mic connected). "MEASURE POS 1" - The system will blink quickly. "CHK OUTPUTS & MIC" - BASIC OPERATION MultEQ Calibration At this point in the source unit, making sure...
... the N driver's seat). Speaker detection Error If there was a problem during normal operation. 2. The MultEQ LED is 8 positions) Press "ENTER" to use at 1Hz when LED and Microphone are connected (TIP: LED is used as PRESET 1 and is OFF if no mic connected). "MEASURE POS 1" - The system will blink quickly. "CHK OUTPUTS & MIC" - BASIC OPERATION MultEQ Calibration At this point in the source unit, making sure...

User Guide
Page 12
... the desired number of MIC positions, press "DONE" while "MEASURE POS X" (Where X is either 5,6,or 7) is showing on the LCD and finally "ALPINE PXE-H650" is displayed on the display. The MultEQ LED illuminates a steady green. 6. Press "ENTER" to restart the MultEQ calibration sequence. Press "ENTER" when ready to select this new position. Equalization and Time Delay will...
... the desired number of MIC positions, press "DONE" while "MEASURE POS X" (Where X is either 5,6,or 7) is showing on the LCD and finally "ALPINE PXE-H650" is displayed on the display. The MultEQ LED illuminates a steady green. 6. Press "ENTER" to restart the MultEQ calibration sequence. Press "ENTER" when ready to select this new position. Equalization and Time Delay will...
User Guide
Page 13
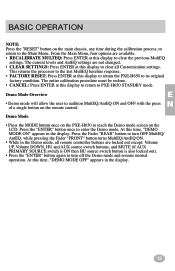
... this time, "DEMO MODE ON" appears in the display. 15 Demo Mode • Press the MODE button once on the PXE-H650 to enter the Demo mode. At this display to return the PXE-H650 to the Main Menu. Press the "ENTER" button once to reach the Demo mode screen on the remote control. At this display to return to clear all remote controller buttons are locked out except: Volume UP, Volume DOWN, HU and AUX source switch buttons, and MUTE (if AUX PRIMARY SOURCE switch...
... this time, "DEMO MODE ON" appears in the display. 15 Demo Mode • Press the MODE button once on the PXE-H650 to enter the Demo mode. At this display to return the PXE-H650 to the Main Menu. Press the "ENTER" button once to reach the Demo mode screen on the remote control. At this display to return to clear all remote controller buttons are locked out except: Volume UP, Volume DOWN, HU and AUX source switch buttons, and MUTE (if AUX PRIMARY SOURCE switch...

User Guide
Page 14
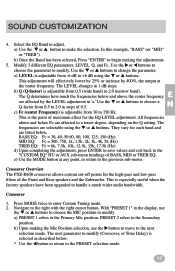
.... PRESET 2 refers to the PXE-H650 has its own EQ. Pressing "ENTER" gets you into the program screen mode, which will return all settings back to their original, corrected levels before customization began. Press MODE to the next selection mode. The next parameter to modify (Crossover, or Time Delay) is adjusted in memory. Each of the Bands (Bass, Mid and Treble) is selected as described following steps use...
.... PRESET 2 refers to the PXE-H650 has its own EQ. Pressing "ENTER" gets you into the program screen mode, which will return all settings back to their original, corrected levels before customization began. Press MODE to the next selection mode. The next parameter to modify (Crossover, or Time Delay) is adjusted in memory. Each of the Bands (Bass, Mid and Treble) is selected as described following steps use...
User Guide
Page 15
... ▲ buttons. Navigate to enter Custom Tuning mode. 2. b) Upon making the adjustments. 5. a) Use the ▼ or ▲ button to modify. Use the or buttons to choose the parameter to make the selection. The LEVEL changes in 'a.' This is adjustable from 0.5 (wide band) to +6 dB using the ▼ or ▲ buttons. PRESET 2 refers to the "CUSTOM EQ" HU or AUX sub-menu headings of the Front and Rear speakers and the Subwoofer. The frequencies are listed...
... ▲ buttons. Navigate to enter Custom Tuning mode. 2. b) Upon making the adjustments. 5. a) Use the ▼ or ▲ button to modify. Use the or buttons to choose the parameter to make the selection. The LEVEL changes in 'a.' This is adjustable from 0.5 (wide band) to +6 dB using the ▼ or ▲ buttons. PRESET 2 refers to the "CUSTOM EQ" HU or AUX sub-menu headings of the Front and Rear speakers and the Subwoofer. The frequencies are listed...
User Guide
Page 16
... crossover slopes. This adjustment changes the LEVEL in ALL modes. The ▼ or ▲ buttons select the frequency. e) If all CROSSOVER adjustments have been completed, use these buttons to choose a channel. The procedure is the same with "CROSSOVER" or "TIME DELAY" selections. In this section. 4. Note: Use the same procedure to select any point, to return to the previous sub-menu to the previous level with only the...
... crossover slopes. This adjustment changes the LEVEL in ALL modes. The ▼ or ▲ buttons select the frequency. e) If all CROSSOVER adjustments have been completed, use these buttons to choose a channel. The procedure is the same with "CROSSOVER" or "TIME DELAY" selections. In this section. 4. Note: Use the same procedure to select any point, to return to the previous sub-menu to the previous level with only the...
User Guide
Page 17
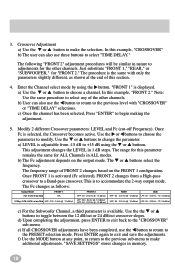
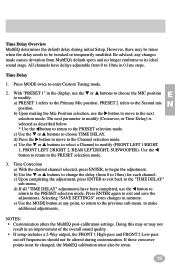
... selection, use the button to move to 10ms in the display, use the button to return to the previous sub-menu. d) If all "TIME DELAY" adjustments have delays adjustable from MultEQ's default specs and no longer conforms to the PRESET selection mode. 3. If these crossover points must be changed, the MultEQ calibration must also be altered during initial Setup. Selecting "SAVE SETTINGS" stores changes in an improvement of the overall sound...
... selection, use the button to move to 10ms in the display, use the button to return to the previous sub-menu. d) If all "TIME DELAY" adjustments have delays adjustable from MultEQ's default specs and no longer conforms to the PRESET selection mode. 3. If these crossover points must be changed, the MultEQ calibration must also be altered during initial Setup. Selecting "SAVE SETTINGS" stores changes in an improvement of the overall sound...
User Guide
Page 19
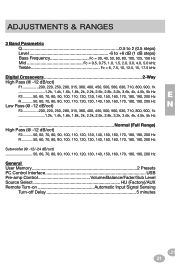
ADJUSTMENTS & RANGES 3 Band Parametric Q 0.5 to 2 (0.5 steps) Level 6 to +6 dB (1 dB steps) Bass Frequency Fc = 30, 40, 50, 60, 80, 100, 125, 150 Hz Mid Fc = 0.5, 0.75, 1.0, 1.5, 2.0, 3.0, 4.0, 5.0 kHz Treble Fc = 6, 7.5, 10, 12.5, 15, 17.5 kHz Digital Crossovers 2-Way High ... 200 Hz Subwoofer (@ -12/-24 dB/oct 50, 60, 70, 80, 90, 100, 110, 120, 130, 140, 150, 160, 170, 180, 190, 200 Hz General User Memory 2 Presets PC Control Interface USB Pre-amp Control Volume/Balance/Fader/Sub Level Source Select HU (Factory)/AUX Remote Turn-on Automatic Input Signal Sensing Turn-off Delay ...
ADJUSTMENTS & RANGES 3 Band Parametric Q 0.5 to 2 (0.5 steps) Level 6 to +6 dB (1 dB steps) Bass Frequency Fc = 30, 40, 50, 60, 80, 100, 125, 150 Hz Mid Fc = 0.5, 0.75, 1.0, 1.5, 2.0, 3.0, 4.0, 5.0 kHz Treble Fc = 6, 7.5, 10, 12.5, 15, 17.5 kHz Digital Crossovers 2-Way High ... 200 Hz Subwoofer (@ -12/-24 dB/oct 50, 60, 70, 80, 90, 100, 110, 120, 130, 140, 150, 160, 170, 180, 190, 200 Hz General User Memory 2 Presets PC Control Interface USB Pre-amp Control Volume/Balance/Fader/Sub Level Source Select HU (Factory)/AUX Remote Turn-on Automatic Input Signal Sensing Turn-off Delay ...
User Guide
Page 20
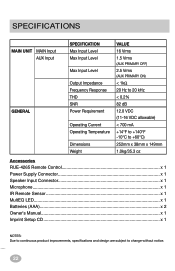
SPECIFICATIONS MAIN UNIT MAIN Input AUX Input GENERAL SPECIFICATION Max Input Level Max Input Level Max Input Level Output Impedance Frequency Response THD SNR Power Requirement Operating Current Operating Temperature Dimensions Weight VALUE 16 Vrms 1.5 Vrms (AUX PRIMARY OFF) 2.5 Vrms (AUX...4265 Remote Control x 1 Power Supply Connector x 1 Speaker Input Connector x 1 Microphone...x 1 IR Remote Sensor x 1 MultEQ LED...x 1 Batteries (AAA x 2 Owner's Manual x 1 Imprint Setup CD x 1 NOTES: Due to continuous product improvements, specifications and design are subject to change ...
SPECIFICATIONS MAIN UNIT MAIN Input AUX Input GENERAL SPECIFICATION Max Input Level Max Input Level Max Input Level Output Impedance Frequency Response THD SNR Power Requirement Operating Current Operating Temperature Dimensions Weight VALUE 16 Vrms 1.5 Vrms (AUX PRIMARY OFF) 2.5 Vrms (AUX...4265 Remote Control x 1 Power Supply Connector x 1 Speaker Input Connector x 1 Microphone...x 1 IR Remote Sensor x 1 MultEQ LED...x 1 Batteries (AAA x 2 Owner's Manual x 1 Imprint Setup CD x 1 NOTES: Due to continuous product improvements, specifications and design are subject to change ...


