
Owners Manual
Page 3
ENGLISH Contents Operating Instructions WARNING WARNING 4 CAUTION 4 PRECAUTIONS 4 Discs playable on this unit 6 Getting Started Turning Power On and Off 8 Detaching and Attaching the Front Panel ........ 8 Initial System Start-Up 9 Adjusting Volume 9 Lowering Volume Quickly 9 Setting Time 9 Radio Listening to Radio 10 Manual Storing of Station Presets 10 Automatic Memory of Station Presets 10 Tuning to Preset Stations 10 Frequency Search Function 11 Switching the HD Radio™ signal 11 CD/MP3/WMA Playback 11 Repeat Play 12 M.I.X. (Random...
ENGLISH Contents Operating Instructions WARNING WARNING 4 CAUTION 4 PRECAUTIONS 4 Discs playable on this unit 6 Getting Started Turning Power On and Off 8 Detaching and Attaching the Front Panel ........ 8 Initial System Start-Up 9 Adjusting Volume 9 Lowering Volume Quickly 9 Setting Time 9 Radio Listening to Radio 10 Manual Storing of Station Presets 10 Automatic Memory of Station Presets 10 Tuning to Preset Stations 10 Frequency Search Function 11 Switching the HD Radio™ signal 11 CD/MP3/WMA Playback 11 Repeat Play 12 M.I.X. (Random...
Owners Manual
Page 4
... Subwoofer System 25 Visual Customizing Dimmer Control 25 Scroll Type Setting 25 Scroll Setting (TEXT SCROLL 25 HD Radio Station Call Setting 25 Demonstration 25 External Device Connecting an MP3 Changer (PLAY MODE) ... 25 Turning Mute Mode On/Off (INT MUTE) ...... 25 Setting the AUX Mode (V-Link 25 Connecting to an External Amplifier 26 Setting the Digital Output 26 DVD Setup DVD Setup Operation 26 Setting the language 27 Setting the TV Screen 27 Setting the Country Code 27 Setting the Rating Level (Parental Lock) ......... 28 Audio Setup Audio Setup Operation...
... Subwoofer System 25 Visual Customizing Dimmer Control 25 Scroll Type Setting 25 Scroll Setting (TEXT SCROLL 25 HD Radio Station Call Setting 25 Demonstration 25 External Device Connecting an MP3 Changer (PLAY MODE) ... 25 Turning Mute Mode On/Off (INT MUTE) ...... 25 Setting the AUX Mode (V-Link 25 Connecting to an External Amplifier 26 Setting the Digital Output 26 DVD Setup DVD Setup Operation 26 Setting the language 27 Setting the TV Screen 27 Setting the Country Code 27 Setting the Rating Level (Parental Lock) ......... 28 Audio Setup Audio Setup Operation...

Owners Manual
Page 7
... Sheet Disc Stabilizer Installation Location Make sure the DVA-9861 will not leave fingerprints on the surface. If "ERROR" continues to : • Direct sun and heat • High humidity and water • Excessive dust • Excessive vibrations 5-EN CORRECT INCORRECT CORRECT Inserting Discs Your player accepts only one disc. Using such accessories can cause the disc to load more than one disc at a time for...
... Sheet Disc Stabilizer Installation Location Make sure the DVA-9861 will not leave fingerprints on the surface. If "ERROR" continues to : • Direct sun and heat • High humidity and water • Excessive dust • Excessive vibrations 5-EN CORRECT INCORRECT CORRECT Inserting Discs Your player accepts only one disc. Using such accessories can cause the disc to load more than one disc at a time for...

Owners Manual
Page 17
DVD-R/DVD-RW discs recorded in a video mode can be used . TUNER XM RADIO/SIRIUS*1 DISC IPOD*2 CHANGER*3 TUNER *1 Only when XM Radio or Sirius Radio is connected. *2 Only when the iPod is connected. *3 Only when the CD changer is already inserted, press SOURCE/POWER on the main unit to switch to the DISC mode. Remove the disc, turn power off or switch the Ignition Key to OFF during its eject cycle. AUDIO ENT. DVD Commercial Audio discs can be used. Playing a Disc Caution • Not all functions will operate for fingerprints...
DVD-R/DVD-RW discs recorded in a video mode can be used . TUNER XM RADIO/SIRIUS*1 DISC IPOD*2 CHANGER*3 TUNER *1 Only when XM Radio or Sirius Radio is connected. *2 Only when the iPod is connected. *3 Only when the CD changer is already inserted, press SOURCE/POWER on the main unit to switch to the DISC mode. Remove the disc, turn power off or switch the Ignition Key to OFF during its eject cycle. AUDIO ENT. DVD Commercial Audio discs can be used. Playing a Disc Caution • Not all functions will operate for fingerprints...
Owners Manual
Page 19
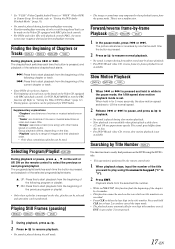
... divisions of movies or musical selections on the remote control to select the previous or next program/playlist. Set VCD PLAY MODE to cancel the input mode. • The playback starts automatically for two digit title numbers even if ENT. Refer to 1/2 the normal speed. 2 Release or playback. The program/playlist switches each time the button is pressed, and playback of the selected chapter/track starts. :Press...
... divisions of movies or musical selections on the remote control to select the previous or next program/playlist. Set VCD PLAY MODE to cancel the input mode. • The playback starts automatically for two digit title numbers even if ENT. Refer to 1/2 the normal speed. 2 Release or playback. The program/playlist switches each time the button is pressed, and playback of the selected chapter/track starts. :Press...

Owners Manual
Page 21
... is displayed first, after which scenes have been filmed from the disc menu. DVD Video 1. Refer to ON or OFF. • There may switch in the changer mode. • The track/disc repeat modes cannot be a delay before the selected alternate track begins to change the unit to REPEAT OFF. The sound switches between the alternate audio tracks recorded on the disc each time the button is set to "VCAP", operation...
... is displayed first, after which scenes have been filmed from the disc menu. DVD Video 1. Refer to ON or OFF. • There may switch in the changer mode. • The track/disc repeat modes cannot be a delay before the selected alternate track begins to change the unit to REPEAT OFF. The sound switches between the alternate audio tracks recorded on the disc each time the button is set to "VCAP", operation...
Owners Manual
Page 26
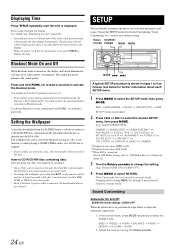
... any tuner or CD function while in disc mode. • Even if the battery power cable is removed, the downloaded data is turned on the unit. The display and button illumination will turn off to select the SETUP mode, then press MODE. Rotary SOURCE/ encoder POWER BAND MENU Blackout Mode On and Off When Blackout mode is not cleared. Select SUBWOOFER) DIMMER SUBWOOFER (SUBW SYSTEM)*1 PLAY MODE SCROLL TYPE TEXT SCROLL INT MUTE AUX IN (AUXNAME)*2 POWER IC (CH SELECT)*3 (XM ADF)*3 OPT OUTPUT STATION DEMO DIMMER *1 Displayed...
... any tuner or CD function while in disc mode. • Even if the battery power cable is removed, the downloaded data is turned on the unit. The display and button illumination will turn off to select the SETUP mode, then press MODE. Rotary SOURCE/ encoder POWER BAND MENU Blackout Mode On and Off When Blackout mode is not cleared. Select SUBWOOFER) DIMMER SUBWOOFER (SUBW SYSTEM)*1 PLAY MODE SCROLL TYPE TEXT SCROLL INT MUTE AUX IN (AUXNAME)*2 POWER IC (CH SELECT)*3 (XM ADF)*3 OPT OUTPUT STATION DEMO DIMMER *1 Displayed...
Owners Manual
Page 27
... setting) This unit has a demonstration feature for the display. • To quit Demo mode, set . Turning Mute Mode On/Off (INT MUTE) MUTE ON (Initial setting) / MUTE OFF If a device having the interrupt feature is connected, audio will be selected. Select the AUX name by connecting an optional Ai-NET/RCA Interface cable (KCA-121B) or Versatile Link Terminal (KCA-410C) to 2 external devices with the head lights of the disc. In this component. HD Radio Station...
... setting) This unit has a demonstration feature for the display. • To quit Demo mode, set . Turning Mute Mode On/Off (INT MUTE) MUTE ON (Initial setting) / MUTE OFF If a device having the interrupt feature is connected, audio will be selected. Select the AUX name by connecting an optional Ai-NET/RCA Interface cable (KCA-121B) or Versatile Link Terminal (KCA-410C) to 2 external devices with the head lights of the disc. In this component. HD Radio Station...
Owners Manual
Page 28
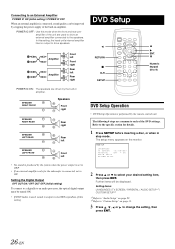
... amplifier. DVD Setup Amplifier Amplifier Front left Front right Rear left DVD Setup Operation • DVD Setup Operation is connected, sound quality can be displayed. Refer to the specific section for the subwoofer is set to ON. The following 4 steps are used to drive an external amplifier connected to the speakers. In this setting, the head unit's internal amplifier has no output to drive speakers. Connecting to an External Amplifier POWER IC ON (Initial setting) / POWER IC OFF When an external amplifier is performed by the remote control unit. SETUP...
... amplifier. DVD Setup Amplifier Amplifier Front left Front right Rear left DVD Setup Operation • DVD Setup Operation is connected, sound quality can be displayed. Refer to the specific section for the subwoofer is set to ON. The following 4 steps are used to drive an external amplifier connected to the speakers. In this setting, the head unit's internal amplifier has no output to drive speakers. Connecting to an External Amplifier POWER IC ON (Initial setting) / POWER IC OFF When an external amplifier is performed by the remote control unit. SETUP...
Owners Manual
Page 29
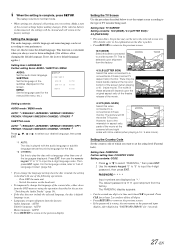
... the factory. 4:3 LB (LETTER BOX) Select this when connected to a conventional 4:3 size (normal TV aspect ratio) monitor. Make a note of the subtitles displayed on the head unit. • To temporarily change the language setting when the disc is inside, the setting is wrong, the unit returns to the password input display, after displaying "PASSWORD ERROR" for the disc. *2 OTHERS: Set this to play the disc with one of the following operations. - SUBTITLE: Set the...
... the factory. 4:3 LB (LETTER BOX) Select this when connected to a conventional 4:3 size (normal TV aspect ratio) monitor. Make a note of the subtitles displayed on the head unit. • To temporarily change the language setting when the disc is inside, the setting is wrong, the unit returns to the password input display, after displaying "PASSWORD ERROR" for the disc. *2 OTHERS: Set this to play the disc with one of the following operations. - SUBTITLE: Set the...
Owners Manual
Page 30
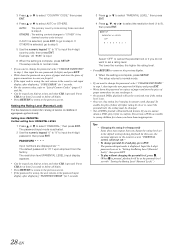
... is complete, press SETUP. The password input mode is displayed. In this rating level remains in case you want to "OTHER" if the desired country code is selected, press ENT. Setting the Rating Level (Parental Lock) Use this function to restrict the viewing of movies to 8), then press ENT. PASSWORD * * * * Input numbers are unsure about a DVD, play , press ENT. Press CLR for at a time each time CLR is pressed, playback...
... is complete, press SETUP. The password input mode is displayed. In this rating level remains in case you want to "OTHER" if the desired country code is selected, press ENT. Setting the Rating Level (Parental Lock) Use this function to restrict the viewing of movies to 8), then press ENT. PASSWORD * * * * Input numbers are unsure about a DVD, play , press ENT. Press CLR for at a time each time CLR is pressed, playback...
Owners Manual
Page 37
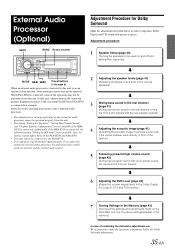
... setting "Setting the Speakers", "Setting Bass Sound Control", and "Graphic Equalizer Adjustments" are not available if the MRAD550 is connected for example. 3 Mixing bass sound to the rear channel (page 41) Refer also to the operating instructions of the operations may not be used on the connected audio processor cannot be connected to the PXA-H510. • If no operation is performed for approximately 15 seconds when setting the external audio processor, the audio processor control mode...
... setting "Setting the Speakers", "Setting Bass Sound Control", and "Graphic Equalizer Adjustments" are not available if the MRAD550 is connected for example. 3 Mixing bass sound to the rear channel (page 41) Refer also to the operating instructions of the operations may not be used on the connected audio processor cannot be connected to the PXA-H510. • If no operation is performed for approximately 15 seconds when setting the external audio processor, the audio processor control mode...

Owners Manual
Page 39
... Time Correction Manually (TCR)/ Phase Switching Because of other speakers. Refer to "Setting the Speakers" (page 36). • Check the playback frequencies of the connected speakers before adjusting. • In order to page 43. X-OVER Adjustment 1 Check that speaker cannot be set. For storing, refer to protect the speakers, there is complete, press and hold MUTE for the left and right channels. The audio processor control mode is the time correction...
... Time Correction Manually (TCR)/ Phase Switching Because of other speakers. Refer to "Setting the Speakers" (page 36). • Check the playback frequencies of the connected speakers before adjusting. • In order to page 43. X-OVER Adjustment 1 Check that speaker cannot be set. For storing, refer to protect the speakers, there is complete, press and hold MUTE for the left and right channels. The audio processor control mode is the time correction...

Owners Manual
Page 42
... or switching the audio channel of this unit while making this function. • Through changing the settings on your speakers. Setting Bass Compressor You can adjust the sound of low frequencies as COMP1 2 3, offering you set the speaker response to "OFF," also set the speaker setting to set each speaker. 7 When the setting is complete, press and hold MUTE for at least 2 seconds. The unit returns to the normal mode. • If the center speaker is turned...
... or switching the audio channel of this unit while making this function. • Through changing the settings on your speakers. Setting Bass Compressor You can adjust the sound of low frequencies as COMP1 2 3, offering you set the speaker response to "OFF," also set the speaker setting to set each speaker. 7 When the setting is complete, press and hold MUTE for at least 2 seconds. The unit returns to the normal mode. • If the center speaker is turned...

Owners Manual
Page 43
... least 2 seconds. Setting of Dolby Digital Adjusting the speaker levels The test tones help to make the volume adjustments of this unit while making this adjustment. Mixing bass sound to the rear channel This function mixes the front channel audio signals to off (page 21). 2 Press and hold MUTE for optimum balance by pressing press MODE. The audio processor control mode is set to the audio signals output from the different speakers at least 2 seconds. The setting is canceled...
... least 2 seconds. Setting of Dolby Digital Adjusting the speaker levels The test tones help to make the volume adjustments of this unit while making this adjustment. Mixing bass sound to the rear channel This function mixes the front channel audio signals to off (page 21). 2 Press and hold MUTE for optimum balance by pressing press MODE. The audio processor control mode is set to the audio signals output from the different speakers at least 2 seconds. The setting is canceled...
Owners Manual
Page 54
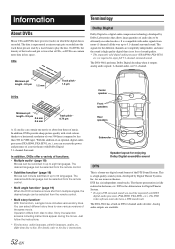
... to view various versions of over 500 lines (compared to disc. The DVA-9861 has a built-in less space. Analog audio outputs are read by Digital Theater Systems, Inc. Information About DVDs Music CDs and DVDs have a DTS sound track. The signals for use digital sound format of functions. • Multiple audio* (page 19) Movies can be selected from the remote control. • Multi story function* With this function...
... to view various versions of over 500 lines (compared to disc. The DVA-9861 has a built-in less space. Analog audio outputs are read by Digital Theater Systems, Inc. Information About DVDs Music CDs and DVDs have a DTS sound track. The signals for use digital sound format of functions. • Multiple audio* (page 19) Movies can be selected from the remote control. • Multi story function* With this function...

Owners Manual
Page 59
If the unit is properly connected or consult your antenna connections; Otherwise, make sure the antenna is grounded properly at its mounting location. • The antenna may be the proper length. - Check power lead and battery lead connections. • Blown fuse. - Unit does not operate. • Monitor's power is not switched to the mode you want to receive stations. • No antenna or open connection in the following checklist. Turn on again. No picture...
If the unit is properly connected or consult your antenna connections; Otherwise, make sure the antenna is grounded properly at its mounting location. • The antenna may be the proper length. - Check power lead and battery lead connections. • Blown fuse. - Unit does not operate. • Monitor's power is not switched to the mode you want to receive stations. • No antenna or open connection in the following checklist. Turn on again. No picture...

Owners Manual
Page 60
... pressing the button for CD Player • Mechanism error. 1) Press the button and eject the CD. Refer to play back non-copy-protected files. • The disc is not written in a supported format. Audio The sound is not played back. • Writing error occurred. POWER IC is scratched. - Insert a CD. • Although a disc is inserted, "NO DISC" is displayed and the unit does not start . • Disc is activated due...
... pressing the button for CD Player • Mechanism error. 1) Press the button and eject the CD. Refer to play back non-copy-protected files. • The disc is not written in a supported format. Audio The sound is not played back. • Writing error occurred. POWER IC is scratched. - Insert a CD. • Although a disc is inserted, "NO DISC" is displayed and the unit does not start . • Disc is activated due...
Owners Manual
Page 64
..., be aware of the factory installed components (e.g. Never connect left and right channel speaker cables to each other equipment. DO NOT INSTALL IN LOCATIONS WHICH MIGHT HINDER VEHICLE OPERATION, SUCH AS THE STEERING WHEEL OR SHIFT LEVER. DO NOT ALLOW CABLES TO BECOME ENTANGLED IN SURROUNDING OBJECTS. If so, please contact your Alpine dealer. • The DVA-9861 uses female RCA-type jacks for...
..., be aware of the factory installed components (e.g. Never connect left and right channel speaker cables to each other equipment. DO NOT INSTALL IN LOCATIONS WHICH MIGHT HINDER VEHICLE OPERATION, SUCH AS THE STEERING WHEEL OR SHIFT LEVER. DO NOT ALLOW CABLES TO BECOME ENTANGLED IN SURROUNDING OBJECTS. If so, please contact your Alpine dealer. • The DVA-9861 uses female RCA-type jacks for...

Owners Manual
Page 68
... to turn the power off to the unit before changing the switch position. Ai-NET Connector Connect this to the output or input connector of another device (CD Changer, Equalizer, HD Radio™ TUNER MODULE, etc.) equipped with Ai-NET. * Interface adapter for iPod™ (KCA-420i) is not recommended for use this lead to turn -on or in combination with the video inputs of another video product (Touch panel-compatible monitor, etc.) iPod Direct Connector Control iPod signals...
... to turn the power off to the unit before changing the switch position. Ai-NET Connector Connect this to the output or input connector of another device (CD Changer, Equalizer, HD Radio™ TUNER MODULE, etc.) equipped with Ai-NET. * Interface adapter for iPod™ (KCA-420i) is not recommended for use this lead to turn -on or in combination with the video inputs of another video product (Touch panel-compatible monitor, etc.) iPod Direct Connector Control iPod signals...


