Owners Manual
Page 2
... 5 Adjusting Volume 5 Lowering Volume Quickly 5 Radio Changing the Radio Frequencies for each Country (CDE-9846 only 6 Listening to Radio 6 Manual Storing of Station Presets 6 Automatic Memory of Station Presets 7 Tuning to Preset Stations 7 CD/MP3 Playback 8 Repeat Play 9 M.I.X. (Random Play 9 Scanning Programs 9 Searching CD Text (CDE-9846 only 9 File/Folder Name Search (concerning MP3) (CDE-9846 only 10 Quick Search (CDE-9846 only 10 About MP3 (CDE-9846 only 10 Sound Setting Adjusting Bass/Treble/Balance...
... 5 Adjusting Volume 5 Lowering Volume Quickly 5 Radio Changing the Radio Frequencies for each Country (CDE-9846 only 6 Listening to Radio 6 Manual Storing of Station Presets 6 Automatic Memory of Station Presets 7 Tuning to Preset Stations 7 CD/MP3 Playback 8 Repeat Play 9 M.I.X. (Random Play 9 Scanning Programs 9 Searching CD Text (CDE-9846 only 9 File/Folder Name Search (concerning MP3) (CDE-9846 only 10 Quick Search (CDE-9846 only 10 About MP3 (CDE-9846 only 10 Sound Setting Adjusting Bass/Treble/Balance...
Owners Manual
Page 3
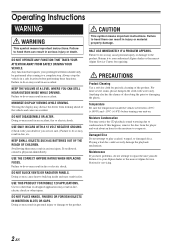
... PANELS. Playing a bad disc could severely damage the playback mechanism. Always stop . KEEP THE VOLUME AT A LEVEL WHERE YOU CAN STILL HEAR OUTSIDE NOISE WHILE DRIVING. Return it to the product. Temperature Be sure the temperature inside and may result in an accident, fire or electric shock. Operating Instructions WARNING WARNING This symbol means important instructions. DO NOT OPERATE ANY FUNCTION...
... PANELS. Playing a bad disc could severely damage the playback mechanism. Always stop . KEEP THE VOLUME AT A LEVEL WHERE YOU CAN STILL HEAR OUTSIDE NOISE WHILE DRIVING. Return it to the product. Temperature Be sure the temperature inside and may result in an accident, fire or electric shock. Operating Instructions WARNING WARNING This symbol means important instructions. DO NOT OPERATE ANY FUNCTION...
Owners Manual
Page 4
... load more than one disc at a time for protecting the disc surface and improving sound quality. If "ERROR" continues to be installed in a location subjected to use round shape discs only for this unit and never use any small bumps or irregularities, this will be displayed if discs with a clean, soft cloth from jamming, "ERROR" will not scratch the disc or damage the player. Installation Location Make sure the CDE...
... load more than one disc at a time for protecting the disc surface and improving sound quality. If "ERROR" continues to be installed in a location subjected to use round shape discs only for this unit and never use any small bumps or irregularities, this will be displayed if discs with a clean, soft cloth from jamming, "ERROR" will not scratch the disc or damage the player. Installation Location Make sure the CDE...
Owners Manual
Page 6
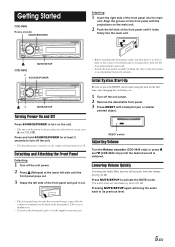
... or similar pointed object. 1 RESET switch Adjusting Volume Turn the Rotary encoder (CDE-9846 only) or press 4 and 3 (CDE-9842 only) until it in normal usage (especially the connector terminals on , the volume will start from level 12. Lowering Volume Quickly Activating the Audio Mute function will decrease by 20 dB. Detaching and Attaching the Front Panel Detaching 1 Turn off the unit power. 2 Press (Release) at least...
... or similar pointed object. 1 RESET switch Adjusting Volume Turn the Rotary encoder (CDE-9846 only) or press 4 and 3 (CDE-9842 only) until it in normal usage (especially the connector terminals on , the volume will start from level 12. Lowering Volume Quickly Activating the Audio Mute function will decrease by 20 dB. Detaching and Attaching the Front Panel Detaching 1 Turn off the unit power. 2 Press (Release) at least...
Owners Manual
Page 7
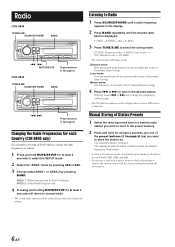
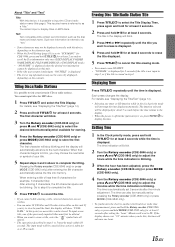
... displayed. The selected station is Distance mode. AREA 1: Radio frequencies for North America AREA 2: Other Radio frequencies 4 Pressing and holding MUTE/SETUP for at least 2 seconds will return to Radio 1 Press SOURCE/POWER until a radio frequency appears in (Automatic Seek Tuning). Radio CDE-9846 TUNE/A.ME SOURCE/POWER BAND g f MUTE/SETUP Preset buttons (1 through 6) CDE-9842 TUNE/A.ME SOURCE/POWER BAND Listening to normal mode. • The stored radio stations will be cleared every time you change the setting. Manual Storing of Station Presets 1 Select the radio...
... displayed. The selected station is Distance mode. AREA 1: Radio frequencies for North America AREA 2: Other Radio frequencies 4 Pressing and holding MUTE/SETUP for at least 2 seconds will return to Radio 1 Press SOURCE/POWER until a radio frequency appears in (Automatic Seek Tuning). Radio CDE-9846 TUNE/A.ME SOURCE/POWER BAND g f MUTE/SETUP Preset buttons (1 through 6) CDE-9842 TUNE/A.ME SOURCE/POWER BAND Listening to normal mode. • The stored radio stations will be cleared every time you change the setting. Manual Storing of Station Presets 1 Select the radio...

Owners Manual
Page 8
... to before the auto memory procedure began. The tuner will automatically seek and store 6 strong stations in preset location No.1. • If no stations are stored, the tuner will be stored into buttons 1 to Preset Stations 1 Press BAND repeatedly until the desired radio band is displayed. 2 Press and hold TUNE/A.ME for at least 2 seconds. The display shows the band, preset number and frequency of the station selected. 7-EN They...
... to before the auto memory procedure began. The tuner will automatically seek and store 6 strong stations in preset location No.1. • If no stations are stored, the tuner will be stored into buttons 1 to Preset Stations 1 Press BAND repeatedly until the desired radio band is displayed. 2 Press and hold TUNE/A.ME for at least 2 seconds. The display shows the band, preset number and frequency of the station selected. 7-EN They...
Owners Manual
Page 9
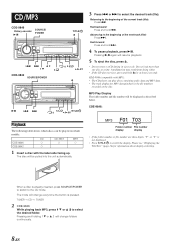
... not eject, press and hold c for information about display switching. CDE-9846: MP3 F01 T03 Folder number File number display display • If the folder number or file number are three digits, "F" or "T" is already inserted, press SOURCE/POWER to switch to the beginning of the current track (file): Press g. The mode will be played on the disc. When a disc is not displayed. • Press TITLE/ to select...
... not eject, press and hold c for information about display switching. CDE-9846: MP3 F01 T03 Folder number File number display display • If the folder number or file number are three digits, "F" or "T" is already inserted, press SOURCE/POWER to switch to the beginning of the current track (file): Press g. The mode will be played on the disc. When a disc is not displayed. • Press TITLE/ to select...
Owners Manual
Page 13
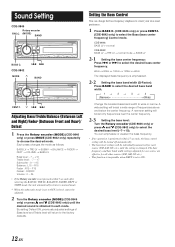
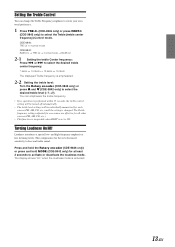
... unit automatically returns to normal mode. * When the subwoofer mode is emphasized. 2-2 Setting the bass band width (Q-Factor): Press BAND to select the desired bass band width. →1 → 2 → 3 → 4 (Narrow Wide) Change the boosted bass band width to select the Bass (bass center frequency) Control mode. Each press changes the mode as follows: BASS LV → TRE LV → SUBW* → BALANCE → FADER → DEFT → VOLUME → BASS...
... unit automatically returns to normal mode. * When the subwoofer mode is emphasized. 2-2 Setting the bass band width (Q-Factor): Press BAND to select the desired bass band width. →1 → 2 → 3 → 4 (Narrow Wide) Change the boosted bass band width to select the Bass (bass center frequency) Control mode. Each press changes the mode as follows: BASS LV → TRE LV → SUBW* → BALANCE → FADER → DEFT → VOLUME → BASS...
Owners Manual
Page 14
... activate or deactivate the loudness mode. The display shows "LD" when the loudness mode is set to select the Treble (treble center frequency) Control mode. Setting the Treble Control You can emphasize the treble frequency. • If no operation is performed within 15 seconds, the treble control setting will be turned off automatically. • The treble level settings will be individually memorized for each source (FM, AM, CD, etc.) until the setting is changed. You can change the Treble Frequency...
... activate or deactivate the loudness mode. The display shows "LD" when the loudness mode is set to select the Treble (treble center frequency) Control mode. Setting the Treble Control You can emphasize the treble frequency. • If no operation is performed within 15 seconds, the treble control setting will be turned off automatically. • The treble level settings will be individually memorized for each source (FM, AM, CD, etc.) until the setting is changed. You can change the Treble Frequency...
Owners Manual
Page 15
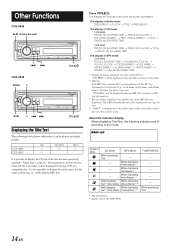
... Name*2 While displaying Artist Name*1/*2 While displaying Album Name*1/*2 While displaying Track Name*1/*2 TUNER MODE - - - - - Other Functions CDE-9846 -/J Rotary encoder g f CDE-9842 MODE 4 TITLE/ -/J 3 gf TITLE/ Displaying the Title/Text The following indicators are displayed. About the indicator display When displaying Title/Text, the following table shows which discs can be displayed if playing a CD text compatible disc. "NO TEXT" will change every time the button is ignored.
... Name*2 While displaying Artist Name*1/*2 While displaying Album Name*1/*2 While displaying Track Name*1/*2 TUNER MODE - - - - - Other Functions CDE-9846 -/J Rotary encoder g f CDE-9842 MODE 4 TITLE/ -/J 3 gf TITLE/ Displaying the Title/Text The following indicators are displayed. About the indicator display When displaying Title/Text, the following table shows which discs can be displayed if playing a CD text compatible disc. "NO TEXT" will change every time the button is ignored.
Owners Manual
Page 16
You cannot input titles for at least 2 seconds. Erasing Disc Title/Radio Station Title 1 Press TITLE/ to display the time. The function selected will interrupt the time display momentarily. The time is automatically set 5 seconds after entering the 8th character automatically stores the title into all spaces. • The operations described in step 4. Such text information is referred to as a "title." Pressing the Rotary...
You cannot input titles for at least 2 seconds. Erasing Disc Title/Radio Station Title 1 Press TITLE/ to display the time. The function selected will interrupt the time display momentarily. The time is automatically set 5 seconds after entering the 8th character automatically stores the title into all spaces. • The operations described in step 4. Such text information is referred to as a "title." Pressing the Rotary...
Owners Manual
Page 17
... 3 Press BAND to "Changing the Radio Frequencies for each SETUP menu. 1 Press and hold MUTE/SETUP for at least 2 seconds again. BASS LV → TRE LV → SUBW* → BALANCE → FADER → DEFT → VOLUME → BASS LV 2 To adjust the level, turn the Rotary encoder (CDE-9846 only) or press 4 and 3 (CDE-9842 only). * When the subwoofer mode is on CDTEXT discs, as well as...
... 3 Press BAND to "Changing the Radio Frequencies for each SETUP menu. 1 Press and hold MUTE/SETUP for at least 2 seconds again. BASS LV → TRE LV → SUBW* → BALANCE → FADER → DEFT → VOLUME → BASS LV 2 To adjust the level, turn the Rotary encoder (CDE-9846 only) or press 4 and 3 (CDE-9842 only). * When the subwoofer mode is on CDTEXT discs, as well as...
Owners Manual
Page 18
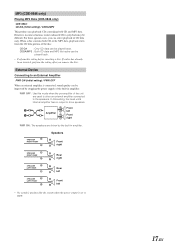
... disc. If a disc has already been inserted, perform the setting after you can select playback of CD data only. PWR OFF : Use this setting, the head unit's internal amplifier has no output to drive speakers. External Device Connecting to an External Amplifier PWR ON (Initial setting) / PWR OFF When an external amplifier is set to the speakers. In this mode when the pre-amplifier of the unit are driven by stopping the power...
... disc. If a disc has already been inserted, perform the setting after you can select playback of CD data only. PWR OFF : Use this setting, the head unit's internal amplifier has no output to drive speakers. External Device Connecting to an External Amplifier PWR ON (Initial setting) / PWR OFF When an external amplifier is set to the speakers. In this mode when the pre-amplifier of the unit are driven by stopping the power...
Owners Manual
Page 19
... format supported by this device. * CDE-9846 is compatible with the proper value if necessary. • Internal micro-computer malfunctioned due to the mechanism. replace the antenna or cable if necessary. Make sure the antenna is grounded properly at its mounting location. Eject the CD and remove it. • The CD is being inserted following instructions, the unit will help you encounter a problem, please turn the power off...
... format supported by this device. * CDE-9846 is compatible with the proper value if necessary. • Internal micro-computer malfunctioned due to the mechanism. replace the antenna or cable if necessary. Make sure the antenna is grounded properly at its mounting location. Eject the CD and remove it. • The CD is being inserted following instructions, the unit will help you encounter a problem, please turn the power off...
Owners Manual
Page 20
... turn off after ejecting, press the c button again. UNSUPORT (CDE-9846 only) • The disc is not written in the section "Changing the Radio Frequencies for each Country" (page 6), the tuning range is compatible with the unit. - If the disc still does not eject, consult your Alpine dealer. • When "ERROR" is activated due to play or eject the disc. - Indication for CD Player HI TEMP • Protective circuit is displayed...
... turn off after ejecting, press the c button again. UNSUPORT (CDE-9846 only) • The disc is not written in the section "Changing the Radio Frequencies for each Country" (page 6), the tuning range is compatible with the unit. - If the disc still does not eject, consult your Alpine dealer. • When "ERROR" is activated due to play or eject the disc. - Indication for CD Player HI TEMP • Protective circuit is displayed...
Owners Manual
Page 21
... into this unit may need an adaptor to connect other or to the vehicle body. amplifier) having RCA connectors. Never connect left and right channel speaker cables to each other units. Cables or wiring that penetrates into these leads to provide power for proper use only the specified accessory parts. can be aware of the factory installed components (e.g. USE SPECIFIED ACCESSORY PARTS AND INSTALL THEM SECURELY. Avoid installing the unit in place...
... into this unit may need an adaptor to connect other or to the vehicle body. amplifier) having RCA connectors. Never connect left and right channel speaker cables to each other units. Cables or wiring that penetrates into these leads to provide power for proper use only the specified accessory parts. can be aware of the factory installed components (e.g. USE SPECIFIED ACCESSORY PARTS AND INSTALL THEM SECURELY. Avoid installing the unit in place...
Owners Manual
Page 22
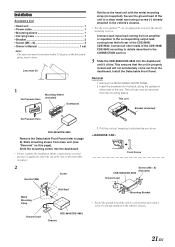
... amplifier or equalizer to the corresponding output lead coming from the left rear of the unit to a clean metal spot using a screw (*) already attached to either side of the unit or the removable nosepiece. 2 Hex Nut (M5) Screw Metal Mounting Strap Ground Lead ** Bolt Stud * CDE-9846/CDE-9842 Chassis 3 Pull the unit out, keeping it clicks. Install the Detachable Front Panel. Removal 1 Remove...
... amplifier or equalizer to the corresponding output lead coming from the left rear of the unit to a clean metal spot using a screw (*) already attached to either side of the unit or the removable nosepiece. 2 Hex Nut (M5) Screw Metal Mounting Strap Ground Lead ** Bolt Stud * CDE-9846/CDE-9842 Chassis 3 Pull the unit out, keeping it clicks. Install the Detachable Front Panel. Removal 1 Remove...
Owners Manual
Page 23
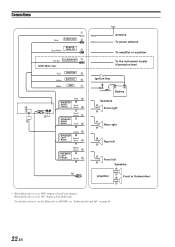
.... 22-EN Violet/ ) Black " SPEAKER RIGHT REAR Violet # Green $ SPEAKER LEFT REAR Green/ Black % White/ Black & SPEAKER LEFT FRONT White ( + Antenna To power antenna To amplifier or equalizer To the instrument cluster illumination lead Ignition Key Battery Speakers Front right Rear right Rear left Front left Speakers Amplifier Front or Subwoofers∗ * When Subwoofer is set the Subwoofer to OFF: Output is from Front speakers. Connections 1 Blue POWER ANT 2 REMOTE Blue/White TURN-ON 3 Orange ILLUMINATION 4 (CDE-9846...
.... 22-EN Violet/ ) Black " SPEAKER RIGHT REAR Violet # Green $ SPEAKER LEFT REAR Green/ Black % White/ Black & SPEAKER LEFT FRONT White ( + Antenna To power antenna To amplifier or equalizer To the instrument cluster illumination lead Ignition Key Battery Speakers Front right Rear right Rear left Front left Speakers Amplifier Front or Subwoofers∗ * When Subwoofer is set the Subwoofer to OFF: Output is from Front speakers. Connections 1 Blue POWER ANT 2 REMOTE Blue/White TURN-ON 3 Orange ILLUMINATION 4 (CDE-9846...
Owners Manual
Page 24
... Rear (-) Speaker Output Lead (Green/Black) & Left Front (-) Speaker Output Lead (White/Black) ( Left Front (+) Speaker Output Lead (White) ) Front/Subwoofer Output RCA Connectors RED is right and WHITE is left. ~ Fuse Holder (10A) + RCA Extension Cable (Sold Separately) To prevent external noise from entering the audio system. • Locate the unit and route the leads at least 10cm away from the car harness. • Keep the battery power...
... Rear (-) Speaker Output Lead (Green/Black) & Left Front (-) Speaker Output Lead (White/Black) ( Left Front (+) Speaker Output Lead (White) ) Front/Subwoofer Output RCA Connectors RED is right and WHITE is left. ~ Fuse Holder (10A) + RCA Extension Cable (Sold Separately) To prevent external noise from entering the audio system. • Locate the unit and route the leads at least 10cm away from the car harness. • Keep the battery power...
Owners Manual
Page 25
...following number for payment of your nearest Authorized Alpine Service Center. Should you may not apply to use a carrier that you . [IN CANADA ONLY: This Warranty is not valid unless your Alpine car audio product has been installed in the Owner's manual. 4 Damage caused by over-driving the speaker (amplifier level is...). Any cost or expense related to the removal or reinstallation of nature. THE TERM "CONSEQUENTIAL DAMAGES" REFERS TO THE COST OF REPAIRING OR REPLACING OTHER PROPERTY WHICH IS DAMAGED WHEN THIS PRODUCT DOES NOT WORK PROPERLY. THE REMEDIES PROVIDED UNDER THIS WARRANTY...
...following number for payment of your nearest Authorized Alpine Service Center. Should you may not apply to use a carrier that you . [IN CANADA ONLY: This Warranty is not valid unless your Alpine car audio product has been installed in the Owner's manual. 4 Damage caused by over-driving the speaker (amplifier level is...). Any cost or expense related to the removal or reinstallation of nature. THE TERM "CONSEQUENTIAL DAMAGES" REFERS TO THE COST OF REPAIRING OR REPLACING OTHER PROPERTY WHICH IS DAMAGED WHEN THIS PRODUCT DOES NOT WORK PROPERLY. THE REMEDIES PROVIDED UNDER THIS WARRANTY...


