Owners Manual
Page 3
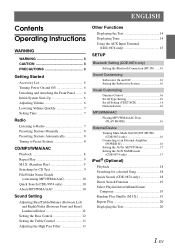
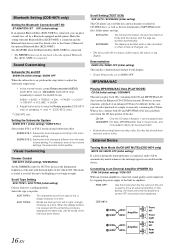
... Displaying Time 14 Using the AUX Input Terminal (CDE-9874 only 15 SETUP Bluetooth Setting (CDE-9874 only) Setting the Bluetooth Connection (BT IN) ......16 Sound Customizing Subwoofer On and Off 16 Setting the Subwoofer System 16 Visual Customizing Dimmer Control 16 Scroll Type Setting 16 Scroll Setting (TEXT SCR 16 Demonstration 16 MP3/WMA/AAC Playing MP3/WMA/AAC Data (PLAY MODE 16 External Device Turning Mute Mode On/Off (INT MUTE) (CDE-9874 only 16 Connecting to an External Amplifier (POWER IC 16 Setting the AUX+ SETUP Mode...
... Displaying Time 14 Using the AUX Input Terminal (CDE-9874 only 15 SETUP Bluetooth Setting (CDE-9874 only) Setting the Bluetooth Connection (BT IN) ......16 Sound Customizing Subwoofer On and Off 16 Setting the Subwoofer System 16 Visual Customizing Dimmer Control 16 Scroll Type Setting 16 Scroll Setting (TEXT SCR 16 Demonstration 16 MP3/WMA/AAC Playing MP3/WMA/AAC Data (PLAY MODE 16 External Device Turning Mute Mode On/Off (INT MUTE) (CDE-9874 only 16 Connecting to an External Amplifier (POWER IC 16 Setting the AUX+ SETUP Mode...
Owners Manual
Page 6
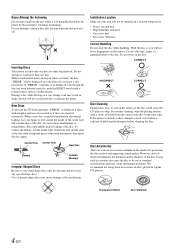
... jamming, "ERROR" is ejected immediately after initial loading, use your player if you will not leave fingerprints on the market for protecting the disc surface and improving sound quality. Disc Accessories There are inserted incorrectly. "ERROR" will not scratch the disc or damage the player. Use of mild neutral detergent before cleaning the disc. Installation Location Make sure this could cause the CD player to : • Direct sun and...
... jamming, "ERROR" is ejected immediately after initial loading, use your player if you will not leave fingerprints on the market for protecting the disc surface and improving sound quality. Disc Accessories There are inserted incorrectly. "ERROR" will not scratch the disc or damage the player. Use of mild neutral detergent before cleaning the disc. Installation Location Make sure this could cause the CD player to : • Direct sun and...
Owners Manual
Page 8
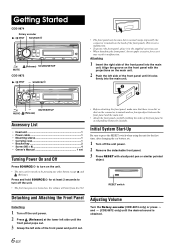
... first time, after changing the car battery, etc. 1 Turn off the unit power. 2 Remove the detachable front panel. 3 Press RESET with the projections on the connector terminals and no dirt or dust on the main unit. 2 Push the left side of the front panel to avoid pushing buttons by pressing any other button except and (Release). Getting Started CDE-9874 Rotary encoder / /ENT SOURCE/ / MUTE (Release) SOUND/SETUP CDE-9872 / /ENT SOURCE/ •...
... first time, after changing the car battery, etc. 1 Turn off the unit power. 2 Remove the detachable front panel. 3 Press RESET with the projections on the connector terminals and no dirt or dust on the main unit. 2 Push the left side of the front panel to avoid pushing buttons by pressing any other button except and (Release). Getting Started CDE-9874 Rotary encoder / /ENT SOURCE/ / MUTE (Release) SOUND/SETUP CDE-9872 / /ENT SOURCE/ •...
Owners Manual
Page 9
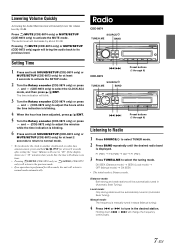
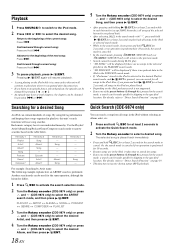
.... The audio level will instantly lower the volume level by about 20 dB. Radio CDE-9874 SOURCE/ TUNE/A.ME BAND Setting Time 1 Press and hold SOUND/SETUP (CDE-9874 only) or MUTE/SETUP (CDE-9872 only) for at least 2 seconds to return to normal mode. • To synchronize the clock to select TUNER mode. 2 Press BAND repeatedly until the desired radio band is displayed. The time indication will return to normal mode automatically. CDE-9872 SOURCE/ TUNE/A.ME BAND Preset buttons (1 through 6) Preset buttons...
.... The audio level will instantly lower the volume level by about 20 dB. Radio CDE-9874 SOURCE/ TUNE/A.ME BAND Setting Time 1 Press and hold SOUND/SETUP (CDE-9874 only) or MUTE/SETUP (CDE-9872 only) for at least 2 seconds to return to normal mode. • To synchronize the clock to select TUNER mode. 2 Press BAND repeatedly until the desired radio band is displayed. The time indication will return to normal mode automatically. CDE-9872 SOURCE/ TUNE/A.ME BAND Preset buttons (1 through 6) Preset buttons...
Owners Manual
Page 10
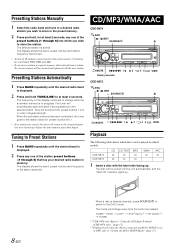
... table shows which discs can be played on the display continues to change every time the button is stored. Presetting Stations Automatically 1 Press BAND repeatedly until the desired band is in the preset memory (6 stations for at least 2 seconds. The tuner will return to the original station you wish to "Using the AUX Input Terminal (CDE-9874 only)" (page 15). *2 Displayed only when the iPod is connected and AUX+ SETUP is displayed. 2 Press and...
... table shows which discs can be played on the display continues to change every time the button is stored. Presetting Stations Automatically 1 Press BAND repeatedly until the desired band is in the preset memory (6 stations for at least 2 seconds. The tuner will return to the original station you wish to "Using the AUX Input Terminal (CDE-9874 only)" (page 15). *2 Displayed only when the iPod is connected and AUX+ SETUP is displayed. 2 Press and...
Owners Manual
Page 11
... are played back in the search mode to select the desired track, and then press / /ENT. The track (file) will change folders continuously. 3 Press or to BT ADAPTER, CDE-9874 only. F101 T103 Folder number File number display display • Press VIEW to select the desired folder. Or, the search mode is canceled if no operation is performed for information about display switching. *3 Displayed only when the AUX+ SETUP is set...
... are played back in the search mode to select the desired track, and then press / /ENT. The track (file) will change folders continuously. 3 Press or to BT ADAPTER, CDE-9874 only. F101 T103 Folder number File number display display • Press VIEW to select the desired folder. Or, the search mode is canceled if no operation is performed for information about display switching. *3 Displayed only when the AUX+ SETUP is set...
Owners Manual
Page 12
... displayed during playback. 1 During MP3/WMA/AAC playback, press /ESC to activate the search mode. 2 Turn the Rotary encoder (CDE-9874 only) or press and (CDE-9872 only) to select Folder Name Search mode or File Name Search mode, and then press / /ENT. File Name Search mode 3 Press 1 or 2 to select another Folder. 4 Select the desired file by other sounds. MP3 files contain compressed audio...
... displayed during playback. 1 During MP3/WMA/AAC playback, press /ESC to activate the search mode. 2 Turn the Rotary encoder (CDE-9874 only) or press and (CDE-9872 only) to select Folder Name Search mode or File Name Search mode, and then press / /ENT. File Name Search mode 3 Press 1 or 2 to select another Folder. 4 Select the desired file by other sounds. MP3 files contain compressed audio...
Owners Manual
Page 14
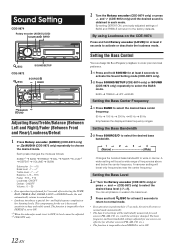
... mode, the unit automatically returns to the factory defaults. The function is inoperable when DEFEAT is set to ON. *1 When the subwoofer mode is set to select the BASS mode. The bass frequency and bass bandwidth settings adjusted for one source are effective for at least 2 seconds to return to normal mode. • If no operation is performed for 15 seconds, the unit will return to normal mode automatically. • The bass level settings...
... mode, the unit automatically returns to the factory defaults. The function is inoperable when DEFEAT is set to ON. *1 When the subwoofer mode is set to select the BASS mode. The bass frequency and bass bandwidth settings adjusted for one source are effective for at least 2 seconds to return to normal mode. • If no operation is performed for 15 seconds, the unit will return to normal mode automatically. • The bass level settings...
Owners Manual
Page 15
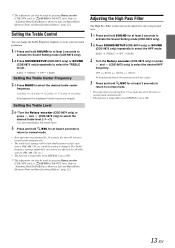
... mode. • If no operation is performed for each source (FM, AM, CD, etc.) until the setting is changed. Adjusting the High Pass Filter The High Pass Filter on this unit can be adjusted to suit your own tonal preference. 1-1 Press and hold SOUND for at least 2 seconds to activate the Sound Setting mode (CDE-9872 only). 1-2 Press SOUND/SETUP (CDE-9874 only) or SOUND (CDE-9872 only) repeatedly to select the TREBLE mode...
... mode. • If no operation is performed for each source (FM, AM, CD, etc.) until the setting is changed. Adjusting the High Pass Filter The High Pass Filter on this unit can be adjusted to suit your own tonal preference. 1-1 Press and hold SOUND for at least 2 seconds to activate the Sound Setting mode (CDE-9872 only). 1-2 Press SOUND/SETUP (CDE-9874 only) or SOUND (CDE-9872 only) repeatedly to select the TREBLE mode...
Owners Manual
Page 16
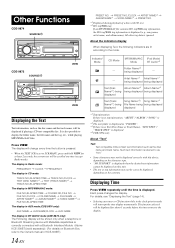
... displayed if playing a CD text compatible disc. About "Text" Text: Text compatible CDs contain text information such as the disc name and the track name, will change every time the button is pressed. • When the TEXT SCR is displayed. *4 CDE-9874 only. For details, see "Displaying the Text" (page 14). • Selecting any tuner or CD function while in the clock priority mode will be scrolled one time (except Radio mode). It is displayed...
... displayed if playing a CD text compatible disc. About "Text" Text: Text compatible CDs contain text information such as the disc name and the track name, will change every time the button is pressed. • When the TEXT SCR is displayed. *4 CDE-9874 only. For details, see "Displaying the Text" (page 14). • Selecting any tuner or CD function while in the clock priority mode will be scrolled one time (except Radio mode). It is displayed...
Owners Manual
Page 17
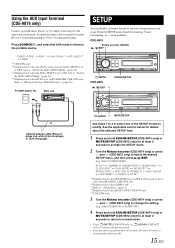
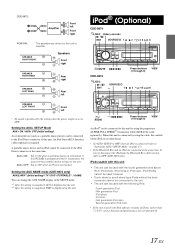
... BT ADAPTER, CDE-9874 only. by simply connecting it to suit your own preferences and usage. SETUP You can be modified. Using the AUX Input Terminal (CDE-9874 only) Connect a portable music player, etc. From the SETUP menu, Sound Customizing, Visual Customizing, etc., can flexibly customize the unit to the input on the front panel. Select SUBWOOFER) BT IN*1 DIMMER SUBWOOFER (SUBW SYS) *2 CLOCK ADJ*3 PLAY MODE INT MUTE*4 SCROLLTYPE TEXT SCR AUX NAME*5 DEMO POWER IC BT IN*1 AUX+ SETUP *1 Displayed only...
... BT ADAPTER, CDE-9874 only. by simply connecting it to suit your own preferences and usage. SETUP You can be modified. Using the AUX Input Terminal (CDE-9874 only) Connect a portable music player, etc. From the SETUP menu, Sound Customizing, Visual Customizing, etc., can flexibly customize the unit to the input on the front panel. Select SUBWOOFER) BT IN*1 DIMMER SUBWOOFER (SUBW SYS) *2 CLOCK ADJ*3 PLAY MODE INT MUTE*4 SCROLLTYPE TEXT SCR AUX NAME*5 DEMO POWER IC BT IN*1 AUX+ SETUP *1 Displayed only...
Owners Manual
Page 18
... 2 for the display. • To quit Demo mode, set to an External Amplifier (POWER IC) POW ON (Initial setting) / POW OFF When an external amplifier is connected, sound quality can be difficult. Select the type you prefer. Make this setting, the head unit's internal amplifier is too bright at a time. SUBW BASS TREBLE BAL FADER LOUD*1 DEFEAT VOLUME SUBW 2 Adjust the level by a Bluetooth-equipped mobile phone. For example, even at a time. Words are scrolled...
... 2 for the display. • To quit Demo mode, set to an External Amplifier (POWER IC) POW ON (Initial setting) / POW OFF When an external amplifier is connected, sound quality can be difficult. Select the type you prefer. Make this setting, the head unit's internal amplifier is too bright at a time. SUBW BASS TREBLE BAL FADER LOUD*1 DEFEAT VOLUME SUBW 2 Adjust the level by a Bluetooth-equipped mobile phone. For example, even at a time. Words are scrolled...
Owners Manual
Page 19
... functional. • Set AUX+ SETUP to OFF when an iPod is set to the unit. AUX+ ON: Set to OFF when an iPod is displayed on the unit. / AUDIO Preset buttons VIEW (1 through 6) 2 45 6 SPEAKER LEFT FRONT Front left • No sound is produced by using the cable, the controls on the unit. *2 After the setting is completed, PMD is connected. Setting the AUX NAME mode (CDE-9874 only) AUXILIARY*1(Initial setting) / TV / DVD / PORTABLE*2 / GAME You can change the AUX NAME display in amplifier. CDE-9872: Amplifier...
... functional. • Set AUX+ SETUP to OFF when an iPod is set to the unit. AUX+ ON: Set to OFF when an iPod is displayed on the unit. / AUDIO Preset buttons VIEW (1 through 6) 2 45 6 SPEAKER LEFT FRONT Front left • No sound is produced by using the cable, the controls on the unit. *2 After the setting is completed, PMD is connected. Setting the AUX NAME mode (CDE-9874 only) AUXILIARY*1(Initial setting) / TV / DVD / PORTABLE*2 / GAME You can change the AUX NAME display in amplifier. CDE-9872: Amplifier...
Owners Manual
Page 20
.... • In the search mode, pressing /MUTE (CDE-9874 only) or /AUDIO (CDE-9872 only) will return to this unit's search functions will be made quickly by skipping to cancel. Album* Song Hierarchy 4 - - - - - play back all songs in the iPod without selecting an album, artist, etc. 1 Press and hold /ESC for songs. • If any one of the preset buttons (1 through 6) is pressed...
.... • In the search mode, pressing /MUTE (CDE-9874 only) or /AUDIO (CDE-9872 only) will return to this unit's search functions will be made quickly by skipping to cancel. Album* Song Hierarchy 4 - - - - - play back all songs in the iPod without selecting an album, artist, etc. 1 Press and hold /ESC for songs. • If any one of the preset buttons (1 through 6) is pressed...
Owners Manual
Page 23
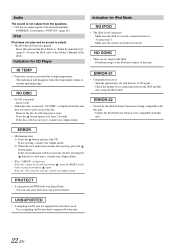
... vehicle's interior (or trunk) temperature to receive stations. • No antenna or open connection in your authorized Alpine dealer. Allow enough time for CD. - using a damaged CD in cable. - CD playback sound skips without vibration. • The disc is properly connected; Make sure the MP3/WMA/AAC has been written in CD player only). • Mechanical error. - If connected following checklist. Press the RESET switch with a new one. Unable to interference...
... vehicle's interior (or trunk) temperature to receive stations. • No antenna or open connection in your authorized Alpine dealer. Allow enough time for CD. - using a damaged CD in cable. - CD playback sound skips without vibration. • The disc is properly connected; Make sure the MP3/WMA/AAC has been written in CD player only). • Mechanical error. - If connected following checklist. Press the RESET switch with a new one. Unable to interference...
Owners Manual
Page 24
... unit is correctly connected (refer to play or eject the disc. - Reset this unit, using the iPod cable. • No CD is supported by pressing , press the RESET switch (refer to the Owner's Manual of the internal amplifier. - Make sure the cable is not connected. - If not ejecting, consult your Alpine dealer. • A copy-protected WMA file was played back. - Make sure the iPod is used. - If the error indication still does not turn off , and then set to be ejected...
... unit is correctly connected (refer to play or eject the disc. - Reset this unit, using the iPod cable. • No CD is supported by pressing , press the RESET switch (refer to the Owner's Manual of the internal amplifier. - Make sure the cable is not connected. - If not ejecting, consult your Alpine dealer. • A copy-protected WMA file was played back. - Make sure the iPod is used. - If the error indication still does not turn off , and then set to be ejected...
Owners Manual
Page 26
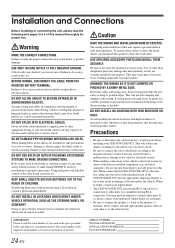
... THE WIRING AND INSTALLATION DONE BY EXPERTS. USE SPECIFIED ACCESSORY PARTS AND INSTALL THEM SECURELY. Avoid installing the unit in locations with the manual to prevent obstructions when driving. Precautions • Be sure to disconnect the cable from the (-) battery post before installing your authorized Alpine dealer for installations or ground connections. amplifier) having RCA connectors. IMPORTANT Please record the serial number of your Alpine dealer. • The CDE-9874/CDE-9872 uses female...
... THE WIRING AND INSTALLATION DONE BY EXPERTS. USE SPECIFIED ACCESSORY PARTS AND INSTALL THEM SECURELY. Avoid installing the unit in locations with the manual to prevent obstructions when driving. Precautions • Be sure to disconnect the cable from the (-) battery post before installing your authorized Alpine dealer for installations or ground connections. amplifier) having RCA connectors. IMPORTANT Please record the serial number of your Alpine dealer. • The CDE-9874/CDE-9872 uses female...
Owners Manual
Page 28
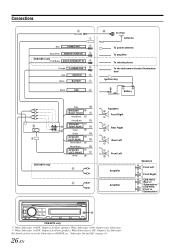
... set the Subwoofer to ON/OFF, see "Subwoofer On and Off" on page 16. 26-EN Connections Blue POWER ANT Blue/White REMOTE TURN-ON CDE-9874 only Pink/Black AUDIO INTERRUPT IN Orange ILLUMINATION Red Yellow IGNITION BATTERY Black GND CDE-9874 only Gray SPEAKER RIGHT FRONT Gray/Black Violet/Black SPEAKER RIGHT REAR Violet Green SPEAKER LEFT REAR Green/Black White/Black SPEAKER LEFT FRONT White To iPod Antenna To power antenna To amplifier...
... set the Subwoofer to ON/OFF, see "Subwoofer On and Off" on page 16. 26-EN Connections Blue POWER ANT Blue/White REMOTE TURN-ON CDE-9874 only Pink/Black AUDIO INTERRUPT IN Orange ILLUMINATION Red Yellow IGNITION BATTERY Black GND CDE-9874 only Gray SPEAKER RIGHT FRONT Gray/Black Violet/Black SPEAKER RIGHT REAR Violet Green SPEAKER LEFT REAR Green/Black White/Black SPEAKER LEFT FRONT White To iPod Antenna To power antenna To amplifier...
Owners Manual
Page 29
... the Owner's Manual of the vehicle's battery. Connect this to an iPod (or to "Setting the AUX+ SETUP Mode" (page 17). AUX+ ON : When the external device is left . Remote Turn-On Lead (Blue/White) Connect this lead to turn -on the vehicle. Rear/Subwoofer Output RCA Connectors (CDE-9874 only) Front/Subwoofer Output RCA Connectors (CDE-9872 only) RED is right and WHITE is connected. Do not use a hands-free mobile phone, an optional Bluetooth Box connection is required. Make sure the connection...
... the Owner's Manual of the vehicle's battery. Connect this to an iPod (or to "Setting the AUX+ SETUP Mode" (page 17). AUX+ ON : When the external device is left . Remote Turn-On Lead (Blue/White) Connect this lead to turn -on the vehicle. Rear/Subwoofer Output RCA Connectors (CDE-9874 only) Front/Subwoofer Output RCA Connectors (CDE-9872 only) RED is right and WHITE is connected. Do not use a hands-free mobile phone, an optional Bluetooth Box connection is required. Make sure the connection...
Owners Manual
Page 30
... Authorized Alpine Service Center or Alpine for repair and for payment of the problem(s) for your vehicle by the installation center. D You must supply proof of your Dealer or contact Alpine at one year from the date of incidental or consequential damages. Products purchased in the product. Dropped or damaged hard drives. D Damage caused by over-driving the speaker (amplifier level is...
... Authorized Alpine Service Center or Alpine for repair and for payment of the problem(s) for your vehicle by the installation center. D You must supply proof of your Dealer or contact Alpine at one year from the date of incidental or consequential damages. Products purchased in the product. Dropped or damaged hard drives. D Damage caused by over-driving the speaker (amplifier level is...


