Cde-102 Owner′s Manual (english)
Page 3
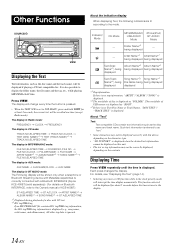
.../AAC 10 Sound Setting Adjusting Subwoofer Level/Bass Level/Treble Level/Balance (Between Left and Right)/Fader (Between Front and Rear)/Defeat 12 Setting the Bass Control 12 Setting the Treble Control 13 Adjusting the High Pass Filter 13 Turning Loudness On/Off 13 Other Functions Displaying the Text 14 Displaying Time 14 Using the Front AUX Input Terminal 15 SETUP Bluetooth Setting Setting the Bluetooth Connection (BT IN) ......16 Sound Customizing Subwoofer On and Off 16 Setting the Subwoofer System 16 Visual Customizing Dimmer Control 16 Scroll...
.../AAC 10 Sound Setting Adjusting Subwoofer Level/Bass Level/Treble Level/Balance (Between Left and Right)/Fader (Between Front and Rear)/Defeat 12 Setting the Bass Control 12 Setting the Treble Control 13 Adjusting the High Pass Filter 13 Turning Loudness On/Off 13 Other Functions Displaying the Text 14 Displaying Time 14 Using the Front AUX Input Terminal 15 SETUP Bluetooth Setting Setting the Bluetooth Connection (BT IN) ......16 Sound Customizing Subwoofer On and Off 16 Setting the Subwoofer System 16 Visual Customizing Dimmer Control 16 Scroll...
Cde-102 Owner′s Manual (english)
Page 5
... This symbol means important instructions. Playing a bad disc could severely damage the playback mechanism. DO NOT DISASSEMBLE OR ALTER. Doing so may result in a safe location before turning your authorized Alpine dealer or the nearest Alpine Service Center for repairing. MINIMIZE DISPLAY VIEWING WHILE DRIVING. USE THIS PRODUCT FOR MOBILE 12V APPLICATIONS. Excessive volume levels that requires your Alpine dealer or the nearest Alpine Service Station for periodic cleaning...
... This symbol means important instructions. Playing a bad disc could severely damage the playback mechanism. DO NOT DISASSEMBLE OR ALTER. Doing so may result in a safe location before turning your authorized Alpine dealer or the nearest Alpine Service Center for repairing. MINIMIZE DISPLAY VIEWING WHILE DRIVING. USE THIS PRODUCT FOR MOBILE 12V APPLICATIONS. Excessive volume levels that requires your Alpine dealer or the nearest Alpine Service Station for periodic cleaning...
Cde-102 Owner′s Manual (english)
Page 6
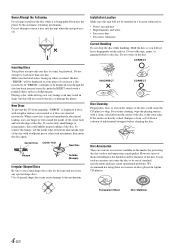
... standard specifications and may create operational problems. We recommend not using these accessories on the market for playback. Center Hole Center Hole New Disc Bumps Outside (Bumps) Irregular Shaped Discs Be sure to use round shape discs only for this could cause the CD player to load more than one disc at a time for protecting the disc surface and improving sound quality. Hold the disc so...
... standard specifications and may create operational problems. We recommend not using these accessories on the market for playback. Center Hole Center Hole New Disc Bumps Outside (Bumps) Irregular Shaped Discs Be sure to use round shape discs only for this could cause the CD player to load more than one disc at a time for protecting the disc surface and improving sound quality. Hold the disc so...
Cde-102 Owner′s Manual (english)
Page 7
... the disc in progress. If you may be connected to direct sunlight or high temperatures. Protecting the USB connection terminal • Only USB flash memory devices can be a danger while driving. Also, avoid connecting USB memory and Front Aux at high or low temperature. • The USB flash memory supports only 512 or 2,048 bytes per sector. • Use only certified USB memory. Read the USB memory Owner's Manual thoroughly. Do not touch the terminals by Alpine...
... the disc in progress. If you may be connected to direct sunlight or high temperatures. Protecting the USB connection terminal • Only USB flash memory devices can be a danger while driving. Also, avoid connecting USB memory and Front Aux at high or low temperature. • The USB flash memory supports only 512 or 2,048 bytes per sector. • Use only certified USB memory. Read the USB memory Owner's Manual thoroughly. Do not touch the terminals by Alpine...
Cde-102 Owner′s Manual (english)
Page 8
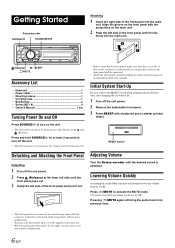
... the connector terminals on the back of the front panel). Getting Started Rotary encoder SOURCE/ SOUND/SETUP Attaching 1 Insert the right side of the front panel into the main unit. (Release) / /ENT /MUTE Accessory List • Head unit 1 • Power cable 1 • Mounting sleeve 1 • Carrying case 1 • Bracket key 2 • Screw (M5 × 8 4 • Owner's Manual 1 set Turning Power On and Off Press SOURCE/ to turn off the unit power. 2 Remove the...
... the connector terminals on the back of the front panel). Getting Started Rotary encoder SOURCE/ SOUND/SETUP Attaching 1 Insert the right side of the front panel into the main unit. (Release) / /ENT /MUTE Accessory List • Head unit 1 • Power cable 1 • Mounting sleeve 1 • Carrying case 1 • Bracket key 2 • Screw (M5 × 8 4 • Owner's Manual 1 set Turning Power On and Off Press SOURCE/ to turn off the unit power. 2 Remove the...
Cde-102 Owner′s Manual (english)
Page 9
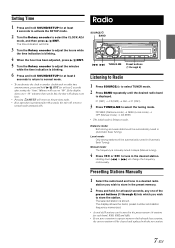
... hours while the time indication is blinking. 4 When the hour has been adjusted, press / /ENT. 5 Turn the Rotary encoder to adjust the minutes while the time indication is manually tuned in steps (Manual tuning). 4 Press or to select the CLOCK ADJ mode, and then press / /ENT. Local mode: Only strong stations will change the frequency continuously. Holding down or will be stored in the preset memory (6 stations for each...
... hours while the time indication is blinking. 4 When the hour has been adjusted, press / /ENT. 5 Turn the Rotary encoder to adjust the minutes while the time indication is manually tuned in steps (Manual tuning). 4 Press or to select the CLOCK ADJ mode, and then press / /ENT. Local mode: Only strong stations will change the frequency continuously. Holding down or will be stored in the preset memory (6 stations for each...

Cde-102 Owner′s Manual (english)
Page 10
... change every time the button is pressed. TUNER DISC USB AUDIO iPod*1/AUX+*2 BT AUDIO*3 AUX*4 TUNER *1 Displayed only when the iPhone/iPod is connected and AUX+ SETUP is set to OFF, refer to "Setting the AUX+ SETUP Mode" (page 17). *2 Displayed only when the AUX+ SETUP is set to ON, refer to "Setting the AUX+ SETUP Mode" (page 17). *3 Displayed only when BT IN is set to the DISC mode. CD/MP3/WMA/AAC SOURCE/ Rotary encoder /MUTE 1 2 45 / /ENT /ESC VIEW Playback 1 Insert a disc with the label side facing...
... change every time the button is pressed. TUNER DISC USB AUDIO iPod*1/AUX+*2 BT AUDIO*3 AUX*4 TUNER *1 Displayed only when the iPhone/iPod is connected and AUX+ SETUP is set to OFF, refer to "Setting the AUX+ SETUP Mode" (page 17). *2 Displayed only when the AUX+ SETUP is set to ON, refer to "Setting the AUX+ SETUP Mode" (page 17). *3 Displayed only when BT IN is set to the DISC mode. CD/MP3/WMA/AAC SOURCE/ Rotary encoder /MUTE 1 2 45 / /ENT /ESC VIEW Playback 1 Insert a disc with the label side facing...
Cde-102 Owner′s Manual (english)
Page 14
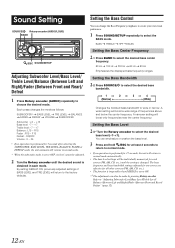
... the displayed bass frequency ranges. BASS TREBLE HPF BASS Setting the Bass Center Frequency 2-1 Press BAND to "Adjusting Subwoofer Level/Bass Level/Treble Level/ Balance (Between Left and Right)/Fader (Between Front and Rear)/ Defeat" (page 12). 12-EN Each press changes the mode as follows: SUBWOOFER* BASS LEVEL TRE LEVEL BALANCE FADER DEFEAT VOLUME SUBWOOFER Subwoofer : +0 ~ +15 Bass level: -7 ~ +7 Treble level: -7 ~ +7 Balance : L15 ~ R15 Fader : R15 ~ F15 Defeat : ON/OFF Volume : 0 ~ 35 • If no operation is performed for all other sources (FM, AM, CD, etc...
... the displayed bass frequency ranges. BASS TREBLE HPF BASS Setting the Bass Center Frequency 2-1 Press BAND to "Adjusting Subwoofer Level/Bass Level/Treble Level/ Balance (Between Left and Right)/Fader (Between Front and Rear)/ Defeat" (page 12). 12-EN Each press changes the mode as follows: SUBWOOFER* BASS LEVEL TRE LEVEL BALANCE FADER DEFEAT VOLUME SUBWOOFER Subwoofer : +0 ~ +15 Bass level: -7 ~ +7 Treble level: -7 ~ +7 Balance : L15 ~ R15 Fader : R15 ~ F15 Defeat : ON/OFF Volume : 0 ~ 35 • If no operation is performed for all other sources (FM, AM, CD, etc...
Cde-102 Owner′s Manual (english)
Page 16
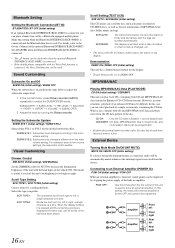
... time (except Radio mode). For details, see "Displaying the Text" (page 14). • Selecting any tuner or CD function while in the clock priority mode will be displayed correctly with this unit. • The text or tag information may not be shown only when a telephone or Bluetooth Streaming device with a Bluetooth INTERFACE (Alpine KCE-400BT) (sold separately). (For details on the contents. The display will change every time the button...
... time (except Radio mode). For details, see "Displaying the Text" (page 14). • Selecting any tuner or CD function while in the clock priority mode will be displayed correctly with this unit. • The text or tag information may not be shown only when a telephone or Bluetooth Streaming device with a Bluetooth INTERFACE (Alpine KCE-400BT) (sold separately). (For details on the contents. The display will change every time the button...
Cde-102 Owner′s Manual (english)
Page 17
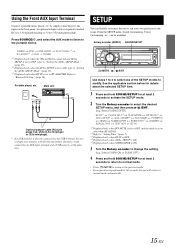
... flexibly customize the unit to change the setting. (e.g. Select SUBWOOFER) BT IN*1 CLOCK ADJ*2 PLAY MODE INT MUTE*3 AUX+ SETUP AUX+ NAME*4 AUX NAME POWER IC DEMO SUBWOOFER SUBW SYS*5 DIMMER SCROLLTYPE TEXT SCR BT IN *1 Displayed only when INT MUTE is set to OFF, and the mode is set to the portable device. by simply connecting it to "Bluetooth Setting" (page 16). Refer to the input on the front panel. Main unit or Optional adapter cable (RCA pin plugs [red, white] 3.5ø...
... flexibly customize the unit to change the setting. (e.g. Select SUBWOOFER) BT IN*1 CLOCK ADJ*2 PLAY MODE INT MUTE*3 AUX+ SETUP AUX+ NAME*4 AUX NAME POWER IC DEMO SUBWOOFER SUBW SYS*5 DIMMER SCROLLTYPE TEXT SCR BT IN *1 Displayed only when INT MUTE is set to OFF, and the mode is set to the portable device. by simply connecting it to "Bluetooth Setting" (page 16). Refer to the input on the front panel. Main unit or Optional adapter cable (RCA pin plugs [red, white] 3.5ø...
Cde-102 Owner′s Manual (english)
Page 18
...-free call by turning the Rotary encoder. Set ADAPTER when the Bluetooth INTERFACE (KCE-400BT) is connected. • The button can be played back. For example, even at a time. Visual Customizing Dimmer Control DIM AUTO (Initial setting) / DIM MANUAL Set the DIMMER control to AUTO to an External Amplifier (POWER IC) POW ON (Initial setting) / POW OFF When an external amplifier is used . Words are built up from the main volume setting. MP3/WMA/AAC Playing...
...-free call by turning the Rotary encoder. Set ADAPTER when the Bluetooth INTERFACE (KCE-400BT) is connected. • The button can be played back. For example, even at a time. Visual Customizing Dimmer Control DIM AUTO (Initial setting) / DIM MANUAL Set the DIMMER control to AUTO to an External Amplifier (POWER IC) POW ON (Initial setting) / POW OFF When an external amplifier is used . Words are built up from the main volume setting. MP3/WMA/AAC Playing...
Cde-102 Owner′s Manual (english)
Page 19
... music player) can change to another source or set to select the desired AUX+ name. POW ON : The speakers are operative only when a USB memory is pressed. AUX+ ON: Set to ON when a portable device is set to ON, refer to the unit. TUNER DISC USB AUDIO iPod*1 / AUX+*2 BT AUDIO*3 AUX*4 TUNER *1 Displayed only when the iPhone/iPod is connected and AUX+ SETUP is set to OFF, refer to "Setting the AUX+ SETUP Mode" (page 17). *2 Displayed only when the AUX+ SETUP is set to ADAPTER, refer to "Setting the Bluetooth Connection (BT...
... music player) can change to another source or set to select the desired AUX+ name. POW ON : The speakers are operative only when a USB memory is pressed. AUX+ ON: Set to ON when a portable device is set to ON, refer to the unit. TUNER DISC USB AUDIO iPod*1 / AUX+*2 BT AUDIO*3 AUX*4 TUNER *1 Displayed only when the iPhone/iPod is connected and AUX+ SETUP is set to OFF, refer to "Setting the AUX+ SETUP Mode" (page 17). *2 Displayed only when the AUX+ SETUP is set to ADAPTER, refer to "Setting the Bluetooth Connection (BT...
Cde-102 Owner′s Manual (english)
Page 20
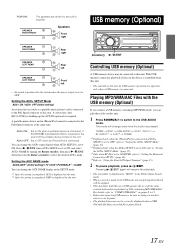
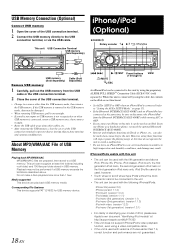
... not make a file's playback time more than the USB memory mode, then remove the USB memory. iPhones/iPods usable with this unit • The unit can be used with the following iPhones/iPods. If the USB memory is connected (refer to "Setting the AUX+ SETUP Mode" on page 17). • If the Bluetooth INTERFACE (KCE-400BT) and an iPhone/iPod are prepared, then stored to a USB memory. USB Memory Connection (Optional) iPhone/iPod Connect USB memory 1 Open the cover of the USB connection terminal. 2 Connect the USB memory directly to the USB connection...
... not make a file's playback time more than the USB memory mode, then remove the USB memory. iPhones/iPods usable with this unit • The unit can be used with the following iPhones/iPods. If the USB memory is connected (refer to "Setting the AUX+ SETUP Mode" on page 17). • If the Bluetooth INTERFACE (KCE-400BT) and an iPhone/iPod are prepared, then stored to a USB memory. USB Memory Connection (Optional) iPhone/iPod Connect USB memory 1 Open the cover of the USB connection terminal. 2 Connect the USB memory directly to the USB connection...
Cde-102 Owner′s Manual (english)
Page 21
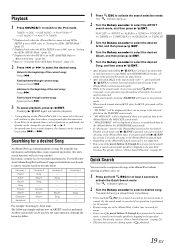
... activate the Quick Search mode. Fast forward through current song: Press and hold . 3 To pause playback, press / /ENT. Also, if you can be made quickly by pressing or . Album* Song - Fast backward through current song: Press and hold . TUNER DISC USB AUDIO iPod*1/AUX+*2 BT AUDIO*3 AUX*4 TUNER *1 Displayed only when the iPhone/iPod is connected and AUX+ SETUP is set to OFF, refer to "Setting the AUX+ SETUP Mode" (page 17). *2 Displayed...
... activate the Quick Search mode. Fast forward through current song: Press and hold . 3 To pause playback, press / /ENT. Also, if you can be made quickly by pressing or . Album* Song - Fast backward through current song: Press and hold . TUNER DISC USB AUDIO iPod*1/AUX+*2 BT AUDIO*3 AUX*4 TUNER *1 Displayed only when the iPhone/iPod is connected and AUX+ SETUP is set to OFF, refer to "Setting the AUX+ SETUP Mode" (page 17). *2 Displayed...
Cde-102 Owner′s Manual (english)
Page 24
... the disc; Error displays (built-in cable. - If the unit is not the proper length. - If connected following instructions, the unit will help you are in a supported format. Check the fuse of the unit. - Broadcast is noisy. • The antenna is still not functioning normally, please review the items in the following instructions in is off . • Improper power lead (Red) and battery lead (Yellow) connections. - Make sure the CD is...
... the disc; Error displays (built-in cable. - If the unit is not the proper length. - If connected following instructions, the unit will help you are in a supported format. Check the fuse of the unit. - Broadcast is noisy. • The antenna is still not functioning normally, please review the items in the following instructions in is off . • Improper power lead (Red) and battery lead (Yellow) connections. - Make sure the CD is...

Cde-102 Owner′s Manual (english)
Page 25
... supported by the unit has been input. - Turn the ignition key off after pressing the button for a few times, consult your Alpine dealer. • A sampling rate/bit rate not supported by the unit is supported by the unit. • A copy-protected WMA file was played back. - UNIT ERROR • A USB device that is connected. - Make sure the USB memory device is correctly connected and the cable is used . - Reset the iPod. - Insert a CD. • Although a disc is inserted, "NO DISC...
... supported by the unit has been input. - Turn the ignition key off after pressing the button for a few times, consult your Alpine dealer. • A sampling rate/bit rate not supported by the unit is supported by the unit. • A copy-protected WMA file was played back. - UNIT ERROR • A USB device that is connected. - Make sure the USB memory device is correctly connected and the cable is used . - Reset the iPod. - Insert a CD. • Although a disc is inserted, "NO DISC...
Cde-102 Owner′s Manual (english)
Page 27
.... When connecting the CDE-102 to the fuse box, make the proper connections may cause parts to do so may result in case of moisture or dust. The serial number or the engraved serial number is located on the bottom of the CDE-102 has the appropriate amperage. Failure to become loose resulting in metal, use only the specified accessory parts. Cables or wiring that penetrates...
.... When connecting the CDE-102 to the fuse box, make the proper connections may cause parts to do so may result in case of moisture or dust. The serial number or the engraved serial number is located on the bottom of the CDE-102 has the appropriate amperage. Failure to become loose resulting in metal, use only the specified accessory parts. Cables or wiring that penetrates...
Cde-102 Owner′s Manual (english)
Page 29
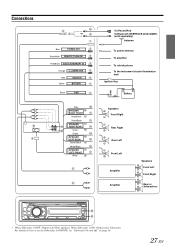
... 16. 27-EN Connections or Blue POWER ANT Blue/White REMOTE TURN-ON Pink/Black AUDIO INTERRUPT IN Orange ILLUMINATION Red Yellow IGNITION BATTERY Black GND Gray SPEAKER RIGHT FRONT Gray/Black Violet/Black SPEAKER RIGHT REAR Violet Green SPEAKER LEFT REAR Green/Black White/Black SPEAKER LEFT FRONT White To iPhone/iPod To Bluetooth INTERFACE (KCE-400BT) (sold separately) Antenna To power antenna To amplifier To vehicle phone To the instrument...
... 16. 27-EN Connections or Blue POWER ANT Blue/White REMOTE TURN-ON Pink/Black AUDIO INTERRUPT IN Orange ILLUMINATION Red Yellow IGNITION BATTERY Black GND Gray SPEAKER RIGHT FRONT Gray/Black Violet/Black SPEAKER RIGHT REAR Violet Green SPEAKER LEFT REAR Green/Black White/Black SPEAKER LEFT FRONT White To iPhone/iPod To Bluetooth INTERFACE (KCE-400BT) (sold separately) Antenna To power antenna To amplifier To vehicle phone To the instrument...
Cde-102 Owner′s Manual (english)
Page 30
... (10A) Front Output RCA Connectors RED is right and WHITE is connected. Connect this to an iPhone/iPod (or to a good chassis ground on an amplifier or a signal processor, etc. USB Connection Terminal Connect USB memory (sold separately). * Refer to "Setting the AUX+ SETUP Mode" (page 17). This will allow the backlighting of this unit to turn -on connection, refer to the positive (+) post of the vehicle's battery. Illumination Lead...
... (10A) Front Output RCA Connectors RED is right and WHITE is connected. Connect this to an iPhone/iPod (or to a good chassis ground on an amplifier or a signal processor, etc. USB Connection Terminal Connect USB memory (sold separately). * Refer to "Setting the AUX+ SETUP Mode" (page 17). This will allow the backlighting of this unit to turn -on connection, refer to the positive (+) post of the vehicle's battery. Illumination Lead...
Cde-102 Owner′s Manual (english)
Page 31
... its option, repair or replace the product with a new or reconditioned product without Alpine's consent. Cracked or damaged LCD panels. D Damage caused by the installation center. Any cost or expense related to locate a service center. F Any product which has been adjusted, altered or modified without charge. HOW TO OBTAIN WARRANTY SERVICE: A You are covered only in your Alpine car audio product has...
... its option, repair or replace the product with a new or reconditioned product without Alpine's consent. Cracked or damaged LCD panels. D Damage caused by the installation center. Any cost or expense related to locate a service center. F Any product which has been adjusted, altered or modified without charge. HOW TO OBTAIN WARRANTY SERVICE: A You are covered only in your Alpine car audio product has...


