
Owners Manual
Page 3
... 15 Displaying Time 16 SETUP Sound Customizing Subwoofer On and Off 17 Setting the Subwoofer System 17 Visual Customizing Dimmer Control 17 Scroll Type Setting 17 Scroll Setting (TEXT SCROLL 17 HD Radio Station Call Setting 17 Demonstration 17 MP3/WMA Playing MP3/WMA Data (PLAY MODE) .......18 External Device Turning Mute Mode On/Off (INT MUTE) ......18 Setting the AUX Mode (V-Link 18 Setting the External Digital Input (DIGITAL AUX 18 Connecting to an External Amplifier 18 SAT Radio Receiver (Optional) Receiving Channels...
... 15 Displaying Time 16 SETUP Sound Customizing Subwoofer On and Off 17 Setting the Subwoofer System 17 Visual Customizing Dimmer Control 17 Scroll Type Setting 17 Scroll Setting (TEXT SCROLL 17 HD Radio Station Call Setting 17 Demonstration 17 MP3/WMA Playing MP3/WMA Data (PLAY MODE) .......18 External Device Turning Mute Mode On/Off (INT MUTE) ......18 Setting the AUX Mode (V-Link 18 Setting the External Digital Input (DIGITAL AUX 18 Connecting to an External Amplifier 18 SAT Radio Receiver (Optional) Receiving Channels...

Owners Manual
Page 5
... important instructions. DO NOT OPERATE ANY FUNCTION THAT TAKES YOUR ATTENTION AWAY FROM SAFELY DRIVING YOUR VEHICLE. KEEP THE VOLUME AT A LEVEL WHERE YOU CAN STILL HEAR OUTSIDE NOISE WHILE DRIVING. Doing so may cause personal injury or damage to do so may result in injury or material property damage. MINIMIZE DISPLAY VIEWING WHILE DRIVING. USE THE CORRECT AMPERE RATING WHEN REPLACING FUSES...
... important instructions. DO NOT OPERATE ANY FUNCTION THAT TAKES YOUR ATTENTION AWAY FROM SAFELY DRIVING YOUR VEHICLE. KEEP THE VOLUME AT A LEVEL WHERE YOU CAN STILL HEAR OUTSIDE NOISE WHILE DRIVING. Doing so may cause personal injury or damage to do so may result in injury or material property damage. MINIMIZE DISPLAY VIEWING WHILE DRIVING. USE THE CORRECT AMPERE RATING WHEN REPLACING FUSES...
Owners Manual
Page 6
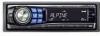
... the RESET switch with a ballpoint pen or other such instrument, then insert the disc again. "ERROR" will be installed in skips, but this will not leave fingerprints on the market for protecting the disc surface and improving sound quality. If the surface is displayed if discs with a clean, soft cloth from jamming, "ERROR" is heavily soiled, dampen a clean, soft cloth in Alpine CD players. Using...
... the RESET switch with a ballpoint pen or other such instrument, then insert the disc again. "ERROR" will be installed in skips, but this will not leave fingerprints on the market for protecting the disc surface and improving sound quality. If the surface is displayed if discs with a clean, soft cloth from jamming, "ERROR" is heavily soiled, dampen a clean, soft cloth in Alpine CD players. Using...

Owners Manual
Page 9
... audio back to its previous level. The time can be manually set 5 seconds after setting the "hour." For details, consult your Alpine dealer. • Point the optional remote control transmitter at the remote control sensor Remote control sensor RESET switch Adjusting Volume Turn the Rotary encoder until the time is displayed. Initial System Start-Up Be sure to press the RESET switch when using the unit for the first time, after changing the car battery, etc. 1 Turn off the unit power...
... audio back to its previous level. The time can be manually set 5 seconds after setting the "hour." For details, consult your Alpine dealer. • Point the optional remote control transmitter at the remote control sensor Remote control sensor RESET switch Adjusting Volume Turn the Rotary encoder until the time is displayed. Initial System Start-Up Be sure to press the RESET switch when using the unit for the first time, after changing the car battery, etc. 1 Turn off the unit power...
Owners Manual
Page 10
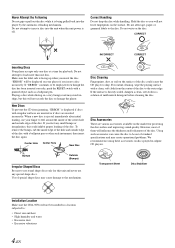
... to select the tuning mode. Local mode: Only strong stations will change while the automatic memory is displayed. Holding down or will be cleared and replaced with the new station. F1 (FM1) F2 (FM2) AM F1 (FM1) 3 Press TUNE/A.ME to Radio 1 Press SOURCE/POWER until the desired radio band is in the selected band. The tuner will be automatically tuned in (Automatic Seek Tuning). Preset buttons (1 through the Ai-Net bus.
... to select the tuning mode. Local mode: Only strong stations will change while the automatic memory is displayed. Holding down or will be cleared and replaced with the new station. F1 (FM1) F2 (FM2) AM F1 (FM1) 3 Press TUNE/A.ME to Radio 1 Press SOURCE/POWER until the desired radio band is in the selected band. The tuner will be automatically tuned in (Automatic Seek Tuning). Preset buttons (1 through the Ai-Net bus.

Owners Manual
Page 11
... search mode will be pulled into the unit automatically. While receiving HD Radio, the unit can also switch to select the desired track (file). The front panel will change folders continuously. 4 Press or to the analog signal exclusively. 1 When receiving HD Radio, press FUNC. TUNER XM RADIO/SIRIUS*1 DISC IPOD*2 CHANGER*3 TUNER *1 Only when XM Radio or Sirius Radio is connected. *2 Only when the iPod is connected. *3 Only when the CD changer is displayed. 2 Press preset 1 to select the...
... search mode will be pulled into the unit automatically. While receiving HD Radio, the unit can also switch to select the desired track (file). The front panel will change folders continuously. 4 Press or to the analog signal exclusively. 1 When receiving HD Radio, press FUNC. TUNER XM RADIO/SIRIUS*1 DISC IPOD*2 CHANGER*3 TUNER *1 Only when XM Radio or Sirius Radio is connected. *2 Only when the iPod is connected. *3 Only when the CD changer is displayed. 2 Press preset 1 to select the...

Owners Manual
Page 13
... such high compression ratios by eliminating the sounds that can display and search for a fee, without permission of compressing audio data at least 2 seconds in the CD/ Changer/MP3/WMA mode to activate Quick Search mode. 2 Turn the Rotary encoder to File Name Search mode. • While in the changer, searches can be searched and played using MP3/WMA specified software. What is...
... such high compression ratios by eliminating the sounds that can display and search for a fee, without permission of compressing audio data at least 2 seconds in the CD/ Changer/MP3/WMA mode to activate Quick Search mode. 2 Turn the Rotary encoder to File Name Search mode. • While in the changer, searches can be searched and played using MP3/WMA specified software. What is...
Owners Manual
Page 15
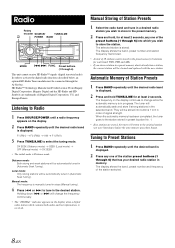
... after selecting the BASS, TREBLE, BALANCE, FADER, DEFEAT or SUBW mode, the unit automatically returns to normal mode. * When the subwoofer mode is set to OFF, its level cannot be adjusted. 2 Turn the Rotary encoder until the setting is set to the factory defaults. • Depending on the connected devices, some functions and display indications do not work . By setting Defeat ON, previously adjusted settings of frequencies above and below the center frequency. BASS TREBLE Setting the Bass Center Frequency 3-1 Press SOURCE/POWER...
... after selecting the BASS, TREBLE, BALANCE, FADER, DEFEAT or SUBW mode, the unit automatically returns to normal mode. * When the subwoofer mode is set to OFF, its level cannot be adjusted. 2 Turn the Rotary encoder until the setting is set to the factory defaults. • Depending on the connected devices, some functions and display indications do not work . By setting Defeat ON, previously adjusted settings of frequencies above and below the center frequency. BASS TREBLE Setting the Bass Center Frequency 3-1 Press SOURCE/POWER...

Owners Manual
Page 16
... connected devices, some functions and display indications do not work. The Treble frequency settings adjusted for one source are effective for each source (FM, AM, CD, etc.) until the setting is connected, this setting cannot be individually memorized for all music sources, press OFF in step 3. BBE BASS ENGINE SETUP RETURN (OFF) BBE 3 Press to set to select BBE mode, then press MODE. After 2 seconds, the unit returns to select the BASS ENGINE mode, then press MODE. Setting the Treble Control...
... connected devices, some functions and display indications do not work. The Treble frequency settings adjusted for one source are effective for each source (FM, AM, CD, etc.) until the setting is connected, this setting cannot be individually memorized for all music sources, press OFF in step 3. BBE BASS ENGINE SETUP RETURN (OFF) BBE 3 Press to set to select BBE mode, then press MODE. After 2 seconds, the unit returns to select the BASS ENGINE mode, then press MODE. Setting the Treble Control...

Owners Manual
Page 17
..."/"ALBUM"/"SONG"/ "STATION" will change every time the button is ignored. A WMA file of a disc with CD Text. If there is as fast forward, etc., is displayed. Indicator/ Mode CD Mode MP3/WMA Mode SAT RADIO/ HD RADIO Mode iPod Mode Folder - displayed Artist Name Artist Name Artist Name - The display example is no Text (Disc Name or Track Name), "DISC TEXT"/ "TRACK TEXT" is displayed. Also lights when operation, such as shown...
..."/"ALBUM"/"SONG"/ "STATION" will change every time the button is ignored. A WMA file of a disc with CD Text. If there is as fast forward, etc., is displayed. Indicator/ Mode CD Mode MP3/WMA Mode SAT RADIO/ HD RADIO Mode iPod Mode Folder - displayed Artist Name Artist Name Artist Name - The display example is no Text (Disc Name or Track Name), "DISC TEXT"/ "TRACK TEXT" is displayed. Also lights when operation, such as shown...
Owners Manual
Page 19
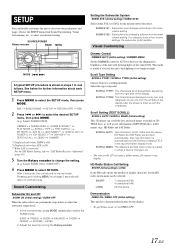
... SETUP menu, then press MODE. (e.g. BASS TREBLE SUBW BALANCE FADER DEFEAT VOLUME BASS 2 Adjust the level by one by turning the Rotary encoder. Also, tag information is changed, etc. • The unit scrolls CD text names, folder names, file names or tag display. HD Radio Station Call Setting SHORT (Initial setting) / LONG In the HD radio mode, the number of the display after the screen is too bright at low volume settings, the subwoofer is connected. BBE BASS ENGINE SETUP...
... SETUP menu, then press MODE. (e.g. BASS TREBLE SUBW BALANCE FADER DEFEAT VOLUME BASS 2 Adjust the level by one by turning the Rotary encoder. Also, tag information is changed, etc. • The unit scrolls CD text names, folder names, file names or tag display. HD Radio Station Call Setting SHORT (Initial setting) / LONG In the HD radio mode, the number of the display after the screen is too bright at low volume settings, the subwoofer is connected. BBE BASS ENGINE SETUP...
Owners Manual
Page 20
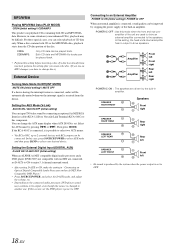
... NonCompatible DVD Player." • Press SOURCE/POWER, and select the D-AUX mode, and adjust the volume, etc. • Depending on the connected audio processor, DVD player sound may be difficult. CDDA: CDDA/MP3: Only CD data can input TV/video sound by the built-in amplifier. Setting the External Digital Input (DIGITAL AUX) D-AUX ON / D-AUX OFF (Initial setting) When an ALPINE Ai-NET compatible digital audio processor and a DVD player (DVE-5207) not compatible with RCA output can select playback of the unit...
... NonCompatible DVD Player." • Press SOURCE/POWER, and select the D-AUX mode, and adjust the volume, etc. • Depending on the connected audio processor, DVD player sound may be difficult. CDDA: CDDA/MP3: Only CD data can input TV/video sound by the built-in amplifier. Setting the External Digital Input (DIGITAL AUX) D-AUX ON / D-AUX OFF (Initial setting) When an ALPINE Ai-NET compatible digital audio processor and a DVD player (DVE-5207) not compatible with RCA output can select playback of the unit...
Owners Manual
Page 21
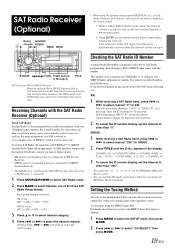
... Alpine dealer. * XM and its corresponding logos are trademarks of XM Satellite Radio Inc. * SIRIUS and its corresponding logos are trademarks of SIRIUS Satellite Radio Inc. • The SAT Receiver controls on the CDA-9856 are operative only when a SAT Receiver is connected. 1 Press SOURCE/POWER to select SAT Radio mode. 2 Press BAND to -coast via the Ai-NET bus, the following way. COMP NAME CLOCK CHANNEL No. 3 To cancel the ID number display, set...
... Alpine dealer. * XM and its corresponding logos are trademarks of XM Satellite Radio Inc. * SIRIUS and its corresponding logos are trademarks of SIRIUS Satellite Radio Inc. • The SAT Receiver controls on the CDA-9856 are operative only when a SAT Receiver is connected. 1 Press SOURCE/POWER to select SAT Radio mode. 2 Press BAND to -coast via the Ai-NET bus, the following way. COMP NAME CLOCK CHANNEL No. 3 To cancel the ID number display, set...
Owners Manual
Page 22
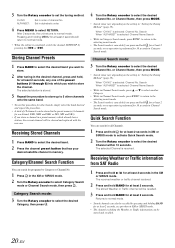
... desired band. 2 Press the channel preset button that has your desired satellite channel in memory. Storing Channel Presets 1 Press BAND to select the desired band you wish to normal mode. Receiving Stored Channels 1 Press BAND to set the tuning method. Category Search mode: 3 Turn the Rotary encoder to select the desired Category, then press . 4 Turn the Rotary encoder to the selecting search mode. • The Search mode is performed for at...
... desired band. 2 Press the channel preset button that has your desired satellite channel in memory. Storing Channel Presets 1 Press BAND to select the desired band you wish to normal mode. Receiving Stored Channels 1 Press BAND to set the tuning method. Category Search mode: 3 Turn the Rotary encoder to select the desired Category, then press . 4 Turn the Rotary encoder to the selecting search mode. • The Search mode is performed for at...
Owners Manual
Page 27
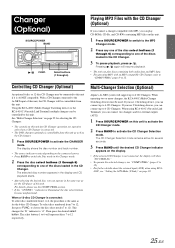
... of this unit. Then press the desired select button. When operating two or more changers, the KCA-400C (Multi-Changer Switching device) must be controlled by this unit. If you use 1 Switching device, you can play CD-ROMs, CD-Rs, and CD-RWs containing MP3 files on the display. • If the selected CD Changer is not connected, the display will represent discs 7 to 4 CD Changers. The CD Changer Selection mode remains active for the 6-disc CD Changer. Using the KCA-400C (Multi-Changer Switching device) or the...
... of this unit. Then press the desired select button. When operating two or more changers, the KCA-400C (Multi-Changer Switching device) must be controlled by this unit. If you use 1 Switching device, you can play CD-ROMs, CD-Rs, and CD-RWs containing MP3 files on the display. • If the selected CD Changer is not connected, the display will represent discs 7 to 4 CD Changers. The CD Changer Selection mode remains active for the 6-disc CD Changer. Using the KCA-400C (Multi-Changer Switching device) or the...
Owners Manual
Page 28
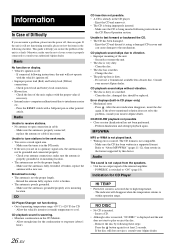
... power lead and battery lead connections. • Blown fuse. - CD playback sound skips due to tune stations in the seek mode. • You are in is not output from the speakers. • Unit has no output signal of the unit. - Consult your Alpine dealer. Make sure the CD has been written in CD player only) • Mechanical error - Basic No function or display. • Vehicle's ignition is fully extended; Make sure the antenna is...
... power lead and battery lead connections. • Blown fuse. - CD playback sound skips due to tune stations in the seek mode. • You are in is not output from the speakers. • Unit has no output signal of the unit. - Consult your Alpine dealer. Make sure the CD has been written in CD player only) • Mechanical error - Basic No function or display. • Vehicle's ignition is fully extended; Make sure the antenna is...

Owners Manual
Page 29
... your Alpine dealer. • No indicated disc. - Choose another channel. • The user has selected a channel number that time. - Select another disc. Check whether the XM or SIRIUS antenna cable is being updated with a stronger signal. • Protective circuit is activated due to receive the disc left inside the CD Changer. (XM mode) (SIRIUS mode) Scrolling display only once • The channel currently selected has stopped broadcasting. - Wait until the car reaches a location with latest encryption code. - The unit will...
... your Alpine dealer. • No indicated disc. - Choose another channel. • The user has selected a channel number that time. - Select another disc. Check whether the XM or SIRIUS antenna cable is being updated with a stronger signal. • Protective circuit is activated due to receive the disc left inside the CD Changer. (XM mode) (SIRIUS mode) Scrolling display only once • The channel currently selected has stopped broadcasting. - Wait until the car reaches a location with latest encryption code. - The unit will...
Owners Manual
Page 31
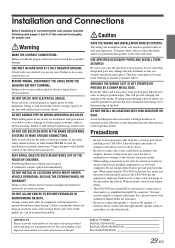
.... Avoid installing the unit in doubt, consult your authorized Alpine dealer for connection to other units (e.g. This will reduce any other units. When connecting the CDA-9856 to the fuse box, make the proper connections may need an adaptor to prevent obstructions when driving. When in locations with the manual to connect other safety-related system), or tanks should NEVER be extremely hazardous. BEFORE WIRING, DISCONNECT THE CABLE FROM...
.... Avoid installing the unit in doubt, consult your authorized Alpine dealer for connection to other units (e.g. This will reduce any other units. When connecting the CDA-9856 to the fuse box, make the proper connections may need an adaptor to prevent obstructions when driving. When in locations with the manual to connect other safety-related system), or tanks should NEVER be extremely hazardous. BEFORE WIRING, DISCONNECT THE CABLE FROM...
Owners Manual
Page 32
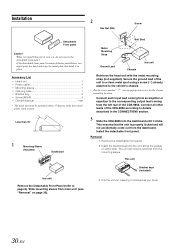
... List • Head unit 1 • Power cable 1 • Mounting sleeve 1 • Carrying case 1 • Bracket key 2 • Screw (M5x8 4 • Owner's Manual 1 set • The main unit must be removed from the left rear of the unit to a clean metal spot using a screw (*1) already attached to details described in the CONNECTlONS section. 3 Slide the CDA-9856 into the unit, along the guides on page 30). Removal 1. Installation 2 Hex Nut...
... List • Head unit 1 • Power cable 1 • Mounting sleeve 1 • Carrying case 1 • Bracket key 2 • Screw (M5x8 4 • Owner's Manual 1 set • The main unit must be removed from the left rear of the unit to a clean metal spot using a screw (*1) already attached to details described in the CONNECTlONS section. 3 Slide the CDA-9856 into the unit, along the guides on page 30). Removal 1. Installation 2 Hex Nut...
Owners Manual
Page 35
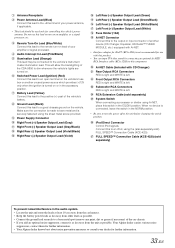
... CD Changer) Rear Output RCA Connectors RED is right and WHITE is made to dim whenever the vehicle's lights are turned on. When no device is turned on an amplifier, or a signal processor, etc. FULL SPEED™ Connection Cable (KCE-422i) (sold separately) To prevent noise/interference in the NORM position. • Be sure to turn the power off to the unit before changing the switch position. iPod Direct Connector Control iPod...
... CD Changer) Rear Output RCA Connectors RED is right and WHITE is made to dim whenever the vehicle's lights are turned on. When no device is turned on an amplifier, or a signal processor, etc. FULL SPEED™ Connection Cable (KCE-422i) (sold separately) To prevent noise/interference in the NORM position. • Be sure to turn the power off to the unit before changing the switch position. iPod Direct Connector Control iPod...


