Owners Manual
Page 21
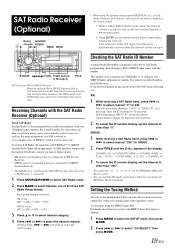
...1 While in XM or SIRIUS Radio mode, enter the Channel number you nearest Alpine dealer. * XM and its corresponding logos are trademarks of XM Satellite Radio Inc. * SIRIUS and its ... Receiving Channels with the SAT Radio Receiver (Optional) About SAT Radio Satellite Radio* is printed on a label found on the CDA-9856 are trademarks of the three SAT Radio Preset Bands. Each press changes ... SAT Radio Receiver (Optional) Rotary SOURCE/ encoder POWER / BAND MENU • When using the SIRIUS Tuner Box: For details about functions, refer to the SIRIUS Tuner Box Owner's Manual. ...
...1 While in XM or SIRIUS Radio mode, enter the Channel number you nearest Alpine dealer. * XM and its corresponding logos are trademarks of XM Satellite Radio Inc. * SIRIUS and its ... Receiving Channels with the SAT Radio Receiver (Optional) About SAT Radio Satellite Radio* is printed on a label found on the CDA-9856 are trademarks of the three SAT Radio Preset Bands. Each press changes ... SAT Radio Receiver (Optional) Rotary SOURCE/ encoder POWER / BAND MENU • When using the SIRIUS Tuner Box: For details about functions, refer to the SIRIUS Tuner Box Owner's Manual. ...
Owners Manual
Page 24
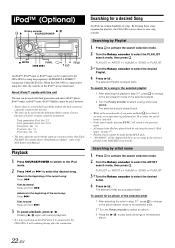
...for a song in the selected playlist 1 After selecting the playlist in playlists, the CDA-9856 can use these to play . • "NO SONG" will be guranteed. Searching by using the proprietary ALPINE FULL SPEED™ Connection Cable (KCE-422i). The selected song is canceled. •...CDA-9856 is connected to the unit. • The unit can be used with third generation and above iPod™ photo, iPod™ minis or iPod™ nano. will continue playing after the connection. PLAYLIST ARTIST ALBUM SONG PLAYLIST 3*1 Turn the Rotary encoder to the iPod Instruction Manual...
...for a song in the selected playlist 1 After selecting the playlist in playlists, the CDA-9856 can use these to play . • "NO SONG" will be guranteed. Searching by using the proprietary ALPINE FULL SPEED™ Connection Cable (KCE-422i). The selected song is canceled. •...CDA-9856 is connected to the unit. • The unit can be used with third generation and above iPod™ photo, iPod™ minis or iPod™ nano. will continue playing after the connection. PLAYLIST ARTIST ALBUM SONG PLAYLIST 3*1 Turn the Rotary encoder to the iPod Instruction Manual...
Owners Manual
Page 31
... Please record the serial number of the vehicle and cause fire etc. USE ONLY IN CARS WITH A 12 VOLT NEGATIVE GROUND. (Check with the manual to other safety-related system), or tanks should NEVER be used for the brake or steering systems (or any chance of damage to do so...• Be sure to connect the speaker (-) leads to the unit and/or the vehicle. Using such parts could disable control of your Alpine dealer. • The CDA-9856 uses female RCA-type jacks for connection to prevent obstructions when driving. DO NOT INSTALL IN LOCATIONS WHICH MIGHT HINDER VEHICLE OPERATION, SUCH AS...
... Please record the serial number of the vehicle and cause fire etc. USE ONLY IN CARS WITH A 12 VOLT NEGATIVE GROUND. (Check with the manual to other safety-related system), or tanks should NEVER be used for the brake or steering systems (or any chance of damage to do so...• Be sure to connect the speaker (-) leads to the unit and/or the vehicle. Using such parts could disable control of your Alpine dealer. • The CDA-9856 uses female RCA-type jacks for connection to prevent obstructions when driving. DO NOT INSTALL IN LOCATIONS WHICH MIGHT HINDER VEHICLE OPERATION, SUCH AS...
Owners Manual
Page 32
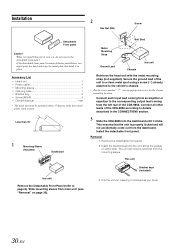
...• Head unit 1 • Power cable 1 • Mounting sleeve 1 • Carrying case 1 • Bracket key 2 • Screw (M5x8 4 • Owner's Manual 1 set • The main unit must be removed from main unit (see "Removal" on either side. Slide mounting sleeve from the mounting sleeve. Install the... in place. Connect each input lead coming from an amplifier or equalizer to details described in the CONNECTlONS section. 3 Slide the CDA-9856 into the unit, along the guides on page 30). This ensures that holds it clicks. This unit this unit Remove the Detachable...
...• Head unit 1 • Power cable 1 • Mounting sleeve 1 • Carrying case 1 • Bracket key 2 • Screw (M5x8 4 • Owner's Manual 1 set • The main unit must be removed from main unit (see "Removal" on either side. Slide mounting sleeve from the mounting sleeve. Install the... in place. Connect each input lead coming from an amplifier or equalizer to details described in the CONNECTlONS section. 3 Slide the CDA-9856 into the unit, along the guides on page 30). This ensures that holds it clicks. This unit this unit Remove the Detachable...


