
Owners Manual
Page 2
... Calendar (CDA-9855 only 7 Setting Time (CDA-9853 only 7 Opening and Closing the Movable Display ...... 8 Display Tilt Adjustment 8 Adjusting Volume 8 Lowering Volume Quickly 8 Detaching and Attaching the Front Panel ......... 8 Radio Changing the Radio Frequencies for each Country 9 Listening to Radio 9 Manual... Storing of Station Presets 9 Automatic Memory of Station Presets 9 Tuning to Preset Stations 10 Station Title Search Function 10 Freqency Search Function 10 CD / MP3 / WMA...
... Calendar (CDA-9855 only 7 Setting Time (CDA-9853 only 7 Opening and Closing the Movable Display ...... 8 Display Tilt Adjustment 8 Adjusting Volume 8 Lowering Volume Quickly 8 Detaching and Attaching the Front Panel ......... 8 Radio Changing the Radio Frequencies for each Country 9 Listening to Radio 9 Manual... Storing of Station Presets 9 Automatic Memory of Station Presets 9 Tuning to Preset Stations 10 Station Title Search Function 10 Freqency Search Function 10 CD / MP3 / WMA...
Owners Manual
Page 3
... Indicator (CDA-9853 only 30 Switching the Animation Display Type (CDA-9855 only 30 Opening Message ON/OFF Setting (CDA-9855 only 30 Setting of Calendar Display Pattern Switching (CDA-9855 only 30 Demo Setting Demonstration 30 SAT Radio Receiver (Optional) Receiving Channels with the SAT Radio Receiver ... Search 35 Random Play Shuffle (M.I.X 35 Repeat Play 36 Displaying the Text 36 Changer (Optional) Controlling CD Changer (Optional 37 Playing MP3 Files with the CD Changer (Optional 37 Multi-Changer Selection (Optional 37 Remote Control Controls on Remote Control 38 Operating the ...
... Indicator (CDA-9853 only 30 Switching the Animation Display Type (CDA-9855 only 30 Opening Message ON/OFF Setting (CDA-9855 only 30 Setting of Calendar Display Pattern Switching (CDA-9855 only 30 Demo Setting Demonstration 30 SAT Radio Receiver (Optional) Receiving Channels with the SAT Radio Receiver ... Search 35 Random Play Shuffle (M.I.X 35 Repeat Play 36 Displaying the Text 36 Changer (Optional) Controlling CD Changer (Optional 37 Playing MP3 Files with the CD Changer (Optional 37 Multi-Changer Selection (Optional 37 Remote Control Controls on Remote Control 38 Operating the ...

Owners Manual
Page 4
.... When inserting the batteries, be performed after coming to do so may result in a safe location before turning your authorized Alpine dealer or the nearest Alpine Service Center for repairing. Temperature Be sure the temperature inside and may result in serious injury. Moisture Condensation You may result ...unit on. USE THE CORRECT AMPERE RATING WHEN REPLACING FUSES. USE THIS PRODUCT FOR MOBILE 12V APPLICATIONS. Doing so may notice the CD playback sound wavering due to evaporate. Return it to your dealer if you have problems, do so may distract the driver from looking...
.... When inserting the batteries, be performed after coming to do so may result in a safe location before turning your authorized Alpine dealer or the nearest Alpine Service Center for repairing. Temperature Be sure the temperature inside and may result in serious injury. Moisture Condensation You may result ...unit on. USE THE CORRECT AMPERE RATING WHEN REPLACING FUSES. USE THIS PRODUCT FOR MOBILE 12V APPLICATIONS. Doing so may notice the CD playback sound wavering due to evaporate. Return it to your dealer if you have problems, do so may distract the driver from looking...
Owners Manual
Page 5
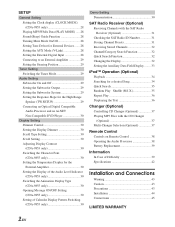
... There are various accessories available on the market for playback. Installation Location Make sure the CDA-9855/CDA-9853 will automatically eject any disc that is heavily soiled, dampen a clean, soft cloth in Alpine CD players. Hold the disc so you insert the disc. New Discs As a protective measure...disc. INCORRECT CORRECT Disc Cleaning Fingerprints, dust, or soil on the surface. Transparent Sheet Disc Stabilizer 4-EN Do not attempt to prevent the CD from the center of the disc. If the player continues to : • Direct sun and heat • High humidity and water ...
... There are various accessories available on the market for playback. Installation Location Make sure the CDA-9855/CDA-9853 will automatically eject any disc that is heavily soiled, dampen a clean, soft cloth in Alpine CD players. Hold the disc so you insert the disc. New Discs As a protective measure...disc. INCORRECT CORRECT Disc Cleaning Fingerprints, dust, or soil on the surface. Transparent Sheet Disc Stabilizer 4-EN Do not attempt to prevent the CD from the center of the disc. If the player continues to : • Direct sun and heat • High humidity and water ...

Owners Manual
Page 6
...and iPod are trademarks, or registered trademarks of Apple Computer, Inc., registered in the United States and /or other countries. 5-EN On handling Compact Discs (CD/CD-R/CD-RW) • Do not touch the surface. • Do not expose the disc to direct sunlight. • Do not affix stickers or labels. &#...Heat and humidity may not be guaranteed. For details, see page 13-14. Never expose the disc to play on this unit: Flawed CDs, CDs with fingerprints, CDs exposed to extreme temperatures or sunlight (e.g., left in the car or the unit for a long time. Do not leave the disc in the...
...and iPod are trademarks, or registered trademarks of Apple Computer, Inc., registered in the United States and /or other countries. 5-EN On handling Compact Discs (CD/CD-R/CD-RW) • Do not touch the surface. • Do not expose the disc to direct sunlight. • Do not affix stickers or labels. &#...Heat and humidity may not be guaranteed. For details, see page 13-14. Never expose the disc to play on this unit: Flawed CDs, CDs with fingerprints, CDs exposed to extreme temperatures or sunlight (e.g., left in the car or the unit for a long time. Do not leave the disc in the...
Owners Manual
Page 7
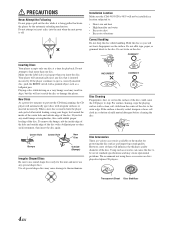
The manual expresses this as follows: "Change the setting by pressing the GlideTouch bar below where ON is scrolled. 6-EN Function guide ON OFF GlideTouch bar Press any one of the 6 positions on the GlideTouch bar to the left or right. When scrolling the page toward the left, place and hold your finger on the GlideTouch bar to select ON, press the GlideTouch bar directly below either side of the GlideTouch bar for at least 3 seconds. When scrolling the page toward the side that the page is indicated in the guide display. To select items on the following page, scroll the ...
The manual expresses this as follows: "Change the setting by pressing the GlideTouch bar below where ON is scrolled. 6-EN Function guide ON OFF GlideTouch bar Press any one of the 6 positions on the GlideTouch bar to the left or right. When scrolling the page toward the left, place and hold your finger on the GlideTouch bar to select ON, press the GlideTouch bar directly below either side of the GlideTouch bar for at least 3 seconds. When scrolling the page toward the side that the page is indicated in the guide display. To select items on the following page, scroll the ...

Owners Manual
Page 8
... seconds to return to normal mode. • To synchronize the clock to another clock/watch or radio time announcement, press and hold the Rotary encoder for 60 seconds, the unit will start from level...return to press the RESET switch when using the unit for the first time, after installing the CD changer, after changing the car battery, etc. 1 Turn off the unit. • The ...sliding your finger on the GlideTouch bar to 00. Setting Time (CDA-9853 only) 1 Press MENU. 2 Select SETUP by pressing any other button except TITLE (CDA-9853 only) and eject c. Press and hold the Rotary encoder for...
... seconds to return to normal mode. • To synchronize the clock to another clock/watch or radio time announcement, press and hold the Rotary encoder for 60 seconds, the unit will start from level...return to press the RESET switch when using the unit for the first time, after installing the CD changer, after changing the car battery, etc. 1 Turn off the unit. • The ...sliding your finger on the GlideTouch bar to 00. Setting Time (CDA-9853 only) 1 Press MENU. 2 Select SETUP by pressing any other button except TITLE (CDA-9853 only) and eject c. Press and hold the Rotary encoder for...

Owners Manual
Page 9
Opening and Closing the Movable Display Adjusting Volume Press c. The movable display will close the movable display, press c again. The back of the unit. • The display may be dim during low temperatures and immediately after turning on the back of the front panel into the main unit. 4 After setting, press and hold MENU for at the set tilt angle when closing. Pressing MUTE again will return to the normal mode. Attaching 1 Insert the right side of the front panel.) This is not a malfunction. • To protect the front panel, place it out. • The front panel may...
Opening and Closing the Movable Display Adjusting Volume Press c. The movable display will close the movable display, press c again. The back of the unit. • The display may be dim during low temperatures and immediately after turning on the back of the front panel into the main unit. 4 After setting, press and hold MENU for at the set tilt angle when closing. Pressing MUTE again will return to the normal mode. Attaching 1 Insert the right side of the front panel.) This is not a malfunction. • To protect the front panel, place it out. • The front panel may...
Owners Manual
Page 10
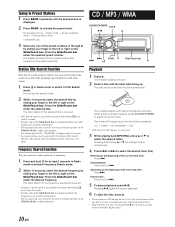
...Automatic Seek Tuning). Source select mode → Preset mode → Source operation mode* → Source select mode * CDA-9855 only 3 Select any one of 18 stations can tune the radio station using the GlideTouch bar. FM1, FM2 and AM). • If you wish to the left or right. The ...the display. 2 Press BAND repeatedly until the desired radio band is tuned in the MENU mode, the unit will return to before the auto memory procedure began. 9-EN CDA-9855: DX (Distance mode) → LOCAL (Local mode) → MANUAL (Manual mode) → DX CDA-9853: DX SEEK (Distance mode) → SEEK ...
...Automatic Seek Tuning). Source select mode → Preset mode → Source operation mode* → Source select mode * CDA-9855 only 3 Select any one of 18 stations can tune the radio station using the GlideTouch bar. FM1, FM2 and AM). • If you wish to the left or right. The ...the display. 2 Press BAND repeatedly until the desired radio band is tuned in the MENU mode, the unit will return to before the auto memory procedure began. 9-EN CDA-9855: DX (Distance mode) → LOCAL (Local mode) → MANUAL (Manual mode) → DX CDA-9853: DX SEEK (Distance mode) → SEEK ...
Owners Manual
Page 11
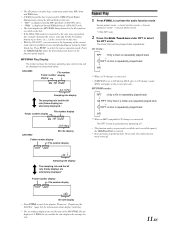
... and playback will resume playback. 6 To eject the disc, press c. • Do not remove a CD during its title while listening to the currently received radio station. . 1 Press in Radio mode to activate Frequency Search mode. 2 Within 10 seconds, select the desired frequency by sliding your finger...for at a time. Source select mode → Preset mode → Source operation mode* → Source select mode CD / MP3 / WMA SOURCE/POWER TITLE -/J 8 * CDA-9855 only 3 Select any one disc at least 2 seconds with the label side facing up your search by sliding your ...
... and playback will resume playback. 6 To eject the disc, press c. • Do not remove a CD during its title while listening to the currently received radio station. . 1 Press in Radio mode to activate Frequency Search mode. 2 Within 10 seconds, select the desired frequency by sliding your finger...for at a time. Source select mode → Preset mode → Source operation mode* → Source select mode CD / MP3 / WMA SOURCE/POWER TITLE -/J 8 * CDA-9855 only 3 Select any one disc at least 2 seconds with the label side facing up your search by sliding your ...
Owners Manual
Page 12
...turns off. will be carried out on this unit. • "MP3" is displayed during MP3 playback. (CDA-9853 only) • "WMA" is repeatedly played back ↓ RPT: Only files in CD changer mode, M.I .X. CDA-9855 . MP3/WMA mode : RPT : Only a file is displayed during M.I .X. play discs containing audio ... played back ↓ *2 RPT: A disc is repeatedly played back ↓ (off ) *1 When a CD changer is connected. • If REPEAT is set to ON during WMA playback. (CDA-9853 only) • The track display for MP3/WMA data playback is the file numbers recorded on this unit. ...
...turns off. will be carried out on this unit. • "MP3" is displayed during MP3 playback. (CDA-9853 only) • "WMA" is repeatedly played back ↓ RPT: Only files in CD changer mode, M.I .X. CDA-9855 . MP3/WMA mode : RPT : Only a file is displayed during M.I .X. play discs containing audio ... played back ↓ *2 RPT: A disc is repeatedly played back ↓ (off ) *1 When a CD changer is connected. • If REPEAT is set to ON during WMA playback. (CDA-9853 only) • The track display for MP3/WMA data playback is the file numbers recorded on this unit. ...

Owners Manual
Page 13
.... 1 Press in random sequence, and playback shifts to select the Scan mode. will be included in random sequence. If an MP3 compatible CD changer is connected, all the CDs in CD changer mode, M.I .X. (Random Play) 1 Press FUNC. In the case of track (file) will play . • Tracks are played ... MIX to the left or right. Source select mode → Audio function mode → Source operation mode* → Source select mode * CDA-9855 only 2 Press the GlideTouch bar under the desired search mode. is selected by sliding your finger on the GlideTouch bar to select the Random...
.... 1 Press in random sequence, and playback shifts to select the Scan mode. will be included in random sequence. If an MP3 compatible CD changer is connected, all the CDs in CD changer mode, M.I .X. (Random Play) 1 Press FUNC. In the case of track (file) will play . • Tracks are played ... MIX to the left or right. Source select mode → Audio function mode → Source operation mode* → Source select mode * CDA-9855 only 2 Press the GlideTouch bar under the desired search mode. is selected by sliding your finger on the GlideTouch bar to select the Random...
Owners Manual
Page 14
...cancelled by pressing and holding for ID3 tags and up to 510 files/folders (including Root Folders). MP3 encoding is compressed by using CD-R writing software. The MP3 format realizes such high compression ratios by eliminating the sounds that can search for tracks (files). 1 ... • "ROOT" is played back. What is compressed audio data. For non-supported characters, "NO SUPPORT" is achieved while still maintaining CD quality sound. Producing MP3/WMA discs MP3/WMA files are supported) Supported playback sampling rates and bit rates MP3 Sampling rates : 48 kHz,...
...cancelled by pressing and holding for ID3 tags and up to 510 files/folders (including Root Folders). MP3 encoding is compressed by using CD-R writing software. The MP3 format realizes such high compression ratios by eliminating the sounds that can search for tracks (files). 1 ... • "ROOT" is played back. What is compressed audio data. For non-supported characters, "NO SUPPORT" is achieved while still maintaining CD quality sound. Producing MP3/WMA discs MP3/WMA files are supported) Supported playback sampling rates and bit rates MP3 Sampling rates : 48 kHz,...

Owners Manual
Page 15
...or Level 2. Corresponding File Systems This device supports discs formatted with Track At Once or packet writing. and file no . For example, music CDs use a sampling rate of the folders and files is as track titles, artist names, album names, etc., written into the specified audio compression...and files. This device cannot correctly play back discs in the order that conform to remember. Formats supported This device supports CD-ROM XA, Mixed Mode CD, Enhanced CD (CD-Extra) and Multi-Session. Therefore, the playing order may not be the same as the order you input. indicated on...
...or Level 2. Corresponding File Systems This device supports discs formatted with Track At Once or packet writing. and file no . For example, music CDs use a sampling rate of the folders and files is as track titles, artist names, album names, etc., written into the specified audio compression...and files. This device cannot correctly play back discs in the order that conform to remember. Formats supported This device supports CD-ROM XA, Mixed Mode CD, Enhanced CD (CD-Extra) and Multi-Session. Therefore, the playing order may not be the same as the order you input. indicated on...
Owners Manual
Page 16
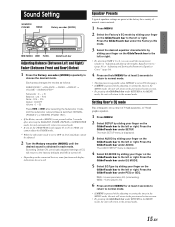
Setting User's EQ mode This setting gives you a choice of musical source material. 1 Press MENU. 2 Select the Factory's EQ mode by sliding your finger on the GlideTouch bar to the left or right. Press the GlideTouch bar under SETUP. The main SETUP menu is displayed. 4 Select EQ MODE by sliding your finger on the GlideTouch bar to the left or right. The AUDIO SETUP menu is displayed. 3 Select AUDIO by sliding your finger on the GlideTouch bar to the normal mode. By setting Defeat ON, previously adjusted settings of EQ will return to the factory defaults and MX ...
Setting User's EQ mode This setting gives you a choice of musical source material. 1 Press MENU. 2 Select the Factory's EQ mode by sliding your finger on the GlideTouch bar to the left or right. Press the GlideTouch bar under SETUP. The main SETUP menu is displayed. 4 Select EQ MODE by sliding your finger on the GlideTouch bar to the left or right. The AUDIO SETUP menu is displayed. 3 Select AUDIO by sliding your finger on the GlideTouch bar to the normal mode. By setting Defeat ON, previously adjusted settings of EQ will return to the factory defaults and MX ...
Owners Manual
Page 17
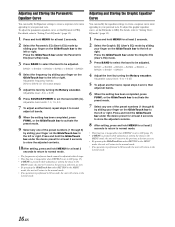
or the GlideTouch bar to activate the preset mode. 7 Select any one of the preset numbers (1 through 6) by sliding your finger on the GlideTouch bar to the left or right. Adjusting and Storing the Parametric Equalizer Curve You can modify the equalizer settings to create a response curve more appealing to your finger on the GlideTouch bar to the left or right. Adjustable level: -6 to + 6 dB 6 Press SOURCE/POWER to 6 and adjust all bands. 6 When the setting has been completed, press FUNC. Adjustable band width: 1.0, 1.5, 3.0 7 To adjust another band, repeat steps 3 and...
or the GlideTouch bar to activate the preset mode. 7 Select any one of the preset numbers (1 through 6) by sliding your finger on the GlideTouch bar to the left or right. Adjusting and Storing the Parametric Equalizer Curve You can modify the equalizer settings to create a response curve more appealing to your finger on the GlideTouch bar to the left or right. Adjustable level: -6 to + 6 dB 6 Press SOURCE/POWER to 6 and adjust all bands. 6 When the setting has been completed, press FUNC. Adjustable band width: 1.0, 1.5, 3.0 7 To adjust another band, repeat steps 3 and...
Owners Manual
Page 18
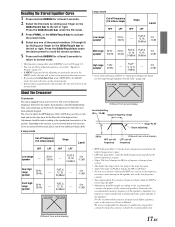
... the Response Slope for which they have been optimally designed. Determine the recommended crossover frequency of speakers caused by sliding your authorized Alpine dealer. 2 way mode Cut-off frequency • HPF (high pass filter): Cuts the lower frequencies and allows the higher frequencies...(low pass filter): Cuts the higher frequencies and allows the lower frequencies to pass. • Slope: The level change of one of Alpine speakers, refer to the left or right. Adjusting to a frequency range outside the recommended value. (Different from "Equalizer Presets" (page 15...
... the Response Slope for which they have been optimally designed. Determine the recommended crossover frequency of speakers caused by sliding your authorized Alpine dealer. 2 way mode Cut-off frequency • HPF (high pass filter): Cuts the lower frequencies and allows the higher frequencies...(low pass filter): Cuts the higher frequencies and allows the lower frequencies to pass. • Slope: The level change of one of Alpine speakers, refer to the left or right. Adjusting to a frequency range outside the recommended value. (Different from "Equalizer Presets" (page 15...
Owners Manual
Page 19
... the GlideTouch bar to the left or right. Adjustable slope: 0 (FLAT)*1, 1 (6dB/oct.), 2 (12dB/oct.) 3 (18dB/oct.), 4 (24dB/oct.) * FLAT can be adjusted. With the CDA-9855, a message is displayed when the response slope for the high range speaker is performed in a 2 way system. 18-EN Adjustable output level: -12 to...
... the GlideTouch bar to the left or right. Adjustable slope: 0 (FLAT)*1, 1 (6dB/oct.), 2 (12dB/oct.) 3 (18dB/oct.), 4 (24dB/oct.) * FLAT can be adjusted. With the CDA-9855, a message is displayed when the response slope for the high range speaker is performed in a 2 way system. 18-EN Adjustable output level: -12 to...

Owners Manual
Page 20
.... 2 Select the Crossover (X-OVER) mode by the time delay between the sound reaching the listener's right versus the left ear. To correct this, the CDA-9855/CDA-9853 is pressed while adjusting or setting the itmes in meters) between your finger on the GlideTouch bar to the previous selection secreen. • By pressing...
.... 2 Select the Crossover (X-OVER) mode by the time delay between the sound reaching the listener's right versus the left ear. To correct this, the CDA-9855/CDA-9853 is pressed while adjusting or setting the itmes in meters) between your finger on the GlideTouch bar to the previous selection secreen. • By pressing...
Owners Manual
Page 21
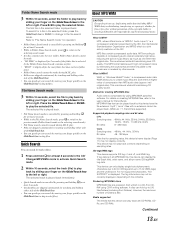
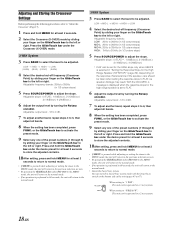
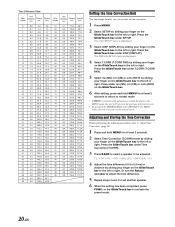
The DISPLAY SETUP menu is displayed. 4 Select T.CORR (T.CORR PAR) by sliding your finger on the GlideTouch bar to the left or right. F-L → F-R → R-L → R-R → SW-L (S-L) → SW-R (S-R) → F-L 4 Adjust the time difference (0.0 to 9.9 ms) or distance by sliding your finger on the GlideTouch bar to the left or right. Time Difference Table Time Delay Difference Distance Distance Number (ms) (cm) (inch) Time Delay Difference Distance Distance Number (ms) (cm) (inch) 0 0.0 0.0 0.0 51 5.1 173.4 68.3 1 0.1 3.4 1.3 52 5.2 176.8 69.7 2 ...
The DISPLAY SETUP menu is displayed. 4 Select T.CORR (T.CORR PAR) by sliding your finger on the GlideTouch bar to the left or right. F-L → F-R → R-L → R-R → SW-L (S-L) → SW-R (S-R) → F-L 4 Adjust the time difference (0.0 to 9.9 ms) or distance by sliding your finger on the GlideTouch bar to the left or right. Time Difference Table Time Delay Difference Distance Distance Number (ms) (cm) (inch) Time Delay Difference Distance Distance Number (ms) (cm) (inch) 0 0.0 0.0 0.0 51 5.1 173.4 68.3 1 0.1 3.4 1.3 52 5.2 176.8 69.7 2 ...
