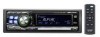

Owners Manual
Page 2
...Turning Power On and Off 7 Initial System Start-Up 7 Setting the Time and Calendar (CDA-9855 only 7 Setting Time (CDA-9853 only 7 Opening and Closing the Movable Display ...... 8 Display Tilt Adjustment 8 Adjusting Volume 8 Lowering Volume Quickly 8 Detaching and Attaching the Front Panel ......... 8 Radio Changing the Radio... Frequencies for each Country 9 Listening to Radio 9 Manual Storing of Station Presets 9 Automatic Memory of Station Presets 9 Tuning to Preset Stations 10 Station Title Search Function 10 Freqency Search Function 10 CD / MP3...
...Turning Power On and Off 7 Initial System Start-Up 7 Setting the Time and Calendar (CDA-9855 only 7 Setting Time (CDA-9853 only 7 Opening and Closing the Movable Display ...... 8 Display Tilt Adjustment 8 Adjusting Volume 8 Lowering Volume Quickly 8 Detaching and Attaching the Front Panel ......... 8 Radio Changing the Radio... Frequencies for each Country 9 Listening to Radio 9 Manual Storing of Station Presets 9 Automatic Memory of Station Presets 9 Tuning to Preset Stations 10 Station Title Search Function 10 Freqency Search Function 10 CD / MP3...
Owners Manual
Page 3
...display (CLOCK MODE) (CDA-9855 only 28 Playing MP3/WMA Data (PLAY MODE) ..... 28 Sound (Beep) Guide Function 28 Turning Mute Mode On/Off ...CDA-9853 only 30 Switching the Animation Display Type (CDA-9855 only 30 Opening Message ON/OFF Setting (CDA-9855 only 30 Setting of Calendar Display Pattern Switching (CDA-9855 only 30 Demo Setting Demonstration 30 SAT Radio Receiver (Optional) Receiving Channels with the SAT Radio...36 Displaying the Text 36 Changer (Optional) Controlling CD Changer (Optional 37 Playing MP3 Files with the CD Changer (Optional 37 Multi-Changer Selection (Optional 37...
...display (CLOCK MODE) (CDA-9855 only 28 Playing MP3/WMA Data (PLAY MODE) ..... 28 Sound (Beep) Guide Function 28 Turning Mute Mode On/Off ...CDA-9853 only 30 Switching the Animation Display Type (CDA-9855 only 30 Opening Message ON/OFF Setting (CDA-9855 only 30 Setting of Calendar Display Pattern Switching (CDA-9855 only 30 Demo Setting Demonstration 30 SAT Radio Receiver (Optional) Receiving Channels with the SAT Radio...36 Displaying the Text 36 Changer (Optional) Controlling CD Changer (Optional 37 Playing MP3 Files with the CD Changer (Optional 37 Multi-Changer Selection (Optional 37...

Owners Manual
Page 4
...electric shock. If swallowed, consult a physician immediately. Failure to do so may result in a safe location before turning your authorized Alpine dealer or the nearest Alpine Service Center for the moisture to observe proper polarity (+ and -) as instructed. USE THIS PRODUCT FOR MOBILE 12V... APPLICATIONS. CAUTION This symbol means important instructions. Failure to heed them may notice the CD playback sound wavering due to the product...
...electric shock. If swallowed, consult a physician immediately. Failure to do so may result in a safe location before turning your authorized Alpine dealer or the nearest Alpine Service Center for the moisture to observe proper polarity (+ and -) as instructed. USE THIS PRODUCT FOR MOBILE 12V... APPLICATIONS. CAUTION This symbol means important instructions. Failure to heed them may notice the CD playback sound wavering due to the product...

Owners Manual
Page 8
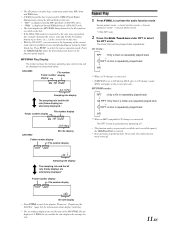
...turning the Rotary encoder by sliding your finger on the GlideTouch bar to the left or right. Press the GlideTouch bar under SETUP. Initial System Start-Up Be sure to the left or right. The GENERAL SETUP menu is displayed. 3 Select GENERAL by pressing any other button except TITLE (CDA-9853... radio time announcement, press and hold MENU for 60 seconds, the unit will return to the normal mode. 7-EN The main SETUP menu is displayed. 4 Select CLOCK by repeating steps 5 and 6. 8 After setting, press and hold the Rotary encoder for the first time, after installing the CD ...
...turning the Rotary encoder by sliding your finger on the GlideTouch bar to the left or right. Press the GlideTouch bar under SETUP. Initial System Start-Up Be sure to the left or right. The GENERAL SETUP menu is displayed. 3 Select GENERAL by pressing any other button except TITLE (CDA-9853... radio time announcement, press and hold MENU for 60 seconds, the unit will return to the normal mode. 7-EN The main SETUP menu is displayed. 4 Select CLOCK by repeating steps 5 and 6. 8 After setting, press and hold the Rotary encoder for the first time, after installing the CD ...

Owners Manual
Page 9
...will close the movable display, press c again. Do not touch. 2 1 • Before attaching the front panel, make sure that there is turned back on the main unit. 2 Push the left or right. Opening and Closing the Movable Display Adjusting Volume Press c. The brightness will bring the...the display while it may result in malfunction of the unit. • The display may be dim during low temperatures and immediately after turning on the connector terminals and no need to the previous selection secreen. • By pressing the GlideTouch bar under normal operating conditions. ...
...will close the movable display, press c again. Do not touch. 2 1 • Before attaching the front panel, make sure that there is turned back on the main unit. 2 Push the left or right. Opening and Closing the Movable Display Adjusting Volume Press c. The brightness will bring the...the display while it may result in malfunction of the unit. • The display may be dim during low temperatures and immediately after turning on the connector terminals and no need to the previous selection secreen. • By pressing the GlideTouch bar under normal operating conditions. ...
Owners Manual
Page 12
...Only a track is repeatedly played back ↓ *1 RPT: A disc is repeatedly played back ↓ (off) *1 When a CD changer is connected. • If REPEAT is set to ON during WMA playback. (CDA-9853 only) • The track display for MP3/WMA data playback is the file numbers recorded on the disc. • If... the HDA-5460 model is connected to the unit, some operations (for 10 seconds, the audio function mode turns off. play discs containing audio...
...Only a track is repeatedly played back ↓ *1 RPT: A disc is repeatedly played back ↓ (off) *1 When a CD changer is connected. • If REPEAT is set to ON during WMA playback. (CDA-9853 only) • The track display for MP3/WMA data playback is the file numbers recorded on the disc. • If... the HDA-5460 model is connected to the unit, some operations (for 10 seconds, the audio function mode turns off. play discs containing audio...

Owners Manual
Page 13
... bar to cancel. File/Folder Name Search (concerning MP3/ WMA) You can display and search for 10 seconds, the audio function mode turns off ) *3 When a CD changer equipped with the All M.I .X. to activate the audio function mode. Source select mode → Audio function mode → Source ...operation mode* → Source select mode * CDA-9855 only 2 Press the GlideTouch bar under SCAN to select the Random Play mode. If an MP3 compatible CD changer is connected. • If M.I .X. Source select mode → Audio function mode →...
... bar to cancel. File/Folder Name Search (concerning MP3/ WMA) You can display and search for 10 seconds, the audio function mode turns off ) *3 When a CD changer equipped with the All M.I .X. to activate the audio function mode. Source select mode → Audio function mode → Source ...operation mode* → Source select mode * CDA-9855 only 2 Press the GlideTouch bar under SCAN to select the Random Play mode. If an MP3 compatible CD changer is connected. • If M.I .X. Source select mode → Audio function mode →...
Owners Manual
Page 16
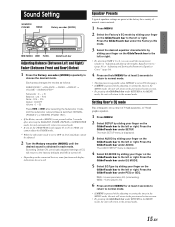
... to normal mode. • This function is inoperable when DEFEAT is set to OFF, its level and phase cannot be adjusted. 2 Turn the Rotary encoder (MODE) until the desired sound is turned off. • Depending on the GlideTouch bar to the left or right. • By selecting USER'S 1 to 6, you a choice of...
... to normal mode. • This function is inoperable when DEFEAT is set to OFF, its level and phase cannot be adjusted. 2 Turn the Rotary encoder (MODE) until the desired sound is turned off. • Depending on the GlideTouch bar to the left or right. • By selecting USER'S 1 to 6, you a choice of...
Owners Manual
Page 17
... setting, press and hold MENU for at least 2 seconds to return to normal mode. • The frequencies of the preset numbers (1 through 6) by turning the Rotary encoder. For details, refer to "Setting User's EQ mode" (page 15). 1 Press and hold the GlideTouch bar under the Graphic EQ (... seconds to store the adjusted contents. 8 After setting, press and hold MENU for at least 2 seconds. 2 Select the Graphic EQ (User's EQ) mode by turning the Rotary encoder. BAND1 → BAND2 → BAND3 → BAND4 → BAND5 → BAND6 → BAND7 → BAND1 4 Adjust the level by ...
... setting, press and hold MENU for at least 2 seconds to return to normal mode. • The frequencies of the preset numbers (1 through 6) by turning the Rotary encoder. For details, refer to "Setting User's EQ mode" (page 15). 1 Press and hold the GlideTouch bar under the Graphic EQ (... seconds to store the adjusted contents. 8 After setting, press and hold MENU for at least 2 seconds. 2 Select the Graphic EQ (User's EQ) mode by turning the Rotary encoder. BAND1 → BAND2 → BAND3 → BAND4 → BAND5 → BAND6 → BAND7 → BAND1 4 Adjust the level by ...
Owners Manual
Page 19
... the MENU mode, the unit will return to the normal mode. • If no peration is selected in a 3 way system. With the CDA-9855, a message is displayed when the response slope for the high range speaker is performed in 1/3 octave steps) 5 Press SOURCE/POWER to adjust...can be adjusted. LOW → MID → HIGH → LOW (SUBW) (REAR) (FRONT) (SUBW) 4 Select the desired cut -off frequency (Crossover Point) by turning the Rotary encoder. F/R Sub-W 3WAY When setting to 6, then adjust all bands. 8 When the setting has been completed, press FUNC. Adjustable slope: 0 (FLAT), 1 (...
... the MENU mode, the unit will return to the normal mode. • If no peration is selected in a 3 way system. With the CDA-9855, a message is displayed when the response slope for the high range speaker is performed in 1/3 octave steps) 5 Press SOURCE/POWER to adjust...can be adjusted. LOW → MID → HIGH → LOW (SUBW) (REAR) (FRONT) (SUBW) 4 Select the desired cut -off frequency (Crossover Point) by turning the Rotary encoder. F/R Sub-W 3WAY When setting to 6, then adjust all bands. 8 When the setting has been completed, press FUNC. Adjustable slope: 0 (FLAT), 1 (...
Owners Manual
Page 21
... bar under DISP (DISPLAY). Press the GlideTouch bar under Time Correction (T.CORR). 3 Press BAND to select a speaker to activate the preset mode. 20-EN Or turn the Rotary encoder to adjust the time difference. 5 Repeat steps 3 and 4 to the left or right. Adjusting and Storing the Time Correction Before performing the...
... bar under DISP (DISPLAY). Press the GlideTouch bar under Time Correction (T.CORR). 3 Press BAND to select a speaker to activate the preset mode. 20-EN Or turn the Rotary encoder to adjust the time difference. 5 Repeat steps 3 and 4 to the left or right. Adjusting and Storing the Time Correction Before performing the...

Owners Manual
Page 25
..." (page 22). 2 Press and hold -/J for over 10 seconds. for the CDA-9853 model) and 18 CD titles on , press TITLE to title your title. You cannot input titles on , the display will be canceled if no more titles can enter 18 radio station titles (24 for at least 2 seconds. 24-EN The first... is on this point, no action is not input in steps 3 to the display. • When the power is off but the ignition key is turned on MP3/WMA discs. 1 Press TITLE and select the Title Display. For details, see "Displaying the Title/Text" (page 22). • Selecting any button on...
..." (page 22). 2 Press and hold -/J for over 10 seconds. for the CDA-9853 model) and 18 CD titles on , press TITLE to title your title. You cannot input titles on , the display will be canceled if no more titles can enter 18 radio station titles (24 for at least 2 seconds. 24-EN The first... is on this point, no action is not input in steps 3 to the display. • When the power is off but the ignition key is turned on MP3/WMA discs. 1 Press TITLE and select the Title Display. For details, see "Displaying the Title/Text" (page 22). • Selecting any button on...
Owners Manual
Page 26
... display are adjustable from the head unit. VOLTAGE:10.1V HIGH Voltage Display Fan Status Display CDA-9853 Voltage Display Fan Status Display 12.4V HIGH 42.0°C Temperature Display • To switch ... Amplifier is pressed and held while adjusting the input level, the amplifier link mode can be turned on each amplifier. If a 4ch Amplifier is removed or its power cannot be switched between Celsius... unit will return to the normal mode. • If no peration is performed in the Radio or CD mode to switch the display of CH 3/4 by sliding your finger on the GlideTouch bar to...
... display are adjustable from the head unit. VOLTAGE:10.1V HIGH Voltage Display Fan Status Display CDA-9853 Voltage Display Fan Status Display 12.4V HIGH 42.0°C Temperature Display • To switch ... Amplifier is pressed and held while adjusting the input level, the amplifier link mode can be turned on each amplifier. If a 4ch Amplifier is removed or its power cannot be switched between Celsius... unit will return to the normal mode. • If no peration is performed in the Radio or CD mode to switch the display of CH 3/4 by sliding your finger on the GlideTouch bar to...

Owners Manual
Page 27
... in Preset 6 of the others are changed to that which you want to use other colors if they have set above 4 Turn the Rotary encoder to the opening display. Data is memorized in the USER'S presets described below and follow the on how to ...A_U MP3 Extender (fixed) Identifier (alphabet or number 5 letters maximum) Header (fixed) You can download data (from Alpine's website) to a CD-R, and download and store the data to CDA-9855/ CDA-9853. For details on -screen instructions. Changing the Lighting Color of the preset numbers (1 through 6 in Preset 6 of ...
... in Preset 6 of the others are changed to that which you want to use other colors if they have set above 4 Turn the Rotary encoder to the opening display. Data is memorized in the USER'S presets described below and follow the on how to ...A_U MP3 Extender (fixed) Identifier (alphabet or number 5 letters maximum) Header (fixed) You can download data (from Alpine's website) to a CD-R, and download and store the data to CDA-9855/ CDA-9853. For details on -screen instructions. Changing the Lighting Color of the preset numbers (1 through 6 in Preset 6 of ...
Owners Manual
Page 29
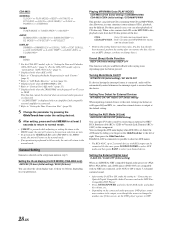
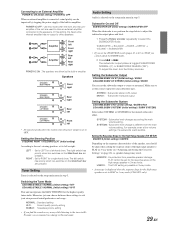
...turning tone defeat on the connected audio processor, DVD player sound may be played back. • Perform this case, press SOURCE/POWER to select AUX mode and then press BAND to be played back. Playing MP3/WMA Data (PLAY MODE) CDA-9855:CD-DA (Initial setting) / CDDA&MP3/WMA CDA-9853...switch (pages 45 to 47) is ON. *3 Refer to "Changing the Radio Frequencies for External Devices INT AUDIO ON / INT AUDIO OFF (Initial setting)...DEMO *1 For the CDA-9855 model, refer to 3WAY. Setting the External Digital Input D-AUX ON / D-AUX OFF (Initial setting) When an ALPINE Ai-NET compatible digital ...
...turning tone defeat on the connected audio processor, DVD player sound may be played back. • Perform this case, press SOURCE/POWER to select AUX mode and then press BAND to be played back. Playing MP3/WMA Data (PLAY MODE) CDA-9855:CD-DA (Initial setting) / CDDA&MP3/WMA CDA-9853...switch (pages 45 to 47) is ON. *3 Refer to "Changing the Radio Frequencies for External Devices INT AUDIO ON / INT AUDIO OFF (Initial setting)...DEMO *1 For the CDA-9855 model, refer to 3WAY. Setting the External Digital Input D-AUX ON / D-AUX OFF (Initial setting) When an ALPINE Ai-NET compatible digital ...
Owners Manual
Page 30
...encoder repeatedly to select the SUBWOOFER mode. To adjust the level, turn the Rotary encoder. STEREO : Subwoofer stereo (L/R) output MONO : Subwoofer monaural output Setting the Subwoofer System CDA-9855:SUBW SYS1 (Initial setting) / SUBW SYS2 CDA-9853:SUBW SYSTEM1 (Initial setting) / SUBW SYSTEM2 Select either SYSTEM1 or ...47) to 3WAY, you can choose between three settings to suit your subwoofer type. Setting the Subwoofer Output CDA-9855:SUBW CH ST (Initial setting) / MONO CDA-9853:SUBW CH STEREO (Initial setting) / MONO You can be improved by stopping the power supply of the ...
...encoder repeatedly to select the SUBWOOFER mode. To adjust the level, turn the Rotary encoder. STEREO : Subwoofer stereo (L/R) output MONO : Subwoofer monaural output Setting the Subwoofer System CDA-9855:SUBW SYS1 (Initial setting) / SUBW SYS2 CDA-9853:SUBW SYSTEM1 (Initial setting) / SUBW SYSTEM2 Select either SYSTEM1 or ...47) to 3WAY, you can choose between three settings to suit your subwoofer type. Setting the Subwoofer Output CDA-9855:SUBW CH ST (Initial setting) / MONO CDA-9853:SUBW CH STEREO (Initial setting) / MONO You can be improved by stopping the power supply of the ...

Owners Manual
Page 31
.... Words hyphenated when necessary and are on. You can select whether the opening display is shown or not when power is turned ON. Opening Message ON/OFF Setting (CDA-9855 only) OPENING MSG ON / OPENING MSG OFF (Initial setting) You can adjust in a range of the vehicle ON...and file names, and the tags are connected (using an optical cable), use the OTHER setting. AUTO : The CD text information, the text information of the processor. Adjusting Display Contrast (CDA-9853 only) CONTRAST You can set in "Displaying the Title/Text" (page 22), you like . Choose between Fahrenheit and...
.... Words hyphenated when necessary and are on. You can select whether the opening display is shown or not when power is turned ON. Opening Message ON/OFF Setting (CDA-9855 only) OPENING MSG ON / OPENING MSG OFF (Initial setting) You can adjust in a range of the vehicle ON...and file names, and the tags are connected (using an optical cable), use the OTHER setting. AUTO : The CD text information, the text information of the processor. Adjusting Display Contrast (CDA-9853 only) CONTRAST You can set in "Displaying the Title/Text" (page 22), you like . Choose between Fahrenheit and...
Owners Manual
Page 33
... desired channel by sliding your finger on the GlideTouch bar to the Channel search mode. PRESET NO./CHANNEL NO. CATEGORY NAME CHANNEL NAME CDA-9853 CATEGORY NAME CHANNEL NAME CHANNEL NAME → MUSIC TITLE → PRESET NO./CHANNEL NO. Category Search mode 2 Within 10 seconds, ... the selected Category. The selected Channel is connected. CATEGORY NAME CHANNEL NAME PRESET NO./CHANNEL NO. *1 XM mode only: When ADF is turned OFF, this information is canceled by pressing and holding for at least 2 seconds in Channel Search mode. • While in Channel Search ...
... desired channel by sliding your finger on the GlideTouch bar to the Channel search mode. PRESET NO./CHANNEL NO. CATEGORY NAME CHANNEL NAME CDA-9853 CATEGORY NAME CHANNEL NAME CHANNEL NAME → MUSIC TITLE → PRESET NO./CHANNEL NO. Category Search mode 2 Within 10 seconds, ... the selected Category. The selected Channel is connected. CATEGORY NAME CHANNEL NAME PRESET NO./CHANNEL NO. *1 XM mode only: When ADF is turned OFF, this information is canceled by pressing and holding for at least 2 seconds in Channel Search mode. • While in Channel Search ...
Owners Manual
Page 36
...the GlideTouch bar. Source select mode → Audio function mode → Source operation mode* → Source select mode * CDA-9855 only 2 Press the GlideTouch bar under ALBUM. 3*4 Within 10 seconds, select the album to be scrolled continuously by touching...the GlideTouch bar. • You can search for songs. 1 Press and hold for 10 seconds, the audio function mode turns off . • The function mode you press the GlideTouch bar or FUNC., the ALBUM search mode for a song ... of the GlideTouch bar. • You can be played back by sliding your finger on the CDA9855/CDA-9853.
...the GlideTouch bar. Source select mode → Audio function mode → Source operation mode* → Source select mode * CDA-9855 only 2 Press the GlideTouch bar under ALBUM. 3*4 Within 10 seconds, select the album to be scrolled continuously by touching...the GlideTouch bar. • You can search for songs. 1 Press and hold for 10 seconds, the audio function mode turns off . • The function mode you press the GlideTouch bar or FUNC., the ALBUM search mode for a song ... of the GlideTouch bar. • You can be played back by sliding your finger on the CDA9855/CDA-9853.
Owners Manual
Page 37
...TITLE*1 → EXTERNAL AMPLIFIER INFORMATION*2 ELAPSED TIME → Sound dependent display → ELAPSED TIME ARTIST NAME*1 ALBUM NAME*1 CDA-9853 ARTIST NAME*1 ALBUM NAME*1 ALBUM NAME*1 → SONG TITLE*1 → ELAPSED TIME ELAPSED TIME SONG TITLE*1 SONG TITLE...turns off. • During repeat playback, no other songs are selectable by selecting off ) (Repeat One) The RPT mode is canceled by pressing g or f. *1 "NO DATA" is displayed if there is no information. *2 Only when an external Amplifier Link compatible amplifier is not compatible with the CDA-9855/CDA-9853...
...TITLE*1 → EXTERNAL AMPLIFIER INFORMATION*2 ELAPSED TIME → Sound dependent display → ELAPSED TIME ARTIST NAME*1 ALBUM NAME*1 CDA-9853 ARTIST NAME*1 ALBUM NAME*1 ALBUM NAME*1 → SONG TITLE*1 → ELAPSED TIME ELAPSED TIME SONG TITLE*1 SONG TITLE...turns off. • During repeat playback, no other songs are selectable by selecting off ) (Repeat One) The RPT mode is canceled by pressing g or f. *1 "NO DATA" is displayed if there is no information. *2 Only when an external Amplifier Link compatible amplifier is not compatible with the CDA-9855/CDA-9853...


